
Are you an iPhone user who also owns a Windows PC? If so, you may wonder how to access your iCloud data on your computer. Fortunately, Apple has provided a solution for that – iCloud for Windows. This handy software allows you to seamlessly sync your photos, documents, and other data between your iPhone and your Windows PC. In this article, we will guide you through the simple process of downloading iCloud for Windows onto your PC. By the end, you’ll be able to access and manage your iCloud data right from the convenience of your desktop. So, let’s get started and unlock the full potential of your iCloud on your Windows PC!
Inside This Article
- How to Download iCloud for Windows on Your PC
- System Requirements
- Step 1: Download iCloud for Windows Installer
- Step 2: Install iCloud for Windows
- Step 3: Set Up iCloud for Windows
- Step 4: Choose iCloud Features and Sign In
- Step 5: Start Using iCloud on Windows PC
- Conclusion
- FAQs
How to Download iCloud for Windows on Your PC
If you own an iPhone or iPad and use a Windows PC, you might be wondering how to access your iCloud files and data on your computer. The good news is that you can easily download and install iCloud for Windows, allowing you to seamlessly sync and access your iCloud files on your PC. In this article, we will guide you through the step-by-step process of downloading iCloud for Windows on your PC.
System Requirements
Before you proceed with downloading iCloud for Windows, make sure your PC meets the system requirements:
- Windows 10 or later
- iCloud for Windows requires iCloud account (create one if you don’t have it)
- Up-to-date web browser (Microsoft Edge, Firefox, or Google Chrome)
- Internet connection
Step 1: Download iCloud for Windows Installer
Start by opening your preferred web browser and navigating to the official Apple website. Look for the iCloud for Windows download page or simply search “iCloud for Windows” in the search engine. Click on the official Apple link that appears in the search results to access the download page.
Once you’re on the download page, click on the “Download” button to initiate the download of the iCloud for Windows installer. Depending on your browser settings, you may be prompted to save the installer file or it may start downloading automatically.
Step 2: Install iCloud for Windows
Once the iCloud for Windows installer file is downloaded, locate the file on your PC (usually in the “Downloads” folder) and double-click on it to start the installation process. You may be prompted by the User Account Control to allow the installer to make changes to your PC. Click “Yes” to proceed.
In the iCloud for Windows setup window, review the license agreement and terms of use. If you agree to them, click on the box next to “I accept the terms in the license agreement” and then click on the “Install” button. The installation process may take a few minutes.
Once the installation is complete, click on the “Finish” button to close the setup window.
Step 3: Set Up iCloud for Windows
After the installation, the iCloud for Windows setup wizard will open automatically. In the setup wizard, you will be prompted to sign in with your Apple ID. Enter your Apple ID and password and click on the “Sign In” button.
If you have two-factor authentication enabled for your Apple ID, you may be requested to enter a verification code that will be sent to one of your trusted devices. Retrieve the code and enter it when prompted.
Step 4: Choose iCloud Features and Sign In
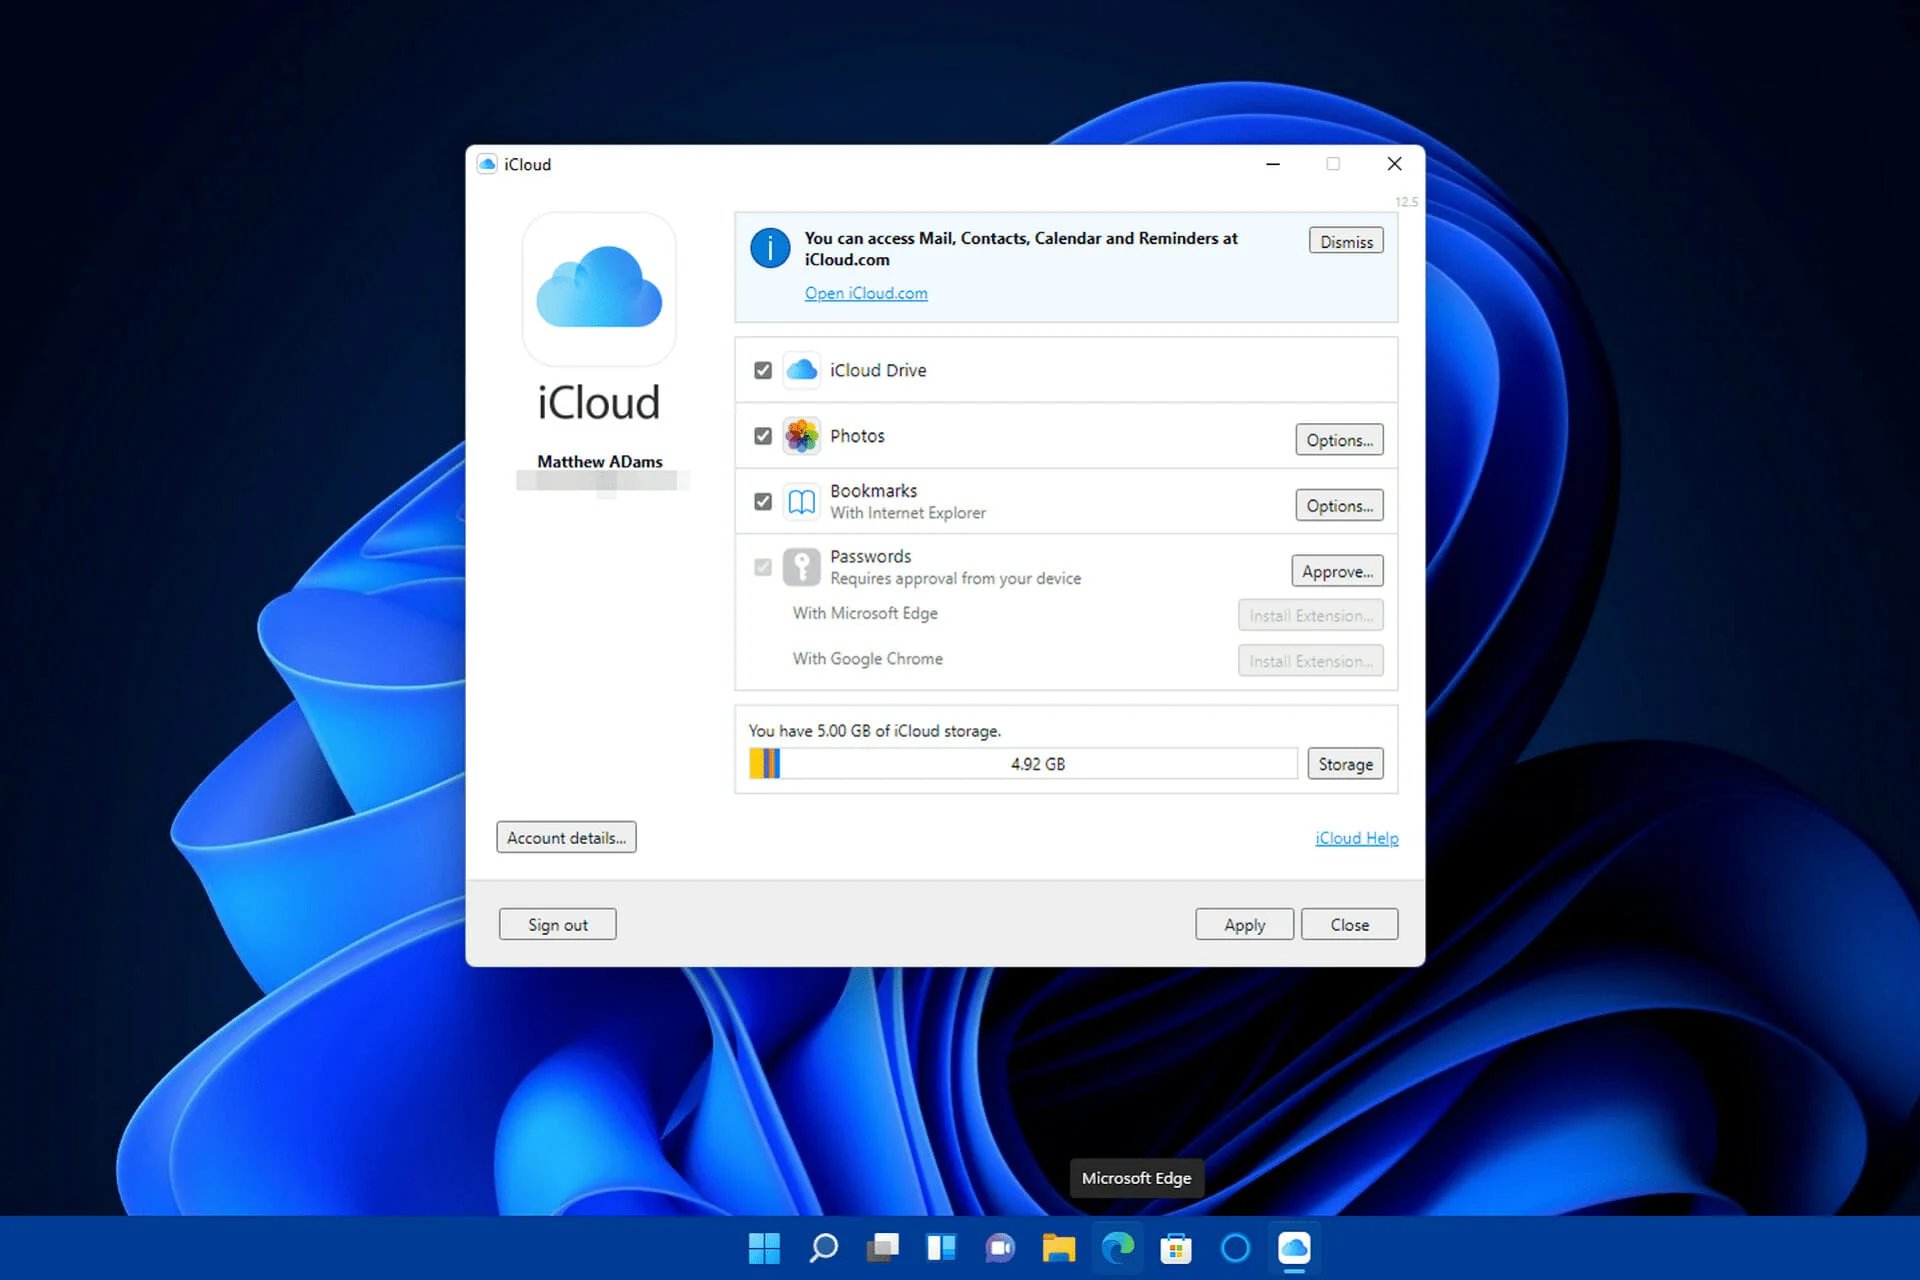
In the iCloud for Windows setup window, you will see a list of iCloud features that can be synced with your PC. Choose the features you want to enable by checking the boxes next to them. The available features include iCloud Drive, Photos, Mail, Contacts, Calendars, and Bookmarks.
Once you have selected the desired features, click on the “Apply” button to confirm your choices and start the syncing process. Depending on the amount of data you have on your iCloud account, the initial sync may take some time.
When the syncing process is complete, click on the “Done” button to exit the iCloud for Windows setup wizard.
Step 5: Start Using iCloud on Windows PC
Now that iCloud for Windows is installed and set up on your PC, you can start using iCloud to access and manage your files and data. iCloud will create a dedicated folder on your PC called “iCloud Drive,” where you can find all your synced files.
To access your iCloud Drive files, open the iCloud Drive folder on your PC. You can also access other iCloud features like Photos, Mail, Contacts, Calendars, and Bookmarks through their respective apps or services on your PC.
That’s it! You have successfully downloaded and installed iCloud for Windows on your PC. Enjoy seamless syncing and access to your iCloud files and data on your Windows computer.
System Requirements
Before you dive into downloading iCloud for Windows on your PC, it is essential to ensure that your system meets the necessary requirements. The following are the minimum system requirements for seamlessly installing iCloud for Windows:
- Operating System: Windows 10, Windows 8.1, or Windows 7 (with Service Pack 1) are the supported operating systems for iCloud for Windows.
- Processor: Your PC should have a 1GHz or faster processor. This will ensure smooth performance when using iCloud for Windows.
- Memory: At least 1GB of RAM is recommended to run iCloud for Windows effectively. Having sufficient memory is crucial when working with cloud-based applications.
- Storage Space: You will need a minimum of 1.5GB of available storage space on your PC for the iCloud for Windows installation.
- Browser: iCloud for Windows supports the latest version of Internet Explorer, Microsoft Edge, Firefox, or Google Chrome. It is recommended to use the latest version of your preferred browser for better compatibility and security.
- Apple ID: To sign in and access your iCloud account on Windows, you will need a valid Apple ID. If you don’t have one, you can easily create a new Apple ID during the iCloud for Windows setup process.
By ensuring that your PC fulfills these system requirements, you can proceed with confidence to download and install iCloud for Windows.
Step 1: Download iCloud for Windows Installer
Downloading iCloud for Windows on your PC is the first step to access your iCloud photos, videos, documents, and more. Follow the steps below to download iCloud for Windows installer:
- Open your preferred web browser on your PC.
- Go to the official Apple website. Search for “iCloud for Windows” or go to the direct download page.
- Click on the “Download” button or link to start the download process.
- Save the iCloud for Windows installer file to a location on your PC where you can easily find it, such as your desktop or downloads folder.
- Wait for the download to complete. The time it takes will depend on your internet connection speed.
Once the download is complete, you’re ready to move on to the next step of installing iCloud for Windows on your PC.
Step 2: Install iCloud for Windows
After successfully downloading the iCloud for Windows installer, it’s time to install it on your PC and start enjoying the benefits of syncing your iCloud data across devices. Follow these simple steps to install iCloud for Windows:
1. Locate the downloaded iCloud for Windows installer file in your computer’s Downloads folder or the location where you saved it.
2. Double-click on the installer file to begin the installation process. If prompted by User Account Control, click “Yes” to allow the installer to make changes to your computer.
3. The iCloud for Windows installation wizard will open. Click “Next” to proceed to the license agreement.
4. Read through the license agreement carefully and click on the checkbox that indicates you agree to the terms. Then, click “Install”.
5. The installation process may take a few minutes to complete. During this time, you may see a progress bar indicating the status of the installation.
6. Once the installation is finished, you will see a window confirming that iCloud for Windows was successfully installed. Click on the “Finish” button.
7. Congratulations! You have now installed iCloud for Windows on your PC. Now it’s time to set up iCloud and start syncing your data.
Remember, having iCloud for Windows installed on your computer allows you to access your iCloud emails, contacts, calendars, photos, and more, directly from your PC. It provides seamless integration between your Apple devices and your Windows PC, making it easier for you to stay connected and access your data wherever you are.
Step 3: Set Up iCloud for Windows
After successfully installing the iCloud for Windows program on your PC, it’s time to set it up and start enjoying its features. Here is a step-by-step guide to help you through the process:
1. Launch the iCloud for Windows program by clicking on the Start menu and searching for iCloud. Click on the app when it appears in the search results.
2. A welcome screen will appear, prompting you to sign in using your Apple ID. Enter your Apple ID and password in the respective fields and click on the “Sign In” button.
3. If you have enabled two-factor authentication for your Apple ID, you may be required to verify your identity by entering the verification code sent to your trusted device or phone number.
4. Next, you will see a screen with various checkboxes representing different iCloud features. Choose the features you want to enable on your Windows PC by ticking the checkboxes next to them.
5. By default, iCloud Drive, Photos, Mail, Contacts, Calendars, and Tasks are selected. You can also choose to enable iCloud Bookmarks, iCloud Passwords, and iCloud Keychain if you want to sync these data across your devices.
6. Once you have selected the desired iCloud features, click on the “Apply” button at the bottom right corner of the window. This will save your settings and start syncing your selected data to your PC.
7. Depending on the amount of data you have stored in your iCloud account, the initial sync may take some time. You can monitor the progress of the sync by clicking on the iCloud icon in the system tray of your Windows PC.
8. Once the sync is complete, you can access your iCloud data on your PC through the respective applications. For example, if you enabled iCloud Photos, you can open the Photos app on your Windows PC to view and manage your iCloud photo library.
That’s it! You have successfully set up iCloud for Windows on your PC. Now you can enjoy the convenience of accessing your iCloud data seamlessly across your Apple devices and your Windows computer.
Step 4: Choose iCloud Features and Sign In
Once you have successfully installed iCloud for Windows on your PC, it’s time to choose which iCloud features you want to enable and sign in to your iCloud account. This step is crucial as it allows you to access and sync your iCloud data across your devices.
When you launch iCloud for Windows, you’ll be presented with a list of checkboxes for various iCloud features, such as iCloud Drive, Photos, Mail, Contacts, and more. Select the features that you want to use on your PC by ticking the corresponding checkboxes. It’s worth noting that enabling certain features will require additional setup and configuration.
After selecting the desired iCloud features, click on the “Apply” button at the bottom right corner of the window to save your preferences. If prompted, choose whether you want to merge or replace the existing data on your PC with the data from iCloud.
Now, it’s time to sign in to your iCloud account. Click on the “Sign In” button, and a new window will pop up asking you to enter your Apple ID and password. Enter your credentials and click “Sign In”. If you have enabled two-factor authentication for your Apple ID, you may be prompted to input a verification code sent to your trusted device.
Once you have successfully signed in to your iCloud account, you’ll be able to access your iCloud data on your Windows PC. This includes your iCloud Drive files, photos and videos, mail, contacts, calendars, and more, depending on the features you have enabled. Keep in mind that any changes you make to your iCloud data on your PC will be synced across all your iCloud-enabled devices.
It’s important to note that if you ever want to disable or change the iCloud features on your PC, you can simply relaunch iCloud for Windows and modify your preferences. Additionally, if you need to sign out of your iCloud account, you can do so by clicking on the “Sign Out” button within the iCloud for Windows app.
html
Step 5: Start Using iCloud on Windows PC
Once you have successfully installed and set up iCloud for Windows on your PC, you can now start using it to access and manage your iCloud data. In this step, we will explore some of the key features and functions you can utilize on your Windows PC.
1. iCloud Drive: iCloud Drive allows you to access and sync your files across all your devices. To access iCloud Drive on your Windows PC, open File Explorer and navigate to the iCloud Drive folder. Here, you can view, upload, and download files saved in your iCloud Drive.
2. Photos: With iCloud for Windows, you can access and manage your iCloud Photos. Open the iCloud Photos app on your PC to view and download your photos and videos from iCloud. You can also enable the option to automatically upload new photos and videos from your PC to iCloud.
3. Mail, Contacts, Calendars, and Tasks: iCloud for Windows allows you to sync your iCloud Mail, Contacts, Calendars, and Tasks with the corresponding apps on your PC. This enables you to access and manage your iCloud data seamlessly on both your Apple devices and Windows PC.
4. iCloud Bookmarks: If you use Safari as your default browser on your Apple devices, you can sync your bookmarks with iCloud Bookmarks on your Windows PC. This ensures that your bookmarks are accessible across all your devices, making it easy to pick up where you left off.
5. iCloud Passwords: With iCloud for Windows, you can securely store and utilize your saved passwords on your Windows PC. This feature allows you to autofill passwords, generate strong passwords, and sync your passwords across all your Apple devices.
6. Find My: The Find My app on iCloud for Windows lets you locate and secure your Apple devices, as well as share your location with family and friends. You can access the app on your PC to track the location of your devices, play a sound to find them, or remotely erase their data if needed.
7. iCloud Photos Optimized Storage: If you have limited storage space on your Windows PC, you can enable iCloud Photos Optimized Storage. This feature automatically keeps your full-resolution photos and videos in iCloud, while replacing them with smaller, optimized versions on your PC to save space.
By utilizing these features, you can seamlessly integrate your iCloud data with your Windows PC. Whether it’s accessing your files, managing your photos, staying organized with your emails and calendars, or enhancing the security of your passwords, iCloud for Windows provides a convenient way to stay connected across all your devices.
Conclusion
Downloading iCloud for Windows on your PC is a simple and convenient way to access your iCloud data and seamlessly manage it across your devices. Whether you want to sync your photos, documents, or even your bookmarks, iCloud for Windows provides a user-friendly solution.
By following the step-by-step instructions outlined in this article, you can easily download and install iCloud for Windows on your PC. Once installed, you’ll have access to your iCloud files and data right from your desktop. This allows for seamless integration between your Apple devices and your Windows computer.
Remember, iCloud for Windows offers a host of features, including iCloud Drive, Photos, Mail, Contacts, Calendars, and more. So go ahead and download iCloud for Windows on your PC today, and take full advantage of the power and convenience of Apple’s iCloud ecosystem.
FAQs
Here are some frequently asked questions about downloading iCloud for Windows on your PC:
Q: Can I download iCloud for Windows on any PC?
A: Yes, you can download and install iCloud for Windows on any PC running Windows 10, Windows 8, or Windows 7.
Q: How do I download iCloud for Windows?
A: To download iCloud for Windows, simply visit the official Apple website and search for iCloud for Windows. Click on the download link and follow the installation instructions.
Q: What are the system requirements for iCloud for Windows?
A: The system requirements for iCloud for Windows are as follows:
- A PC running Windows 10, Windows 8, or Windows 7
- An Apple ID
- An iCloud account
Q: Can I access my iCloud files and photos on my Windows PC?
A: Yes, with iCloud for Windows, you can access your iCloud Drive files and iCloud Photos directly from your Windows PC. You can view, download, and upload files and photos seamlessly between your iCloud account and your PC.
Q: What other features does iCloud for Windows offer?
A: In addition to accessing your iCloud Drive and iCloud Photos, iCloud for Windows also allows you to sync your iCloud Mail, Contacts, Calendar, and Bookmarks with your PC. This ensures that you can access and manage your iCloud data across multiple devices.