
Backing up your iPhone is crucial to ensure that your valuable data, such as contacts, photos, videos, and app settings, are always safe and secure. While Apple provides its own backup solution, iCloud, not everyone may have access to unlimited storage or a stable internet connection, leading them to look for alternative methods. If you’re a Windows PC user, you’re in luck! In this comprehensive guide, we will walk you through the step-by-step process of backing up your iPhone using a Windows PC. Whether you want to transfer your data to a new iPhone or simply want to have a copy of your files as a precautionary measure, this guide will provide you with all the information you need. So, grab your lightning cable, fire up your Windows PC, and let’s get started!
Inside This Article
- Why Backup Your iPhone?
- Methods to Backup iPhone with Windows PC
- Using iTunes
- Using iCloud for Windows
- Using Third-Party Backup Tools
- Conclusion
- FAQs
Why Backup Your iPhone?
Your iPhone is not just a device; it holds a treasure trove of precious memories, important data, and personal information. From photos and videos to contacts and documents, losing any of this valuable data can be devastating. That’s why it’s crucial to regularly backup your iPhone. Here are a few key reasons why backing up your iPhone is essential:
1. Protecting Against Data Loss: Accidents happen, and devices can get lost, damaged, or stolen. Without a backup, you risk losing all your valuable data. By creating regular backups, you have a safety net to rely on, ensuring that your important files can be restored even in the worst-case scenario.
2. Easy Device Replacement: If you ever need to replace your iPhone due to a software or hardware issue, having a backup makes the transition seamless. You can restore your backup onto the new device, saving hours of time and effort in setting up your phone from scratch.
3. Preserving Memories: Your iPhone is likely filled with cherished photos and videos capturing priceless memories. Whether it’s family vacations, special occasions, or milestones, losing these moments is heartbreaking. By regularly backing up your iPhone, you can ensure that these memories are safely stored and easily accessible.
4. Retaining App Data and Settings: When you backup your iPhone, you’re not just saving your personal files, but also preserving app data, preferences, and settings. This means that when you restore from a backup, you won’t have to go through the hassle of reconfiguring your apps, accounts, and customized settings.
5. Securing Personal Information: Your iPhone contains a wealth of personal information, such as emails, messages, and passwords. By backing up your device, you can protect this sensitive data from falling into the wrong hands. In case of any security breach or data loss, you can easily restore your backup and ensure that your personal information remains secure.
Given the importance of the data stored on your iPhone, don’t take any chances. Take the time to regularly backup your device to ensure that your valuable data is safe and protected. In the next section, we’ll explore the methods to backup your iPhone using a Windows PC.
Methods to Backup iPhone with Windows PC
Backing up your iPhone is crucial to ensure that your valuable data, including contacts, photos, videos, and app settings, is safe and secure. While many iPhone users are familiar with backing up their devices using iTunes or iCloud, some prefer to use their Windows PC for this task. If you’re one of those users, you’re in luck! Here are three reliable methods to backup your iPhone with a Windows PC.
1. Using iTunes: iTunes is a software developed by Apple that allows you to manage your iPhone data and perform backups. To backup your iPhone with iTunes on your Windows PC, follow these steps:
- Connect your iPhone to your Windows PC using a USB cable.
- Launch iTunes, and if prompted, update it to the latest version.
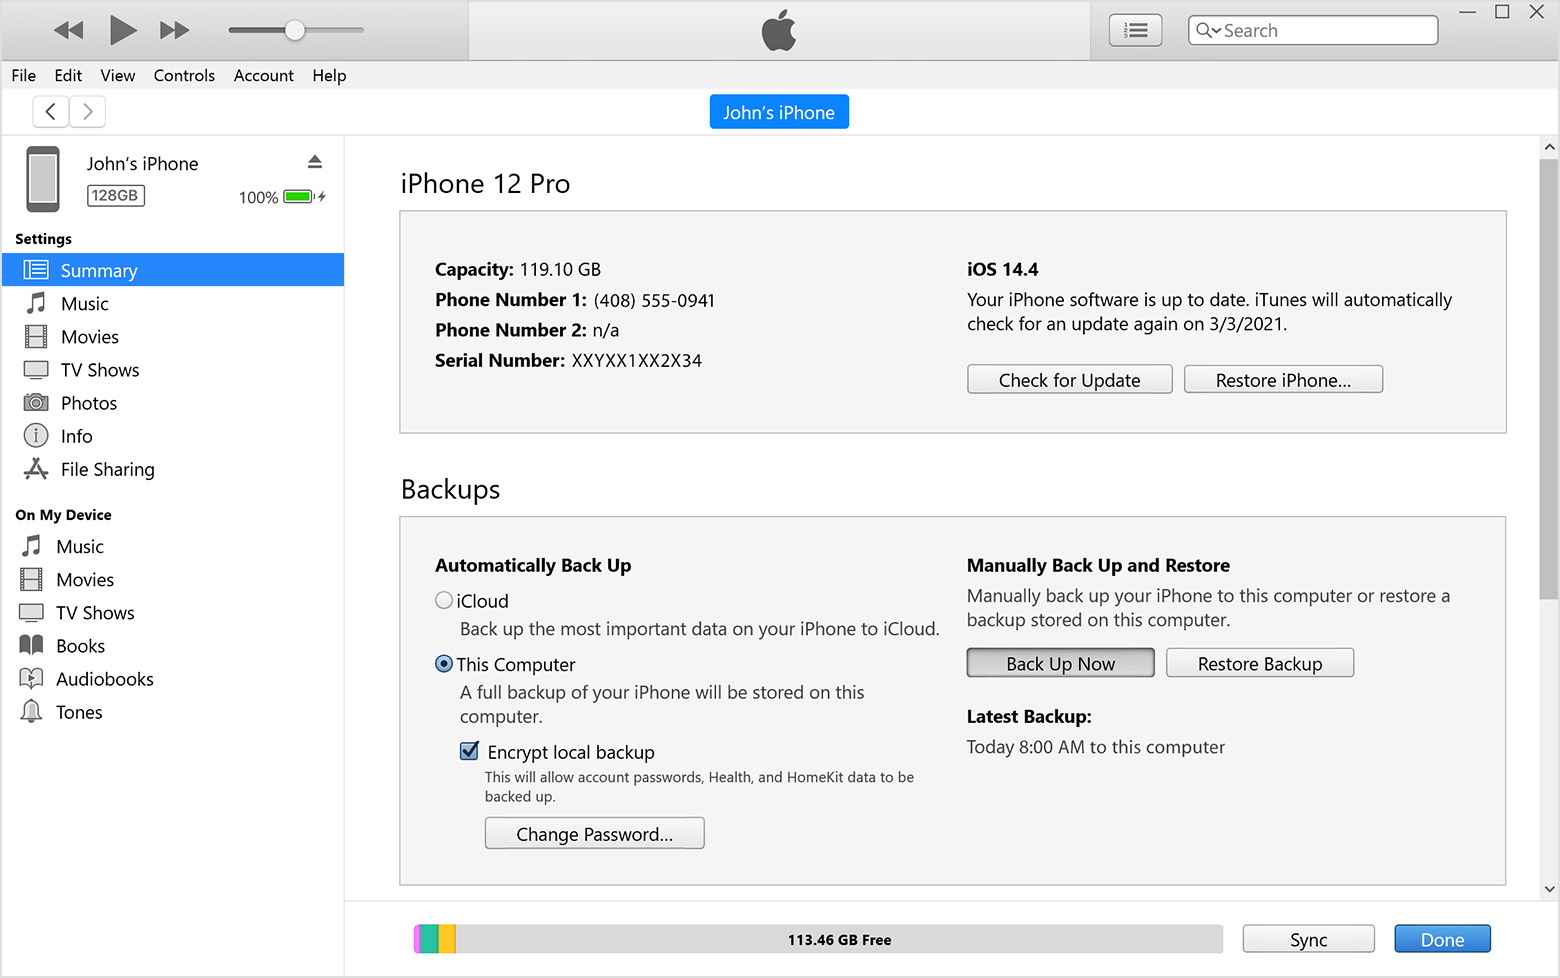
- Click on the iPhone icon located in the upper-left corner of the iTunes window.
- In the Summary tab, under the Backups section, select “This computer”.
- Choose whether you want to encrypt the backup or not. Encrypting the backup ensures that your sensitive data is protected.
- Click on the “Back Up Now” button and wait for the process to complete.
2. Using iCloud for Windows: If you have an iCloud account, you can also backup your iPhone using the iCloud for Windows app. Here’s how to do it:
- Download and install the iCloud for Windows app on your PC.
- Launch the app and sign in with your Apple ID.
- Select the items you want to back up, such as photos, videos, contacts, and calendars.
- Click on the “Apply” button to start the backup process.
- Make sure you have a stable internet connection throughout the backup process.
3. Using Third-Party Backup Tools: If you prefer more flexibility and control over your iPhone backup, you can consider using third-party backup tools. There are several reliable options available, such as iMazing, Dr.Fone, and Syncios. These tools offer additional features like selective backup, easy file management, and even the ability to restore your backup to a new iPhone.
With these three methods, you can easily backup your iPhone using your Windows PC. Remember to regularly backup your device to ensure you never lose your important data. Whether you choose iTunes, iCloud for Windows, or a third-party tool, the most important thing is to have a backup plan in place to protect your valuable information.
Using iTunes
If you own an iPhone and a Windows PC, one of the most common and reliable ways to backup your iPhone is by using iTunes. iTunes is Apple’s official media player and device management software that allows you to sync and backup your iPhone data to your computer.
Here’s a step-by-step guide on how to backup your iPhone using iTunes:
- Start by connecting your iPhone to your Windows PC using the USB cable that came with your device.
- Launch iTunes on your computer. If you don’t have iTunes installed, you can download it from the Apple website and follow the installation instructions.
- Once iTunes is open, you should see your iPhone icon appear on the top left corner of the window. Click on the iPhone icon to access your device.
- In the left sidebar, under the “Summary” tab, you’ll find the “Backups” section. Here, you can choose whether to backup your iPhone to iCloud or your computer.
- To backup your iPhone to your computer, select the “This computer” option under the “Automatically Back Up” section. This will ensure that your iPhone data is backed up to your Windows PC.
- If you want to encrypt your backup for added security, check the “Encrypt iPhone backup” option. This will require you to set a password that will be needed to restore your backup.
- Click on the “Back Up Now” button to start the backup process. The time it takes to backup your iPhone will depend on the amount of data stored on your device.
- Once the backup is complete, you can verify that it was successful by going to Preferences, then Devices, where you should see your backup listed with the date and time it was created.
It’s important to regularly backup your iPhone to ensure that your data, including contacts, photos, messages, and app data, is safe and easily recoverable in case of any unexpected incidents like data loss, device damage, or software issues.
Using iTunes not only allows you to create backups of your iPhone, but it also gives you the ability to restore your device from a previous backup if needed. With regular backups, you can have peace of mind knowing that your important data is protected and easily accessible.
Using iCloud for Windows
If you are a Windows PC user and want to backup your iPhone, one of the options available is to use iCloud for Windows. iCloud is Apple’s cloud storage service that allows you to securely store and sync your data across multiple devices. By enabling iCloud backup on your iPhone and installing iCloud for Windows on your PC, you can easily backup your iPhone data and access it from your computer.
Here’s a step-by-step guide on how to backup your iPhone using iCloud for Windows:
- Make sure you have the latest version of iTunes installed on your Windows PC.
- Open your web browser and go to the iCloud for Windows download page on the Apple website.
- Click on the download button to download the iCloud for Windows installer.
- Once the download is complete, open the installer and follow the on-screen instructions to install iCloud for Windows on your PC.
- After the installation process is complete, launch iCloud for Windows.
- Sign in with your Apple ID and password.
- In the iCloud for Windows app, you will see a list of options for syncing various types of data. Make sure the checkbox next to “Photos” is checked to enable iCloud Photo Library sync.
- To backup other data such as contacts, calendars, and reminders, make sure the respective checkboxes are checked.
- Click on the “Apply” button at the bottom right corner of the iCloud for Windows app to save your settings.
- Connect your iPhone to your Windows PC using a USB cable.
- On your iPhone, go to Settings, tap on your Apple ID at the top, select iCloud, and turn on iCloud Backup.
- Back in iCloud for Windows, click on the “Back Up Now” button to initiate the backup process. Your iPhone data will be backed up to your iCloud storage.
It’s important to note that iCloud offers 5GB of free storage, which may not be sufficient for all users. If you need more storage space, you can upgrade to a higher storage plan for a monthly fee.
Once you have successfully backed up your iPhone using iCloud for Windows, you can rest assured knowing that your data is securely stored on Apple’s servers. In case you ever lose or damage your iPhone, you can easily restore your data to a new device using the iCloud backup.
Using Third-Party Backup Tools
If you’re looking for an alternative to iTunes and iCloud for backing up your iPhone on a Windows PC, third-party backup tools can be a great solution. These tools provide more flexibility and advanced features to ensure a seamless backup process. Here are a few popular third-party backup tools that you can consider:
1. iMazing: iMazing is a comprehensive iPhone backup tool that offers a user-friendly interface and a wide range of features. With iMazing, you can easily backup your iPhone data to your Windows PC, including messages, photos, videos, contacts, and more. It allows you to selectively backup specific items or create a complete snapshot of your device. iMazing also offers options for archiving backups, restoring specific data, and even browsing and extracting files from your backups.
2. Dr.Fone – Phone Backup: Dr.Fone – Phone Backup is another popular choice for backing up your iPhone on a Windows PC. It supports a wide range of iOS devices and offers a simple and intuitive interface. With Dr.Fone – Phone Backup, you can easily backup and restore your iPhone data, including contacts, messages, photos, videos, and more. It also allows you to preview and select specific items to backup or restore, making the process more efficient and convenient.
3. AnyTrans: AnyTrans is a versatile iPhone backup tool that offers both Windows and Mac versions. It allows you to easily backup and transfer your iPhone data to your computer, including photos, videos, music, contacts, messages, and more. AnyTrans also supports selective backup and restore, giving you control over which items to include in your backup. Additionally, it offers a range of other features like managing your iPhone content, transferring data between devices, and even importing/exporting iCloud backups.
When choosing a third-party backup tool, it’s important to consider factors like supported devices, features, ease of use, and customer reviews. Make sure to choose a reputable and reliable tool to ensure a smooth and secure backup process.
Using third-party backup tools can offer a more personalized and efficient backup experience for your iPhone on a Windows PC. Explore the options mentioned above, and choose the one that best fits your needs and preferences. With the right tool, you can ensure that your data is always backed up and protected.
Conclusion
In conclusion, backing up your iPhone to a Windows PC is a crucial step to ensure the safety of your data. Whether you want to protect your contacts, photos, messages, or app data, having a backup is essential. Throughout this guide, we have explored various methods to backup your iPhone, including using iTunes and third-party software such as iMazing. By following the step-by-step instructions provided, you can easily create a backup of your iPhone on your Windows PC.
Remember, accidents can happen at any time, whether it’s a software malfunction, a hardware failure, or accidental deletion. By having a backup, you can restore your iPhone to its previous state without losing any important information. It is recommended to regularly backup your iPhone to ensure that you have the most up-to-date copy of your data. So, don’t delay and start backing up your iPhone to your Windows PC today!
FAQs
1. Can I backup my iPhone using a Windows PC?
Yes, you can backup your iPhone using a Windows PC. Apple provides iTunes software for Windows that allows you to back up and manage your iPhone data. Follow the steps outlined in our guide to backup your iPhone with a Windows PC.
2. How do I backup my iPhone using a Windows PC?
To backup your iPhone using a Windows PC, you will need to install iTunes. Connect your iPhone to your PC using a USB cable and open iTunes. Select your iPhone from the list of devices, go to the “Summary” tab, and click on “Back Up Now” to start the backup process. Our guide provides a step-by-step explanation on how to backup your iPhone with a Windows PC.
3. What data is backed up when I backup my iPhone with a Windows PC?
When you backup your iPhone with a Windows PC using iTunes, it will back up your device settings, app data, home screen layout, iMessage, and SMS history, photos, videos, and more. It’s important to note that some data, like music, movies, and non-iTunes purchased content, may not be included in the backup.
4. How long does it take to backup my iPhone with a Windows PC?
The time it takes to backup your iPhone with a Windows PC will depend on the amount of data on your device. Generally, the initial backup may take longer, especially if you have a large amount of data. Subsequent backups will be faster as iTunes only records the changes since the last backup. It is recommended to connect your iPhone to your PC and start the backup process when you have sufficient time available.
5. Can I access the data in my iPhone backup on a Windows PC?
Yes, you can access the data in your iPhone backup on a Windows PC. After backing up your iPhone using iTunes, the backup file will be saved on your PC. However, the backup file is not in a readable format, and you will need third-party software to extract and view the data. There are various tools available that can help you easily access and restore specific data from your iPhone backup.