
A messaging app is essential nowadays because it makes communication fast and convenient on any device. For Mac users, iMessage is one of the most popular programs due to its many perks. The only downside is that it is only available for iOS devices. Even so, many people want to use iMessage on a PC without a Mac. If you share the sentiment, you can learn how to do so as you read on.
What Is iMessage?
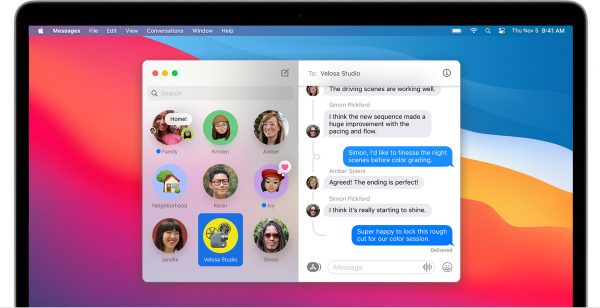
iMessage refers to Apple’s official instant messaging app. It is like WeChat but is dedicated to and built into iOS devices. An iMessage is also a term for the actual content sent from an iPhone, iPad, or Mac to another iOS device. For example, text and multimedia messages with photos and videos.
To elaborate, an iMessage is different from regular SMS or MMS because it is transmitted through a Wi-Fi or cellular network. Also, the text bubbles are in blue, not green.
Also Read: 6 Best Ways to Send a Text From a Computer
Why Use iMessage on PC?
As previously mentioned, the iMessage app has several good features that are why you might wish to have it on all your devices, including your Windows PC. Here are some of its perks that are not offered by other instant messaging apps:
Backs Up and Syncs to iCloud
There is no better way to store important iOS messages other than Apple’s iCloud. iMessage on PC does not require you to back up your text, photos, and videos to iCloud manually because the app can do it on its own regularly. Furthermore, it allows you to access and delete your saved messages across your iOS devices. Automatic backup can be switched on from your iMessage account settings.
Supports Apple Pay
In these modern times, cashless is the way to go. This is why iMessage on PC can be used to make and receive payments. To experience this feature, you and your iMessage contact should have an Apple Pay Cash account.
If you are already an Apple Pay user, just tap on iMessage’s Apple Pay button. Next, input the amount in dollars and the text that has to go with it, or the Request button to ask for payment. The message will be clickable for you or your contact afterward. It will direct you to the Apple Pay app or website for an easy transaction.
Also Read: Samsung Pay vs. Apple Pay
Has Memoji Sticker Effects
The iMessage app can enhance expressions beyond memes and emojis through its Memoji Sticker Effects. For instance, you can spruce up photos, send floating bubbles, make your avatar fill up the screen, or have a handwritten message displayed. You can take your pick from the Memoji Sticker Effects options once you click on the App Store icon in the messaging app.
Integrates Apple Business Chat
The iMessage app on PC also lets you connect to businesses that have a dedicated Apple Business Chat account and support team. As a result, you do not need to browse through websites or call through the busy main landline numbers just to make an inquiry or report. Additionally, iMessage helps you get in touch with legitimate companies by putting the check icon on a verified business profile. It also does not share your personal information with companies for your safety.
Just type in the name of the business you want to converse with and click the chat icon via your iOS device’s Maps, Safari, Siri, and Search, then iMessage will launch automatically. This makes business communication direct and fast.
Requirements for iMessage on PC
Now that you know how unique iMessage is compared to a regular messaging app, you are ready to try to use it on your Windows PC. Here is a rundown of the requirements, besides the computer, which you will be needing in the process. Having the first and any of the succeeding things listed below will do:
Apple ID
You cannot sign in to iMessage if you do not have a registered Apple ID. In fact, an Apple ID is essential for accessing iCloud, the App Store, the iTunes Store, Apple Music, and other iOS services. The good thing about this is that you can create an account regardless if you are an iOS device user or not. You can sign up for one from the official Apple ID website or the Create New Apple ID option that appears when you search for and launch iMessage on a Mac. Once you have an account, your credentials can now be inputted to sign in to and use iMessage on any iOS device.
Google Chrome
To enable iMessage on a PC that uses Windows, you should get a web browser. You will need Google Chrome because it has a suitable extension that helps access iMessage and all of its features. If you do not have it, just download the browser online. It is free and easy to install.
iMessage Emulator
The iMessage app is not designed for Windows PCs. It only makes sense to make it an exclusive feature for iOS devices, a perk for those who choose Apple over other brands. There is a workaround to this, though, and that is an emulator.
Think of setting up and using an emulator for a game you want to play on an unsupported platform. An iMessage emulator is easy to configure and run just like game emulators. Moreover, there are multiple options available online. Among the reliable emulators are iPadian and BlueStacks, which will be discussed shortly.
iPhone (Optional)
An iPhone is an optional requirement. You will only need this if you want to jailbreak your iPhone to enable a Windows computer to access iMessage. Note that jailbreaking is not recommended because it is risky. You can destroy your device, void its warranty, lose its existing data, expose it to security threats, and lose access to Apple content.
How to Use iMessage on Windows PC
Let’s proceed to the actual methods that make use of the abovementioned requirements for iMessage on PC. Without further ado, below are the best ways to effectively enable the messaging app on your Windows computer:
iMessage on PC via Chrome Remote Desktop Extension
Chrome Remote Desktop is an extension that grants you secure access to a remote computer. It is handy in scenarios when you do not have a Mac because you are away from it. For example, you are not using one in the office or vice versa. The extension should be set up on the Mac first before doing so for the Windows PC.
On Mac
1. Download and install Google Chrome.
2. Sign up or sign in to your Google Chrome account via your credentials.
3. Visit the Chrome Store online and look for the Chrome Remote Desktop Extension.
4. Click on the extension’s image then the Add to Chrome button on the next page.

5. Click on Continue on the pop-up window asking you to grant full permission.
6. On Google Chrome’s search bar, input chrome://apps.
7. Select Chrome Remote Desktop App from the dashboard.
8. On the pop-up window, choose Enable Remote Connections.
9. Download the Chrome Host Installer as prompted.
10. Go to where you chose to save the Chrome Remote Desktop file and double click it.
11. Install and set up the Chrome Remote Desktop Host package as prompted.
12. Relaunch Chrome Remote Desktop from the browser app dashboard.
13. Enable remote connection from the pop-up window.
14. Type in your preferred six-digit PIN on the next pop-up field.
15. Hit the OK button once done.
16. Keep your Mac and iMessage app online and running during remote access:
- Switch on the prevent sleep mode and wake for Wi-Fi settings on your Mac’s System Preferences menu.
- Search for iMessage on the Mac then input your credentials to sign in.
On Windows PC
1. Download and set up Google Chrome if you do not have it yet.
2. Log in to your Google Chrome account.
3. Go to the Chrome Extension Store to download, install and add Chrome Remote Desktop.
4. Head back to Google Chrome and type chrome://apps on the search field.
5. Click the Chrome Remote Desktop App on the page.
6. On My Computers, double click on your Mac’s name from the dashboard or list.
7. Input the PIN code you set up previously on your Mac.
8. Once you see your Mac’s home screen on a separate window, you can now use iMessage as usual from it.
iMessage on PC via Emulator
If you do not own a Mac, this is when an iMessage emulator comes in handy. You can use two of the most popular options online, iPadian Emulator and BlueStacks, or any other emulator of your choice.
The former is an iOS emulator for PC that is free to download. The latter can also run mobile games on your Windows PC and has free basic and paid advanced features. Below are the guidelines to follow if you want to try iPadian or BlueStacks.
iPadian
1. Visit www.ipadian.net on your PC and hit the Download for Windows button.
2. Run the iPadian.exe file you obtained.
3. Click on Next and Install Now from the pop-up windows.
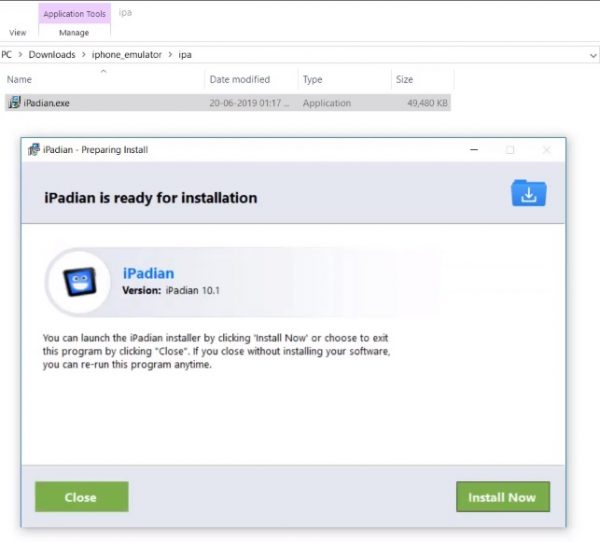
4. Input the folder destination where you want to save iPadian.
5. Select Finish after the installation bar goes full.
6. Open the installed iPadian emulator from the desktop shortcut or file destination.
7. Search for or download the iMessage app from the emulator’s Mac-like interface.
8. Sign in to iMessage using your Apple ID credentials.
BlueStacks
1. Visit www.bluestacks.com and download the emulator.
2. Install BlueStacks on your Windows PC by following the on-screen prompts.
3. Double click on its shortcut icon from the desktop or local file destination.
4. Use the emulator to search for iMessage and download it.
5. Right-click on the iMessage apk file afterward.
6. Select Open then BlueStacks Apk Handler.
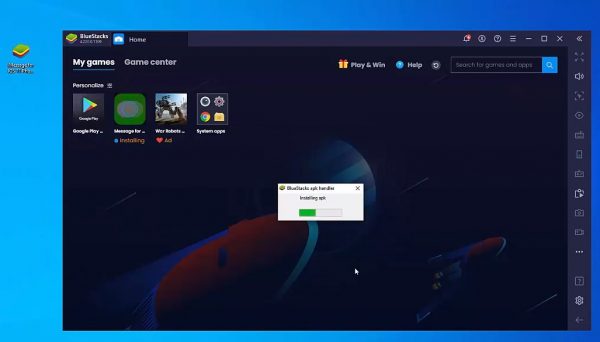
7. Wait for iMessage to install and have an icon on the BlueStacks dashboard.
8. Click on the iMessage icon to use the app.
iMessage on PC via iPhone IP Address
The iPhone IP Address is your key to getting iMessage work on a Windows PC when your preferred method is jailbreaking. The risks are already mentioned previously, so just keep in mind the most important precaution: back up iPhone data in iCloud and an external hard drive.
If you are well prepared and a hundred percent decided on proceeding, you can check our guide on how to jailbreak an iOS device. Just follow the steps outlined and you will also need to do two more things afterward.
Once the iPhone is jailbroken, use Remote Messages or any similar app that lets you download iMessage on PC. Input the credentials on the app and the iPhone’s IP address with a colon and 333 after the last digits. Log into iMessage afterward to use it on the Windows PC.
Also Read: How to Do an iCloud Backup of Your Apple Devices
Takeaway
Apple’s iMessage is a well-loved instant messaging app so many people are wishing for it to be made available for any kind of device. It seems that Apple is not granting the public open-platform access to it anytime soon so you have to rely on the best and most effective workarounds. If you have read and understood this guide, you can now experience iMessage on a PC hassle-free.