
Are you looking to install a wireless printer on your Samsung tablet? You’ve come to the right place! Connecting a wireless printer to your tablet is a convenient way to print documents, photos, and more without the need for cables or a computer. In this article, we will guide you through the step-by-step process of installing a wireless printer on your Samsung tablet. Whether you’re using an Android or iOS tablet, we’ve got you covered. By the end of this tutorial, you’ll be able to print wirelessly from your Samsung tablet with ease. So let’s get started and make printing on the go a breeze!
Inside This Article
- Before You Begin
- Step 1: Check Compatibility
- Step 2: Connect the Printer to Wi-Fi
- Step 3: Enable Wi-Fi Printing on Samsung Tablet
- Step 4: Install Printer Software/App
- Troubleshooting Tips
- Conclusion
- FAQs
Before You Begin
Before diving into the process of installing a wireless printer on your Samsung tablet, there are a few important things you need to consider. By taking these initial steps, you can ensure a smooth and hassle-free installation process:
- Check Compatibility: Before proceeding, make sure that your Samsung tablet is compatible with wireless printing. Most modern Samsung tablets support wireless printing, but it’s always a good idea to double-check.
- Gather the Necessary Information: Take note of the printer’s make and model. This information will be useful when searching for the correct software or app needed for installation.
- Ensure Wi-Fi Connectivity: Make sure your Samsung tablet is connected to a stable Wi-Fi network. This is important for establishing the connection between your tablet and the wireless printer.
- Ensure Printer’s Wi-Fi Connectivity: Check if your printer has Wi-Fi capabilities and is connected to the same Wi-Fi network as your tablet. If not, refer to the printer’s user manual for instructions on connecting it to Wi-Fi.
- Charge Your Tablet: It’s always a good idea to ensure that your Samsung tablet has enough battery before starting the installation process. This will prevent any unexpected interruptions.
By following these simple and important steps, you will be well-prepared to install a wireless printer on your Samsung tablet.
Step 1: Check Compatibility
Before you begin the process of installing a wireless printer on your Samsung tablet, it is essential to check the compatibility between the two devices. Not all printers are compatible with all tablets, so it’s crucial to ensure that your Samsung tablet is compatible with the printer you intend to install.
Here are a few steps to follow to check the compatibility:
- Research Printer Compatibility: Begin by researching the specifications of the wireless printer you plan to install. Visit the manufacturer’s website or refer to the printer’s user manual to find out if it supports compatibility with Samsung tablets.
- Check Samsung Tablet Specifications: Next, check the specifications of your Samsung tablet. Look for information about wireless printing capabilities, supported printer protocols (such as AirPrint or Google Cloud Print), and any specific requirements for connecting to a wireless printer.
- Compare Compatibility: Cross-reference the printer’s compatibility information with your Samsung tablet’s specifications. Ensure that they align, allowing you to connect the two seamlessly.
If you find that your Samsung tablet is not compatible with the wireless printer you initially chose, don’t worry! There are alternatives available, such as using a print server or utilizing a third-party printing app that may bridge the compatibility gap.
Ensuring compatibility between your Samsung tablet and the wireless printer before proceeding with the installation process can save you time, effort, and frustration. It guarantees a smooth and successful installation experience, allowing you to start printing wirelessly with ease.
Step 2: Connect the Printer to Wi-Fi
Connecting your wireless printer to Wi-Fi is essential to ensure smooth and seamless printing from your Samsung tablet. Follow these steps to connect your printer to Wi-Fi:
1. Power on the printer: Ensure that your printer is turned on and connected to a power source.
2. Access the printer’s control panel: Locate the control panel on your printer. It may be a touchscreen display or a button interface.
3. Select the Wi-Fi setup option: Use the navigation buttons or touchscreen display on your printer to access the Wi-Fi setup menu.
4. Choose your network: Once you are in the Wi-Fi setup menu, select the option to connect to a network. Your printer should display a list of available Wi-Fi networks.
5. Enter the Wi-Fi password: Select your Wi-Fi network from the list, and then enter the password when prompted. Use the printer’s control panel to input the password, and ensure that you type it correctly.
6. Wait for the connection: After entering the password, your printer will attempt to connect to the Wi-Fi network. Wait for a few moments while the printer establishes the connection.
7. Test the connection: Once the printer is connected to Wi-Fi, perform a test print or use the printer’s built-in diagnostic tools to ensure that the connection is successful.
By following these steps, you can connect your wireless printer to Wi-Fi, enabling you to print wirelessly from your Samsung tablet with ease.
Step 3: Enable Wi-Fi Printing on Samsung Tablet
Once you have successfully connected your wireless printer to Wi-Fi, the next step is to enable Wi-Fi printing on your Samsung tablet. Follow these simple steps to get started:
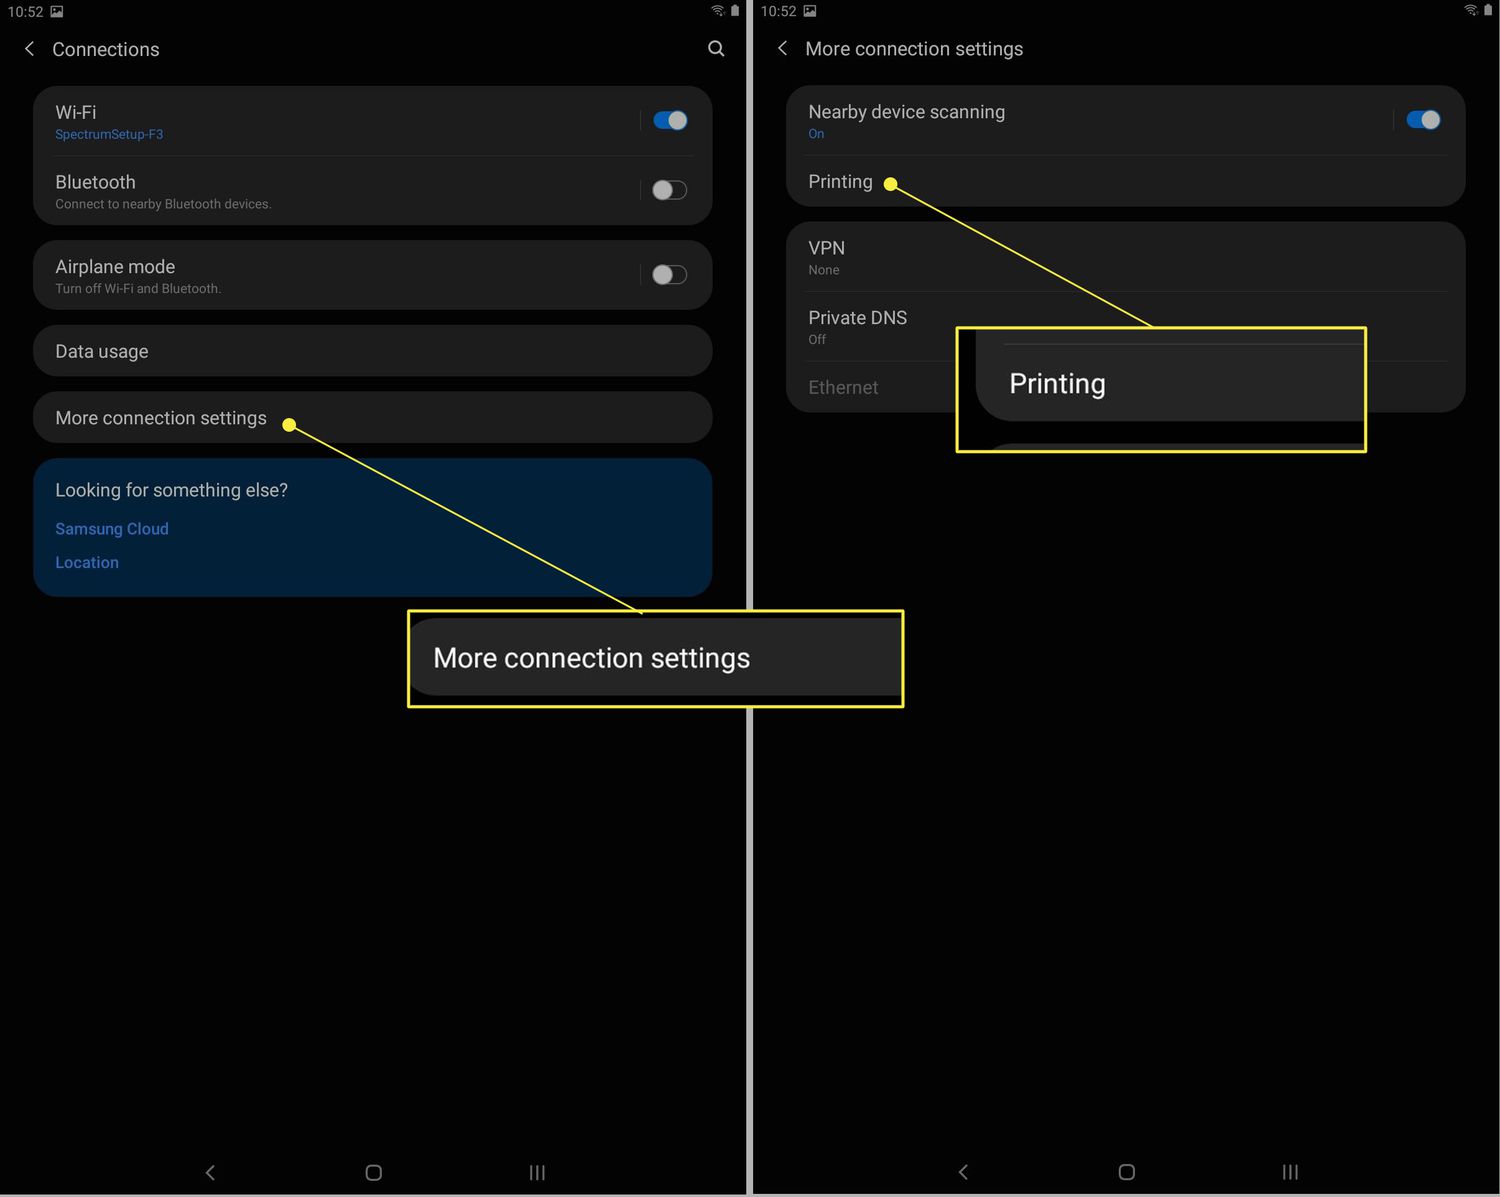
1. Open the Settings app on your Samsung tablet. You can usually find it in the app drawer or by swiping down on the notification panel and tapping the gear icon.
2. In the Settings menu, scroll down and look for the “Printing” or “Print” option. Tap on it to access the printing settings.
3. Tap on “Printers” to view the list of available printers. If your wireless printer is already connected to the same Wi-Fi network as your tablet, it should appear in the list. Tap on it to select it as your default printer.
4. To further customize your printing options, tap on the three-dot menu icon in the top right corner of the screen. This will open a drop-down menu with additional settings such as print quality, paper size, and orientation. Adjust the settings according to your preferences.
5. Once you have selected your printer and customized the settings, you are ready to start printing from your Samsung tablet. Simply open the file or document you want to print, tap on the three-dot menu icon, and select the “Print” option. Your tablet will communicate with the wireless printer and send the print job.
It’s worth noting that the specific steps to enable Wi-Fi printing on a Samsung tablet may vary slightly depending on the model and Android version. However, the general process should be similar.
By enabling Wi-Fi printing on your Samsung tablet, you can conveniently print wirelessly without the need for any physical connections. Whether it’s documents, photos, or important files, you can easily print them directly from your tablet.
Step 4: Install Printer Software/App
After successfully connecting your wireless printer to your Samsung tablet, the next step is to install the printer software or app. This step will enable your tablet to communicate with the printer and print documents seamlessly. Follow the instructions below to complete the installation process.
1. Determine the Software/App: Start by identifying the appropriate software or app for your wireless printer. Most printer manufacturers provide dedicated software or apps that are specifically designed for their devices. Visit the manufacturer’s website or app store to locate the software or app.
2. Download and Install: Once you have identified the correct software or app, download it onto your Samsung tablet. You can do this by visiting the manufacturer’s website and locating the download section. Alternatively, you can search for the software or app in your device’s app store. Click on the download or install button to initiate the process. Follow the on-screen instructions to complete the installation.
3. Configure the Software/App: After installing the printer software or app, launch it on your Samsung tablet. The software or app will guide you through the configuration process. Provide the necessary information, such as the printer model and your Wi-Fi network, to establish a connection between the printer and tablet. Ensure that you follow the instructions carefully to avoid any errors.
4. Test the Connection: Once you have completed the configuration process, it’s essential to test the connection between your Samsung tablet and the wireless printer. Open a document or photo on your tablet and select the print option. The printer software or app will detect the available printers on your network and display them as options. Select your wireless printer and adjust any additional print settings if required. Finally, click on the print button to send the document to the printer. If the document prints successfully, it means that the installation was successful and you can now use your wireless printer with your Samsung tablet.
By following these steps, you can easily install the necessary software or app on your Samsung tablet to connect and print wirelessly with your printer. Enjoy the convenience and flexibility of wireless printing, and make sure to keep your printer software or app updated to access the latest features and optimizations.
Troubleshooting Tips
While installing a wireless printer on a Samsung tablet is generally a straightforward process, there might be times when you encounter issues. Here are some troubleshooting tips to help you overcome common problems:
1. Check Wi-Fi Connection: Make sure your tablet is connected to a stable Wi-Fi network. Poor connectivity can prevent the printer from being recognized. Try restarting your router or moving closer to the wireless access point.
2. Restart Devices: Sometimes, a simple restart can resolve connectivity issues. Turn off both your tablet and printer, wait a few seconds, and then power them back on. This can refresh the connection and resolve any temporary glitches.
3. Update Printer Firmware: Outdated printer firmware can lead to compatibility issues. Check the manufacturer’s website for any available firmware updates and follow the instructions to update the printer’s software.
4. Check Printer Settings: Ensure that your printer is set to “Wireless” or “Wi-Fi Direct” mode. Access the printer’s settings menu and verify that the wireless option is enabled. Additionally, ensure that the printer’s network settings match your Wi-Fi network details.
5. Install the Correct Printer Driver: In some cases, the printer driver may not be installed correctly. Visit the manufacturer’s website and download the latest driver specifically designed for your printer model. Install the driver on your tablet following the provided instructions.
6. Clear Printer Queue: If you’re experiencing print job errors or delays, there might be a backlog of print jobs in the printer queue. Access the printer settings on your tablet, find the print queue, and clear any pending print jobs. This can help resolve printing issues.
7. Check Firewall and Security Settings: Firewalls or security software on your tablet may be blocking the printer’s connection. Disable any firewall or antivirus software temporarily and check if the printer is recognized. If it is, adjust the firewall or security settings to allow the printer’s connection.
8. Reset Printer Settings: If none of the above solutions work, you can try resetting the printer to its default settings. Consult the printer’s user manual to find the instructions on how to perform a factory reset. Note that this will erase any custom settings you have made on the printer.
9. Contact Technical Support: If you have exhausted all troubleshooting options and still cannot get your Samsung tablet to connect with the wireless printer, it’s time to reach out to the printer manufacturer’s technical support. They can provide more specific guidance based on your printer model and the issues you’re experiencing.
By following these troubleshooting tips, you should be able to resolve most common issues encountered when installing a wireless printer on a Samsung tablet.
Conclusion
Installing a wireless printer on a Samsung tablet can greatly enhance your productivity and convenience. By following the simple steps outlined in this guide, you can seamlessly connect your tablet to a wireless printer and enjoy the freedom of printing documents, photos, and more, directly from your device.
Remember to ensure that your printer and tablet are on the same Wi-Fi network for a smooth connection. Additionally, make sure to download and install the necessary printer drivers or apps from the Samsung store or the printer manufacturer’s website.
With a wireless printer at your disposal, you can easily print important documents on the go, without the need for bulky cables or a computer. This opens up a world of possibilities, making tasks such as printing boarding passes, concert tickets, or even personal photos a breeze.
Take advantage of the convenience and flexibility that a wireless printer offers. Say goodbye to traditional wired connections and hello to a seamless printing experience with your Samsung tablet.
FAQs
1. Can I install a wireless printer on my Samsung tablet?
Absolutely! Samsung tablets are equipped with wireless capabilities, allowing you to connect and install a wireless printer. This enables you to conveniently print documents, photos, and more directly from your tablet.
2. What do I need to install a wireless printer on my Samsung tablet?
To install a wireless printer on your Samsung tablet, you will need the following:
- A wireless printer that supports mobile printing
- A stable Wi-Fi network connection
- The compatible printer app for your tablet
Ensure that your tablet and printer are connected to the same Wi-Fi network for seamless printing.
3. How do I connect my Samsung tablet to a wireless printer?
To connect your Samsung tablet to a wireless printer, follow these steps:
- Make sure your tablet and printer are connected to the same Wi-Fi network.
- Install the printer app for your specific printer model from the Google Play Store.
- Open the printer app and select the option to add a printer.
- Search for and select your printer from the available list of devices.
- Follow the on-screen instructions to complete the setup.
Once the setup is complete, you can start printing wirelessly from your Samsung tablet.
4. Can I print from any app on my Samsung tablet using a wireless printer?
Yes, you can print from most apps on your Samsung tablet using a wireless printer. Many apps have a built-in print function, allowing you to select your printer and customize printing options such as page layout, color settings, and number of copies.
5. What if I don’t have a wireless printer? Can I still print from my Samsung tablet?
If you don’t have a wireless printer, you can still print from your Samsung tablet. You can use a USB OTG (On-The-Go) cable to connect your tablet to a printer that supports USB connectivity. Alternatively, you can also use cloud-based printing services that allow you to send documents to a nearby printer for printing.