
Setting up a wireless internet connection has become an essential task for many people in today’s digital age. Whether you need to connect your cell phone, laptop, or tablet, having a reliable and efficient wireless connection is crucial for staying connected and getting things done. In this article, we will guide you through the step-by-step process of setting up a wireless internet connection, ensuring that you can enjoy a seamless and fast connection wherever you go. Whether you are a beginner or have experience with technology, we have got you covered. So, let’s dive in and discover the simple yet effective ways to get your devices connected to the internet without the hassle of cables and wires.
Inside This Article
- Overview of Wireless Internet Connection Setup
- Step 1: Check the Equipment Requirements
- Step 2: Connect the Modem to the Internet Service Provider (ISP)
- Step 3: Set up the Wireless Router
- Step 4: Configure the Wireless Network Settings
- Step 5: Connect Devices to the Wireless Network
- Troubleshooting Tips and Common Issues
- Conclusion
- FAQs
Overview of Wireless Internet Connection Setup
Setting up a wireless internet connection is essential for accessing the internet on multiple devices without the need for cumbersome cables. Whether you’re connecting your home or office, the process can be relatively straightforward if you follow the right steps. In this article, we will guide you through the process of setting up a wireless internet connection, from checking the equipment requirements to troubleshooting common issues.
To set up a wireless internet connection, you will need a modem, a wireless router, and a stable internet service provider (ISP) connection. The modem acts as the bridge between your ISP and your router, while the router acts as the central hub for your wireless network. By following a systematic approach, you can easily establish a reliable and secure wireless internet connection.
The first step in the setup process is to ensure that you have all the necessary equipment. Check if your modem and router are compatible with your ISP’s requirements. If not, you may need to purchase new devices or contact your ISP for assistance. Additionally, make sure you have access to the necessary cables and power adapters to connect your devices.
Once you have checked the equipment requirements, the next step is to connect the modem to your ISP. This typically involves connecting one end of an Ethernet cable to the modem’s WAN port and the other end to your ISP’s configured wall outlet. Follow the instructions provided by your ISP to ensure a successful connection.
After connecting the modem, you can proceed to set up your wireless router. Start by connecting one end of an Ethernet cable to the modem’s LAN port and the other end to the router’s WAN port. Power on the router and wait for it to initialize. Consult the router’s manual or the manufacturer’s website for specific setup instructions.
Once your router is set up, it’s time to configure the wireless network settings. Access the router’s web-based interface using a computer connected to the router via an Ethernet cable or wirelessly through the default network name (SSID) and password provided by the manufacturer. From the interface, you can customize the network name, password, security settings, and other preferences.
Finally, you can connect your devices to the wireless network. On your computer or mobile device, search for available networks and select your network name from the list. Enter the password you set during the configuration process, and you should be connected to the internet wirelessly. Repeat this process for all the devices you wish to connect to your network.
If you encounter any issues during the setup process or have trouble connecting to the wireless network, there are several troubleshooting tips you can try. These include power cycling your modem and router, checking for firmware updates, and adjusting the placement of your router for optimal signal strength.
Setting up a wireless internet connection can seem daunting at first, but by following the outlined steps and utilizing troubleshoot techniques, you can establish a reliable and convenient network for all your internet-enabled devices. Now you can enjoy the freedom of wireless internet connectivity throughout your home or office!
Step 1: Check the Equipment Requirements
Before setting up a wireless internet connection, it’s important to ensure that you have all the necessary equipment. Here are the key items you’ll need:
- Modem: This device connects your home network to your Internet Service Provider (ISP) and allows you to access the internet.
- Wireless Router: A wireless router serves as the central hub for your wireless network, enabling you to connect multiple devices and share the internet connection wirelessly.
- Ethernet Cable: You’ll need an Ethernet cable to connect the modem to the wireless router. This cable transfers data between the devices.
- Power Cords and Adapters: Make sure you have the necessary power cords and adapters for all your devices. Check if they are compatible with the electrical outlets in your location.
- Internet Service Plan: Finally, check your internet service plan to ensure it supports wireless connectivity. Some ISPs provide separate plans or require additional fees for wireless access.
It’s important to note that the specific equipment you need may vary depending on your ISP and the type of connection you have. For example, if you’re using a DSL connection, you may require a DSL modem instead of a regular modem.
Once you have confirmed that you have all the necessary equipment, you can proceed to the next step of setting up your wireless internet connection.
Step 2: Connect the Modem to the Internet Service Provider (ISP)
Once you have gathered all the necessary equipment and verified their compatibility, it’s time to connect the modem to your Internet Service Provider (ISP). The modem serves as the bridge between your home network and the ISP, allowing you to access the internet.
Here are the steps to connect the modem to your ISP:
- Locate the modem: You will typically find the modem near the main entry point of your home where the ISP connection comes in. It may be a standalone device or combined with a router.
- Disconnect any old equipment: If there is an existing modem or router connected to the ISP, you will need to disconnect it before connecting the new modem. Turn off and unplug the old equipment for safety purposes.
- Connect the modem to the ISP: Use an Ethernet cable to connect the modem’s Ethernet port to the ISP’s provided wall outlet or connection point. Ensure that the cable is securely plugged into both the modem and the wall outlet.
- Power on the modem: Plug in the modem’s power adapter and turn on the power. Wait for the modem to fully boot up and establish a connection with the ISP. This process may take a few minutes, so be patient.
- Verify the connection status: Check the modem’s indicator lights or user interface to ensure that it has successfully established a connection with the ISP. The specific indicator lights and interface may vary depending on the modem model.
Once the modem is connected and the connection is established, you have completed the second step of setting up a wireless internet connection. Now, you can proceed to the next step of setting up the wireless router to distribute the internet connection to your devices.
Step 3: Set up the Wireless Router
Setting up a wireless router is a crucial step in establishing a wireless internet connection. It allows you to create a network for multiple devices to connect wirelessly and access the internet. Here’s a step-by-step guide to help you set up your wireless router:
1. Choose an optimal location: Select a central location for your wireless router to maximize coverage throughout your home or office. Avoid placing it near objects that may interfere with the signal, such as metal objects or thick walls.
2. Connect the router to a power source: Plug the power adapter into the router’s power port and connect it to an electrical outlet. Ensure that the router’s power LED indicator is on.
3. Connect the router to the modem: Use an Ethernet cable to connect the router’s WAN (Wide Area Network) port to the Ethernet or LAN (Local Area Network) port on your modem. This connection allows the router to receive internet access from the modem.
4. Access the router’s configuration page: Open a web browser on a connected device and enter the router’s default IP address in the address bar. The default IP address can usually be found in the router’s manual or on the manufacturer’s website.
5. Enter the login credentials: You will be prompted to enter a username and password to access the router’s configuration page. This information is typically provided in the router’s manual or can be found on the manufacturer’s website.
6. Set up the wireless network: Once you’ve logged in, navigate to the wireless settings section. Here, you can customize the network name (SSID) and choose a strong password to secure your network. It is crucial to use a combination of letters, numbers, and symbols for a secure password.
7. Enable wireless encryption: Select the appropriate encryption type, such as WPA2-PSK (AES), to encrypt your wireless network and protect it from unauthorized access. This feature ensures that your data remains secure while being transmitted over the wireless network.
8. Save the settings: After configuring the wireless settings, click on the “Save” or “Apply” button to save the changes made to the router’s configuration. Allow a few moments for the router to apply the settings.
9. Restart the router: Once the settings are saved, restart the router to apply the changes completely. This step will ensure that the new settings take effect and your wireless network is operational.
By following these steps, you can successfully set up your wireless router and establish a reliable and secure wireless internet connection for your devices. Remember to refer to the router’s manual or contact the manufacturer’s support if you encounter any difficulties during the setup process.
Step 4: Configure the Wireless Network Settings
Once you have set up your wireless router, the next step is to configure the wireless network settings. This will allow you to customize your network according to your preferences and ensure a secure and reliable connection. Here are the steps to configure the wireless network settings:
1. Access the router’s admin panel: To configure your wireless network settings, you need to access the admin panel of your router. This can be done by typing the router’s IP address in a web browser. The IP address is typically mentioned in the user manual or can be found on the router itself.
2. Enter the login credentials: Once you have accessed the router’s admin panel, you will be prompted to enter the login credentials. This usually includes a username and password. If you have not changed the default login credentials, you can find them in the user manual or on the router manufacturer’s website.
3. Configure the network name (SSID): The network name, also known as the SSID (Service Set Identifier), is the name that appears when you search for available Wi-Fi networks on your device. It is recommended to choose a unique name for your network to avoid confusion with nearby networks. You can also choose to hide the SSID if you want to keep your network more secure.
4. Set the network security type and password: It is crucial to secure your wireless network with a strong password to prevent unauthorized access. Choose a network security type, such as WPA2 (Wi-Fi Protected Access 2), and create a strong password that includes a combination of letters, numbers, and special characters. Remember to save the password somewhere safe.
5. Adjust additional settings (optional): Depending on your router model, there may be additional settings that you can configure. These settings can include enabling guest network access, setting up parental controls, or prioritizing certain devices over others. Explore the router’s admin panel and customize these settings according to your needs.
6. Save and apply the changes: After configuring the wireless network settings, don’t forget to save and apply the changes. This will ensure that the settings are implemented and your wireless network is properly configured.
Once you have completed the steps to configure the wireless network settings, your wireless network is ready for use. You can now connect your devices to the network and enjoy a fast and reliable wireless internet connection.
Remember to keep your router’s firmware up to date and periodically check the network settings to ensure optimal performance and security.
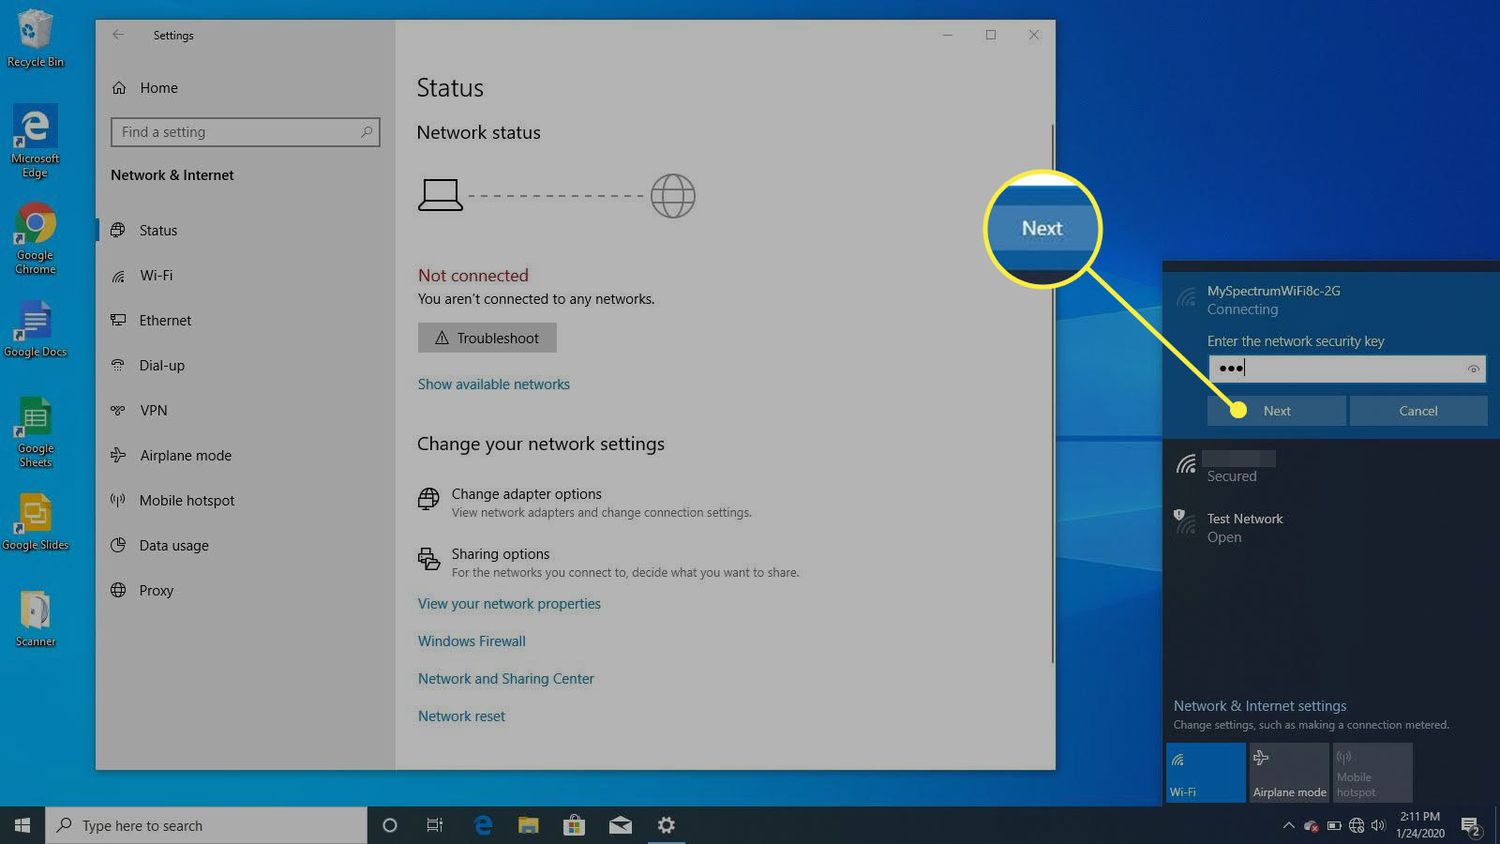
Step 5: Connect Devices to the Wireless Network
Once you have successfully set up your wireless network, the next step is to connect your devices to it. Whether you have a smartphone, laptop, tablet, or any other Wi-Fi enabled device, connecting them to your wireless network is a breeze.
The first thing you need to do is ensure that the Wi-Fi feature on your device is turned on. You can usually find this option in the settings menu of your device. Once it is enabled, your device will start searching for available Wi-Fi networks in the vicinity.
Next, locate your wireless network name (also known as the SSID) on the list of available networks. This is the name that you assigned to your network during the setup process. Once you have identified your network, click on it or tap on it to connect.
If you have set up a password for your wireless network (which is highly recommended for security reasons), your device will prompt you for the password. Enter the password correctly and click or tap on “Connect” to complete the connection process.
Once connected, your device will display a confirmation message indicating that it is now connected to the wireless network. You will also see the wireless network symbol or icon in the status bar of your device, indicating a successful connection.
Remember, you can connect multiple devices to your wireless network simultaneously. Simply repeat the above steps for each device you wish to connect. However, be mindful of the limitations of your wireless router, as having too many devices connected can affect the network performance.
If your device fails to connect to the wireless network, ensure that you have entered the correct network name and password. Additionally, check your wireless router’s settings to ensure that it is configured to allow new devices to connect.
Connecting your devices to a wireless network is an essential step in modern-day connectivity. With the ability to access the internet wirelessly, you can enjoy the convenience of browsing, streaming, and communicating online from any corner of your home or office.
Now that you have successfully connected your devices to your wireless network, you can start making the most of your high-speed internet connection. Stream movies, browse the web, play online games, and stay connected with friends and family effortlessly.
Remember to periodically check the devices connected to your network and ensure that the network security features are up to date. This will help protect your network from unauthorized access and keep your personal information secure while enjoying the benefits of wireless connectivity.
Troubleshooting Tips and Common Issues
While setting up a wireless internet connection can be a relatively straightforward process, it’s not uncommon to encounter some bumps along the way. Here are some troubleshooting tips and solutions to common issues that you might face:
1. Weak or Unstable Signal: If you’re experiencing a weak or unstable signal, try moving the wireless router to a central location in your home or office. Avoid placing it near electronic devices that may interfere with the signal, such as cordless phones or microwave ovens.
2. Slow Internet Speed: If you’re noticing slow internet speeds, there are a few things you can do. First, check to see if other devices on the network are causing the slowdown. Disconnect any unnecessary devices or applications that may be eating up bandwidth. Additionally, try restarting your router and modem to refresh the connection.
3. Unable to Connect: If you’re having trouble connecting to the wireless network, double-check that you’re using the correct network name (SSID) and password. Also, make sure that your device’s Wi-Fi is turned on and that you’re within range of the router.
4. Network Disconnections: If your device keeps disconnecting from the wireless network, try updating the firmware of your router and the drivers of your Wi-Fi adapter. You can also try changing the channel settings on your router to avoid interference from neighboring networks.
5. Forgotten Password: If you’ve forgotten your Wi-Fi password, you can usually find it on the back or bottom of your router. Alternatively, you can log into the router’s administration interface using a computer connected via Ethernet and change the Wi-Fi password from there.
6. Security Concerns: If you’re worried about the security of your wireless network, make sure to enable WPA2 encryption, which provides the highest level of security. Regularly update your router’s firmware to protect against any potential vulnerabilities.
7. Multiple Networks with the Same Name: In densely populated areas, you may encounter other Wi-Fi networks with the same name (SSID) as yours. To avoid confusion and interference, change your network’s name to something unique. This can usually be done through the router’s administration interface.
8. Resetting the Router: If all else fails and you’re still experiencing issues, you can try resetting your router to its factory settings. Keep in mind that this will erase all your custom settings, so it should be a last resort.
By using these troubleshooting tips and solutions, you can overcome common issues and enjoy a seamless and stable wireless internet connection.
Conclusion
Setting up a wireless internet connection may seem like a daunting task, but with the right knowledge and guidance, it can be a smooth and seamless process. By following the steps outlined in this article, you’ll be able to enjoy the convenience and freedom of a wireless connection in no time.
Remember to choose a reliable and secure wireless router, configure the necessary settings, and protect your network with a strong password. Additionally, take advantage of the various wireless features available, such as guest networks and parental controls, to enhance your internet experience.
With a wireless internet connection, you can stay connected throughout your home or office, conveniently access the internet from multiple devices, and enjoy the flexibility of a wire-free setup. So, why wait? Get started on setting up your wireless connection today and enjoy the benefits of seamless connectivity.
FAQs
1. How do I set up a wireless internet connection?
Setting up a wireless internet connection is a relatively straightforward process. First, you’ll need a wireless router that supports Wi-Fi. Connect the router to your modem using an Ethernet cable. Then, power on the router and wait for it to fully boot up. Next, navigate to your device’s Wi-Fi settings and locate the network name (SSID) of the router. Select the network and enter the password (if applicable). Once connected, you should have access to the internet wirelessly.
2. What are the benefits of having a wireless internet connection?
There are several benefits to having a wireless internet connection. Firstly, it allows for greater convenience and mobility, as you can access the internet from anywhere within the range of the Wi-Fi signal. This means you can move around your home or office without being tied to a wired connection. Additionally, wireless connections enable multiple devices to be connected simultaneously, allowing for seamless multitasking and device communication.
3. How can I improve the speed and performance of my wireless internet connection?
To improve the speed and performance of your wireless internet connection, there are several steps you can take. First, ensure that your router is placed in a central location and not obstructed by walls or other objects that may interfere with the signal. Additionally, try changing the Wi-Fi channel on your router to avoid congestion from other nearby wireless networks. Upgrading your router or using a Wi-Fi range extender can also help enhance the signal strength and coverage.
4. What security measures should I take with my wireless internet connection?
Securing your wireless internet connection is crucial to protect your personal information and prevent unauthorized access. Start by changing the default administrator password on your router to a strong, unique password. Enable encryption, such as WPA2, to encrypt data transmitted over your network. It’s also advisable to use a strong Wi-Fi password that includes a combination of letters, numbers, and symbols. Regularly updating your router’s firmware can help protect against potential security vulnerabilities.
5. I’m having trouble connecting to my wireless network, what should I do?
If you’re having trouble connecting to your wireless network, there are a few troubleshooting steps you can try. First, double-check that you’ve entered the correct password for your Wi-Fi network. Restarting your router and device may also help resolve connectivity issues. If you’re still experiencing difficulties, try resetting your router to factory settings and reconfiguring it. If all else fails, contacting your internet service provider or the manufacturer of your router for assistance can be beneficial.