
Welcome to our comprehensive guide on how to set up your AT&T wireless router! Setting up a wireless router can seem like a daunting task, but with the right information and guidance, you can have your router up and running in no time. AT&T offers a range of wireless routers that provide excellent connectivity and advanced features to ensure a seamless internet experience. In this article, we will walk you through the step-by-step process of setting up your AT&T wireless router, from unboxing to connecting your devices. Whether you are a tech-savvy individual or a novice, our easy-to-follow instructions and helpful tips will make the setup process a breeze. So, let’s dive in and get your AT&T wireless router up and running!
Inside This Article
- Step 1: Gather the necessary equipment
- Step 2: Connect the router to the power source
- Step 3: Connect the Router to the Modem
- Step 4: Access the router’s settings
- Step 5: Configure the wireless network settings
- Step 6: Set a password for your wireless network
- Step 7: Connect your devices to the wireless network
- Troubleshooting tips and common issues
- Conclusion
- FAQs
Step 1: Gather the necessary equipment
Before you begin setting up your AT&T wireless router, it’s important to gather all the necessary equipment. Having everything you need at hand can save you time and ensure a smooth installation process. Here are the essential items you will need:
- AT&T wireless router: This is the main device that will provide the wireless connectivity for your home network.
- Modem: This is the device that connects your home network to your internet service provider.
- Ethernet cables: You will need one or two Ethernet cables, depending on the setup, to establish a wired connection between the router and the modem.
- Power adapter: The router will need to be connected to a power source, so make sure you have the appropriate power adapter.
- Computer or smartphone: You will need a device to access the router’s settings and configure the wireless network.
By gathering all these items beforehand, you can avoid any delays or interruptions during the setup process. Make sure to double-check that you have everything on the list before moving on to the next step.
Step 2: Connect the router to the power source
Once you have gathered all the necessary equipment for setting up your AT&T wireless router, it’s time to connect it to a power source. This step is crucial to ensure that your router receives the necessary power supply to function properly and provide a stable wireless network.
Start by locating the power port on your router. It is typically found on the back panel of the device and is labeled “Power” or indicated by a power symbol. Plug the power adapter into the power port.
Next, find an electrical outlet near the desired location for your router. Make sure the outlet is easily accessible and not obstructed by any objects. Plug the other end of the power adapter into the electrical outlet. Ensure that the connection is secure.
Once the router is connected to the power source, you will notice lights or indicators on the front panel of the device. These lights indicate that the router is receiving power and is in the process of initializing.
It is important to allow the router some time to boot up and establish a stable connection. This initial setup process usually takes a few minutes, during which the lights on the front panel may flash or change colors. Once the lights stabilize, it means that the router is ready for the next steps of configuration and connection.
Ensure that you do not disconnect the router from the power source during the setup process, as this can disrupt the configuration and may require you to start the setup from the beginning.
With the router now connected to the power source, you can proceed to the next step of connecting it to your modem or internet service provider’s device to establish internet connectivity.
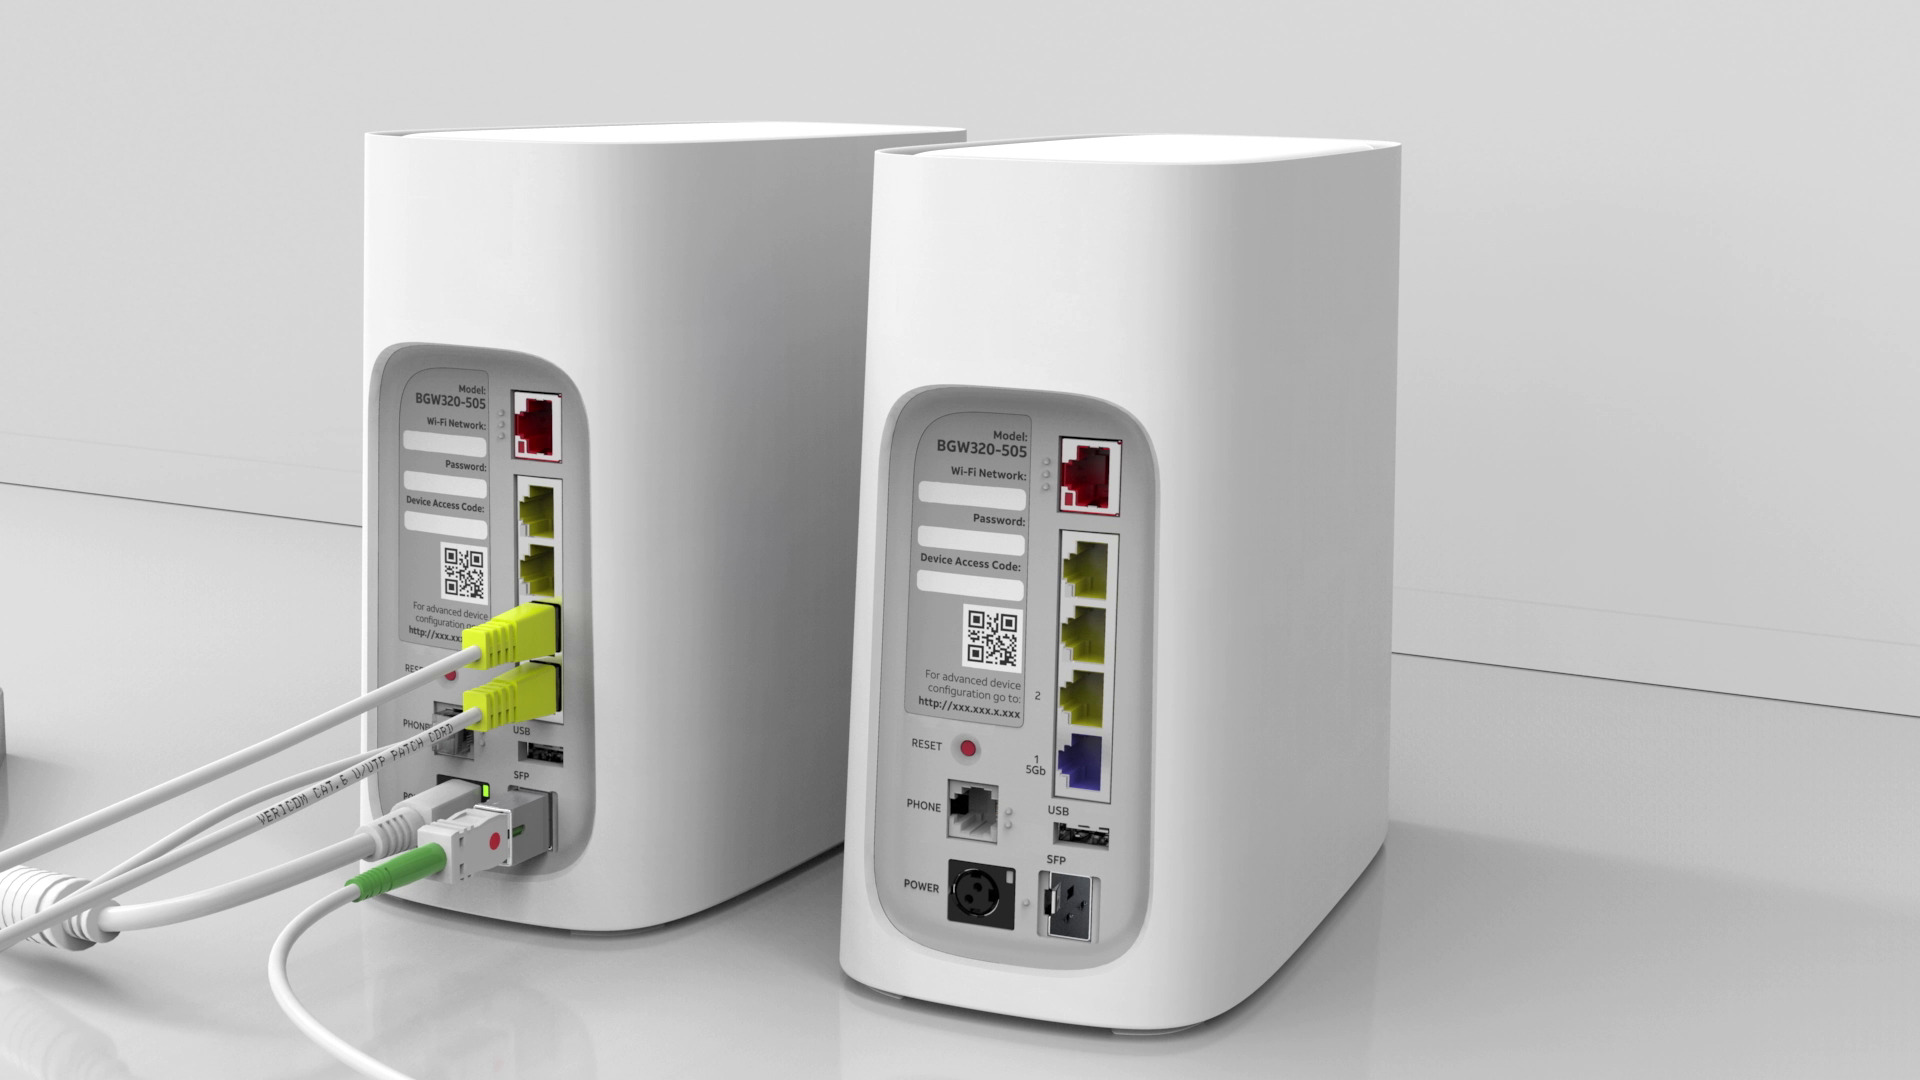
Step 3: Connect the Router to the Modem
Once you have gathered your necessary equipment and connected the router to the power source, it’s time to connect the router to the modem. The modem serves as the bridge between your internet service provider and your router, allowing it to transmit internet signals to your devices. Follow the steps below to complete this crucial step:
1. Locate the Ethernet port on the back of your modem. It is usually labeled as “Internet” or “WAN.”
2. Take one end of the Ethernet cable and connect it to the Ethernet port on the back of the modem. Ensure that the connection is secure by pushing the cable connector into the port firmly.
3. Now, take the other end of the Ethernet cable and connect it to the WAN or Internet port on the back of the router. Like before, make sure the connection is secure by firmly pushing the cable connector into the port.
4. If your router has additional Ethernet ports, you can connect other devices, such as your computer or gaming console, to the router using Ethernet cables. This will allow for a more stable and faster internet connection for those devices.
5. Once all the connections are made, power on the modem first and wait for it to establish a stable connection with your ISP. This may take a few minutes.
6. After the modem is fully connected, power on the router. Give it a few minutes to boot up and establish a connection with the modem.
7. To ensure that the connection between your modem and router is successful, check the LED lights on both devices. Most routers have LED indicators that show the status of the internet connection. If the lights are steady, it means your router is successfully connected to the modem.
By following these steps, you have successfully connected your router to the modem. Now, your router is ready to provide a wireless network for your devices to connect to.
Step 4: Access the router’s settings
Once you have connected your router to the modem, it’s time to access the router’s settings to configure it according to your needs. To do this, follow these steps:
- Open your preferred web browser on a device connected to the router. It could be a computer, laptop, or even a smartphone.
- In the address bar of the browser, type in the default IP address for your router. Typically, this is either “192.168.1.1” or “192.168.0.1”. If you’re unsure, refer to the documentation provided with the router or visit the manufacturer’s website for the correct IP address.
- Press Enter to access the router’s login page.
- You will be prompted to enter the router’s username and password. These credentials are typically printed on a label on the router itself or in the documentation. If you have changed the default login credentials in the past, use the updated username and password.
- Once you have entered the correct username and password, click on the Login or Submit button to proceed.
- You will now be redirected to the router’s settings page, sometimes referred to as the admin panel or dashboard.
From the settings page, you will have access to a variety of options to customize your router’s configuration. Here, you can set up parental controls, change the network name (SSID), adjust security settings, create guest networks, and more. It’s recommended to explore each option carefully and make changes as per your requirements.
It’s important to note that making changes to the router’s settings should be done with caution, as improper configuration may result in connectivity issues. If you are unsure about a specific setting or its impact, it’s always a good idea to consult the router’s documentation or reach out to the manufacturer’s support for guidance.
Once you have made the desired changes, don’t forget to save the settings before exiting the admin panel. This will ensure that your configurations are applied and will be effective.
Now that you have successfully accessed the router’s settings, you are ready to proceed to the next step and configure the wireless network settings.
Step 5: Configure the wireless network settings
Configuring the wireless network settings on your AT&T wireless router is an essential step to ensure a secure and reliable connection. By customizing these settings, you can personalize your network name (SSID) and password, as well as adjust other advanced options if needed. Follow the steps below to configure the wireless network settings:
1. Access the router’s settings: To begin, open your web browser and enter the IP address of your AT&T wireless router in the address bar. Typically, the default IP address is either 192.168.1.1 or 192.168.0.1. Press Enter to access the router’s login page.
2. Enter the router’s login credentials: On the login page, enter the username and password for your router. If you haven’t changed them before, the default username and password can be found in the router’s user manual or on the manufacturer’s website. Once you’ve entered the correct login details, click on the Login or Sign In button.
3. Navigate to the wireless settings: After successfully logging into your router’s settings, look for the wireless settings section. This section may be labeled as “Wireless,” “Wi-Fi,” or something similar. Click on the corresponding option to access the wireless settings.
4. Customize the network name (SSID): In the wireless settings, locate the field that allows you to change the network name, also known as the SSID. Enter a unique and easily identifiable name for your wireless network. Choosing a creative and memorable name can make it easier for you to identify your network when connecting devices.
5. Set the wireless security mode: Look for the security settings option in the wireless settings menu. It is crucial to select a strong security mode to protect your network from unauthorized access. The recommended security mode is WPA2-PSK (Wi-Fi Protected Access 2 with Pre-Shared Key). This will encrypt the data transmitted between your devices and the router, ensuring a secure connection.
6. Create a password: Within the security settings, locate the field to set the password for your wireless network. It is important to choose a strong password consisting of a combination of letters, numbers, and special characters. Avoid using easy-to-guess passwords like your name or birthdate. Note down the password for future reference.
7. Save the changes: Once you have modified the wireless network settings, be sure to save the changes. Look for the “Apply” or “Save” button at the bottom or top of the page, depending on the router’s interface. Click on it to apply the changes and update the wireless network settings.
After completing these steps, your AT&T wireless router will have its wireless network settings configured according to your preferences. Make sure to reconnect your devices to the newly named network using the password you set. It is recommended to test the connection on multiple devices to ensure a successful setup.
Remember that if you encounter any difficulties during this process, consult the router’s user manual or contact the AT&T customer support team for assistance. They will be able to guide you through the configuration process and address any concerns or issues you may have.
Step 6: Set a password for your wireless network
Now that your AT&T wireless router is connected and configured, it’s important to set a password for your wireless network to ensure its security. This will prevent unauthorized users from accessing your network and potentially compromising your personal information.
Here are the steps to set a password for your wireless network:
- Open a web browser on a device that is connected to your AT&T wireless network.
- Type the default Gateway IP address, usually “192.168.1.1” or “192.168.0.1”, into the address bar and press Enter.
- You will be prompted to enter a username and password. If you have never changed these from the default settings, refer to your router’s manual or look for the default username and password on the router itself.
- Once you have logged in, navigate to the wireless settings section of your router’s configuration page.
- Look for the option to set a password or passphrase for your wireless network. This may be referred to as the “Wi-Fi password” or “WPA key.”
- Choose a strong password that combines uppercase and lowercase letters, numbers, and special characters. Avoid using dictionary words or easily guessable information, such as your name or address.
- Enter the chosen password in the designated field and save the changes.
After setting a password for your wireless network, make sure to update the password on all the devices that connect to it. This includes smartphones, laptops, tablets, and any other devices that use your AT&T wireless network.
By setting a strong password for your wireless network, you can ensure that only authorized users are able to connect to your network, keeping your personal information and data secure.
Step 7: Connect your devices to the wireless network
Now that you have set up your AT&T wireless router and configured the wireless network settings, it’s time to connect your devices to the network. Here’s a step-by-step guide to help you with the process:
- On your device, such as a laptop, smartphone, or tablet, navigate to the Wi-Fi settings.
- In the list of available Wi-Fi networks, locate and select the network name (SSID) you set up during the router configuration process. It should be the same name you chose earlier.
- If you set up a password for your wireless network, you will be prompted to enter it. Type in the password exactly as you set it during the router configuration process.
- Once you have entered the correct password, click or tap on the “Connect” button or press Enter to establish the connection.
- After a few seconds, your device should successfully connect to the AT&T wireless network. You will typically see a confirmation message or an indication that the connection is successful.
- Repeat this process for each additional device you want to connect to the wireless network.
It’s important to note that some devices might have slightly different steps or user interfaces for connecting to a Wi-Fi network. However, the general process remains the same – search for the network name (SSID), enter the password, and establish the connection.
If you encounter any issues while connecting your devices to the network, there are a few troubleshooting tips you can try:
- Double-check that you entered the correct password. Wi-Fi passwords are case-sensitive, so make sure the uppercase and lowercase letters are entered correctly.
- Ensure that your device’s Wi-Fi is turned on. It may sound obvious, but sometimes the Wi-Fi feature can accidentally get switched off.
- If you are still having trouble, try restarting your device and attempting the connection again.
- If none of the above steps resolve the issue, it may be helpful to consult AT&T’s customer support or refer to their online resources for further assistance.
Once all your devices are successfully connected to the AT&T wireless network, you can enjoy the convenience of wireless internet access throughout your home or office.
Troubleshooting tips and common issues
Setting up a wireless router can be a smooth process, but occasionally, you may encounter some common issues. Here are a few troubleshooting tips to help you resolve them:
1. No Internet Connectivity:
If you’re unable to connect to the internet after setting up your AT&T wireless router, check the following:
- Make sure your modem is properly connected to the router.
- Restart both the modem and the router.
- Ensure that the Ethernet cables are securely plugged in.
- Check for any firmware updates for your router and apply them if necessary.
2. Slow Wi-Fi Speed:
If you’re experiencing slow Wi-Fi speed, try these troubleshooting steps:
- Place the router in a central location, away from obstructions.
- Reduce interference from other devices by avoiding crowded channels. Change the Wi-Fi channel to a less congested one.
- Ensure that the router’s firmware is up to date.
- Consider upgrading your internet plan if the speed issue persists.
3. Weak Wi-Fi Signal:
If you’re experiencing weak Wi-Fi signal in certain areas of your home, try these steps:
- Position the router in a higher location to improve signal strength.
- Consider using a Wi-Fi extender or a mesh network to extend coverage.
- Update the router’s firmware to optimize signal performance.
- Check for any physical obstructions that may be blocking the Wi-Fi signal.
4. Forgotten Router Login Credentials:
If you’ve forgotten the login credentials for your router’s settings, you can reset the router to its factory defaults. Look for a small reset button on the router and press it using a paperclip or a pin. Note that this will erase any customized settings you may have made.
5. Network Name (SSID) Not Visible:
If your network name is not showing up in the list of available Wi-Fi networks, check the following:
- Make sure the router is broadcasting the SSID. Log in to the router’s settings and verify this.
- Ensure that the SSID is not hidden. Some routers allow you to hide the network name for added security.
- Try restarting the router and refresh the available networks on your device.
If you’re still experiencing issues after trying these troubleshooting tips, it may be advisable to contact your internet service provider (ISP) or seek technical support from AT&T for further assistance.
Conclusion
Setting up your AT&T wireless router doesn’t have to be a daunting task. With the right knowledge and a few simple steps, you can have your router up and running in no time. Remember to gather all the necessary information beforehand, such as your network name and password, and always follow the manufacturer’s instructions.
By choosing the right location for your router, optimizing the settings, and ensuring a secure connection, you can enjoy a seamless and reliable wireless experience. Remember to regularly update your router’s firmware to benefit from the latest improvements and security patches.
Whether you’re a tech-savvy individual or a beginner, setting up your AT&T wireless router is a manageable process. Take the time to familiarize yourself with the router’s features and settings, and don’t hesitate to reach out to AT&T’s customer support if you encounter any difficulties.
Now that you have the knowledge to set up your AT&T wireless router, you can enjoy fast and reliable internet access throughout your home or office. Get started today and enjoy seamless connectivity!
FAQs
1. Can I set up an AT&T wireless router on my own?
Yes, you can set up an AT&T wireless router on your own. AT&T provides detailed instructions and guides to help you through the process. Additionally, you can also reach out to AT&T customer support for assistance if needed.
2. What do I need to set up an AT&T wireless router?
To set up an AT&T wireless router, you will need the following:
– An AT&T wireless router
– An active internet connection from AT&T
– A computer or mobile device for the setup process
– A power outlet to connect the router
– Ethernet cables to connect the router to your modem and devices
3. How long does it typically take to set up an AT&T wireless router?
The time it takes to set up an AT&T wireless router can vary depending on your technical expertise and the complexity of your network setup. Generally, it can take anywhere from 15 minutes to an hour to complete the setup process.
4. Can I use my own wireless router with AT&T?
Yes, you can use your own wireless router with AT&T, but it requires some additional steps. You will need to configure your router with the necessary AT&T settings, such as the correct internet connection type and login credentials. It’s recommended to consult AT&T customer support or the router’s manufacturer for instructions specific to your setup.
5. Is it possible to secure my AT&T wireless router?
Yes, it is essential to secure your AT&T wireless router to protect your network and personal information. You can enable encryption protocols like WPA2, set a strong password for your Wi-Fi network, and change the default administrator credentials. It is also recommended to regularly update your router’s firmware to ensure optimal security.