
Are you ready to take your iPhone photography skills to the next level? One of the key features that sets the iPhone 14 apart from its predecessors is its ability to manually adjust the shutter speed. This allows you to have greater control over the exposure and capture stunning photos in various lighting conditions.
In this article, we will guide you through the simple steps to change the shutter speed on your iPhone 14, unlocking a world of creative possibilities. Whether you’re a professional photographer or just an enthusiast looking to improve your photography game, mastering the art of adjusting shutter speed will help you capture incredible shots with your iPhone.
Inside This Article
- Why Adjust Shutter Speed on iPhone 14?
- How to Change Shutter Speed on iPhone 14
- Additional Tips and Recommendations
- Conclusion
- FAQs
Why Adjust Shutter Speed on iPhone 14?
Shutter speed is a crucial aspect of photography that allows you to control the amount of light entering your camera sensor and the motion blur in your photos. While the iPhone 14 comes with an exceptional automatic shooting mode, adjusting the shutter speed gives you more creative control over your images.
Here are some reasons why you might want to adjust the shutter speed on your iPhone 14:
- Freeze fast-moving subjects: By setting a higher shutter speed, you can freeze the action and capture sharp, detailed photos of moving objects like sports events or wildlife.
- Create motion blur: On the other hand, using a slower shutter speed can introduce intentional motion blur in your images, adding a sense of movement and dynamism, particularly in scenarios like waterfalls or car light trails at night.
- Low-light photography: In dimly lit situations, a longer shutter speed can help capture more light, resulting in brighter and clearer photos. This technique is ideal for night photography or shooting in indoor environments with limited lighting.
- Long exposure photography: With the iPhone 14’s advanced features, you can experiment with long exposure photography by using slow shutter speeds to capture beautiful light trails, starry skies, or ethereal nightscapes.
Adjusting the shutter speed on your iPhone 14 opens up a world of creative possibilities, allowing you to capture unique and captivating images that stand out. Understanding how to control the shutter speed effectively will help you unleash your creativity and take your iPhone photography to the next level.
How to Change Shutter Speed on iPhone 14
Mastering the art of photography on your iPhone 14 involves understanding and utilizing the various camera settings available. One such essential setting is the shutter speed. By adjusting the shutter speed, you can control the amount of light entering the camera and capture stunning images. In this guide, we will walk you through the steps to change the shutter speed on your iPhone 14.
1. Open the Camera App: Begin by opening the Camera app on your iPhone 14. You can access it directly from the Home screen or swipe left from the lock screen.
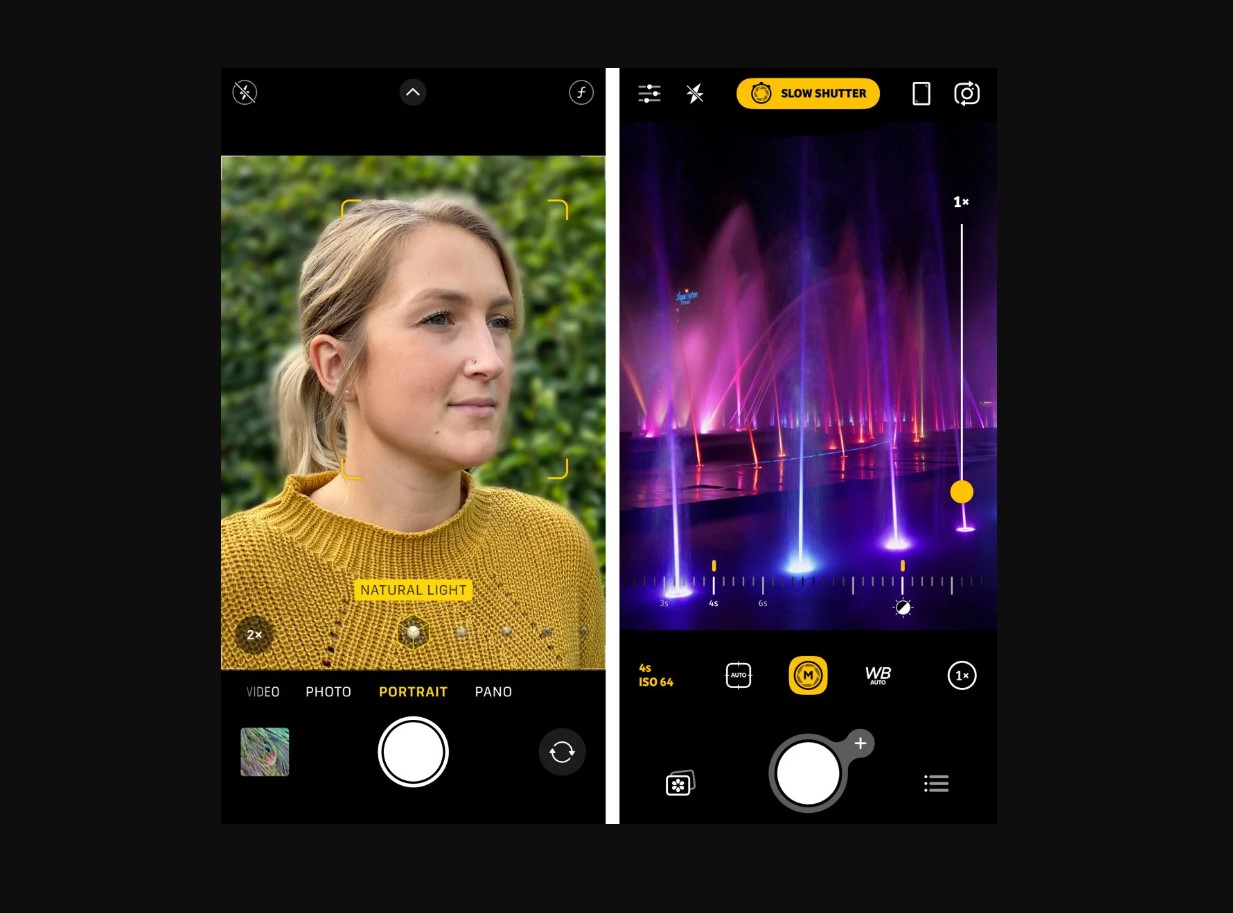
2. Choose the Manual Setting: Once you have the Camera app open, look for the option to switch to manual mode. It is typically represented by a small icon with “M” or “Manual” written on it. Tap on this option to enter manual mode.
3. Access Shutter Speed Controls: After entering manual mode, you will have access to more advanced camera settings, including shutter speed. Look for the shutter speed control, usually located at the top or bottom of the screen. It may be represented by a slider or a numeric value.
4. Adjust the Shutter Speed: Now, it’s time to adjust the shutter speed. You can either slide the shutter speed control left or right to increase or decrease the value, or tap on the numeric value and manually enter the desired shutter speed.
5. Experiment and Capture: Once you have set the desired shutter speed, it’s time to get creative. Experiment with different shutter speeds to achieve different effects. A faster shutter speed freezes motion, while a slower shutter speed creates motion blur. Capture stunning photos by adapting the shutter speed to the specific scene or subject you are capturing.
6. Review and Refine: After capturing your photos, take a moment to review them and assess the results. If needed, make further adjustments to the shutter speed to achieve the desired effect.
Congratulations! You have successfully changed the shutter speed on your iPhone 14. By experimenting with different shutter speeds, you can elevate your photography skills and capture stunning images in various lighting conditions.
Remember to practice and explore the different possibilities that adjusting the shutter speed offers. The more you familiarize yourself with this feature, the more control you will have over the final results of your photographs.
Additional Tips and Recommendations
Now that you know how to change the shutter speed on your iPhone 14, here are some additional tips and recommendations to further enhance your photography experience:
-
Experiment with Different Shutter Speeds: Don’t be afraid to try out different shutter speeds and see how they affect your photos. Play around with fast shutter speeds to freeze motion or slow shutter speeds to capture light trails or create a sense of motion.
-
Use a Tripod or Stabilization Tool: When using slower shutter speeds, it’s crucial to keep your iPhone stable to avoid blurry images. Invest in a tripod or use a stabilization tool like a gimbal for optimal results.
-
Utilize Burst Mode: If you’re capturing a fast-moving subject and want to ensure you get the perfect shot, switch to burst mode. This feature captures a rapid series of photos, increasing the chances of capturing the moment you desire.
-
Combine Shutter Speed with Other Settings: Shutter speed works in conjunction with other camera settings like ISO and aperture. Experiment with different combinations to achieve the desired exposure and creative effects.
-
Edit Your Photos: Even with the right shutter speed settings, post-processing can significantly enhance your images. Utilize photo editing apps such as Adobe Lightroom or Snapseed to fine-tune your photos and make them truly stand out.
-
Take Advantage of Natural Lighting: For outdoor photography, try to capture your images during the golden hour, which refers to the period shortly after sunrise or before sunset. The soft, warm light during this time can add a magical touch to your photos.
-
Experiment with Slow Sync Flash: If you are photographing at night and want to capture both the subject and the ambient light, try using the slow sync flash mode. This combines a slower shutter speed with the flash, resulting in a more balanced exposure.
-
Keep Your Lens Clean: It’s essential to keep the lens of your iPhone clean and free from smudges and fingerprints. This ensures that your photos are sharp and of the highest quality.
-
Practice, Practice, Practice: Like any skill, becoming proficient in using shutter speed takes practice. Take your iPhone 14 out regularly and experiment with different settings and subjects to improve your skills and develop your unique photography style.
By following these additional tips and recommendations, you’ll be able to take full advantage of the shutter speed feature on your iPhone 14 and capture stunning photographs that truly showcase your creativity and vision. Happy shooting!
Conclusion
Changing the shutter speed on an iPhone 14 can significantly enhance your photography skills and allow you to capture stunning images in various lighting conditions. With the advanced camera capabilities of the iPhone 14 and the ability to manually adjust the shutter speed, you have the power to unleash your creativity.
By following the steps outlined in this guide, you can easily change the shutter speed on your iPhone 14 and experiment with different settings to achieve the desired effects in your photos. Whether you want to capture moving subjects with a fast shutter speed or create dreamy long-exposure shots with a slower shutter speed, the iPhone 14 gives you the flexibility to do so.
Keep in mind that practice makes perfect, and don’t be afraid to experiment and explore the possibilities of the iPhone 14’s camera. With time and experience, you will become more comfortable and confident in manipulating the shutter speed to capture breathtaking images that truly showcase your artistic vision.
So, grab your iPhone 14, head out into the world, and start playing around with the shutter speed. You’ll be amazed at the incredible shots you can achieve!
FAQs
Q: Can I change the shutter speed on an iPhone 14?
A: Unfortunately, the iPhone 14 does not have a built-in feature to manually adjust the shutter speed. However, there are several camera apps available on the App Store that offer manual controls, including the ability to change shutter speed.
Q: Are there any recommended camera apps for adjusting shutter speed on iPhone 14?
A: Yes, there are several highly rated camera apps that offer manual controls for adjusting shutter speed on iPhone 14. Some popular options include ProCamera, Halide, and Camera+ 2. These apps provide a wide range of manual settings, including shutter speed adjustments, allowing you to have more control over your photography.
Q: Is it necessary to adjust shutter speed for every photo?
A: No, adjusting shutter speed is not necessary for every photo. It primarily depends on the desired effect you want to achieve. For example, if you’re capturing fast-moving subjects and want to freeze the action, you may need to use a faster shutter speed. On the other hand, if you want to create motion blur or capture long exposures, you may need to use a slower shutter speed. It’s all about understanding what you want to convey through your photo and adjusting the settings accordingly.
Q: Can changing shutter speed affect my iPhone’s battery life?
A: Yes, changing shutter speed can affect your iPhone’s battery life, but the impact will vary depending on how extensively you use the camera and adjust the settings. Since manual control over shutter speed requires the camera to be active for longer durations, it may consume more battery power compared to using the default auto mode. It’s always a good idea to keep an eye on your battery level when using manual camera settings and have a backup battery or charger handy if necessary.
Q: Will adjusting shutter speed improve the quality of my photos?
A: Adjusting shutter speed alone may not necessarily improve the overall quality of your photos. The quality of the photo depends on various factors such as lighting conditions, composition, focus, and exposure. However, changing the shutter speed can certainly help you achieve specific creative effects or capture certain types of shots that require precise control over motion and light. It’s a tool that can enhance your photography, but it’s important to understand how to use it effectively in combination with other camera settings and techniques.