
**
So, you've decided to part ways with the eSIM on your iPhone 14. Whether it's to switch to a physical SIM card, troubleshoot connectivity issues, or for any other reason, removing the eSIM from your iPhone 14 is a straightforward process. In this article, we'll guide you through the steps to delete the eSIM from your iPhone 14, ensuring that you can seamlessly transition to your desired setup. Additionally, we'll address common queries related to eSIM deletion, empowering you with the knowledge to make informed decisions about your device's connectivity options. Let's dive in and explore the simple yet essential process of removing the eSIM from your iPhone 14.
**
Inside This Article
- Preparing to Delete eSIM from iPhone 14
- Deleting eSIM from iPhone 14- Accessing Settings- Removing eSIM Profile
- Verifying eSIM Deletion – Checking for eSIM Removal – Confirming Deletion
- Troubleshooting Potential Issues
- Conclusion
- FAQs
Preparing to Delete eSIM from iPhone 14
Before removing the eSIM from your iPhone 14, it’s crucial to take a few preparatory steps to ensure a smooth transition. One essential measure is backing up your data to prevent any loss of important information during the eSIM removal process.
Backing up your data can be accomplished through iCloud or iTunes. iCloud allows you to seamlessly store your data in the cloud, ensuring that your contacts, photos, and other vital information are safely preserved. Alternatively, utilizing iTunes on your computer enables you to create a complete backup of your iPhone 14, including settings, apps, and media.
Furthermore, it’s imperative to ensure stable network connectivity before proceeding with the eSIM deletion. Reliable internet access is essential for the successful removal of the eSIM profile from your device. Whether you’re using Wi-Fi or cellular data, a strong and uninterrupted connection is necessary to carry out the deletion process without any interruptions.
Deleting eSIM from iPhone 14- Accessing Settings- Removing eSIM Profile
Deleting an eSIM from your iPhone 14 is a straightforward process that can be completed through the device’s settings. By accessing the settings menu, you can easily remove the eSIM profile from your device, allowing you to make changes to your cellular plan or switch to a new provider.
To begin the process of deleting the eSIM from your iPhone 14, navigate to the “Settings” app on your home screen. The “Settings” app is represented by a gear icon and contains a wide range of options for customizing and managing your device’s features.
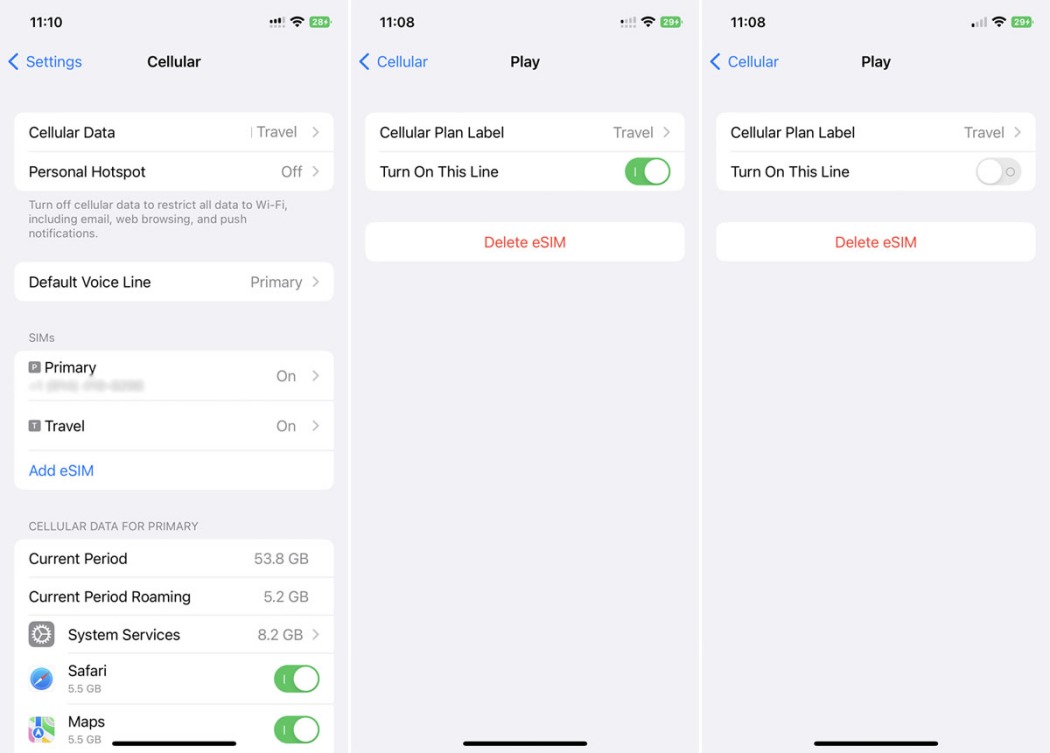
Once you have accessed the “Settings” app, scroll down and tap on the “Cellular” or “Mobile Data” option, depending on the terminology used in your region. This will take you to the cellular settings, where you can view and manage your eSIM profile.
Within the “Cellular” or “Mobile Data” settings, look for the “Cellular Plans” or “Mobile Data Plans” section. Here, you will find the eSIM profile associated with your device. Tap on the eSIM profile to view its details and manage its settings.
After selecting the eSIM profile, you will have the option to “Remove Cellular Plan” or “Delete Data Plan.” Tap on this option to initiate the process of removing the eSIM profile from your iPhone 14. You may be prompted to confirm the deletion to proceed.
Upon confirming the deletion, the eSIM profile will be removed from your device, and you will no longer be connected to the associated cellular plan. This allows you to reconfigure your cellular settings, add a new eSIM profile, or make other changes as needed.
By following these steps, you can effectively delete the eSIM from your iPhone 14, providing you with the flexibility to manage your cellular connectivity according to your preferences and requirements.
Verifying eSIM Deletion – Checking for eSIM Removal – Confirming Deletion
After deleting an eSIM from your iPhone 14, it’s essential to verify that the deletion was successful. This involves checking for the removal of the eSIM profile from your device and confirming that the eSIM has been effectively deleted.
To check for the removal of the eSIM, navigate to the “Settings” app on your iPhone 14. From there, tap on “Cellular” and then “Cellular Plans.” If the eSIM has been successfully deleted, the removed eSIM profile should no longer be visible in the list of cellular plans. This indicates that the eSIM has been removed from your device.
Once you have confirmed the absence of the eSIM profile from the list of cellular plans, it’s crucial to verify the deletion by ensuring that the eSIM is no longer active on your device. To confirm this, attempt to make a call or send a text message using the eSIM. If the eSIM has been successfully deleted, you should encounter an error message indicating that the eSIM is not available or cannot be used.
Troubleshooting Potential Issues
Resolving connectivity problems with your eSIM on the iPhone 14 can be a frustrating experience, but there are a few troubleshooting steps you can take to address the issue. Firstly, ensure that your device has the latest software updates installed. These updates often include bug fixes and improvements that can resolve connectivity issues.
If updating the software doesn’t resolve the problem, try restarting your iPhone 14. Sometimes, a simple restart can clear up temporary glitches and restore proper connectivity. Additionally, check your network settings to ensure that the eSIM profile is correctly configured and activated. Verify that the cellular data and roaming options are enabled if necessary.
If the connectivity problem persists, consider resetting the network settings on your iPhone 14. This action will remove all saved network configurations, including Wi-Fi passwords and Bluetooth connections, so be prepared to re-enter this information. However, it can often resolve persistent connectivity issues related to the eSIM.
If none of these troubleshooting steps resolve the connectivity problems with your eSIM, it may be time to seek assistance from your carrier. Contact their customer support team to report the issue and seek guidance on resolving the connectivity problems. They can provide specific troubleshooting steps tailored to their network and services, and may also be able to identify any network issues that could be affecting your eSIM connectivity.
Conclusion
Removing an eSIM from your iPhone 14 is a straightforward process that can be completed in just a few simple steps. Whether you’re switching to a new device, changing carriers, or simply no longer need the eSIM, it’s essential to know how to remove it properly. By following the steps outlined in this guide, you can seamlessly delete the eSIM from your iPhone 14 and ensure that your device is ready for whatever comes next. With the flexibility and convenience of eSIM technology, managing your cellular connectivity has never been easier. Stay informed about the latest advancements in mobile technology to make the most of your iPhone 14 and stay connected in the way that best suits your needs.
FAQs
Q: Can I delete eSIM from my iPhone 14?
A: Yes, you can delete eSIM from your iPhone 14 by following a few simple steps in the settings menu.
Q: Will deleting eSIM affect my phone’s functionality?
A: Deleting eSIM will not affect the basic functionality of your iPhone 14, but it will remove the associated cellular plan from your device.
Q: Can I re-enable eSIM after deleting it?
A: Yes, you can re-enable eSIM on your iPhone 14 by adding a new eSIM plan or reactivating the previous eSIM if it’s still available.
Q: Is it necessary to delete eSIM before switching to a new device?
A: It’s not mandatory to delete eSIM before switching to a new device, but it’s advisable to remove the eSIM to avoid any potential conflicts or issues.
Q: Will I lose any data or settings by deleting eSIM?
A: Deleting eSIM will not result in any data loss or affect your device settings. It only removes the eSIM cellular plan from your iPhone 14.