
Setting up manual entry on Google Authenticator on your iPhone 10 is a crucial step in securing your online accounts. By enabling this feature, you add an extra layer of protection to your sensitive data and information, safeguarding them from unauthorized access. In this article, we will explore the process of setting up manual entry on Google Authenticator, providing you with step-by-step guidance to ensure a seamless and secure experience. Whether you're new to Google Authenticator or seeking to enhance your account security, this comprehensive guide will empower you to take control of your online safety. So, let's dive in and learn how to set up manual entry on Google Authenticator on your iPhone 10.
Inside This Article
- Setting Up Google Authenticator
- Enabling Manual Entry on Google Authenticator
- Adding Accounts to Google Authenticator
- Troubleshooting and Tips
- Conclusion
- FAQs
Setting Up Google Authenticator
If you’re looking to enhance the security of your online accounts, Google Authenticator is a fantastic option. This app provides an additional layer of protection by generating verification codes on your iPhone, making it more challenging for unauthorized users to access your accounts.
Before you can start using Google Authenticator, you’ll need to download and install the app from the App Store. Once it’s installed, open the app and follow the on-screen instructions to set it up. Google Authenticator will guide you through the process of adding your accounts and enabling two-factor authentication.
After installing the app, you’ll need to link it to your various accounts. This can typically be done by scanning a QR code provided by the service you’re trying to secure. Once the QR code is scanned, Google Authenticator will automatically generate verification codes for that account.
Google Authenticator provides a simple and effective way to secure your online accounts, and it’s especially useful for protecting sensitive information. By setting up Google Authenticator on your iPhone, you can significantly reduce the risk of unauthorized access to your accounts.
Enabling Manual Entry on Google Authenticator
Enabling manual entry on Google Authenticator allows you to add accounts to the app by entering the account information manually, rather than scanning a QR code. This can be useful when a service provider does not offer a QR code for setting up two-factor authentication or when you want to add an account that is not accessible through the QR code method.
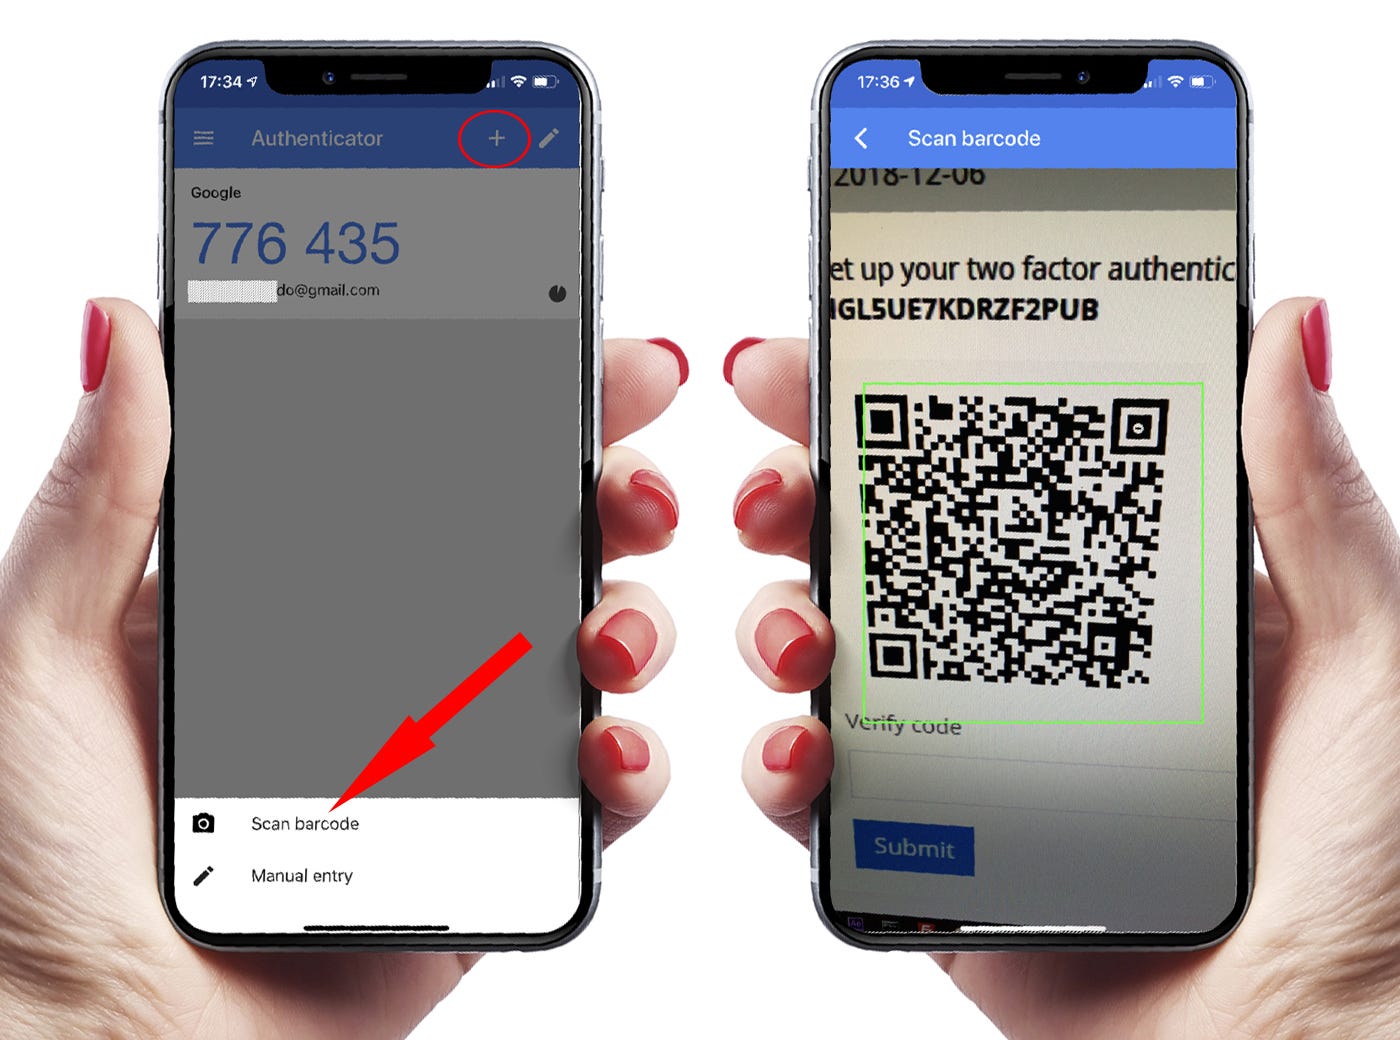
To enable manual entry on Google Authenticator, you can follow these simple steps. First, open the Google Authenticator app on your iPhone. Next, tap the “+” icon or the “Add” button to begin the process of adding a new account. Then, instead of scanning a QR code, select the “Enter a provided key” or “Manual entry” option, depending on the app version.
After selecting the manual entry option, you will be prompted to enter the account name and the secret key provided by the service you are setting up two-factor authentication for. Once you have entered this information, tap “Add” or “Save” to complete the manual entry process. The account will then be added to your Google Authenticator app and will begin generating verification codes for that account.
Adding Accounts to Google Authenticator
Once you have set up Google Authenticator and enabled manual entry, you can start adding accounts to the app to enhance the security of your online accounts. Here’s how to do it:
1. Open the Google Authenticator app on your iPhone.
2. Tap the “+” icon or the “Add” button to begin the process of adding a new account.
3. Choose the “Scan a barcode” or “Enter a provided key” option, depending on how the account’s two-factor authentication is set up.
4. If you select “Scan a barcode,” point your iPhone’s camera at the QR code provided by the service you are setting up, allowing Google Authenticator to scan and add the account automatically.
5. If you choose “Enter a provided key,” manually enter the account name and the secret key provided by the service, and then tap “Add” to complete the process.
6. Once the account is added, a six-digit verification code will be generated in the Google Authenticator app for that specific account.
7. Repeat the process for each account you want to add to Google Authenticator, ensuring that you keep track of which code corresponds to which account.
By adding accounts to Google Authenticator, you bolster the security of your online accounts by requiring a time-based verification code in addition to your password, significantly reducing the risk of unauthorized access.
Troubleshooting and Tips
If you encounter issues with Google Authenticator, there are a few troubleshooting steps you can take to resolve them. First, ensure that the app is updated to the latest version. This can often resolve compatibility issues and bugs that may be causing problems.
Another common issue is the time settings on your device being out of sync. Google Authenticator relies on accurate time to generate codes, so ensuring that your device’s time is set automatically or manually to the correct time zone can resolve many authentication issues.
If you’re still experiencing problems, you may need to reset the app by removing and re-adding your accounts. Before doing this, make sure you have backup codes or alternative methods of authentication available, as removing accounts will require you to set them up again.
When adding accounts, double-check that the information you enter is accurate. Mistyped or incomplete information can lead to authentication failures. Additionally, consider enabling the manual entry feature for accounts that do not offer QR code setup, as this can help avoid input errors.
For added security, consider enabling two-factor authentication on your Google account. This provides an extra layer of protection and can help prevent unauthorized access to your accounts, even if your Google Authenticator codes are compromised.
Lastly, if you’re still experiencing issues, reach out to Google’s support for further assistance. They may be able to provide specific troubleshooting steps or identify any known issues that could be affecting the app’s performance.
Conclusion
Setting up manual entry on Google Authenticator on your iPhone 10 is a straightforward process that enhances the security of your accounts and sensitive information. By following the steps outlined in this guide, you can ensure that your accounts are well-protected from unauthorized access. Additionally, using two-factor authentication adds an extra layer of security, giving you peace of mind when accessing your online accounts. With the convenience and security that Google Authenticator provides, you can confidently navigate the digital landscape, knowing that your information is safe and secure.
FAQs
**Q: What is Google Authenticator?**
A: Google Authenticator is a mobile app that provides an additional layer of security for your online accounts by generating unique verification codes.
Q: How do I set up manual entry on Google Authenticator on iPhone 10?
A: To set up manual entry on Google Authenticator on iPhone 10, you can follow the steps outlined in the article above.
Q: Can I use Google Authenticator for multiple accounts?
A: Yes, Google Authenticator supports multiple accounts across various websites and services.
Q: Is Google Authenticator available for other devices besides iPhone 10?
A: Yes, Google Authenticator is available for both Android and iOS devices, including the iPhone 10.
Q: What should I do if I lose access to my Google Authenticator app?
A: If you lose access to your Google Authenticator app, you should immediately contact the support team of the affected accounts to regain access and set up alternative verification methods.