
Are you looking to transfer your Google Authenticator account to a new iPhone? Whether you have just upgraded to the latest iPhone, lost your old device, or simply want to keep your accounts secure, transferring your Google Authenticator account can be a simple process. Google Authenticator adds an extra layer of security to your online accounts by providing a time-based one-time password (TOTP). By moving your Google Authenticator account to your new iPhone, you can continue to protect your accounts and ensure a seamless transition between devices. In this article, we will guide you through the step-by-step process of transferring your Google Authenticator account to a new iPhone, ensuring that your accounts remain secure and accessible.
Inside This Article
- Overview
- Step 1: Backing up Authenticator Codes
- Step 2: Setting up Authenticator on New iPhone
- Step 3: Transferring Google Authenticator Account
- Step 4: Removing Google Authenticator from Old iPhone
- Conclusion
- FAQs
Overview
Transferring your Google Authenticator account to a new iPhone can seem like a daunting task, but it doesn’t have to be. If you’re planning to switch to a new iPhone or have recently upgraded, it’s essential to ensure that all your important accounts, including Google Authenticator, are seamlessly transferred.
In this article, we’ll guide you through the process of transferring your Google Authenticator account to a new iPhone. We’ll cover the steps you need to take to back up your authenticator codes, set up the authenticator app on your new iPhone, and transfer your Google Authenticator account from the old device. Finally, we’ll also show you how to remove Google Authenticator from your old iPhone to maintain account security.
By following these simple steps, you’ll be able to smoothly transition your Google Authenticator account to your new iPhone, ensuring that you don’t lose access to your important accounts and keeping your data secure.
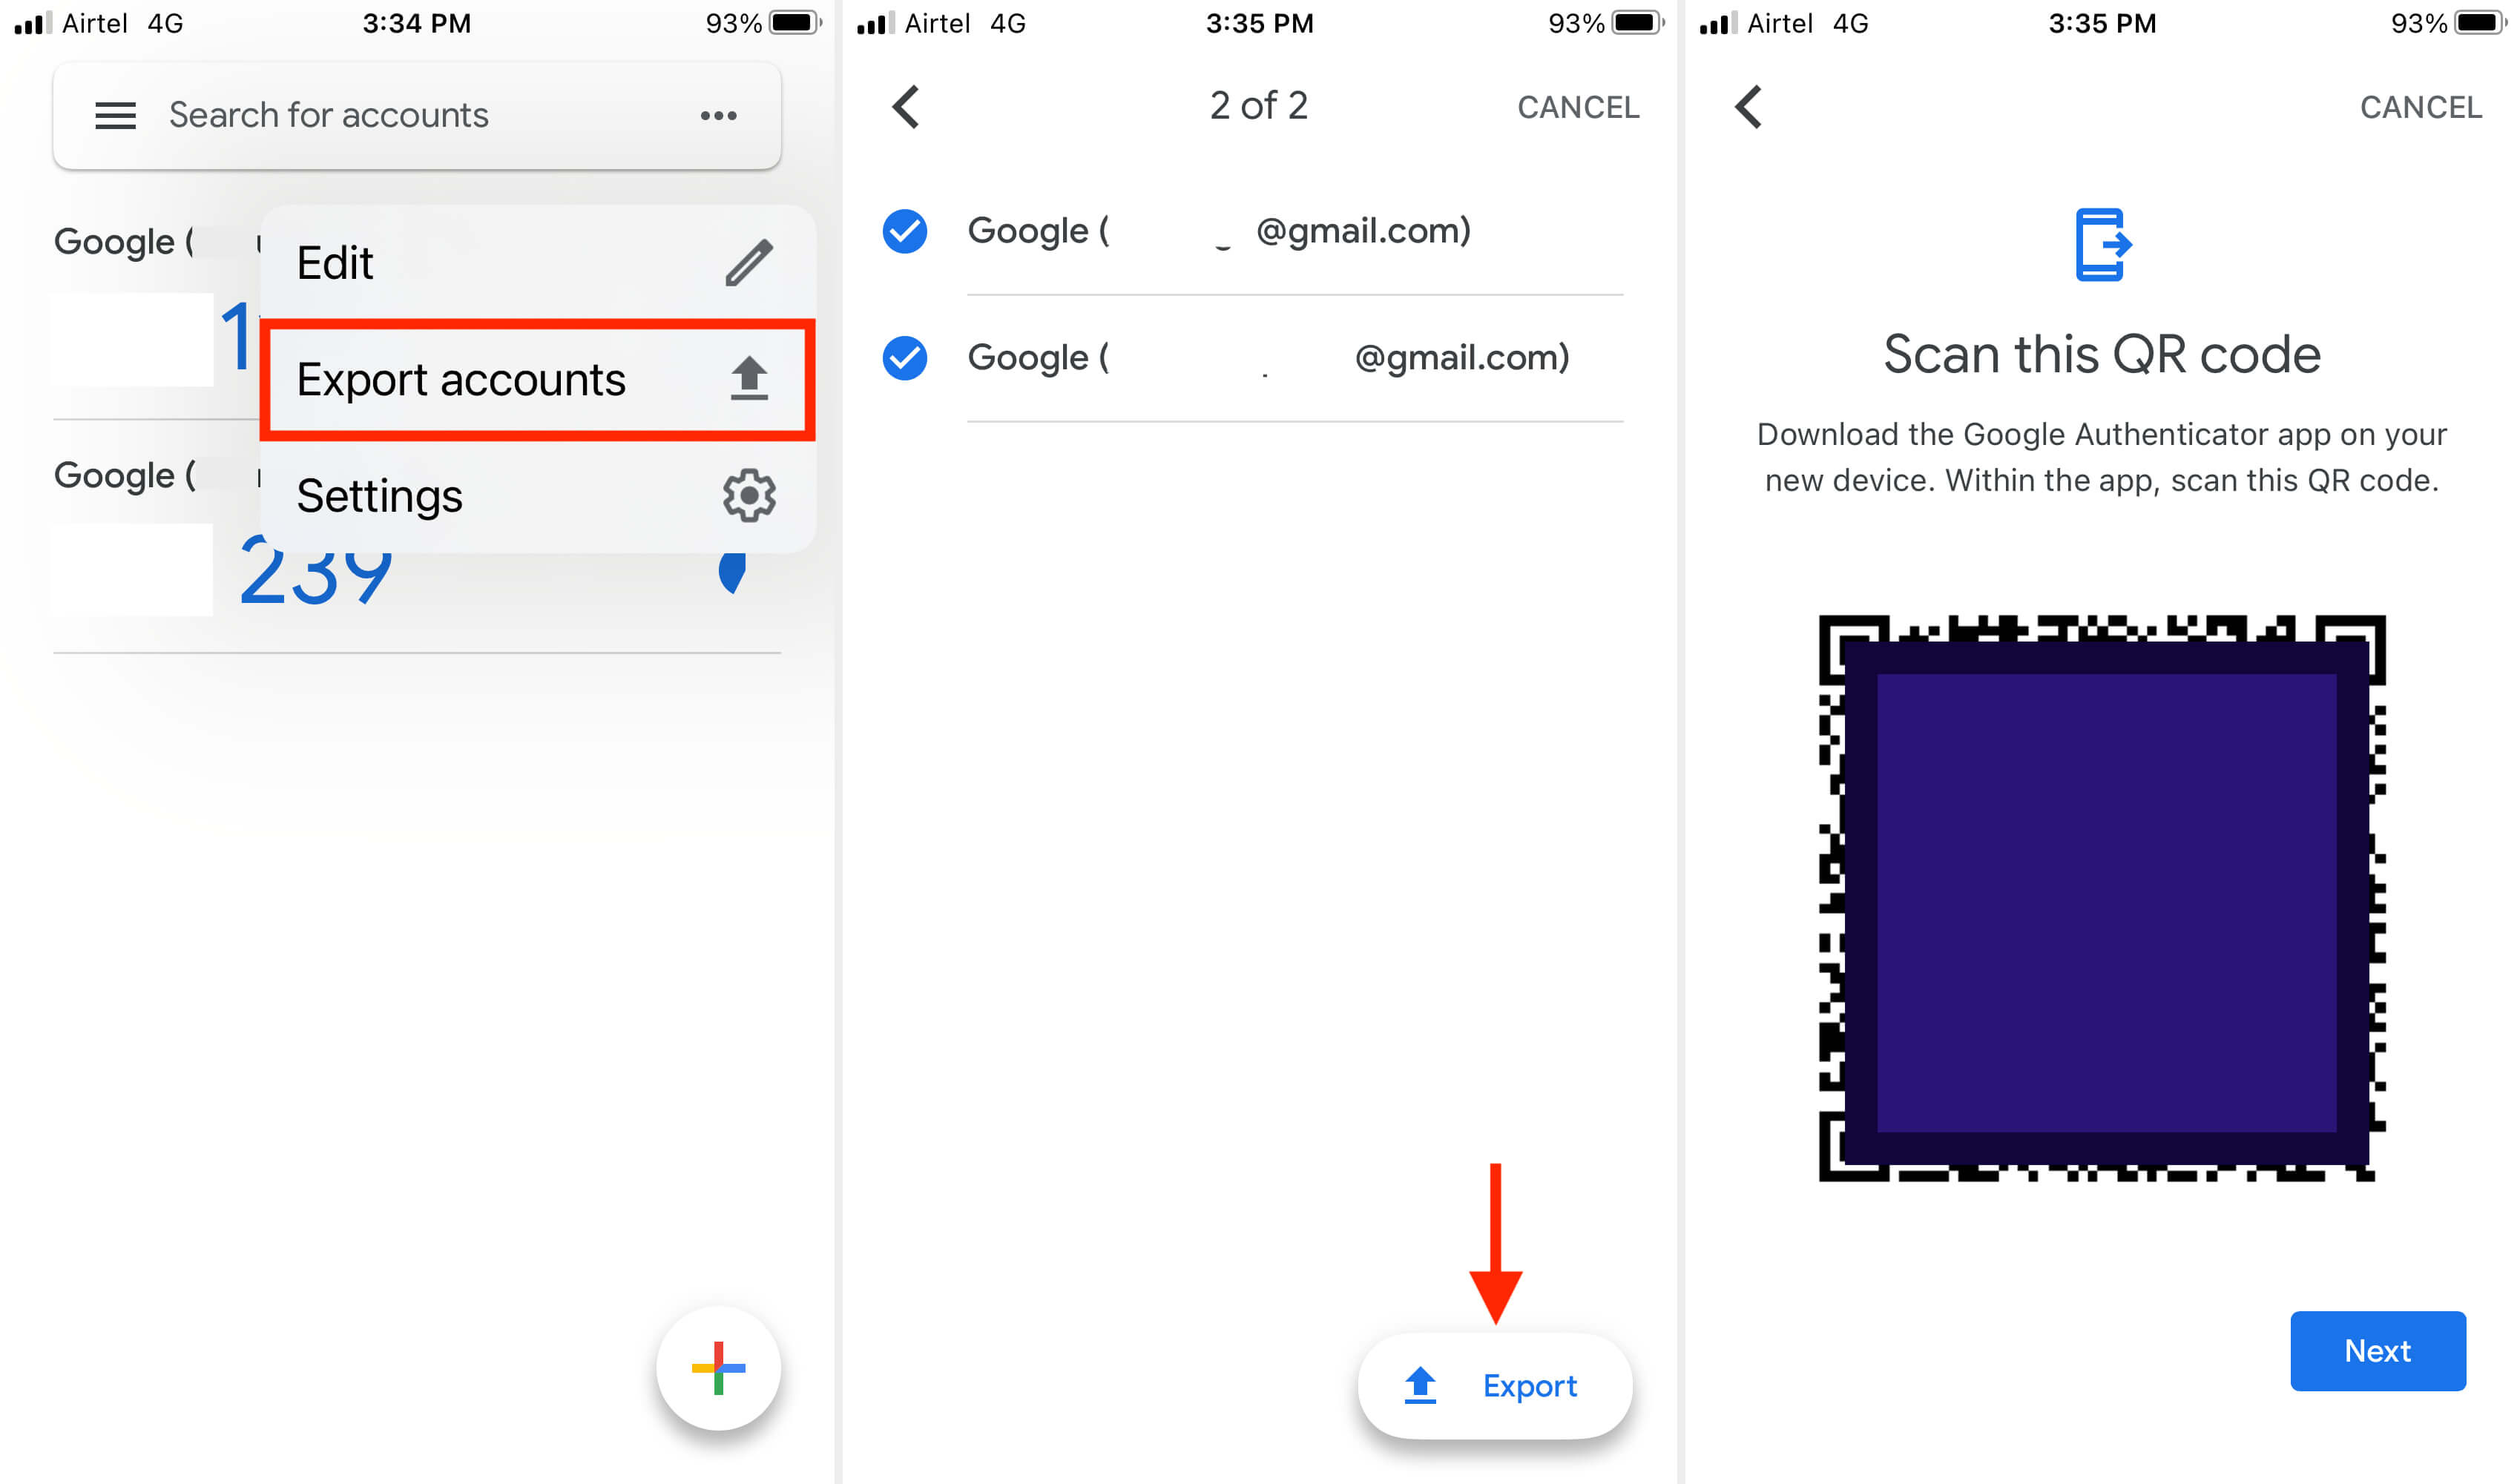
Step 1: Backing up Authenticator Codes
When transferring your Google Authenticator account to a new iPhone, it is crucial to back up your authenticator codes to avoid losing access to your accounts. Follow these steps to ensure a smooth transition:
1. Open the Google Authenticator app on your current iPhone.
2. Tap on the three-dotted menu icon located in the top-right corner of the screen.
3. From the menu options, select “Settings.”
4. Tap on “Transfer accounts” and then choose “Export accounts.”
5. You will be prompted to enter your phone’s passcode or use Touch ID/Face ID for verification.
6. Next, you will see a list of accounts associated with your Google Authenticator. Toggle the switch next to each account to select them for export.
7. Once you have selected the accounts you want to back up, tap on “Next.”
8. You will be presented with two backup options: using the cloud or a QR code. Choose your preferred method.
9. If you select the cloud backup option, sign in to your Google account to store the backup securely.
10. If you choose the QR code option, a QR code will be generated. Take a screenshot or save the QR code image to your device.
11. Ensure that you save the backup file or QR code in a safe and accessible location, such as your iCloud or Google Drive account.
By following these steps, you will have successfully backed up your Google Authenticator account codes, ensuring that they can be easily transferred to your new iPhone. This backup will allow you to restore your accounts without the need to reconfigure each one individually.
Step 2: Setting up Authenticator on New iPhone
Once you have transferred your Google Authenticator account to your new iPhone, the next step is to set up the Authenticator app on your device. Follow the steps below to get started:
1. Go to the App Store on your new iPhone and search for “Google Authenticator”. Tap on the “Get” button to download and install the app.
2. Once the app is installed, open it from your home screen. You will be prompted to grant the app permission to access your camera, which is necessary for scanning QR codes.
3. Tap on the “Begin Setup” button to start setting up Google Authenticator on your iPhone.
4. On the next screen, you will have two options: “Scan a QR code” or “Enter a provided key”. If you have a QR code from your previous transfer, proceed to scan it by tapping on the “Scan a QR code” option. Otherwise, tap on the “Enter a provided key” option and manually enter the account details.
5. If you choose to scan a QR code, position your new iPhone camera in front of the QR code displayed on your computer or previous device. The app will automatically capture the code and add the account to your Authenticator app.
6. If you select the “Enter a provided key” option, type in the account name and the key provided by the website or service you are setting up for two-factor authentication. Tap on the “Add” button to save the account.
7. Once you have added an account, it will appear in the Authenticator app with a unique icon and the corresponding account name. You can repeat the previous steps to add more accounts to the app if needed.
8. To generate a verification code, simply tap on the account icon in the app. The code will appear and automatically refresh every 30 seconds.
Once you have set up Google Authenticator on your new iPhone, you can now use it to generate verification codes for all your accounts that support two-factor authentication. Remember to keep your new device secure and be cautious when granting permissions to any third-party apps.
Step 3: Transferring Google Authenticator Account
Transferring your Google Authenticator account to a new iPhone is a straightforward process. However, it requires a careful approach to ensure that you don’t lose access to your accounts. Here are the steps you need to follow:
1. Install Google Authenticator on the new iPhone: Go to the App Store on your new iPhone and download the Google Authenticator app. Once installed, open the app to begin the setup process.
2. Sign in to your Google Account: Launch the Google Authenticator app and sign in with your Google Account credentials. This is the same account that you used for your authenticator app on your old iPhone.
3. Verify your identity: Google will require you to verify your identity to ensure the security of your account. Follow the prompts and provide the necessary information to complete the verification process.
4. Import the accounts to the new iPhone: Once you have successfully signed in and verified your identity, you will be prompted to import your accounts. Select the option to import accounts from an existing device or app.
5. Choose the transfer method: Google offers multiple methods to transfer your accounts, including scanning a QR code or entering the secret key manually. Choose the method that suits you best.
6. Transfer the accounts: If you choose to scan a QR code, position the camera of your new iPhone in front of the QR code displayed on your old iPhone. Alternatively, if you choose to enter the secret key manually, carefully enter the code provided on your old device.
7. Verify and test the accounts: After transferring the accounts, it is crucial to verify that they work correctly on your new iPhone. Open each account and perform a test login to ensure that the codes are generating correctly.
8. Remove Google Authenticator from your old iPhone: Once you have successfully transferred and verified all your accounts on your new iPhone, it’s essential to remove Google Authenticator from your old iPhone to avoid any confusion or potential security risks.
By following these steps, you can seamlessly transfer your Google Authenticator account to your new iPhone and gain access to all your accounts securely. Remember to double-check your accounts to ensure their smooth functioning on the new device.
Step 4: Removing Google Authenticator from Old iPhone
Once you have successfully transferred your Google Authenticator account to your new iPhone, it is essential to remove the app from your old device. This step ensures that there is no confusion or overlap in generating verification codes and prevents any potential security risks or unauthorized access to your accounts.
Here’s how you can remove Google Authenticator from your old iPhone:
- Open the Settings app on your old iPhone.
- Scroll down and tap on “General”.
- Tap on “iPhone Storage”.
- Scroll down and look for “Google Authenticator” in the list of apps.
- Tap on “Google Authenticator” to open the app settings.
- Tap on “Delete App” and confirm the action when prompted.
By following these steps, you will successfully remove Google Authenticator from your old iPhone, ensuring a seamless and secure transition to your new device.
Conclusion
Transferring your Google Authenticator account to a new iPhone may seem like a daunting task, but with the right steps and guidance, it can be done smoothly. By following the methods outlined in this article, you can ensure that your account and its associated codes are securely transferred to your new device.
Remember to carefully back up your accounts before starting the transfer process. Whether you choose to use the iCloud sync method or the manual method through QR codes, make sure to double-check that all your accounts have been successfully migrated.
With the added security and peace of mind that Google Authenticator provides, it is essential to keep your accounts protected during the transition to a new device. By applying the techniques outlined in this article, you can seamlessly transfer your Google Authenticator account to a new iPhone and continue using it without any interruptions.
FAQs
1. Why would I need to transfer my Google Authenticator account to a new iPhone?
Answer: There are several reasons why you might need to transfer your Google Authenticator account to a new iPhone. You may have upgraded to a new iPhone model, or your old iPhone might have been lost, stolen, or damaged. In these situations, transferring your Google Authenticator account helps you regain access to your accounts and ensure the security of your online services.
2. Can I transfer my Google Authenticator account data directly from my old iPhone to my new one?
Answer: Unfortunately, transferring your Google Authenticator account data directly from one iPhone to another is not currently supported. However, there is a workaround that involves manually reconfiguring your Google Authenticator accounts on the new iPhone. This process requires a few extra steps but is relatively straightforward.
3. How do I transfer my Google Authenticator account to a new iPhone?
Answer: To transfer your Google Authenticator account to a new iPhone, you will first need to disable two-factor authentication for your accounts that rely on Google Authenticator. Next, you will need to set up two-factor authentication again on your new iPhone and reconfigure your accounts in the Google Authenticator app. This process involves scanning QR codes or entering the provided secret key for each account.
4. Do I need to contact each service individually to transfer my Google Authenticator accounts?
Answer: Yes, you will need to access the settings of each service that uses Google Authenticator for two-factor authentication and disable and re-enable the feature. This is necessary to ensure the QR codes or secret keys can be scanned or entered into the Google Authenticator app on your new iPhone.
5. Are there any alternative apps I can use to transfer my Google Authenticator accounts to a new iPhone?
Answer: Yes, there are alternative apps available that can help you transfer your Google Authenticator accounts to a new iPhone. One popular option is the Authy app, which provides a smooth process for backing up and syncing your two-factor authentication accounts across multiple devices. By using Authy, you can easily transfer your Google Authenticator accounts to your new iPhone without the need to manually reconfigure each account.