
Are you concerned about your privacy and want to delete your location and search history on your iPhone in Google Maps and Apple Maps? You’re in the right place! In today’s digital age, it’s important to be mindful of the information we share and take necessary steps to protect our privacy.
Both Google Maps and Apple Maps store your location and search history to provide personalized recommendations and improve their services. However, if you want to clear this data and start fresh, we’ve got you covered. In this article, we will guide you through the steps to delete your location and search history on your iPhone for both Google Maps and Apple Maps. By the end, you’ll have a clean slate and peace of mind knowing that your past locations and searches are no longer stored.
Inside This Article
- How to Delete Location & Search History on iPhone in Google Maps
- How to Delete Location & Search History on iPhone in Apple Maps
- Benefits of Deleting Location & Search History on iPhone
- Additional Tips for Privacy and Data Management on iPhone
- Conclusion
- FAQs
How to Delete Location & Search History on iPhone in Google Maps
If you use Google Maps on your iPhone, you may be aware that it tracks and saves your location and search history. While this can be convenient for accessing previous searches and recommendations, you might also prefer to maintain your privacy and delete this information from time to time. In this guide, we will walk you through the steps to delete your location and search history on iPhone in Google Maps.
To get started, open the Google Maps app on your iPhone. If you haven’t already, make sure you’re signed in to your Google account linked to the app. Once you’re signed in, follow the steps below to delete your location and search history:
- Tap on the menu icon, which is indicated by three horizontal lines, located in the top left corner of the screen.
- Scroll down and select “Settings.”
- Under the “Personal content” section, tap on “Maps history.”
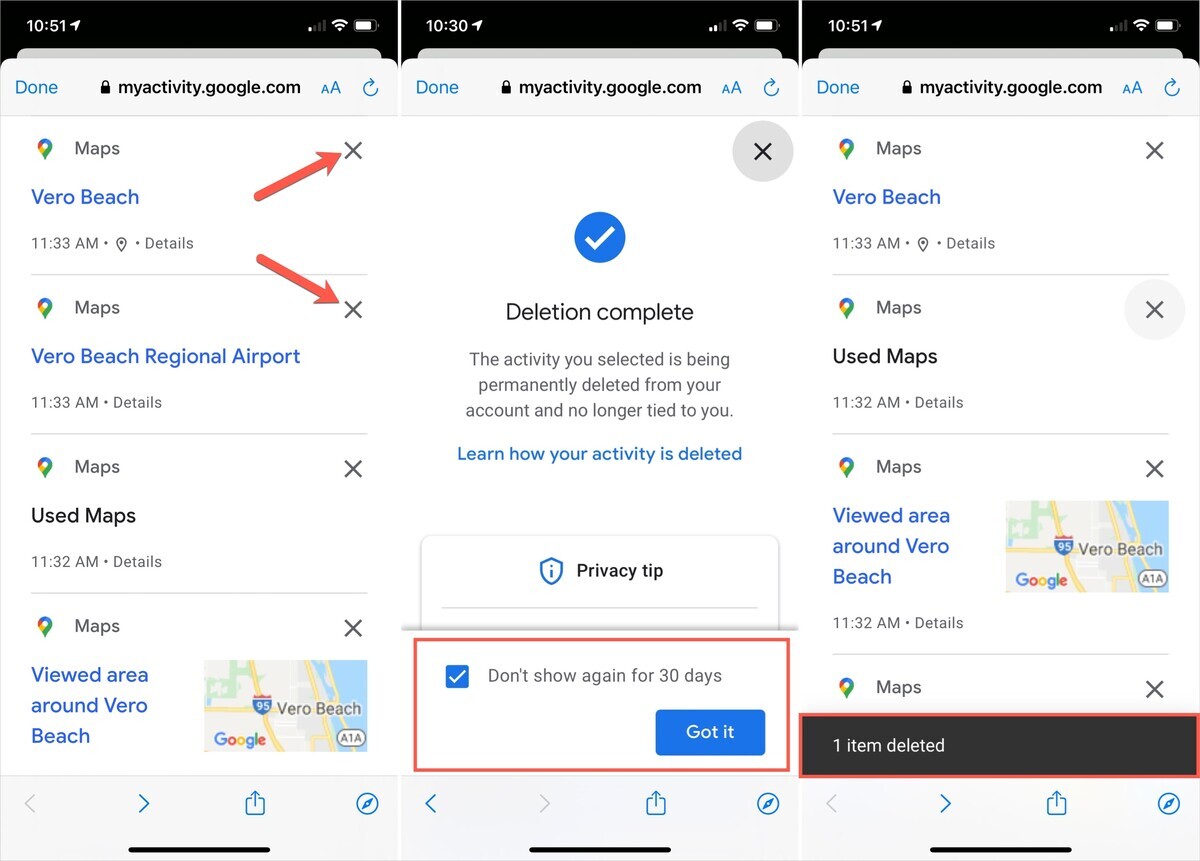
- You will now see a list of your recent searches and locations. To delete individual items, swipe left on the entry and tap on the trash can icon. Alternatively, you can tap on “X” next to each entry to remove it.
- If you want to delete your entire history, tap on the “Delete all” button at the bottom of the screen. Confirm your selection when prompted.
That’s it! Your location and search history in Google Maps on your iPhone will now be deleted. It’s important to note that deleting your history is irreversible, so make sure you’re certain before proceeding.
By regularly deleting your location and search history, you can enhance your privacy and minimize the amount of personal data stored on your iPhone. This can be especially useful if you share your device with others or simply prefer to keep your search habits confidential.
Now that you know how to delete your location and search history in Google Maps on your iPhone, you can take control of your data and enjoy a more private browsing experience.
How to Delete Location & Search History on iPhone in Apple Maps
Apple Maps is a popular navigation app used by millions of iPhone users worldwide. One important aspect of maintaining your privacy is regularly deleting your location and search history from Apple Maps. By doing so, you can ensure that your personal information remains secure and your browsing habits are kept confidential. In this article, we will guide you through the simple steps of deleting location and search history on your iPhone in Apple Maps.
Follow these easy steps to delete your location and search history on iPhone in Apple Maps:
- Open the Apple Maps app on your iPhone.
- Tap on the search bar at the top of the screen.
- Scroll down to find and tap on “Recents.”
- Here, you will see a list of your recent locations and searches.
- To delete a specific location or search, swipe left on the entry and tap on “Delete.”
- If you want to clear your entire history, tap on “Clear” at the bottom right corner of the screen.
- You will be prompted to confirm the action. Tap on “Clear All Recents” to delete all history.
By following these steps, you can easily delete your location and search history in Apple Maps on your iPhone. It’s important to note that deleting your history will not affect your Maps app’s functionality. You will still be able to use the app to access directions and search for new locations.
Now that you know how to delete your location and search history on iPhone in Apple Maps, you can take control of your privacy and keep your browsing habits private. Regularly deleting your history is a good habit to adopt, as it helps maintain the security of your personal information. Don’t forget to also follow additional privacy tips for a more secure and private browsing experience on your iPhone.
Benefits of Deleting Location & Search History on iPhone
Deleting location and search history on your iPhone can offer several benefits. Here are some key advantages:
1. Enhanced Privacy: By deleting your location and search history, you can protect your privacy and prevent unauthorized access to your personal information. This is especially important if you frequently use location-based services or share your device with others.
2. Improved Security: Deleting your location and search history can help prevent potential security breaches. It minimizes the risk of your sensitive information falling into the wrong hands, reducing the chances of identity theft or unauthorized tracking.
3. More accurate recommendations: Deleting your location and search history helps ensure that the recommendations you receive from apps and services are based on your current preferences and requirements. It allows you to start with a clean slate, making the suggestions more relevant and tailored to your needs.
4. Efficient storage utilization: Over time, your location and search history can take up a significant amount of storage space on your iPhone. By regularly deleting this data, you free up storage capacity, allowing your device to run more smoothly and store other important files and media.
5. A fresh start: Deleting your location and search history can give you a fresh start and a sense of control over your digital footprint. It’s a way to clear out any unnecessary clutter and ensure that your iPhone reflects your current usage patterns and preferences.
6. Customized browsing experience: Deleting your location and search history enables you to enjoy a more personalized browsing experience. It allows you to start anew, ensuring that the content and recommendations you encounter are based on your current interests and preferences.
Overall, deleting your location and search history on your iPhone not only enhances your privacy and security, but also improves the efficiency and accuracy of your device’s recommendations. It offers a fresh start and allows you to customize your browsing experience to better align with your current needs and interests.
Additional Tips for Privacy and Data Management on iPhone
Managing privacy and data on your iPhone is crucial to protect your personal information and maintain control over your device. Here are some additional tips to help you safeguard your privacy and effectively manage your data:
1. Update your software regularly: Apple releases regular software updates that contain important security patches and bug fixes. By keeping your iPhone software updated, you ensure that you have the latest security measures in place.
2. Use strong and unique passcodes: Set a strong passcode for your iPhone, using a combination of numbers, letters, and symbols. Avoid using easily guessable passcodes like your birthday or sequential numbers. Additionally, enable the “Erase Data” feature, which automatically erases all data on your phone after ten unsuccessful passcode attempts.
3. Enable two-factor authentication: Two-factor authentication adds an extra layer of security to your Apple ID and other accounts linked to your iPhone. It requires you to verify your identity by entering a code sent to your trusted device or phone number, making it more difficult for unauthorized access.
4. Limit app permissions: Review and manage the permissions granted to apps on your iPhone. Consider whether each app really needs access to your location, photos, contacts, or microphone. Disable unnecessary permissions to minimize the risk of data misuse.
5. Be cautious of public Wi-Fi networks: Public Wi-Fi networks can be a breeding ground for hackers and potential data breaches. Avoid connecting to unsecured networks or use a Virtual Private Network (VPN) to encrypt your internet connection and protect your data when using public Wi-Fi.
6. Regularly backup your data: Use iCloud or iTunes to regularly backup your iPhone data. This ensures that if your device is lost, stolen, or damaged, you can restore your data onto a new device without losing important information.
7. Clear app caches: Some apps store temporary data in the form of caches, which can take up valuable storage space and potentially contain sensitive information. Periodically clear app caches to free up storage and remove any stored data you no longer need.
8. Review app privacy policies: Take the time to read and understand the privacy policies of the apps you use. Ensure that you are comfortable with how the app collects, stores, and uses your data. If you have concerns, consider using alternative apps that prioritize privacy.
9. Use a reputable antivirus and security app: Install a trusted antivirus and security app from the App Store to provide an additional layer of protection against malware, phishing attempts, and other cybersecurity threats.
10. Educate yourself on privacy best practices: Stay informed about the latest privacy and data management best practices. Familiarize yourself with common scams, phishing techniques, and other online threats to avoid falling victim to them.
By following these additional tips, you can maximize the privacy and security of your iPhone, ensuring that your personal information remains safe and protected.
Conclusion
Keeping your location and search history private is essential in today’s digital age. Whether you use Google Maps or Apple Maps, both platforms store a record of your location data and search queries. However, with a few simple steps, you can easily delete this information and protect your privacy.
In this article, we have covered the process of deleting location and search history on your iPhone for both Google Maps and Apple Maps. It’s important to note that regularly clearing your history not only safeguards your personal information but also ensures better performance and accuracy from these mapping applications.
Now that you are equipped with the knowledge of how to delete location and search history, you can take control of your privacy while enjoying the convenience of these powerful navigation tools. So, go ahead and follow the steps outlined in this guide to keep your mapping experience private and secure.
FAQs
1. How do I delete location and search history on my iPhone in Google Maps?
To delete location and search history on iPhone in Google Maps, follow these steps:
– Open the Google Maps app on your iPhone.
– Tap on your profile picture or initials in the top right corner.
– Select “Settings” from the dropdown menu.
– Tap on “Maps history”.
– You will see a list of your recent searches and visited places. Swipe left on any entry to delete it.
– To delete all of your history, tap on “Delete all” at the bottom of the screen.
– Confirm the deletion by selecting “Delete” in the popup.
2. How can I delete location and search history on my iPhone in Apple Maps?
To delete location and search history on iPhone in Apple Maps, follow these steps:
– Open the Apple Maps app on your iPhone.
– Tap on the search bar at the top of the screen.
– You will see a list of your recent searches and visited places. Swipe left on any entry to delete it.
– To delete all of your history, tap on “Clear” at the top right corner of the screen.
– Confirm the deletion by selecting “Clear All Recents” in the popup.
3. Will deleting my location and search history in Google Maps or Apple Maps affect my app’s performance?
No, deleting your location and search history in Google Maps or Apple Maps will not affect the performance of the app. It will only remove the stored data related to your searches and visited places, making it a cleaner and more private experience.
4. Is it necessary to delete my location and search history on my iPhone?
Deleting your location and search history on your iPhone is not necessary, but it can be beneficial for privacy reasons. By deleting this data, you can prevent others from accessing your search and location information. It also allows you to start fresh with a clean history if desired.
5. Can I recover my deleted location and search history on my iPhone?
Once you delete your location and search history on your iPhone in Google Maps or Apple Maps, it cannot be recovered. It is permanently removed from your device and cannot be restored. Therefore, it is important to make sure you want to delete the information before confirming the deletion.