
Have you ever wondered how to capture professional-quality photos with your iPhone 13 Pro? Well, there’s a hidden feature that can take your photography skills to the next level – shooting in RAW format. While the iPhone camera app usually captures images in JPEG, shooting in RAW gives you more control over the final result. RAW files contain all the data captured by the camera sensor, allowing for greater flexibility in post-processing.
In this article, we will guide you through the process of shooting in RAW on your iPhone 13 Pro. We’ll explain what RAW is, how to enable it on your device, and provide tips on how to harness its potential to enhance your mobile photography. So, get ready to unlock the full power of your iPhone camera and capture stunning images like a pro!
Inside This Article
- Overview of Shooting RAW on iPhone 13 Pro
- Step-by-Step Guide to Enable RAW Capture
- Understanding the Benefits of Shooting RAW
- Recommended Editing Apps for Processing RAW Images
- Conclusion
- FAQs
Overview of Shooting RAW on iPhone 13 Pro
If you’re a photography enthusiast, you’ll be pleased to know that the iPhone 13 Pro allows you to capture images in RAW format. RAW files contain unprocessed image data straight from the camera’s sensor, giving you greater control and flexibility during post-processing.
Unlike JPEG files, which are compressed and processed in-camera, RAW files retain all the details captured by the sensor, providing a higher level of image quality. This means that you can make adjustments to exposure, white balance, and other settings without sacrificing image integrity.
The iPhone 13 Pro’s advanced camera system, equipped with the A15 Bionic chip and the ProRAW feature, takes RAW photography to the next level. The improved sensor and image signal processor work together to capture stunning levels of detail, dynamic range, and color accuracy in each shot.
Shooting in RAW also allows you to harness the power of professional photo editing apps. With RAW files, you have the ability to fine-tune every aspect of your image, from adjusting highlights and shadows to enhancing fine details. This level of control empowers you to unleash your creativity and achieve the precise look you envision.
It’s important to note that shooting in RAW does require more storage space compared to JPEG. Since RAW files are larger, you might need to keep an eye on your storage capacity, especially if you take a significant number of photos. Consider using cloud storage or transferring your files to a computer regularly to free up space.
Overall, shooting RAW on the iPhone 13 Pro opens up a world of possibilities for photographers who want to push their creativity to new heights. With the unprecedented image quality and editing flexibility, you can capture and create stunning photographs that truly reflect your artistic vision.
Step-by-Step Guide to Enable RAW Capture
If you’re an avid iPhone photographer, you may already be familiar with shooting in JPEG format. However, if you want to take your photography to the next level and have more control over your images, shooting in RAW format is the way to go. RAW files contain unprocessed data straight from the camera’s sensor, allowing you to make comprehensive adjustments during post-processing.
Enabling RAW capture on your iPhone 13 Pro is a straightforward process. Just follow these simple steps:
- Open the Camera app on your iPhone 13 Pro.
- Tap on the “Settings” icon, which is located at the top right corner of the screen.
- Scroll down and find the “Formats” option. Tap on it to continue.
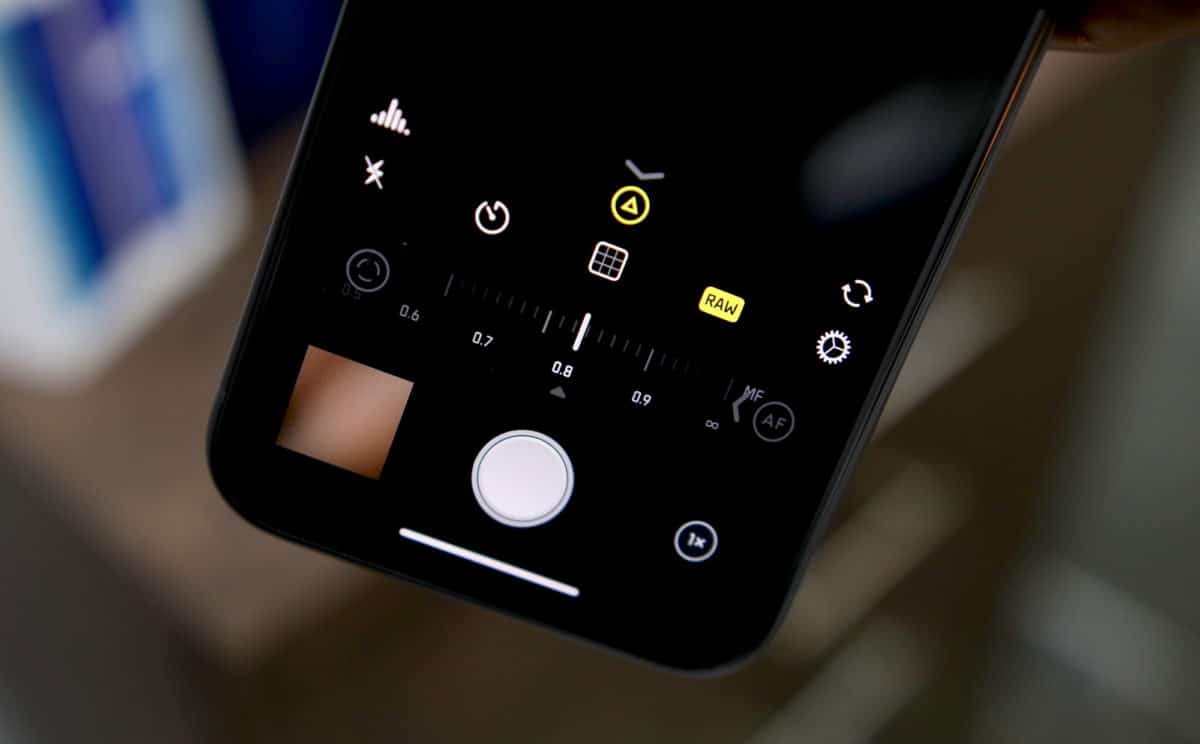
- Under the “Camera Capture” section, you’ll find two options: “High Efficiency” and “Most Compatible”. By default, the “High Efficiency” option is selected, which uses HEIF and HEVC formats. To enable RAW capture, choose the “Most Compatible” option.
- Exit the Settings menu and go back to the Camera app.
- Now, when you select the “RAW” shooting mode in the Camera app, your iPhone 13 Pro will capture images in RAW format.
That’s it! You’ve successfully enabled RAW capture on your iPhone 13 Pro. Now, you can enjoy the flexibility and creative possibilities that shooting in RAW format provides.
Understanding the Benefits of Shooting RAW
When it comes to photography, capturing images in RAW format has become a popular choice among professionals and enthusiasts alike. But what exactly is RAW, and why is it worth considering when shooting with your iPhone 13 Pro?
RAW files are essentially uncompressed image files that capture all of the data recorded by the camera’s sensor. Unlike JPEG files, which apply compression and in-camera processing, RAW files preserve more detailed information, providing greater flexibility for post-processing.
One of the primary advantages of shooting RAW is the ability to have more control over the final image. RAW files offer a wider dynamic range, capturing more details in both the highlights and shadows. This flexibility allows you to experiment with exposure adjustments, recover blown-out highlights, or bring out shadow details without sacrificing image quality.
In addition to dynamic range, RAW files also retain more color information. With JPEG files, the camera applies color processing and compression, which can lead to loss of color accuracy and subtle nuances. Shooting in RAW allows you to have better control over white balance, saturation, and color grading during the editing process.
Another benefit of shooting RAW is the ability to recover fine details in the image. The additional data captured by the sensor in RAW format provides more room for editing, allowing you to enhance sharpness, reduce noise, and apply local adjustments without degrading image quality.
Furthermore, shooting in RAW format gives you the opportunity to experiment with different creative looks and styles. Since RAW files are unprocessed, you have the freedom to apply your own artistic vision during post-processing, adjusting contrast, saturation, and other parameters to create unique and personalized images.
It’s worth noting that shooting in RAW does require more storage space compared to JPEG files. RAW files typically have larger file sizes due to the amount of data they retain. To ensure you have enough storage capacity, it’s advisable to regularly back up your photos and consider using cloud storage or external devices.
Recommended Editing Apps for Processing RAW Images
If you have taken the leap into shooting in RAW on your iPhone 13 Pro, you’ll need powerful editing apps to make the most of your RAW files. These apps offer advanced editing capabilities and allow you to unleash the full potential of your iPhone’s camera. Here are some recommended editing apps that can help you process RAW images:
1. Adobe Lightroom: As one of the most popular photo editing apps, Adobe Lightroom offers extensive RAW editing features. It allows you to adjust exposure, contrast, white balance, and fine-tune colors, shadows, and highlights. With its non-destructive editing capabilities, you can experiment with different edits and easily revert to the original photo if needed.
2. Snapseed: Developed by Google, Snapseed is a powerful photo editing app that supports RAW file editing. It offers a wide range of tools, including selective adjustments, curves, and healing brush, giving you precise control over the editing process. The app also features a user-friendly interface, making it suitable for both beginners and advanced users.
3. Darkroom: Known for its intuitive interface and professional-grade editing tools, Darkroom is a top choice for RAW photo editing. It provides advanced adjustments for exposure, color, and tone, allowing you to create stunning images. The app also offers batch editing, which is a time-saving feature when you need to edit multiple RAW photos simultaneously.
4. ProCamera: Designed specifically for professional-level photography, ProCamera offers comprehensive tools for editing RAW images on your iPhone 13 Pro. Its editing features include exposure adjustment, color grading, selective coloring, and perspective correction. The app also allows you to shoot in RAW directly from its interface, making it a convenient all-in-one solution for capturing and editing RAW photos.
5. VSCO: Known for its minimalist interface and film-inspired presets, VSCO is a popular choice for many photographers. While primarily known for its preset filters, VSCO also supports RAW editing, allowing you to make adjustments to exposure, contrast, and color temperature. The app offers a wide range of editing tools and provides a community for photographers to share their work.
When choosing an editing app for processing your RAW images, consider the features, ease of use, and compatibility with your workflow. Each of these recommended apps provides powerful editing capabilities and can help you take your RAW photos to the next level.
Conclusion
In conclusion, shooting RAW on the iPhone 13 Pro is a game-changer for mobile photography enthusiasts. The ability to capture and edit images in a lossless format provides unparalleled flexibility and control over the final result. The improved camera hardware and advanced image processing algorithms of the iPhone 13 Pro further enhance the RAW photography experience, delivering stunningly detailed and dynamic images.
Whether you’re a professional photographer or an avid hobbyist, embracing RAW photography on the iPhone 13 Pro will take your creative capabilities to new heights. With the right editing apps and a little practice, you can unlock the full potential of your iPhone’s camera and produce professional-grade photos that rival those taken with dedicated DSLRs. So don’t be afraid to venture into the world of RAW photography and see the magic it can bring to your iPhone 13 Pro.
FAQs
1. Can you shoot RAW photos on the iPhone 13 Pro?
Yes, the iPhone 13 Pro allows you to shoot in RAW format. The ProRAW feature introduced in the iPhone 12 Pro has been further improved in the iPhone 13 Pro, offering greater control over image processing and capturing more detail and dynamic range. You can capture RAW photos using the built-in camera app or use third-party apps that support RAW capture.
2. What are the advantages of shooting in RAW?
Shooting in RAW format provides several advantages for photographers. RAW files contain unprocessed data from the camera’s sensor, capturing all the available information and allowing for more flexibility in post-processing. This means you have greater control over aspects such as exposure, white balance, and sharpness, enabling you to fine-tune the final image to your liking. RAW files also retain more detail and dynamic range compared to compressed file formats like JPEG.
3. How do you enable RAW capture on the iPhone 13 Pro?
To enable RAW capture on the iPhone 13 Pro, follow these steps:
- Open the camera app on your iPhone 13 Pro.
- Tap on the “Settings” icon that looks like a gear.
- Scroll down and find the “Formats” section.
- Under “Photos,” select “Apple ProRAW” to enable shooting in RAW format.
4. What are some recommended apps for shooting RAW on the iPhone 13 Pro?
While the built-in camera app supports RAW capture, there are several third-party apps available that offer additional features and capabilities for shooting RAW on the iPhone 13 Pro. Some popular options include Adobe Lightroom, ProCamera, Halide, and RAW Power. These apps provide advanced manual controls, RAW editing capabilities, and more flexibility in capturing and processing RAW images.
5. Can I edit RAW photos on my iPhone 13 Pro?
Yes, you can edit RAW photos directly on your iPhone 13 Pro using various editing apps. The built-in Photos app offers basic editing capabilities for RAW images, allowing you to adjust exposure, contrast, highlights, shadows, and more. Additionally, there are several third-party editing apps available, such as Adobe Lightroom, Snapseed, and Darkroom, which provide advanced editing tools specifically designed for processing RAW files.