
If you’re a frequent traveler, you know just how essential it is to have your boarding pass readily accessible. In the era of digital convenience, gone are the days of fumbling through paper documents while standing in line at the airport. With the introduction of digital wallets, such as Apple’s iPhone Wallet, managing your travel documents has become even more streamlined. In this article, we will guide you through the easy process of adding your boarding pass to your iPhone Wallet. From scanning your physical boarding pass to adding it to your digital wallet, we’ll provide you with step-by-step instructions to ensure a smooth and hassle-free travel experience. So, grab your iPhone and get ready to simplify your journey with the convenience of the iPhone Wallet.
Inside This Article
- Overview
- Step 1: Open the Wallet App
- Step 2: Scan the Boarding Pass
- Step 3: Add the Pass to Wallet
- Step 4: Access and Use the Boarding Pass in Wallet
- Conclusion
- FAQs
Overview
In today’s digital age, smartphones have become an essential part of our daily lives. From communication and entertainment to productivity and convenience, these powerful devices have revolutionized the way we live. One area where smartphones have made a significant impact is in the field of digital wallets, which allow users to store and manage their virtual money and payment information.
One of the most popular features of digital wallets is the ability to add and store boarding passes directly on your smartphone. Gone are the days of rummaging through your bag to find a paper ticket or worrying about losing it. With just a few taps on your iPhone, you can have your boarding pass conveniently stored in your digital wallet, ready to be accessed whenever you need it.
In this article, we will discuss the various methods you can use to add a boarding pass to your iPhone wallet. Whether it’s through the airline’s app, Apple Wallet, or email, we’ve got you covered. So let’s dive in and explore these easy and convenient ways to streamline your travel experience.
Step 1: Open the Wallet App
Adding a boarding pass to your iPhone Wallet is a simple and convenient way to keep your travel documents organized and easily accessible. To start, you’ll need to open the Wallet app on your iPhone. The Wallet app comes pre-installed on all iPhones and is represented by an icon that resembles a wallet with colored cards.
Locate the Wallet app on your home screen and tap on it to open it. If you can’t find it, you can use the spotlight search by swiping down on your home screen and typing “Wallet” in the search bar. Once you find the Wallet app, tap on it to launch it.
Upon opening the Wallet app, you will be greeted with the default view, which displays any cards or passes you have already stored in your wallet. These can include items such as credit or debit cards, loyalty cards, and event tickets. To add a boarding pass, follow the next steps.
Step 2: Scan the Boarding Pass
Once you have successfully added the boarding pass to your iPhone Wallet, the next step is to scan it. Scanning the boarding pass allows you to easily access all the necessary information without the need for paper or printing.
To scan the boarding pass, follow these simple steps:
- Open your iPhone Wallet app.
- Locate and select the boarding pass you have added.
- Hold the iPhone over the barcode on the boarding pass.
- Ensure that the entire barcode is visible within the scanning frame.
- Wait for a moment while the iPhone scans the barcode.
- Once the scan is successful, your boarding pass information will be displayed on the screen.
Scanning the boarding pass is a quick and convenient way to access your flight details, gate information, and boarding time. It eliminates the need to search for the physical pass or rely on printed copies while traveling.
If you have multiple boarding passes or tickets in your Wallet, you can simply swipe left or right to switch between them. This feature is particularly useful if you have connecting flights or multiple bookings.
Remember to keep your iPhone charged and easily accessible at the airport to have a hassle-free boarding experience. With the boarding pass conveniently stored in your iPhone Wallet, you can breeze through security checkpoints and board your flight with ease.
Step 3: Add the Pass to Wallet
After you have received the boarding pass on your iPhone, the next step is to add it to your Apple Wallet. The Wallet app on your iPhone acts as a digital wallet, allowing you to store and access your boarding passes, tickets, and other important cards in one convenient location.
To add the pass to your Wallet, simply tap on the boarding pass file or link that you received. This will open up the pass on your iPhone screen. Look for the “Add to Wallet” option, which is usually located at the top or bottom of the screen. Tap on it to initiate the process.
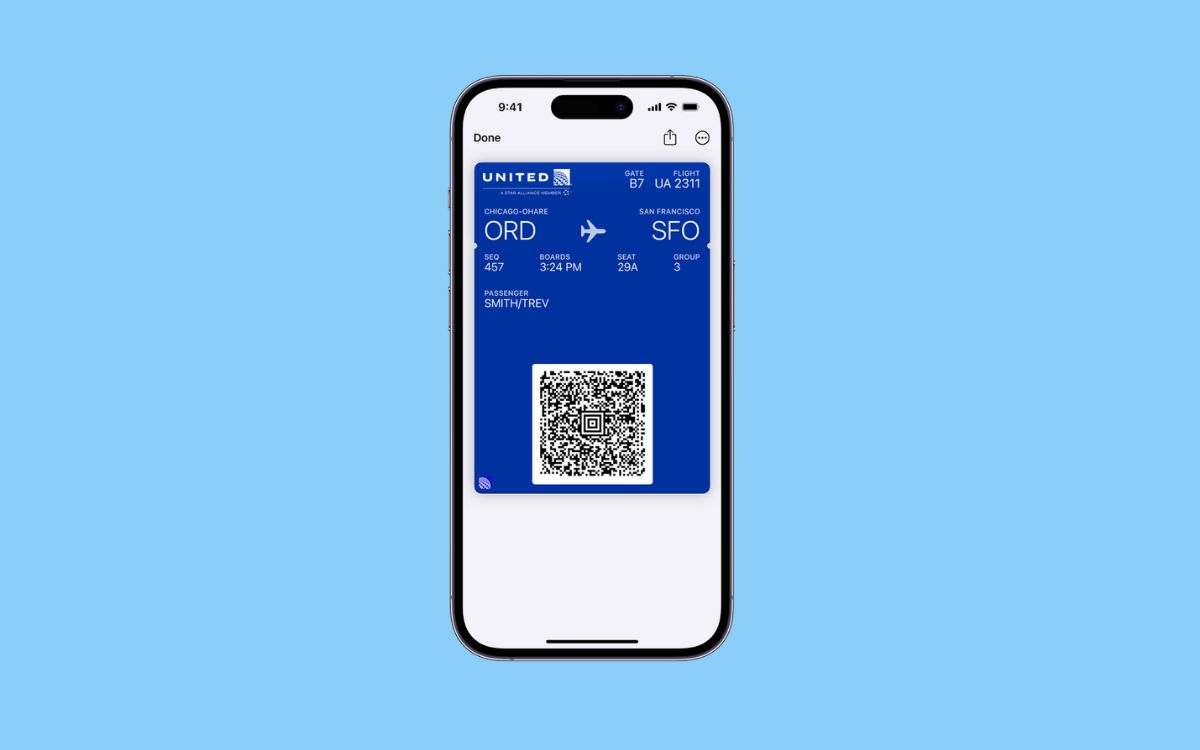
If prompted, confirm your action by entering any necessary information such as your Apple ID password or your device passcode. Once the pass is added to your Wallet, you will see it displayed with the relevant details such as the flight number, departure time, and seat information.
It is important to note that some airlines may require you to check-in prior to adding the pass to your Wallet. In such cases, follow the airline’s instructions for check-in and then proceed to add the pass to your Wallet.
Once the pass is successfully added, it will be easily accessible from your iPhone’s lock screen and the Wallet app. To access it from the lock screen, simply wake your iPhone and swipe left until you see the pass. Tap on it to view the boarding details.
If you prefer to access the pass directly from the Wallet app, locate the Wallet icon on your iPhone’s home screen and tap on it. Your boarding pass should be visible among your other stored cards. Tap on it to view the details or show it to the airline staff during the boarding process.
Adding your boarding pass to the Apple Wallet not only saves you from the hassle of carrying a physical ticket but also allows for quick and easy access to important travel information. With just a few taps, you can have your boarding pass readily available on your iPhone, making your travel experience smoother and more convenient.
Step 4: Access and Use the Boarding Pass in Wallet
Once you have successfully added your boarding pass to the Wallet app on your iPhone, accessing and using it is a breeze. Here’s how you can do it:
1. Open the Wallet app on your iPhone by tapping on the Wallet icon.
2. Scroll through the list of cards and locate your boarding pass. It should be labeled with the name of the airline or the flight number.
3. Tap on the boarding pass to open it and view the details. You will see important information such as the departure and arrival times, gate number, and seat assignment.
4. To use the boarding pass at the airport, simply hold your iPhone near the scanner or NFC reader. The scanner will read the QR code or barcode on the pass and validate your travel details.
5. If you have multiple boarding passes saved in the Wallet app, you can swipe left or right to switch between them.
6. Once you have passed through security and boarded the plane, you can still access your boarding pass from the Wallet app. This can be helpful if you need to refer to your seat number or gate information during the flight.
7. After you have reached your destination and collected your luggage, you can safely delete the boarding pass from the Wallet app. This will help declutter your digital wallet and remove any confidential travel information.
With these simple steps, you can easily access and use your boarding pass stored in the Wallet app on your iPhone. Say goodbye to paper boarding passes and enjoy the convenience of having all your travel documents in one place.
Conclusion
Adding a boarding pass to your iPhone Wallet has never been easier or more convenient. With just a few simple steps, you can have all of your travel information in one place, accessible with just a swipe and a tap. The digital wallet feature on your iPhone not only saves you time and effort but also ensures that you never have to worry about losing or misplacing your boarding pass again.
By utilizing the power of digital wallets, you can simplify your travel experience and streamline your journey from check-in to boarding. Whether you’re a frequent flyer or an occasional traveler, having the ability to store your boarding pass on your iPhone is a game-changer. Say goodbye to paper tickets and hello to a seamless, hassle-free travel experience.
So, the next time you’re preparing for a flight, don’t forget to add your boarding pass to your iPhone Wallet. Empower yourself with the convenience and efficiency of digital wallets and embark on your travels with ease.
FAQs
1. What is a digital wallet?
A digital wallet is a virtual wallet that allows users to securely store payment information, such as credit card details, bank account numbers, and loyalty cards, on their mobile devices. It enables users to make payments, store tickets and boarding passes, and conduct a variety of other transactions using their smartphones or other digital devices.
2. How do I add a boarding pass to iPhone Wallet?
To add a boarding pass to your iPhone Wallet, follow these steps:
- Open the email or app that contains your boarding pass.
- Tap on the boarding pass attachment or the “Add to Wallet” button.
- If prompted, enter your passcode or use Touch ID/Face ID to authenticate.
- Your boarding pass will be added to the Wallet app on your iPhone.
3. Can I add multiple boarding passes to my digital wallet?
Yes, you can add multiple boarding passes to your digital wallet. The Wallet app on your iPhone allows you to store and access multiple boarding passes from different airlines in one place. Simply repeat the process mentioned in the previous question for each boarding pass you want to add.
4. Can I access my boarding pass from the iPhone Wallet without an internet connection?
Yes, once you have added your boarding pass to the iPhone Wallet, you can access it offline. The Wallet app stores the necessary information locally on your device, allowing you to retrieve and display your boarding pass even when you don’t have an active internet connection.
5. Are digital boarding passes accepted by all airlines?
Most major airlines now accept digital boarding passes, but it’s always a good idea to double-check with the specific airline you are traveling with. Many airlines have their own mobile apps that allow you to store and access your boarding pass digitally. Additionally, some airports may have dedicated scanners or systems in place to ensure a smooth digital boarding pass experience.