
As a frequent traveler, one of the most crucial pieces of information you need is your flight details. Luckily, with the convenience of smartphones like the iPhone, sending flight information has become a breeze. From sharing it with family and friends to coordinating pick-ups and drop-offs, knowing how to send flight info on your iPhone can make your travel experience more seamless. In this article, we will guide you through the process of sending flight information on your iPhone, allowing you to easily share your departure time, airline, and flight number. Whether you’re an iPhone user looking to streamline your travel plans or someone who’s curious about the capabilities of their device, read on to discover how you can effortlessly share flight info with just a few taps on your iPhone.
Inside This Article
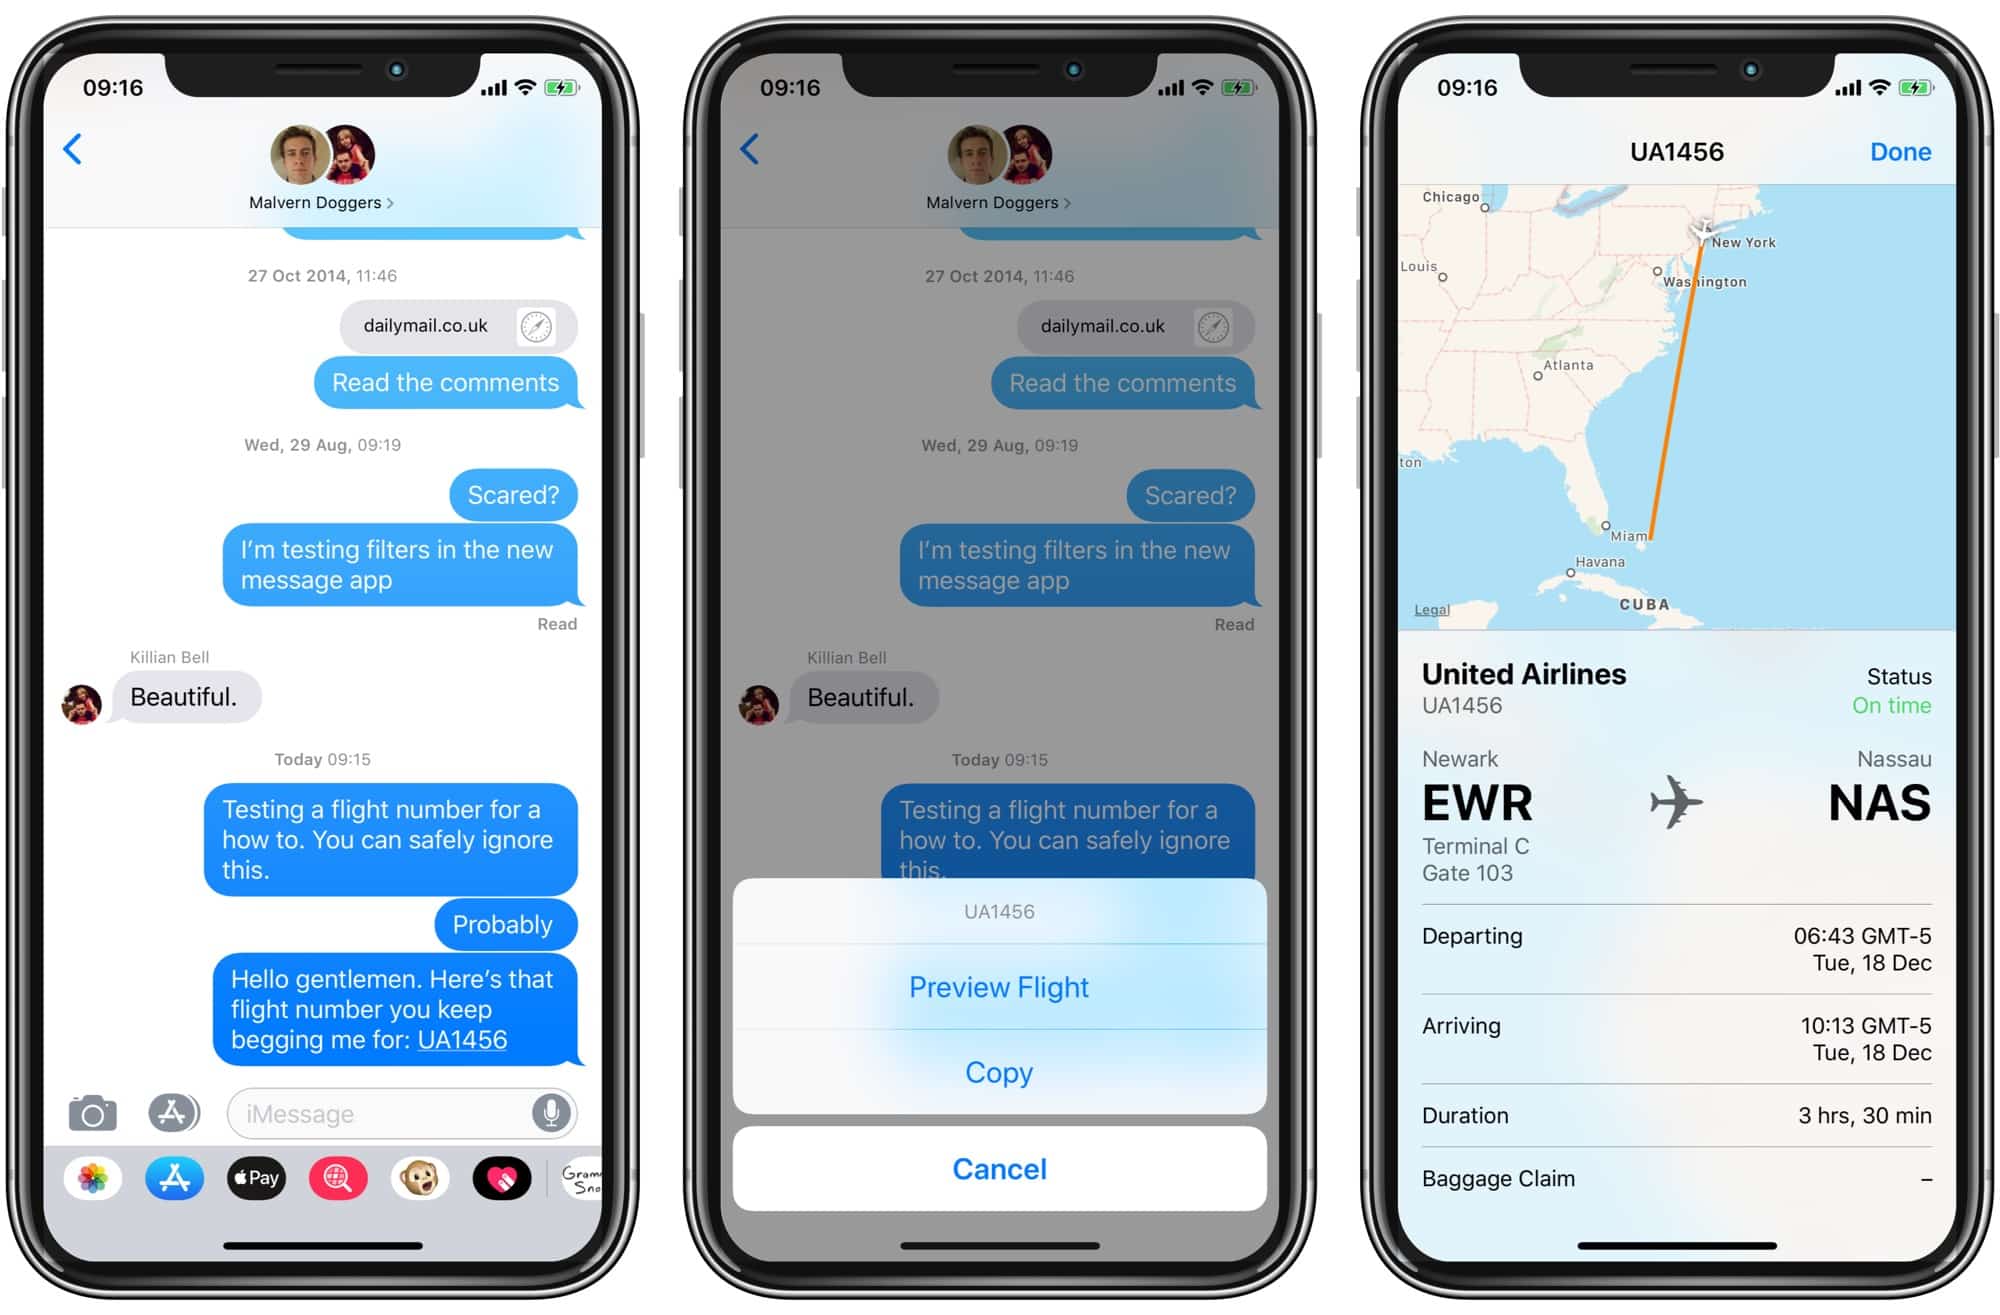
- Sharing Flight Info through Messages – Using the Messages app – Attaching flight details from the Calendar app
- Sharing Flight Info through Email
- Sharing Flight Info through AirDrop – Activating AirDrop on your iPhone – Sending flight info to nearby devices
- Sharing Flight Info through Third-Party Apps – Overview of popular flight information apps – Sharing flight details through selected apps
- Conclusion
- FAQs
Sharing Flight Info through Messages – Using the Messages app – Attaching flight details from the Calendar app
When it comes to sharing flight information, the Messages app on your iPhone can be incredibly useful. Not only can you send text messages and multimedia content, but you can also share important flight details seamlessly. Using the Messages app ensures that your recipient has access to the information on their iPhone, making it convenient and efficient.
To start sharing flight info through Messages, simply open the app and select the contact you want to send the details to. Once you have the conversation open, you can type your message and include any relevant flight information. You can mention the flight number, departure and arrival times, airlines, and any other pertinent details.
Another convenient way to share flight info through Messages is by attaching flight details directly from the Calendar app. If you have already added your flight information to the Calendar app on your iPhone, you can easily share it with your contact. To do this, open the Calendar app, locate the flight event, and tap on it.
Inside the event, you’ll find all the specific information about your flight. From there, tap on the “Share” button located at the bottom of the screen. This will open the sharing menu, where you can select “Messages” as the method of sharing. The flight details will automatically be attached to your message, ready to be sent to your contact.
By sending flight information through Messages, you can ensure that your recipient has instant access to the details. This eliminates the need for them to manually input the information or search for it in their emails. It’s a convenient and efficient way to share flight info, enabling smooth travel coordination and planning.
Sharing Flight Info through Email
When it comes to sharing flight information on your iPhone, using email can be a convenient option. Whether you want to send the details to a friend, a family member, or even to yourself as a backup, composing a new email is a simple and effective way to do it.
To share flight info via email, start by opening the Mail app on your iPhone. Tap on the compose button, usually located at the bottom right corner of the screen. This will open a new email draft, ready for you to fill in the necessary information.
In the recipient field, enter the email address of the person you want to share the flight info with. You can add multiple recipients by separating their email addresses with commas.
Next, it’s time to include the flight details as attachments. To do this, you have a couple of options. The first option is to take a screenshot of the flight information, such as the boarding pass or the confirmation email, and attach it to the email. To take a screenshot on an iPhone, simply press the power button and the volume up button simultaneously.
Once you have taken the screenshot, go back to the email draft and tap on the body of the email to bring up the options menu. From there, select the “Insert Photo or Video” option. This will allow you to choose the screenshot from your camera roll and attach it to the email.
The second option is to save the flight details as a PDF document and attach it to the email. To do this, open the email or confirmation document that contains the flight information. Tap on the share button, which looks like a box with an arrow pointing upward. Scroll through the options until you find “Save PDF to Files” and tap on it. Choose the folder where you want to save the PDF, then go back to the email draft and tap on the “Insert Document” option. This will allow you to select the saved PDF and attach it to the email.
Once you have attached the flight details to the email, you can add any additional information or a personalized message if desired. When you’re ready, tap the send button to send the email with the flight information and attachments.
Sharing flight info through email is not only convenient but also ensures that the recipient has all the necessary information right at their fingertips. Whether it’s a boarding pass, an itinerary, or any other relevant documents, using email to share flight info on your iPhone is a reliable and efficient method.
Sharing Flight Info through AirDrop – Activating AirDrop on your iPhone – Sending flight info to nearby devices
When it comes to sharing flight information with ease, AirDrop on your iPhone can be a game-changer. AirDrop allows you to wirelessly transfer files, photos, and even flight details to nearby devices that are also AirDrop enabled. Let’s take a look at how you can activate AirDrop and effortlessly send flight info to your travel companions.
Activating AirDrop on your iPhone is a simple process. Start by opening the Control Center on your device. To do this, swipe down from the top-right corner of the screen on iPhone models with Face ID, or swipe up from the bottom of the screen on iPhone models with a Home button.
In the Control Center, locate the AirDrop icon, which resembles a series of concentric circles. Tap on the AirDrop icon to bring up the AirDrop options. You can choose between three modes: “Receiving Off,” “Contacts Only,” or “Everyone.”
If you select “Receiving Off,” it means that your iPhone won’t be visible to other devices. “Contacts Only” restricts visibility to only those in your contacts list, while “Everyone” allows any nearby device to discover your iPhone for AirDrop. For the purpose of sharing flight info, it is recommended to select “Everyone” for maximum convenience.
Once AirDrop is activated, you can proceed to send flight info to nearby devices. To do this, open the app or document that contains the flight details you want to share. It could be a note, a PDF file, or even an email with the flight confirmation. Tap the Share icon, which looks like a square with an arrow pointing upwards.
In the Share menu, you’ll find the AirDrop option. Tap on AirDrop, and your iPhone will start scanning for nearby devices. When you see the device you want to share the flight info with, simply tap on its name to initiate the transfer.
The recipient will receive a notification on their device asking if they want to accept the AirDrop transfer. Once they accept, the flight info will be securely and wirelessly transferred to their device, ready for them to view and access.
Please note that AirDrop requires both devices to be in close proximity and have AirDrop activated. Be sure to inform your travel companions beforehand so that they can prepare their devices for the AirDrop transfer.
Sharing flight info through AirDrop not only saves you from the hassle of manually typing or copying the details, but it also provides a seamless and quick way to share essential travel information with your fellow travelers.
So, the next time you need to share flight info with your travel companions, remember to activate AirDrop on your iPhone and utilize this convenient feature for effortless sharing.
Sharing Flight Info through Third-Party Apps – Overview of popular flight information apps – Sharing flight details through selected apps
When it comes to sharing flight information, third-party apps can provide a convenient and efficient way to share details with friends, family, or colleagues. These apps are specifically designed to provide up-to-date flight information and offer various features to make the sharing process seamless. Let’s take a look at an overview of some popular flight information apps and how they can help you share flight details.
One popular app is “FlightAware.” This app provides real-time flight tracking, airport information, and delays. With FlightAware, you can easily share flight details by simply entering the flight number or the airline and the departure and arrival airports. The app generates a comprehensive itinerary that includes departure and arrival times, gate numbers, and even baggage claim information. Sharing this itinerary is as easy as tapping a button.
Another widely used app is “TripIt.” TripIt goes beyond just flight information and allows you to create a complete travel itinerary. By forwarding your flight confirmation emails to TripIt, it automatically creates a detailed itinerary with all the necessary information. You can then easily share this itinerary with others via email or by generating a shareable link. This not only includes flight details but also hotel reservations, car rentals, and other travel arrangements.
“Kayak” is another popular app that offers a range of travel-related services, including flight tracking and itinerary management. With Kayak, you can track your flights in real-time and receive notifications for any changes or delays. Sharing flight details with Kayak is a breeze, as the app allows you to send your itinerary via email or SMS to anyone you choose. This ensures that everyone stays updated on your travel plans.
If you prefer a more feature-rich experience, “TripCase” might be the app for you. In addition to flight tracking and itinerary management, TripCase provides additional features such as weather updates, seat maps, and even alternate flight options in case of cancellations or delays. Sharing your flight details with TripCase is straightforward, with options to email or message your itinerary to your contacts.
While the above-mentioned apps are just a few examples of popular flight information apps, there are many others available that cater to different needs and preferences. Whether you’re looking for advanced tracking features, comprehensive itineraries, or seamless sharing options, there’s most likely an app that suits your requirements.
Conclusion
In conclusion, sending flight information on your iPhone is a seamless and convenient process. With the multitude of options available, you can easily ensure that all travel details are sent to the relevant parties without any hassle. Whether it’s sharing itineraries, boarding passes, or real-time updates, your iPhone offers a wide range of features and apps to make the entire experience smooth and stress-free. From using built-in apps like Apple Wallet and Messages to third-party apps like TripIt and Kayak, you have plenty of choices to suit your preferences. By following the steps outlined in this guide, you can effortlessly share flight info with others, ensuring a seamless travel experience for everyone involved. So next time you’re jetting off on an adventure, take full advantage of your iPhone’s capabilities and simplify your travel preparations.
FAQs
Q: How can I send flight information on my iPhone?
A: Sending flight information on your iPhone is a straightforward process. You can use the built-in features of your iPhone or rely on third-party apps to send your flight details.
Q: Can I send flight information using the Apple Wallet app?
A: Yes, the Apple Wallet app is a convenient way to send and store your flight information. Simply open the Wallet app, tap on the “+” icon to add a pass, and follow the prompts to add your flight details. You can then share the pass via AirDrop, Messages, or other sharing options.
Q: Are there third-party apps that specialize in sending flight information?
A: Yes, there are several third-party apps available on the App Store that specialize in managing and sharing flight details. Some popular options include TripIt, FlightTrack, and Kayak. These apps often offer additional features such as real-time flight updates and automatic syncing with airline itineraries.
Q: Can I send flight information to someone who doesn’t have an iPhone?
A: Yes, you can easily send flight information to someone who doesn’t have an iPhone. If you’re using the Apple Wallet app, you can share the pass via email or by using a file-sharing service. Alternatively, third-party apps usually allow sharing via email or other messaging apps that are compatible with multiple platforms.
Q: Is it possible to send flight information to multiple recipients?
A: Yes, both the Apple Wallet app and third-party apps usually offer the option to share flight information with multiple recipients. You can select multiple contacts from your address book or enter email addresses manually to send the details to multiple people.