
When it comes to cell phones and other electronic devices, a dying battery can be a major inconvenience. But before you rush out to buy a new battery or replace your device altogether, it’s important to determine if the battery is indeed the culprit. This is where a multimeter comes in handy.
A multimeter is a versatile tool that can measure voltage, current, and resistance. By using a multimeter, you can easily check the voltage of your battery to determine its health and if it’s the cause of your phone’s performance issues. In this article, we will guide you through the step-by-step process of checking a battery’s voltage using a multimeter. So whether you’re a beginner or a seasoned techie, you’ll have all the information you need to diagnose your battery issues accurately.
Inside This Article
- Why Use a Multimeter to Check a Battery?
- Step 1: Set Up Your Multimeter
- Step 2: Select the Correct Voltage Setting
- Step 3: Connect the Multimeter Leads to the Battery
- Step 4: Read the Voltage Measurement
- Step 5: Interpret the Results
- Tips for Battery Testing with a Multimeter
- Conclusion
- FAQs
Why Use a Multimeter to Check a Battery?
A multimeter is a versatile and essential tool for anyone working with electronics or batteries. When it comes to checking the health and performance of a battery, a multimeter provides a quick and accurate method. With its ability to measure voltage, a multimeter can give you valuable insights into the condition of a battery.
There are several advantages to using a multimeter for battery testing. Firstly, it allows you to assess the voltage of the battery, which is a crucial indicator of its charge level. By measuring the voltage, you can determine if the battery has enough power to function properly or if it needs to be recharged or replaced.
Secondly, a multimeter can help you identify any issues with the battery, such as voltage drops or inconsistencies. These issues can occur due to various factors, including internal damage or a faulty connection. By detecting such problems early on, you can take appropriate measures to address them and prolong the lifespan of the battery.
Additionally, using a multimeter to check a battery provides a more objective and accurate assessment compared to other methods. While visual inspection or using a battery tester can give you a rough estimate, a multimeter gives you precise voltage readings, allowing for a more detailed analysis of the battery’s health.
Furthermore, using a multimeter is a cost-effective approach to battery testing. Instead of relying on specialized battery testers or diagnostic equipment, which can be expensive, a multimeter offers a versatile solution that can be used for various other electrical measurements as well.
Overall, using a multimeter to check a battery is a practical and efficient method. It provides accurate voltage measurements, helps identify potential issues, and offers a cost-effective solution. Whether you’re working with mobile accessories, automotive batteries, or any other type of battery, a multimeter is an indispensable tool for assessing battery health and performance.
Step 1: Set Up Your Multimeter
Before you can start checking a battery with a multimeter, you need to properly set up the device. Follow these steps to get your multimeter ready:
- Turn on the Multimeter: Locate the power switch on your multimeter and flip it on. This will activate the device and prepare it for use.
- Select the Voltage Setting: Most multimeters have a dial or button that allows you to select the desired measurement function. In this case, you’ll be checking the voltage, so make sure to set your multimeter to the DC (direct current) voltage setting.
- Adjust the Range: Depending on the multimeter model, you might need to adjust the voltage range. If you’re unsure, set it to the highest range available, such as 20V or 200V.
- Ensure Proper Probing: Take a moment to ensure that the multimeter probes are securely connected to the device. Some multimeters have removable probes that need to be inserted into the appropriate sockets.
Once you have completed these steps, your multimeter is ready to be used for battery testing. Proceed to the next step to learn how to select the correct voltage setting for accurate measurements.
Step 2: Select the Correct Voltage Setting
Once you have set up your multimeter, the next step is to select the correct voltage setting. This is crucial in order to obtain accurate readings and ensure the safety of both yourself and the device you are testing.
Most multimeters have a variety of voltage settings, indicated by different ranges such as DCV (Direct Current Voltage) and ACV (Alternating Current Voltage). When testing a battery, you will always want to select the DCV setting.
Start by identifying the smallest voltage range available on your multimeter. It is always better to start with a lower range and then move up if necessary. For example, if your multimeter has voltage settings of 200mV, 2V, 20V, and 200V, start with the 200mV range.
Now, connect the multimeter leads to the battery terminals – the red lead to the positive terminal and the black lead to the negative terminal. Make sure the connections are secure and there is no loose contact that could affect the readings.
Once you have connected the leads, you can adjust the voltage setting on the multimeter. Turn the knob or select the appropriate range using the buttons or selector switch, depending on the type of multimeter you have.
If you are unsure about the voltage of the battery you are testing, it is recommended to start with the highest voltage range available on your multimeter, such as 200V. This will prevent any potential damage to the multimeter if the battery has a higher voltage than anticipated.
Remember, selecting the correct voltage setting is crucial for accurate readings. Choosing a lower range than the actual voltage of the battery can cause the multimeter to overload and potentially damage it. On the other hand, selecting a higher range than necessary may reduce the accuracy of the readings.
Once you have selected the appropriate voltage setting, you are ready to move on to the next step – connecting the multimeter leads to the battery terminals and reading the voltage measurement.
Step 3: Connect the Multimeter Leads to the Battery
After setting up your multimeter and selecting the correct voltage setting, it’s time to connect the multimeter leads to the battery you want to test. Follow these steps:
- Identify the battery terminals: Look for the positive (+) and negative (-) terminals on the battery. These are usually labeled on the battery or indicated by color-coded markings, with red for positive and black for negative.
- Power off the battery: If the battery is rechargeable or connected to a device, make sure it is turned off or disconnected before testing. This ensures accurate readings and prevents any potential issues.
- Attach the multimeter leads: Take the red (positive) lead of the multimeter and connect it to the positive terminal of the battery. Then, take the black (negative) lead and connect it to the negative terminal of the battery.
- Secure the connections: Make sure the leads are securely connected to the battery terminals. A loose connection may lead to unreliable readings.
Once the multimeter leads are connected to the battery, you are ready to move on to the next step of checking the voltage measurement. Remember to double-check the connections to ensure accuracy and safety throughout the testing process.
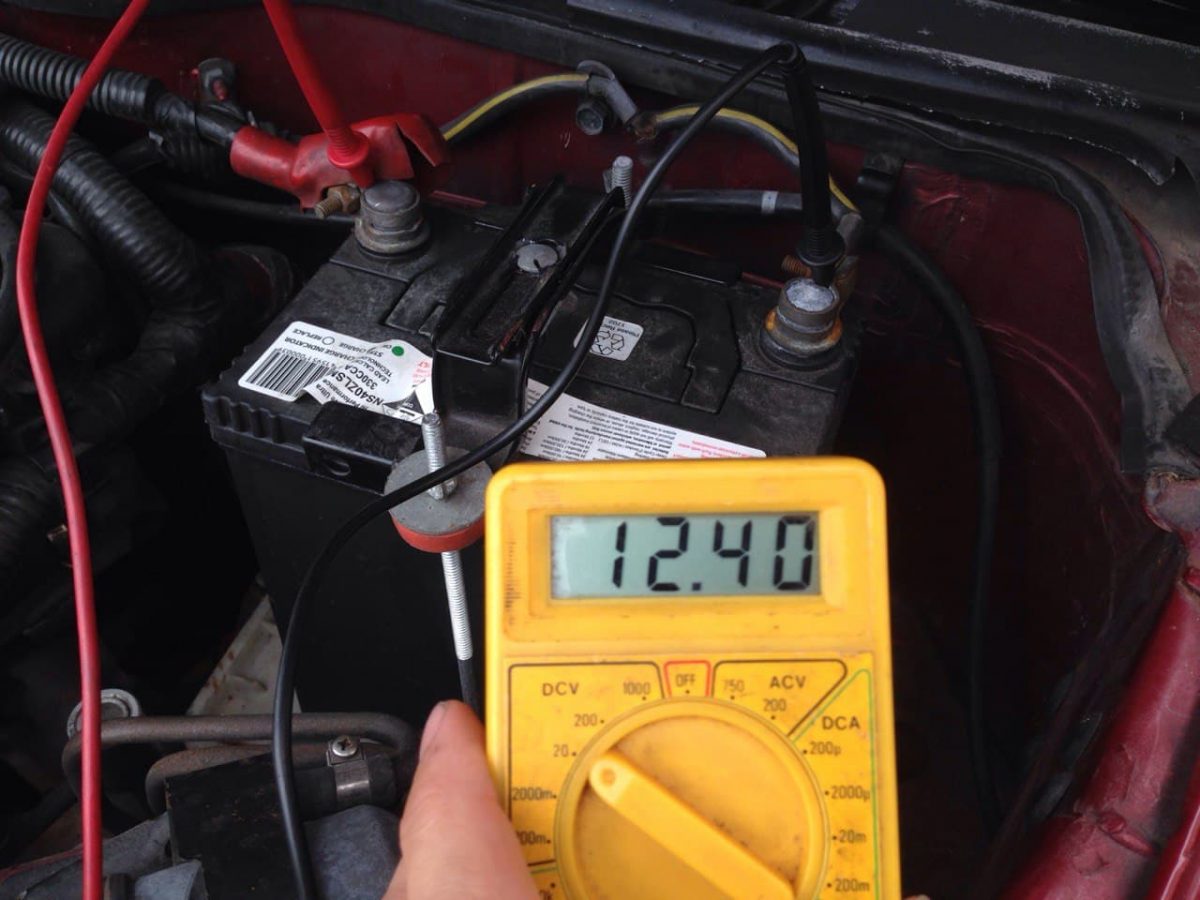
Step 4: Read the Voltage Measurement
To effectively check the voltage of a battery using a multimeter, you need to understand how to read the voltage measurement accurately. Follow these steps:
1. Look at the digital display on your multimeter. It will show the voltage reading in volts (V).
2. If your multimeter has manual range selection, ensure that you have selected the appropriate range for the battery you are testing. It should be set to a suitable voltage range, usually DC voltage.
3. Read the numeric value displayed on the screen. This value represents the voltage of the battery.
4. Take note of the polarity. Most multimeters will display a positive (+) or negative (-) sign next to the voltage reading to indicate the battery’s polarity. This is important to ensure the correct connection and interpretation of the measurement.
5. Keep in mind that battery voltage can fluctuate depending on its charge level and usage. Therefore, it is essential to take multiple voltage readings at different times to get a more accurate understanding of the battery’s condition.
By accurately reading the voltage of the battery, you can determine if it is fully charged, partially charged, or requires recharging or replacement.
Step 5: Interpret the Results
Once you have obtained the voltage measurement using your multimeter, it is crucial to interpret the results accurately. The voltage reading will give you a clear indication of the battery’s health and whether it needs to be replaced or recharged.
If the voltage reading is within the manufacturer’s specified range, typically 12.6 to 12.8 volts for a fully charged battery, then your battery is in good condition. This indicates that the battery has a healthy charge and should work optimally.
On the other hand, if the voltage reading is significantly below the specified range, such as below 11.5 volts, it is a clear indication that the battery is discharged and needs to be recharged. In this case, it is essential to connect the battery to an appropriate charger and allow it to recharge fully.
It is important to note that if you have already recharged the battery recently, a low voltage reading may suggest that there is an internal problem with the battery. In such cases, it is recommended to consult a professional or consider replacing the battery.
Furthermore, if the voltage reading is significantly higher than the specified range, such as above 13.2 volts, it could indicate that the battery is overcharged. Overcharging can lead to damage and reduce the overall lifespan of the battery. If you suspect overcharging, it is advisable to disconnect the battery from any charging source and seek professional assistance.
Remember that interpreting the results accurately is crucial for maintaining the effectiveness of your battery and ensuring optimal performance of your device. If you are unsure of the results or have any concerns, it is always best to consult a knowledgeable professional in the field.
Tips for Battery Testing with a Multimeter
When it comes to testing batteries with a multimeter, there are a few tips that can help you get accurate and reliable results. These tips will not only ensure the effectiveness of your testing process but also help you avoid any potential risks or damage. Here are some essential tips to keep in mind:
- Use a Fully Charged Multimeter: Before starting the battery testing process, make sure that your multimeter’s internal battery is fully charged. This will ensure accurate voltage readings and prevent any false results due to a weak multimeter battery.
- Choose the Correct Voltage Range: Depending on the type of battery you are testing, select the appropriate voltage range on your multimeter. Using the wrong range can result in inaccurate readings or potential damage to your multimeter.
- Ensure Proper Connection: When connecting the multimeter leads to the battery, ensure that they are securely attached to the battery terminals. Loose connections can lead to inconsistent readings or even damage the multimeter.
- Allow Time for Stability: Once the multimeter is connected to the battery, give it a few seconds to stabilize and provide a consistent voltage reading. Rapidly fluctuating readings may indicate a faulty connection or an unstable battery.
- Check Battery Temperature: Batteries can get hot when being charged or discharged. Take note of the battery’s temperature during testing as extreme temperatures can affect the voltage readings. Make sure to conduct the test in a well-ventilated area to avoid any safety risks.
- Take Multiple Readings: To ensure accuracy, take multiple voltage readings at different points on the battery terminals. This will help identify any potential variations or inconsistencies in voltage levels across the battery, providing a more comprehensive assessment of its condition.
- Compare with Manufacturer Specifications: When interpreting the voltage readings, refer to the manufacturer’s specifications for the battery to determine whether it is functioning within the acceptable range. Deviations from the recommended voltage levels may indicate a problem, and further investigation or battery replacement may be necessary.
- Practice Safety Precautions: Always prioritize safety when testing batteries. Wear proper protective equipment, such as gloves and safety glasses, when handling batteries. Additionally, follow the manufacturer’s instructions and guidelines to avoid any potential hazards or accidents.
Following these tips will not only ensure accurate battery testing but will also help prolong the lifespan of your multimeter and prevent any mishaps during the testing process. Remember, it is essential to handle batteries and multimeters with care to ensure safety and reliable results.
Conclusion
Checking a battery with a multimeter is a straightforward process that can help you determine the health and performance of your battery. By following the steps outlined in this article, you can effectively measure the voltage and assess whether your battery is holding a charge or needs replacement.
Remember to always take safety precautions when working with batteries and multimeters, such as wearing protective gloves and eyewear. Regularly monitoring your battery can help you identify potential issues before they lead to a complete failure, saving you time and money in the long run.
Whether you’re a professional technician or a DIY enthusiast, having a multimeter on hand can be a valuable tool for troubleshooting battery problems and ensuring optimal performance. With the knowledge and skills gained from this article, you can confidently check batteries and make informed decisions about their maintenance and replacement.
FAQs
1. Why do I need to check a battery with a multimeter?
Checking a battery with a multimeter allows you to determine its remaining charge and overall health. This is especially useful for batteries in devices like cell phones, where performance and battery life are crucial. By checking the battery voltage, you can assess whether it needs to be charged or replaced, ensuring your device functions optimally.
2. How do I check a battery with a multimeter?
To check a battery using a multimeter, set the meter to the voltage setting and make sure it’s in the appropriate range for the battery you’re testing. Connect the positive (red) lead of the multimeter to the battery’s positive terminal and the negative (black) lead to the negative terminal. The multimeter will display the battery’s voltage, indicating its charge level.
3. What is a multimeter?
A multimeter is a versatile electronic device used to measure various electrical parameters, including voltage, current, and resistance. It typically consists of a digital or analog display, separate ports for connecting test leads, and a dial or buttons to select the desired measurement function. Multimeters are commonly used by electricians, engineers, and DIY enthusiasts to troubleshoot electrical and electronic systems.
4. Can I use a multimeter to check any type of battery?
Most multimeters can be used to check different types of batteries, such as alkaline, lithium-ion, or nickel-cadmium. However, it’s essential to ensure that the battery voltage range matches the capabilities of your multimeter. Some multimeters may not have a wide enough voltage range to measure certain types of batteries accurately.
5. What are the typical voltage ranges for different types of batteries?
The voltage ranges for different types of batteries can vary, but as a general guideline, here are a few examples:
- Alkaline batteries: 1.5V to 1.6V
- Lithium-ion batteries: 3.6V to 4.2V
- Nickel-cadmium batteries: 1.2V to 1.3V
- Lead-acid batteries: 2V per cell (6V, 12V, 24V, etc.)
It’s always best to consult the battery manufacturer’s specifications for the accurate voltage range for a specific battery.