
Are you tired of printing, signing, and scanning documents every time you need to send something important? Well, fret no more! With the power of your iPhone, you can now easily scan documents and even sign them digitally, saving time, money, and paper. In this article, we will guide you through the simple steps to scan documents on your iPhone and provide tips for easily signing digital documents. Whether you need to send a contract, a form, or just a handwritten note, your iPhone can become your portable scanner and virtual signature pen. So, let’s dive in and discover how to scan and sign documents effortlessly with your iPhone!
Inside This Article
- How to Scan on iPhone
- Easily Sign Documents on iPhone
- Additional Features for Scanning and Signing
- Security and Privacy Considerations
- Conclusion
- FAQs
How to Scan on iPhone
Scanning documents on your iPhone has never been easier. With the built-in scanning feature, you can quickly and conveniently digitize physical documents, receipts, or even handwritten notes. Whether you need to send important paperwork or save important documents for future reference, the scanning feature on your iPhone is here to help.
Overview of the scanning feature on iPhone
The scanning feature on iPhone allows you to use your device’s camera to capture and convert physical documents into digital files. This not only saves you the hassle of carrying around bulky paperwork but also helps to keep your documents organized and easily accessible.
Step-by-step guide to scanning documents
To begin scanning on your iPhone, follow these simple steps:
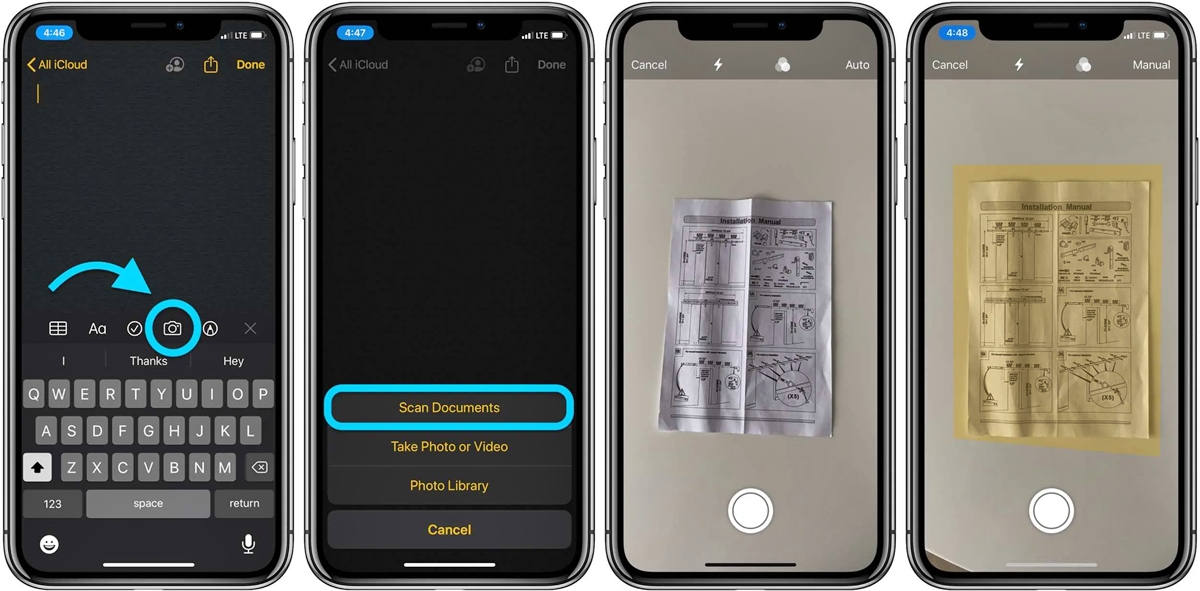
- Open the Notes app on your iPhone.
- Create a new note or open an existing one.
- Tap the “+” button at the bottom of the screen.
- Select the “Scan Documents” option.
- Position your document within the camera frame and tap the shutter button.
- Make any necessary adjustments to the document’s edges or corners.
- Tap “Keep Scan” to save the scanned document.
- You can continue scanning additional pages or tap “Save” to finish.
Tips for enhancing scan quality
To ensure the best possible scan quality, keep the following tips in mind:
- Choose a well-lit environment to eliminate shadows and improve clarity.
- Hold your iPhone steady and avoid shaky hands for sharper images.
- Place your document on a flat surface for better focus and alignment.
- Use your finger to manually adjust the document’s corners if needed.
- Consider using the built-in flash option if the lighting conditions are poor.
Managing and organizing scanned documents
After scanning the documents, you’ll have various options to manage and organize them effectively:
- Assign titles or tags to each document to easily categorize and locate them later.
- Create folders within the Notes app to group related documents together.
- Use the search functionality to quickly find specific scanned documents.
- Sync your scanned documents across your Apple devices using iCloud.
- Share or export scanned documents via email, messaging apps, or cloud storage platforms.
Easily Sign Documents on iPhone
When it comes to signing documents on your iPhone, digital signatures have revolutionized the way we handle paperwork. Gone are the days of printing, signing, and scanning documents. With the convenience of digital signatures, you can sign important contracts, agreements, and forms right from your iPhone.
Understanding the Importance of Digital Signatures
Digital signatures are more than just a digital representation of your handwritten signature. They provide a secure and legally binding way to authenticate documents. Digital signatures utilize encryption technology to ensure the integrity of the document and verify the identity of the signer. This adds an extra layer of trust and security to your signed documents.
Different Methods for Signing Documents on iPhone
There are several methods available for signing documents on your iPhone. The built-in tools provide a seamless signing experience, while third-party apps offer additional features and customization options. Here are some common methods:
- Using the Markup Tool: The Markup tool allows you to add your signature directly to the document using your finger or Apple Pencil. You can also type your name and select from different signature styles to create a professional-looking signature.
- Scanning and Signing: If you have a physical document that needs to be signed, you can scan it using your iPhone’s camera and then use the Markup tool to add your signature. This method is useful for situations where you receive a document via mail or in-person.
- Importing Signatures: If you have a pre-existing digital signature saved as an image file, you can import it directly into the Markup tool and use it to sign documents.
Setting Up and Customizing Your Signature
Before you start signing documents on your iPhone, it’s important to set up and customize your signature. Here are the steps to follow:
- Open the Settings app on your iPhone.
- Scroll down and tap on “Mail” or “Notes”.
- Tap on “Signature”.
- Choose whether you want to use the signature for a specific email account or for all accounts.
- Edit or create your signature by typing or drawing with your finger or Apple Pencil.
- Tap “Done” to save your signature.
You can now use your customized signature when signing documents using the Markup tool or other signing methods.
Sharing and Exporting Signed Documents
Once you have signed a document on your iPhone, you have several options for sharing and exporting it. Here are some common methods:
- Email: You can send the signed document directly from the Markup tool using the “Share” button. This allows you to email the document to recipients right away.
- Save to Files: If you want to save the signed document to your iPhone for later use or for archival purposes, you can choose the “Save to Files” option. This allows you to store the document in the Files app or other cloud storage services.
- Export as PDF: If you need to share the signed document as a PDF file, you can choose the “Export as PDF” option. This converts the document into a PDF format and gives you the flexibility to share it via various platforms.
With these options, you can easily share your signed documents with clients, colleagues, or anyone who needs a copy.
Signing documents on your iPhone not only saves time and reduces paperwork but also provides a secure and efficient way to handle important documents. Whether you’re signing a contract, an agreement, or a form, the built-in tools and methods available on your iPhone make the process simple and convenient.
Additional Features for Scanning and Signing
When it comes to scanning and signing documents on your iPhone, there are a variety of additional features and options that can further enhance your experience. Whether you’re looking for advanced scanning options, third-party apps, cloud storage integration, or troubleshooting tips, this section will cover it all.
Exploring advanced scanning options on the iPhone opens up a world of possibilities for capturing and processing documents. In addition to the basic scan feature, the iPhone offers advanced features such as automatic edge detection, image enhancement, and color correction. These options ensure that your scanned documents are crisp, clear, and professional-looking.
Another option to consider is using third-party scanning and signing apps. These apps often provide more robust features and customization options compared to the built-in scanning tool on the iPhone. With third-party apps, you can easily scan multiple pages, adjust the scan settings, annotate documents, and even perform OCR (optical character recognition) to make the text searchable.
Integrating with cloud storage and productivity apps allows you to seamlessly manage and access your scanned and signed documents across multiple devices. Services like iCloud, Google Drive, Dropbox, and Microsoft OneDrive enable you to save and sync your documents in the cloud, making them easily accessible from your iPhone, iPad, or computer. You can also integrate with productivity apps like Evernote or Microsoft Office to streamline your workflow and collaborate on documents with ease.
Although scanning and signing on the iPhone is generally a smooth process, you may encounter some common issues along the way. For example, you might experience difficulties in capturing a clear image, encounter compatibility issues with certain file formats, or face challenges with exporting or sharing the scanned documents. In such cases, troubleshooting techniques like adjusting lighting conditions, updating your apps, or checking storage availability can help resolve the problems.
By exploring the advanced scanning options, utilizing third-party apps, integrating with cloud storage and productivity apps, and troubleshooting any issues that arise, you can take full advantage of the scanning and signing features on your iPhone. With these additional features, you’ll have a powerful tool in the palm of your hand for efficiently managing your documents and signing them with ease.
Security and Privacy Considerations
Ensuring document confidentiality and data protection is crucial when it comes to scanning and signing documents on your iPhone. With the ever-increasing prevalence of digital communication, it is vital to understand the security measures in place to safeguard your sensitive information.
One of the key aspects of iPhone’s security features is its built-in encryption. Apple implements various encryption protocols to protect your data, including the documents you scan and the signatures you create. This means that unauthorized parties cannot easily access or read your scanned documents.
When handling sensitive documents, it is essential to follow best practices for secure document handling. This includes keeping your iPhone’s software and apps up to date, as updates often include security patches. Additionally, consider enabling device passcodes, Touch ID, or Face ID for an added layer of protection.
Furthermore, be cautious when sharing or exporting signed documents. Choose secure methods such as encrypted email or file-sharing services with password protection to prevent unauthorized access. Avoid sharing documents through insecure channels, such as public Wi-Fi networks or unencrypted messaging apps.
Protecting against unauthorized access or data breaches also involves using reputable scanning and signing apps. These apps often offer additional security features such as document password protection or advanced encryption options. Look for apps that have good reviews and a solid reputation for data security.
Lastly, consider integrating your scanning and signing workflows with trusted cloud storage and productivity apps. These apps usually have robust security measures in place, including data encryption and multi-factor authentication. This adds an extra layer of protection to your scanned documents and signed files.
By following these best practices and utilizing iPhone’s security features, you can confidently scan and sign documents while maintaining document confidentiality and data protection.
In conclusion, being able to scan documents and easily sign them on your iPhone is a game-changer for productivity and convenience. With the advancement in technology, the iPhone has become a powerful tool that can replace traditional scanners and printers. The ability to scan documents on the go, whether it’s a receipt, a contract, or an important form, allows you to digitize your paperwork and keep everything organized in one place.
Furthermore, the ability to quickly and easily sign documents directly from your iPhone saves you time and effort. No more printing, signing, and scanning back in. With just a few taps, you can add your signature and send it off electronically, making it a breeze for remote work and collaboration.
So if you haven’t explored the scanning and signing capabilities of your iPhone yet, now is the time to do so. You’ll be amazed at how this simple feature can transform your workflow and streamline your document management process.
FAQs
1. How do I scan documents on my iPhone?
To scan documents on your iPhone, you can use the built-in Notes app. Open the Notes app, create a new note or open an existing one, tap the (+) icon above the keyboard, and select “Scan Documents” from the options. Align the document within the frame and tap the capture button. You can also make adjustments, crop, or rotate the scanned document before saving it.
2. Can I sign documents on my iPhone?
Yes, you can easily sign documents on your iPhone. If you have a document in PDF format, you can use the Markup feature built into the Files app. Open the Files app, locate the PDF document, tap on it, and select the Markup icon (looks like a pencil). From there, you can add your signature, text, or even draw on the document using your finger or Apple Pencil.
3. Are there any third-party apps for scanning and signing documents on iPhone?
Absolutely! There are numerous third-party apps available on the App Store that specialize in document scanning and signing. Some popular options include Adobe Scan, CamScanner, and Microsoft Office Lens. These apps offer advanced features like OCR (Optical Character Recognition), cloud storage integration, and more customization options for signing documents.
4. Is there a limit to the number of pages I can scan on my iPhone?
The limit for scanning pages on your iPhone may vary depending on the method or app you are using. In the built-in Notes app, you can scan multiple pages and combine them into a single document. However, keep in mind that the more pages you scan, the larger the file size may become. It’s always a good idea to compress or optimize the document if you need to reduce file size for sharing or storage purposes.
5. Can I share or export scanned documents from my iPhone?
Yes, once you’ve scanned a document on your iPhone, you can easily share or export it. In the Notes app, open the scanned document, tap the share icon (usually represented by a box with an arrow pointing up), and choose from various sharing options like Messages, Mail, or save it to other apps. If you’re using third-party apps, they often offer more exporting options, including saving to cloud storage services like Dropbox or Google Drive.