
Do you often find yourself in a situation where you need to quickly scan a document but don’t have access to a scanner or a computer? Well, if you are fortunate enough to own the latest iPhone 13, you are in luck! With its advanced camera capabilities and innovative features, you can easily scan documents right from the convenience of your iPhone.
In this article, we will guide you through the process of scanning documents with the iPhone 13, providing you with step-by-step instructions and tips to ensure a seamless scanning experience. Whether you need to digitize receipts, contracts, or important paperwork, the iPhone 13 offers a user-friendly solution that saves time and boosts productivity.
So, let’s dive into the world of document scanning with the iPhone 13 and discover how this powerful smartphone can simplify your scanning needs.
Inside This Article
- Section 1: Scanning Documents with iPhone 13
- Section 2: Preparing Documents for Scanning
- Section 3: Using the Notes App for Document Scanning
- Section 4: Using Third-Party Scanning Apps
- Section 5: Tips for Successful Document Scanning
- Section 6: Troubleshooting Document Scanning Issues
- Conclusion
- FAQs
Section 1: Scanning Documents with iPhone 13
With the iPhone 13’s advanced camera capabilities, scanning documents has never been easier. Whether you need to digitize important paperwork, scan receipts for expense tracking, or simply want to go paperless, your iPhone 13 can serve as a powerful document scanner. In this section, we will explore the various methods and features available to help you scan documents with ease.
Apple has made document scanning a breeze by integrating the scanning feature directly into the built-in Notes app. With just a few taps, you can capture clear and crisp scans of your documents using your iPhone 13’s camera. Gone are the days of bulky scanners or searching for a nearby photocopier.
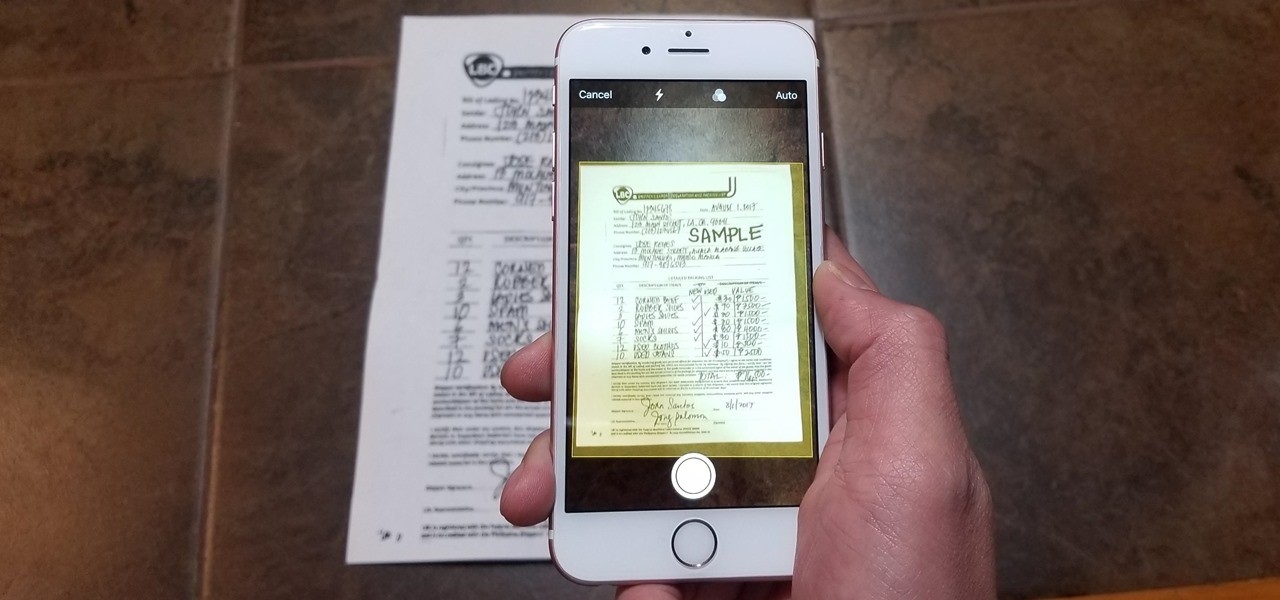
To get started, open the Notes app on your iPhone 13 and create a new note. Tap on the “+” icon and select “Scan Documents” from the menu that appears. Position your document within the on-screen frame, making sure all edges are visible. The iPhone 13 will automatically detect the document and capture the scan.
Once the scan is complete, you can make adjustments to the document, such as cropping, rotating, or enhancing the image quality. The Notes app also provides tools to add notes or annotations to the scanned document, ensuring you can easily add any necessary comments or highlight important sections.
If you have multiple pages to scan, simply continue capturing scans by tapping on the “+” icon again and selecting “Scan Documents.” You can easily rearrange the pages and even delete any unnecessary scans within the Notes app.
In addition to the built-in Notes app, there are also various third-party scanning apps available for download from the App Store. These apps offer additional features and customization options for your document scanning needs. Popular options include Adobe Scan, Microsoft Office Lens, and CamScanner.
These third-party scanning apps often have advanced OCR (Optical Character Recognition) capabilities, allowing you to convert scanned documents into editable text. This can be particularly useful for extracting text from receipts or converting physical documents into digital formats for editing or sharing.
When using any document scanning app, it’s important to ensure that you have good lighting and a stable surface to capture clear and high-quality scans. Avoid shadows, glare, or shaky hands, as they can impact the quality of your scanned documents.
With the powerful camera capabilities of the iPhone 13, scanning documents has never been more convenient. Whether you choose to use the built-in Notes app or opt for a third-party scanning app, you can quickly and easily scan documents on the go, eliminating the need for traditional scanners or photocopiers. Enjoy the convenience of having a portable document scanner right in your pocket with the iPhone 13.
Section 2: Preparing Documents for Scanning
Before scanning documents with your iPhone 13, it’s important to ensure that they are properly prepared. By taking a few simple steps, you can optimize the scanning process and achieve high-quality results. Here are some tips to help you prepare your documents for scanning:
- Remove any obstructions: Clear the surface on which you plan to scan your documents. Remove any clutter, such as pens, paper clips, or sticky notes, that may interfere with the scanning process. This will help ensure that your documents are captured accurately and without any distractions.
- Straighten and organize: Align the pages of your document and make sure they are in the correct order. Straighten any folded or creased edges to ensure that the document lays flat on the surface. This will help the scanner capture the document’s content properly and avoid any skewed or distorted images.
- Check for damages: Inspect the document for any tears, smudges, or stains that could affect the scanning quality. If you come across any damages, consider making a digital copy of the document before attempting to repair it. This way, you can preserve the content without risking further damage during the scanning process.
- Ensure proper lighting: Good lighting is essential for achieving clear and legible scans. Make sure you have ample light in the room or use an external light source. Avoid scanning documents under dim or uneven lighting conditions, as this can result in poor image quality and readability.
- Remove reflective surfaces: To minimize glare and reflections, remove any objects with reflective surfaces that may be in close proximity to the documents. This could include glass frames, mirrors, or glossy surfaces. By eliminating these distractions, you can ensure that the scanned images are crisp and free from unwanted reflections.
- Flatten folded documents: If your document contains folds or wrinkles, gently flatten them before scanning. This will help avoid shadows or distortions that may occur during the scanning process. If necessary, you can use a clean cloth or a weight to keep the document flat on the scanning surface.
- Secure loose pages: If your document has loose pages, it’s advisable to secure them before scanning. You can use a paperclip, binder clip, or rubber band to hold the pages together. This will prevent any pages from getting lost or misplaced during the scanning process, ensuring that your document remains intact.
By following these preparation steps, you can create an optimal scanning environment and increase the chances of obtaining accurate and high-quality scans with your iPhone 13. Taking the time to prepare your documents beforehand will save you from potential issues and ensure that the scanned copies are clear, legible, and ready for use.
Section 3: Using the Notes App for Document Scanning
The iPhone 13 comes equipped with a powerful built-in app called Notes, which not only allows you to jot down quick memos and make to-do lists but also serves as a handy tool for document scanning. With the Notes app, you can easily turn your iPhone into a portable scanner to digitize your important documents and reduce clutter.
To start scanning documents with the Notes app, follow these simple steps:
- Open the Notes app on your iPhone 13.
- Create a new note or choose an existing one.
- Tap on the “+” button in the toolbar at the bottom of the screen.
- Select “Scan Documents” from the menu that appears.
- Position your iPhone camera over the document you want to scan, making sure the entire document is visible within the scanning frame.
- The app will automatically detect the edges of the document and capture the scan. You will have the option to manually adjust the edges if needed.
- Tap on the shutter button to capture the scan.
- If you need to scan multiple pages, repeat the process for each page and tap on the “+” button to add additional scans to your note.
- Once you have completed scanning all the pages, tap on “Save” to save the scanned document in your note.
The Notes app also offers a few additional features to enhance your document scans. You can use the built-in cropping tool to trim any unwanted edges, rotate the scan to the desired orientation, or even adjust the color filters to improve the readability of the document.
Furthermore, you have the option to add annotations, highlights, or handwritten notes to the scanned document directly within the Notes app. This enables you to make necessary changes or mark important sections without having to switch to a different app.
Once you have scanned and edited your document to your satisfaction, you can easily share it with others by tapping on the share button within the Notes app. You can send the scanned document via email, message, or even save it directly to your iCloud Drive or other cloud storage services.
Using the Notes app for document scanning on the iPhone 13 offers a convenient and efficient way to digitize your physical documents while on the go. Whether you need to scan receipts, contracts, or important paperwork, the Notes app’s scanning feature provides a simple solution right at your fingertips.
Section 4: Using Third-Party Scanning Apps
If you want to take your document scanning capabilities on your iPhone 13 to the next level, you can explore the world of third-party scanning apps. These apps offer enhanced features, advanced editing options, and seamless integration with other productivity tools. Here are some popular third-party scanning apps that you can consider:
1. CamScanner: CamScanner is a reliable and feature-rich scanning app that allows you to scan, edit, and share documents effortlessly. With its intelligent cropping and enhancement technology, you can ensure that your scanned documents look professional and polished. Plus, CamScanner provides options for OCR (Optical Character Recognition) so that you can easily convert scanned documents into editable text.
2. Scanner Pro: Scanner Pro is another highly regarded scanning app that offers a user-friendly interface and powerful scanning capabilities. It automatically detects document edges, optimizes scan quality, and provides various editing tools to enhance the scanned documents. Additionally, Scanner Pro integrates seamlessly with cloud storage platforms like iCloud and Google Drive, making it easy to access and share your scanned documents.
3. Adobe Scan: As a leader in the digital document space, Adobe offers a reliable scanning app called Adobe Scan. This app leverages Adobe’s advanced image processing technology to capture and enhance documents with exceptional clarity. Adobe Scan also integrates with Adobe Acrobat, allowing you to create PDFs, sign documents, and collaborate with others seamlessly.
4. Microsoft Office Lens: For those who frequently work with Microsoft Office tools, Office Lens is a fantastic choice. This app allows you to scan various types of documents, including whiteboards and receipts, and automatically crops and enhances them. With Office Lens, you can save your scanned documents to OneDrive or other Microsoft applications such as OneNote and Word for easy access and collaboration.
Remember that each third-party scanning app has its own set of features and interface, so it’s worth exploring them to find the one that suits your needs best. You can find these apps on the App Store and read user reviews to gain insights into their performance and functionality.
Once you have selected a third-party scanning app, follow its specific instructions to scan, edit, and save your documents. Most scanning apps offer intuitive interfaces and step-by-step guides to ensure a smooth scanning experience. Additionally, you can explore the settings within the app to customize the scanning quality, file format, and other preferences according to your requirements.
By using third-party scanning apps, you can unlock advanced features and tools that go beyond the native scanning capabilities of your iPhone 13. These apps can help you digitize and organize your documents more efficiently, saving you time and improving your overall productivity.
Section 5: Tips for Successful Document Scanning
Scanning documents with your iPhone 13 can be a convenient way to digitize your important paperwork. However, to ensure accurate and high-quality scans, it is important to keep a few tips in mind. Here are some valuable tips for successful document scanning with your iPhone 13:
1. Find the Right Lighting: Good lighting is essential for capturing clear and crisp scans. Make sure to scan in a well-lit area or use additional lighting if needed to avoid shadows or reflections on the document.
2. Keep the Document Flat and Stable: Place the document on a flat surface and ensure that it is tightly secured to prevent any movement during the scanning process. This will help in capturing sharper and more accurate scans.
3. Maintain Proper Distance: Position your iPhone 13 at an optimal distance from the document to ensure that the entire content is captured without any cropping or distortion. Too close or too far can result in blurry or incomplete scans.
4. Use the Autofocus Feature: Take advantage of the autofocus feature on your iPhone 13 camera to ensure that the scanned document is in focus. Tap on the screen to adjust the focus if necessary, especially when scanning small text or intricate details.
5. Clean the Camera Lens: Before scanning, make sure to wipe the camera lens of your iPhone 13 to remove any smudges or fingerprints. This will prevent any unwanted blur or distortion in the scanned image.
6. Align the Document Properly: Ensure that the document is aligned within the frame of your iPhone 13 camera. Use the gridlines or guidelines provided in the scanning app to help maintain proper alignment and perspective.
7. Choose the Right Format: Depending on the purpose of the scanned document, select the appropriate file format such as PDF or JPEG. Consider the size and compatibility of the file to ensure that it meets your requirements.
8. Utilize Editing Features: Take advantage of the editing features available in scanning apps or built-in tools to enhance the scanned document. Adjust brightness, contrast, and sharpness if needed to improve the overall quality of the scan.
9. Organize and Name Scanned Documents: Develop a system to keep track of your scanned documents. Create folders or use naming conventions to easily find and retrieve specific scans when needed.
10. Backup and Store Scans: It is crucial to regularly backup and store your scanned documents to prevent any loss or damage. Consider using cloud storage services or external drives as a secure backup solution.
By following these tips, you can ensure that you capture high-quality scans with your iPhone 13 and make the most out of its document scanning capabilities.
Section 6: Troubleshooting Document Scanning Issues
Document scanning can be a convenient and efficient way to digitize and store important paperwork on your iPhone 13. However, like any technology, you may encounter some issues along the way. Here are some common troubleshooting tips for document scanning problems:
- Ensure Sufficient Lighting: Adequate lighting is crucial for achieving clear and legible scans. Make sure you are in a well-lit area or use the flash option in the scanning app to improve the quality of your scans.
- Check Document Placement: Improper document placement may result in skewed or cut-off scans. Ensure that the document is aligned properly within the frame and that all corners are visible before capturing the scan.
- Clean Camera Lens: A dirty or smudged camera lens can impact the clarity of your scans. Gently clean the lens with a microfiber cloth to remove any debris or fingerprints that may be affecting the image quality.
- Close Background Apps: Running multiple apps simultaneously on your iPhone 13 can consume memory and CPU resources, potentially affecting the performance of the scanning app. Close any unnecessary background apps to free up system resources for a smoother scanning experience.
- Update Scanning App: If you are experiencing consistent issues with scanning, check for updates to the scanning app you are using. Developers often release updates to address bugs and improve functionality, so keeping your app up to date is important.
- Restart Your iPhone: Sometimes, a simple restart can resolve temporary glitches or conflicts that may be hindering the scanning process. Restart your iPhone 13 by holding down the power button until the slider appears, then slide to power off. After a few seconds, press the power button again to turn on your device.
- Check Storage Space: Insufficient storage space on your iPhone 13 can prevent you from saving scanned documents. Ensure that you have enough free space by deleting unused apps, photos, or other files.
- Contact App Support: If you have tried the above troubleshooting steps and are still experiencing issues with document scanning, reach out to the app developer’s support team for further assistance. They may be able to provide specific guidance based on your device and app version.
By following these troubleshooting tips, you can overcome common document scanning issues and continue to enjoy the convenience of digitizing and organizing your important paperwork with your iPhone 13.
Conclusion
Scanning documents with the iPhone 13 has become incredibly convenient and accessible. The advanced camera technology and powerful processors in the latest iPhone model make it a versatile tool for document scanning on the go. Whether you need to quickly digitize receipts, contracts, or important notes, the iPhone 13 can handle it all.
With the native Files app and third-party scanning apps available on the App Store, you have multiple options to choose from when it comes to scanning documents. The ability to adjust settings like brightness, contrast, and crop in these apps ensures that you can get high-quality scans every time.
Additionally, with features like automatic text recognition (OCR), document organization, and easy sharing options, you can not only scan documents but also manage and utilize them efficiently.
Overall, the iPhone 13 offers a seamless and straightforward experience for scanning documents, making it an excellent choice for professionals, students, and anyone in need of document digitization. So, take advantage of the power in your pocket and start scanning with your iPhone 13 today!
FAQs
1. Can I scan documents using my iPhone 13?
Absolutely! The iPhone 13 comes equipped with a powerful scanning feature that allows you to easily digitize your documents and store them in a digital format.
2. How do I scan documents with my iPhone 13?
Scanning documents with your iPhone 13 is a breeze. Simply open the Notes app on your iPhone 13, create a new note, tap the camera icon, and choose the “Scan Documents” option. Then, position the document within the frame and let your iPhone 13 capture the image. You can also adjust the corners or crop the document if needed.
3. Can I edit scanned documents on my iPhone 13?
Yes, you can. After scanning a document, you have the option to edit it directly on your iPhone 13. You can crop, rotate, or adjust the color of the document. You can also add annotations, signatures, or even highlight important sections of the document.
4. What format are the scanned documents saved in?
The scanned documents are saved in PDF format by default. PDF is a widely accepted file format that preserves the formatting and layout of the document, making it easy to share and view on different devices.
5. Can I share scanned documents from my iPhone 13?
Absolutely! Once you have scanned a document, you can easily share it directly from your iPhone 13. You can send it via email, save it to your iCloud Drive, or share it using a variety of third-party apps such as Dropbox or Google Drive.