
Are you tired of printing out documents just to sign them? Luckily, with the advancements in technology, signing a PDF document has never been easier. If you are an iPhone user, you can conveniently sign a PDF document directly from the Mail app, eliminating the need for any additional software or printing. In this article, we will guide you through the simple steps on how to sign a PDF document in the iPhone Mail app. Whether you need to sign a contract, agreement, or any other important document, you can do it quickly and securely right from your iPhone. Say goodbye to printing, scanning, and faxing, and say hello to the convenience of signing documents with just a few taps on your iPhone. Let’s get started!
Inside This Article
- # How to Sign a PDF Document in the iPhone Mail App
- Compatibility and Requirements: Explaining iPhone Model and iOS Version
- Preparing the PDF Document
- Adding a Signature
- Signing the PDF Document- Instructions on how to place the signature onto the PDF document.- Steps to position and resize the signature for an accurate placement.- Tips for ensuring a clear and professional-looking signature.
- Sending the Signed PDF Document
- Troubleshooting: Common issues and solutions related to signing PDF documents in the iPhone Mail app. Troubleshooting steps for problems such as missing signature options or difficulties with placement.
- Conclusion
- FAQs
# How to Sign a PDF Document in the iPhone Mail App
Are you tired of printing, signing, and scanning PDF documents just to add your signature? Luckily, you can now sign PDF documents directly within the iPhone Mail app, making the whole process faster and more convenient. In this guide, we will walk you through the steps to sign a PDF document using the iPhone Mail app.
Before we begin, it’s important to check if your iPhone model and iOS version support the sign feature in the Mail app. Generally, all iPhones running iOS 9 or later should have the necessary functionality. To confirm, open the Mail app and create a new email. Look for the Markup icon (pencil tip) in the email composition toolbar. If it’s available, you’re good to go!
Now that you have confirmed compatibility, let’s move on to preparing the PDF document. If you already have the PDF, simply open the email containing the document in the Mail app. Tap on the attachment icon to view the PDF. If the PDF is located elsewhere, you can save it to your iCloud Drive, Dropbox, or any other cloud storage service that is accessible from the Mail app.
Once the PDF is open within the Mail app, it’s time to add your signature. Tap on the Markup icon in the upper right corner of the screen. This will open the Markup toolbar, where you can find various annotation tools, including the signature feature. If you haven’t created a signature before, tap on the “+” sign to add a new one. Alternatively, you can select a pre-existing signature if you have already set it up.
Now that you’re in the signature editor, you have a few options for signing the PDF document. If you have a stylus or Apple Pencil, you can tap on the Draw icon and use your device to write your signature directly onto the screen. If you prefer typing your signature, tap on the Text icon and enter your name. You can also use the Camera icon to take a photo of your handwritten signature and use that as your digital signature.
With your signature ready, it’s time to sign the PDF document. Simply tap on the location where you want to place your signature within the document. You can freely move and resize the signature to ensure it fits perfectly. If you need multiple signatures on the document, repeat the previous steps until you’re satisfied.
Once you have signed the PDF document, it’s time to save and send it. Tap on the Done button in the Markup toolbar to finalize your changes. The Mail app will prompt you to save the document. Choose to save it either as a new attachment or to replace the existing one.
To send the signed PDF, compose a new email or reply to the existing email containing the PDF. Tap on the attachment icon to access the file attachment options. Select the signed PDF document from the list and attach it to the email. You can now send the email with the signed PDF document to the recipient.
If you encounter any issues while signing PDF documents in the iPhone Mail app, there are a few troubleshooting steps you can try. First, make sure that you have the latest version of the Mail app installed. If the sign feature is missing, you may need to update your device’s software. Additionally, resetting your iPhone’s settings can sometimes resolve any software-related glitches.
Compatibility and Requirements: Explaining iPhone Model and iOS Version
The ability to sign PDF documents within the iPhone Mail app is a valuable feature that can save time and effort. However, it’s important to understand the compatibility and requirements to ensure that your iPhone model and iOS version support this functionality.
iPhone Model:
To use the sign feature in the Mail app, you need to have an iPhone that supports this capability. It’s advisable to have an iPhone 6s or a newer model, as older models may not have the necessary hardware or software features.
If you’re unsure about the model of your iPhone, you can find this information in the device’s “Settings.” Go to “General,” then “About,” and you should see details about your iPhone model.
iOS Version:
In addition to having a compatible iPhone model, you also need to ensure that your iOS version supports the sign feature. iOS 9 and later versions have native support for signing PDF documents in the Mail app.
To check your iOS version, go to “Settings” on your iPhone, then tap “General” and choose “Software Update.” Here, you can see the current version installed on your device. If you’re using an older iOS version, you may need to update your iPhone to the latest available version to enable the sign feature.
Checking Mail App Compatibility:
Once you have determined that your iPhone model and iOS version meet the requirements, the next step is to check if the Mail app supports signing PDF documents.
To do this:
- Open the Mail app on your iPhone.
- Create a new email or open an existing one.
- Tap on the attachment icon (a paperclip symbol) to attach a file.
- Select a PDF document from your device’s storage.
- If the Mail app supports signing PDF documents, you will see an option to “Markup and Reply” or “Markup.”
- If you don’t see these options, it’s possible that your Mail app version or email provider doesn’t have this feature enabled. Consider updating the app or checking for any available updates.
By following these steps, you can determine if your Mail app is compatible with signing PDF documents and proceed accordingly.
Preparing the PDF Document
Before you can sign a PDF document using the iPhone Mail app, you need to have the document ready and accessible within the app. Here are the instructions on how to obtain, download, or receive the PDF document in the iPhone Mail app and how to open it:
- Obtaining a PDF Document:
- If the document is stored in a cloud storage service like iCloud, Dropbox, or Google Drive, make sure the respective app is installed on your iPhone. Open the app, locate the PDF file, and download it to your device.
- If the document is in an email attachment, open the email containing the attachment in the Mail app. Tap on the attachment to download it. The PDF document will now be accessible within the app.
- If the document is on a website, open Safari or the browser of your choice on your iPhone. Navigate to the website where the PDF document is located. Find the document and tap on it to open it. Once opened, tap the share icon (located at the bottom center or top right of the screen, depending on the browser) and choose “Copy to Mail” or “Open in Mail.” This will attach the PDF to a new email message in the Mail app.
- Opening the PDF Within the Mail App:
- Launch the Mail app by tapping on its icon on your iPhone’s home screen.
- Navigate to the email message that contains the PDF document.
- Tap on the email message to open it.
- Locate the PDF attachment within the email. It should be displayed as a thumbnail or an icon.
- Tap on the PDF attachment to open it. The document will be displayed within the Mail app.
If you already have the PDF document on your device, you can skip this step. Otherwise, you have a few options:
Once you have the PDF document accessible on your iPhone, follow these steps to open it within the Mail app:
Now you have successfully prepared and opened the PDF document within the iPhone Mail app. You are ready to proceed with adding your signature to the document.
Adding a Signature
Adding a signature to your emails can make them more professional and personalized. With the iPhone Mail app, you have the option to create a signature that will appear at the end of each email you send. Here is a guide on how to access the signature feature and the steps to create a new signature or use an existing one.
1. Accessing the signature feature:
To access the signature feature in the iPhone Mail app, follow these steps:
- Open the Mail app on your iPhone.
- Tap on the “Settings” icon, usually represented by a gear or cog.
- Scroll down and tap on “Mail.”
- Tap on “Signature.”
2. Creating a new signature:
If you want to create a new signature, follow these steps:
- Tap on “Per Account” to set a different signature for each email account, or tap on “All Accounts” to use the same signature for all accounts.
- Tap on “New Signature.”
- Type the desired text for your signature. You can include your name, job title, contact information, or any other relevant details.
- Tap on “Save” to save your new signature.
3. Using an existing signature:
If you already have a signature that you would like to use, follow these steps:
- Tap on “Per Account” or “All Accounts” based on your preference.
- Select the existing signature from the list of available options.
4. Options for adding a signature:
The iPhone Mail app offers different options for adding a signature:
- Drawing: If you prefer a more personalized touch, you can draw your signature directly on the screen using your finger or a stylus.
- Typing: If you prefer a clean and legible signature, you can type your name using the keyboard.
Once you have accessed the signature feature, created a new signature, or selected an existing one, you can customize it further by choosing the font size, style, and color. This allows you to make your signature unique and align it with your personal or professional branding.
By following these steps, you can easily add a signature to your emails using the iPhone Mail app. Whether you choose to draw or type your signature, having a personalized sign-off can make a lasting impression on your recipients.
Signing the PDF Document- Instructions on how to place the signature onto the PDF document.- Steps to position and resize the signature for an accurate placement.- Tips for ensuring a clear and professional-looking signature.
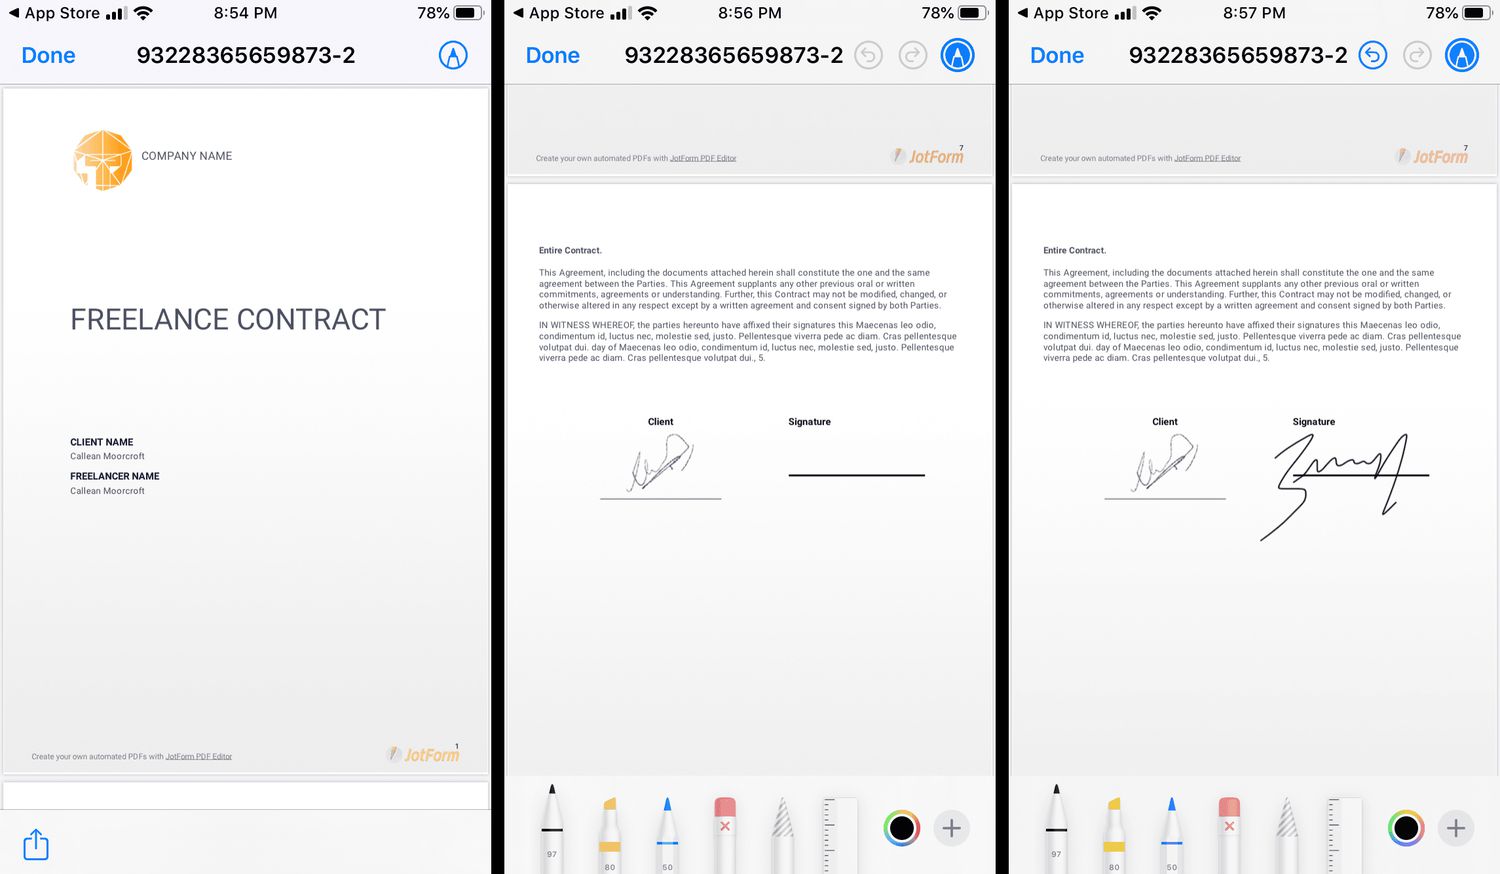
Once you have accessed the signature feature within the iPhone Mail app, it’s time to place your signature onto the PDF document. Follow these instructions to ensure a smooth and accurate placement:
1. Tap on the location in the document where you want to add your signature. This will activate the signature tool.
2. Use your finger or stylus to draw your signature directly onto the screen. Take your time to ensure it matches your actual signature as closely as possible.
3. If you prefer to type your signature, tap on the “Type” option. This will bring up a keyboard where you can enter your name in a signature-like font. Make sure to select a clear and legible font style.
4. To position your signature, use a pinch or spread motion with two fingers to zoom in or out on the screen. This allows you to navigate to the exact spot where your signature should be placed.
5. Once you have zoomed in, use your finger to drag the signature to the desired location. Place it in a way that looks natural within the context of the document.
6. To resize your signature for a perfect fit, place two fingers on the signature and pinch or expand them to adjust the size. This ensures that your signature is not too small or too large compared to the rest of the document.
7. Continue the process for any additional signatures that need to be placed in the document, following the same steps for each individual signature.
To ensure a clear and professional-looking signature, consider the following tips:
– Practice drawing or typing your signature multiple times to find the most accurate representation.
– Use a steady hand when drawing your signature to avoid shaky or uneven lines.
– If typing your signature, choose a font size and style that closely resembles your handwritten signature.
– Make sure the placement of your signature is aligned with any designated signature lines or areas within the document.
– Avoid placing your signature over important text or graphics within the document.
– Test the visibility of your signature by zooming out on the document to view it at a smaller size. Ensure it remains legible and does not appear distorted.
By following these instructions and tips, you can confidently place your signature onto a PDF document using the iPhone Mail app, creating a clear and professional appearance.
Sending the Signed PDF Document
Once you have successfully added a signature to your PDF document using the iPhone Mail app, the next step is to send it to the intended recipient. Here is a guide on how to save the signed PDF document and attach it to a reply or new email message:
1. Save the Signed PDF: After placing your signature on the document, tap on the “Done” button to exit the signature mode. The Mail app will prompt you to save the signed PDF to your device.
2. Choose a File Name and Location: Give the signed document a descriptive name and select a folder or location where you want to save it on your iPhone.
3. Open the Mail App: Go back to the Home screen and open the Mail app.
4. Compose a New Email or Reply to an Existing Email: Choose whether you want to send the signed document as a reply to an existing email or as a new email message.
5. Attach the Signed Document: In the email composition window, tap on the attachment icon (usually represented by a paperclip). This will open the file picker.
6. Select the Signed PDF: Navigate to the folder where you saved the signed PDF document. Tap on the document to select it.
7. Verify Signature: Before sending the email, it’s important to verify the signature on the attached PDF document to ensure its authenticity. You can do this by opening the PDF on your device and confirming that the signature matches the one you added in the Mail app.
8. Send the Email: Once you have verified the signature, proceed to send the email containing the signed PDF document.
By following these steps, you can easily save and send the signed PDF document using the iPhone Mail app. Remember to double-check the attachment and the signature to ensure its accuracy and save a copy of the signed document for your records.
Troubleshooting: Common issues and solutions related to signing PDF documents in the iPhone Mail app. Troubleshooting steps for problems such as missing signature options or difficulties with placement.
While signing PDF documents in the iPhone Mail app is generally a smooth and seamless process, there may be instances where you encounter certain issues or difficulties. In this section, we will address some common problems that users may face and provide troubleshooting steps to help resolve them.
1. Missing Signature Options: One of the common issues users may encounter is the absence of signature options within the Mail app. If you are unable to find the signature feature, follow these steps:
– Ensure that you have the latest version of the Mail app. Check for any available updates in the App Store and install them if necessary.
– Restart your iPhone to refresh the Mail app and its features.
– If the issue persists, go to the Settings app, select Mail, and toggle the “Allow Markup” option. Restart the Mail app to see if the signature options appear.
2. Difficulties with Placement: Sometimes, you may face challenges when positioning and resizing your signature on the PDF document. Here are some troubleshooting steps to help resolve this issue:
– Make sure that you are using the correct gesture or method to move and scale the signature. For example, if you are using the drawing option, use your finger to draw the signature instead of trying to move it.
– Check if the PDF document has any restrictions or locked fields that prevent you from placing the signature. If that’s the case, try signing in an area with no restrictions or unlock the document if possible.
– If the signature appears distorted or jagged after placement, try using the zoom gesture to increase the size of the signature before placing it on the document.
3. Inaccurate Signature Appearance: Occasionally, the signature may not appear as clear or professional-looking as desired. Follow these troubleshooting steps to improve the appearance of your signature:
– Ensure that you are using a smooth and steady motion when drawing the signature. Avoid making abrupt or shaky strokes.
– If you are using the typing option, consider using a different font or adjusting the size and style of the text to enhance its appearance.
– Check the contrast and brightness settings of your iPhone. Adjust them if necessary to make the signature more visible and legible.
If you have tried the troubleshooting steps above and are still experiencing issues with signing PDF documents in the iPhone Mail app, it may be helpful to contact Apple Support or seek assistance from an authorized service provider for further guidance.
Conclusion
In conclusion, signing a PDF document on your iPhone Mail app is a convenient and efficient way to handle important paperwork on the go. With the built-in markup tools and the ability to add signatures directly from your device, you can easily sign and send PDFs without the need for printing or scanning.
By following the step-by-step guide provided in this article, you can confidently sign PDF documents using the iPhone Mail app, ensuring the security and authenticity of your digital signatures.
Make sure to keep your iPhone software updated to access all the latest features and improvements, including enhanced PDF signing capabilities within the Mail app.
With the ability to sign PDFs directly from your iPhone Mail app, you can save time, reduce paper usage, and streamline your document signing process. So next time you receive a PDF that requires your signature, simply follow the steps outlined in this article to sign it with ease.
FAQs
1. Can I sign a PDF document in the iPhone Mail app?
Yes, you can sign a PDF document directly in the iPhone Mail app. The latest versions of iOS include a built-in feature that allows you to annotate and sign PDFs without needing any additional apps.
2. How do I sign a PDF document in the iPhone Mail app?
To sign a PDF document in the iPhone Mail app, follow these steps:
1. Open the email with the PDF attachment in the Mail app on your iPhone.
2. Tap on the PDF attachment to open it.
3. Tap on the Markup icon (looks like a pen tip) at the top-right corner of the screen.
4. Now, tap on the “+” icon at the bottom-right corner and select the Signature option.
5. You can now either create a new signature by tapping on “Add or Remove Signature”, or use an existing signature by selecting it from the list.
6. Once you’ve selected or created your signature, drag and place it on the desired location in the PDF document.
7. Adjust the size and orientation of the signature by using pinch-to-zoom and rotate gestures.
8. Tap on Done when you’re finished, and you can now send the signed PDF document.
3. Can I add multiple signatures to a PDF document?
Yes, you can add multiple signatures to a PDF document in the iPhone Mail app. By following the steps mentioned earlier, you can either create or select different signatures and place them in your document as needed.
4. Can I change or remove a signature from a signed PDF document?
Unfortunately, the iPhone Mail app does not provide the option to directly change or remove a signature from a signed PDF document. To make changes or remove a signature, you would need to use a dedicated PDF editor app that supports editing functions.
5. Are the signatures I add in the iPhone Mail app legally binding?
The legal validity of a signature added in the iPhone Mail app depends on the jurisdiction and the purpose of the document. In some cases, electronic signatures are legally recognized, while in others, physical signatures may be required. If you are signing a document that requires legal validity, it’s always best to consult with a legal professional or follow the regulations specific to your country or region.