
Are you an iPhone 13 user looking to harness the power of your device to its full potential? One of the impressive features of the iPhone 13 is its scanning capabilities, which allow you to digitize documents, photos, and more with ease. Whether you need to scan receipts, important documents, or even handwritten notes, the built-in scanning functionality of the iPhone 13 can come in handy. In this article, we will guide you through the process of how to scan with iPhone 13, ensuring that you can effortlessly scan and store important information right from the palm of your hand. So, let’s dive into the world of scanning with your iPhone 13 and unlock a whole new level of convenience and productivity.
Inside This Article
- Setting up Document Scanning on iPhone 13
- Using the Notes App for Scanning Documents on iPhone 13
- Scanning Documents with the Files App on iPhone 13
- Exploring Third-Party Scanning Apps for iPhone 13
- Conclusion
- FAQs
Setting up Document Scanning on iPhone 13
If you’re the proud owner of the new iPhone 13 and you’re looking to make the most out of its powerful camera, you’ll be pleased to know that your device can also function as a convenient document scanner. With just a few easy steps, you can transform your iPhone 13 into a portable scanner, allowing you to quickly digitize important documents, receipts, or even handwritten notes. Here’s how to set up document scanning on your iPhone 13.
First, ensure that you have the latest version of iOS installed on your iPhone 13. This ensures that you have access to all the latest features and improvements, including the built-in document scanning capabilities. To check for updates, go to Settings > General > Software Update and follow the prompts to install any available updates.
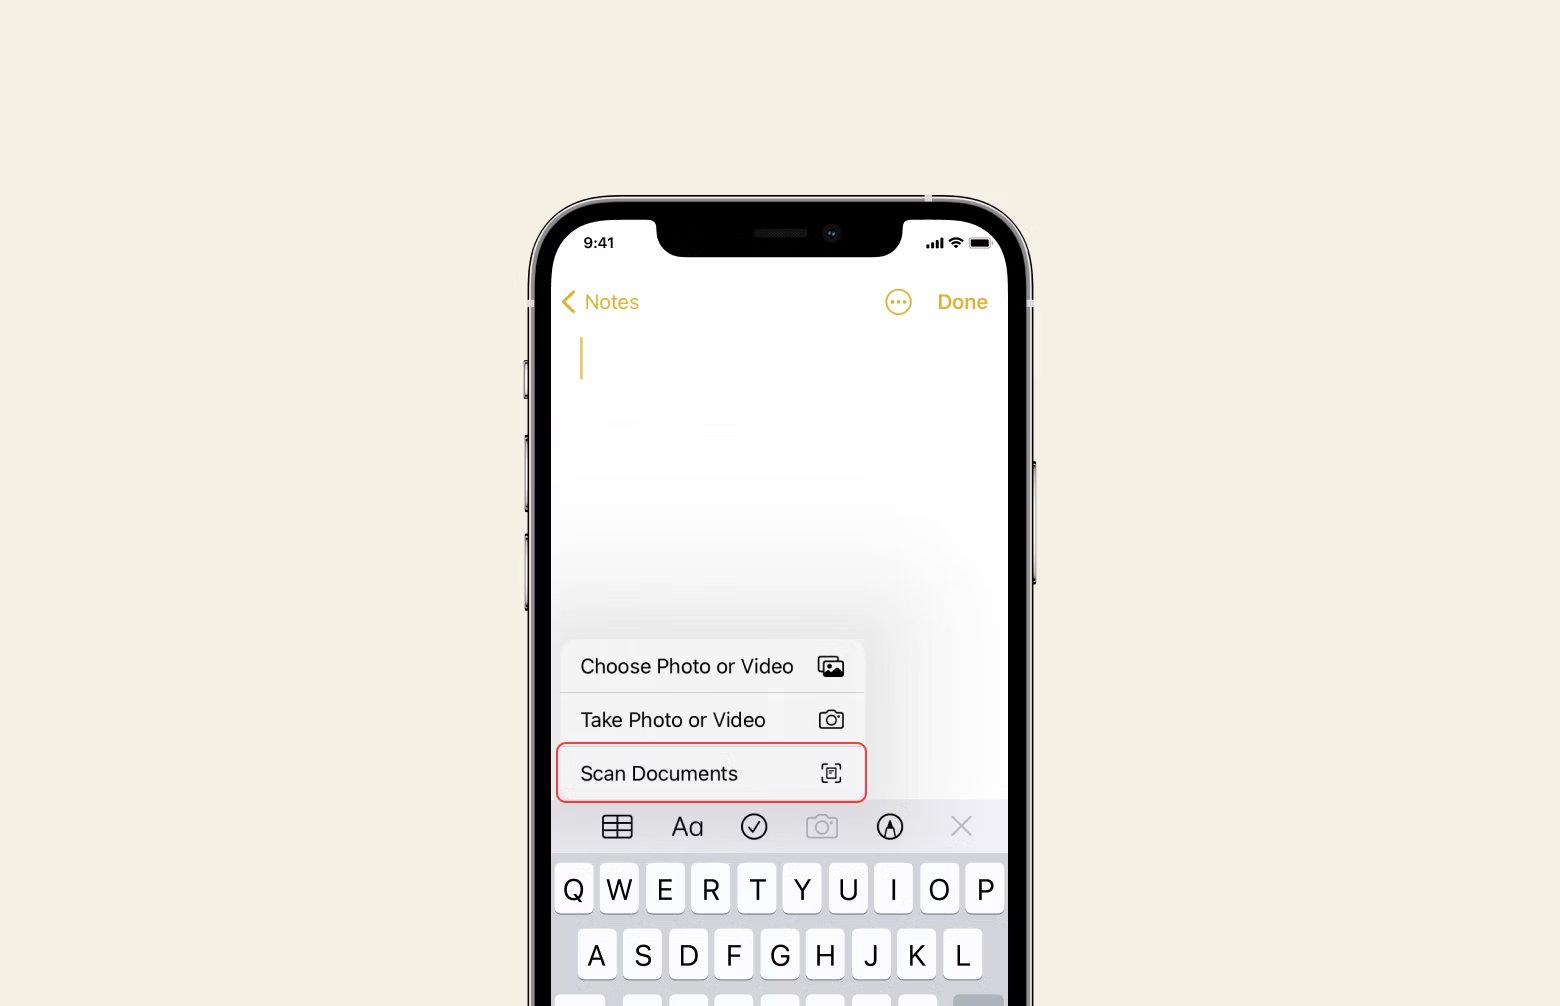
Once your iPhone 13 is updated, you can begin setting up document scanning. Start by opening the “Notes” app, which comes pre-installed on your device. If you can’t find it on your home screen, swipe down on the screen and use the search bar to locate it. Tap on the app icon to launch it.
Next, create a new note or open an existing one that you’d like to add a scanned document to. Tap on the “+” button at the bottom of the screen to reveal a menu of options, and then select “Scan Documents” from the list. This will activate the document scanning feature on your iPhone 13.
Position your iPhone 13 camera over the document you want to scan, making sure that the entire document is within the frame. The app will automatically detect the document and highlight it with a yellow box. If needed, you can manually adjust the corners of the document by dragging them with your finger.
When you’re satisfied with the positioning, tap the capture button to take a scan of the document. You can continue scanning multiple pages by tapping the “+” button again and positioning your iPhone 13 over the next page. The app will automatically append the new scans to your existing note.
Once you have captured all the pages you need, tap the “Save” button to finalize the scan. The document will be saved as a PDF within your note, ready for you to view, annotate, or share as needed.
It’s worth noting that the “Notes” app on your iPhone 13 also offers additional features to enhance your scanned documents. You can use the markup tool to annotate and add text to the scanned pages, or use the share button to send the document to other apps or contacts.
If you prefer to use a third-party scanning app, you can explore the App Store for options that offer advanced features such as OCR (optical character recognition) for converting scanned text into editable content. Simply open the App Store, search for “scanning apps,” and browse through the available options to find the app that suits your needs.
With the document scanning feature on your iPhone 13, you can say goodbye to traditional scanners and easily digitize your important documents on the go. Whether you’re storing receipts for easy expense tracking, archiving important papers, or simply wanting to reduce clutter, your iPhone 13 can be a powerful ally in staying organized and efficient.
Using the Notes App for Scanning Documents on iPhone 13
The iPhone 13 not only offers powerful performance and stunning camera capabilities, but it also provides a convenient way to scan documents using the built-in Notes app. Whether you need to digitize receipts, contracts, or other important paperwork, the Notes app can serve as your go-to tool.
To get started, open the Notes app on your iPhone 13. If you can’t find it, simply swipe down on your home screen and type “Notes” in the search bar. Once you have the app open, create a new note or choose an existing one where you’d like to store the scanned documents.
Next, tap on the “+” sign located above the keyboard. This will bring up a menu of options. Choose the “Scan Documents” option, which is represented by an icon that looks like a camera. A built-in scanner will appear, ready for action.
Align your document within the frame on the screen, making sure all edges are visible and well-lit. The scanner will automatically detect the document and capture a high-quality image. If necessary, you can manually adjust the corners of the document to ensure optimal clarity.
Once you’re satisfied with the scan, you can tap the capture button to take the shot. If you have multiple pages to scan, simply place the next page within the frame and tap the capture button again. The app will automatically append the new page to your document.
After you’ve finished scanning all the necessary pages, you can choose to make further adjustments to the document. The Notes app provides basic editing tools such as cropping, rotating, and adjusting the color and contrast of the scan.
When you’re done editing, you can either save the document within the note or share it with others. To save it, tap the “Save” button at the top right corner of the screen. The document will be stored within the note, ensuring that you can access it whenever you need to.
If you want to share the document, tap the share button located next to the save button. A menu of sharing options will appear, allowing you to send the document via email, message, or even upload it to a cloud storage service.
Using the Notes app for scanning documents on your iPhone 13 not only helps you stay organized and reduce paper clutter, but it also saves you time and effort. With just a few taps, you can transform physical documents into digital files that are easily searchable and shareable.
So, the next time you need to scan a document on your iPhone 13, give the Notes app a try. You’ll be impressed by its simplicity and effectiveness in turning your smartphone into a pocket scanner.
Scanning Documents with the Files App on iPhone 13
If you own an iPhone 13, you are likely already aware of its incredible capabilities. From its powerful camera to its impressive processing speed, the iPhone 13 is a device that can do it all. But did you know that it also comes with a built-in feature for scanning documents? That’s right! With the Files app on your iPhone 13, you can easily and conveniently scan documents with just a few simple steps.
Scanning documents with the Files app on iPhone 13 is a seamless process that can be done in a matter of minutes. To get started, open the Files app on your iPhone 13 and navigate to the location where you want to save the scanned document. This could be a specific folder or even your iCloud Drive.
Once you have selected the desired location, tap on the “…” button at the top-right corner of the screen. From the dropdown menu, choose the “Scan Documents” option. This will open the scanning interface within the Files app.
Position your iPhone 13 over the document that you want to scan. Make sure that the document is aligned properly within the frame on your screen. The Files app will automatically detect the edges of the document and capture a high-quality scan.
After the scan is complete, you will have the option to make adjustments to the image. You can rotate, crop, or apply filters to enhance the quality of the scanned document. Once you are satisfied with the results, tap the “Save” button to save the scanned document to the selected location.
The Files app on iPhone 13 also offers additional features to further organize your scanned documents. You can create folders, rename files, and even tag documents for easy retrieval. Plus, with iCloud integration, your scanned documents will be automatically synced across all your Apple devices.
With the ability to scan documents directly from the Files app on iPhone 13, you no longer need to rely on third-party scanning apps. The built-in feature provides a convenient and efficient way to digitize your documents on the go.
So, whether you need to scan receipts, contracts, or any other important documents, the Files app on your iPhone 13 has got you covered. Give it a try and experience the convenience of document scanning with just a few taps.
Exploring Third-Party Scanning Apps for iPhone 13
While the built-in scanning features on the iPhone 13 with the Notes and Files apps are quite capable, there are also several third-party scanning apps available that can take your scanning experience to the next level. These apps offer extra features, customization options, and advanced scanning capabilities that can enhance productivity and convenience. In this article, we will explore some of the top third-party scanning apps for iPhone 13.
1. CamScanner: CamScanner is a popular scanning app that boasts a powerful set of features. With CamScanner, you can easily scan documents, receipts, business cards, and even whiteboards. The app automatically enhances the scanned images and offers options to crop, rotate, and adjust the color and contrast. It also supports OCR (Optical Character Recognition), which allows you to extract text from scanned documents for easy editing.
2. Scanner Pro: Scanner Pro is another highly acclaimed scanning app for iPhone 13. It provides a user-friendly interface and offers advanced scanning options. The app can automatically detect document edges and optimize the scanned images for clear and crisp results. Scanner Pro also supports OCR, making it easy to search for text within your scanned documents. Additionally, it integrates smoothly with cloud services like iCloud, Dropbox, and Google Drive.
3. Adobe Scan: From the renowned software company Adobe, Adobe Scan is a feature-rich scanning app for iPhone 13. It uses advanced image-processing technology to create high-quality scans. Adobe Scan also supports OCR, allowing you to convert your scanned documents into editable PDF files. The app seamlessly integrates with Adobe Document Cloud, making it easy to store, sync, and share your scanned documents across various devices.
4. Genius Scan: Genius Scan is a popular choice for users who prioritize simplicity and ease of use. With its intuitive interface, you can quickly scan documents with just a few taps. The app automatically detects document edges and enhances the scanned images. It also offers options to organize and categorize your scanned documents for better organization. Genius Scan supports exporting to various file formats and cloud storage services.
Whether you need advanced OCR capabilities, seamless cloud integration, or a simple yet effective scanning app, these third-party options for iPhone 13 have you covered. Consider exploring these apps to find the one that best suits your scanning needs and preferences.
Conclusion
Scanning with the iPhone 13 has never been easier or more convenient. The advanced camera and software capabilities of this device make it a powerful tool for capturing high-quality scans of documents, photos, and even 3D objects. Whether you need to digitize important papers, create digital backups, or simply want to explore the art of mobile scanning, the iPhone 13 has got you covered.
By following the simple steps outlined in this guide, you can unlock the full potential of your iPhone 13’s scanning capabilities. Remember to keep your device updated with the latest software and experiment with different lighting conditions to achieve optimal results. With its sleek design, powerful performance, and versatile camera system, the iPhone 13 is a game-changer when it comes to scanning on the go.
So, go ahead and make the most of your iPhone 13’s scanning features. Capture memories, organize your documents, and digitize your world with ease. Whether it’s for work or personal use, the iPhone 13 is a valuable tool that brings convenience and efficiency to your fingertips.
FAQs
Q: Is it possible to scan documents with the iPhone 13?
A: Absolutely! The iPhone 13 is equipped with a powerful camera and advanced software that allows you to easily scan documents.
Q: How can I access the document scanning feature on my iPhone 13?
A: To access the document scanning feature on your iPhone 13, simply open the Notes app and create a new note. Tap on the + button, then select “Scan Documents” from the options. This will activate the camera and enable you to capture high-quality scans.
Q: Can I scan multiple pages into a single document?
A: Yes, you can! The document scanning feature on the iPhone 13 allows you to scan multiple pages and merge them into a single document. After scanning the first page, simply tap on the “+” button to continue adding more pages to the document.
Q: What formats are supported for scanned documents on the iPhone 13?
A: Scanned documents on the iPhone 13 are saved as PDF files by default. However, you also have the option to save them as JPEG files if needed. This flexibility ensures compatibility with various devices and platforms.
Q: Can I edit the scanned documents on my iPhone 13?
A: Absolutely! The Notes app on the iPhone 13 provides basic editing capabilities for scanned documents. You can crop, rotate, and adjust the color and contrast of scanned pages. Additionally, you can add annotations, text, or even your signature to the scanned documents.