
Scanning documents has become an essential part of our everyday lives, whether it’s for work, school, or personal use. With the advancements in smartphone technology, it has become easier than ever to scan documents on the go. One such device that offers this convenience is the iPhone. With its powerful camera capabilities and user-friendly interface, the iPhone allows you to effortlessly digitize your physical documents and save them in digital format.
In this article, we will guide you on how to scan documents on your iPhone, step by step. Whether you need to quickly scan a receipt, capture important notes, or create a digital copy of a document, we’ve got you covered. Let’s dive in and explore the various methods and apps that you can utilize to make document scanning a breeze with your iPhone.
Inside This Article
- Introduction
- Can You Scan Documents on iPhone?
- Preparing Your iPhone for Scanning
- Method 1: Using the Notes App
- Method 2: Using the Files App
- Method 3: Using a Third-Party Scanner App
- Tips for Better Document Scanning
- Introduction
- Can You Scan Documents on iPhone?
- Preparing Your iPhone for Scanning
- Method 1: Using the Notes App
- Method 2: Using the Files App
- Method 3: Using a Third-Party Scanner App
- Tips for Better Document Scanning
- Conclusion
- Conclusion
- FAQs
Introduction
In today’s digital age, the convenience of smartphones knows no bounds. These small handheld devices have become an integral part of our lives, helping us stay connected, entertained, and productive on the go. But did you know that your iPhone can also be used as a portable document scanner? Yes, you heard it right! With the right tools and techniques, you can easily scan documents right from your iPhone, eliminating the need for bulky physical scanners or photocopiers.
Whether you’re a student needing to scan study notes, a professional who frequently deals with paperwork, or simply someone who wants to digitize important documents, knowing how to scan documents on your iPhone can be a game changer. It allows you to quickly capture and store documents on your device, share them via email or messaging apps, or even edit them using various digital tools.
In this comprehensive guide, we will explore different methods and apps that enable you to effortlessly scan documents on your iPhone. We will also provide you with some valuable tips to ensure high-quality scans and optimize the scanning process. So let’s dive in and unlock the power of document scanning on your iPhone!
Can You Scan Documents on iPhone?
With the advancements in technology, our smartphones have become powerful tools capable of performing a wide range of tasks, including document scanning. Gone are the days of needing a separate scanner to digitize your important papers. Now, you can conveniently scan documents directly from your iPhone. But can you really scan documents on the iPhone? Absolutely!
The iPhone comes equipped with built-in features that make it easy for you to transform physical documents into digital files. Whether it’s a receipt, a business card, or a multi-page document, you can capture and store them digitally right from your iPhone. In this article, we will explore different methods that allow you to scan documents on your iPhone.
So, if you want to free up some space in your filing cabinet, reduce paper clutter, or simply have easy access to your important documents on the go, keep reading to find out how to scan documents on your iPhone.
Preparing Your iPhone for Scanning
Before you start scanning documents on your iPhone, there are a few steps you can take to ensure that your device is ready for the task. Here are some tips to help you prepare your iPhone for scanning:
- Make sure your iPhone is updated: It’s important to have the latest software version installed on your iPhone as it often includes performance improvements and bug fixes. Check for any available updates by going to the Settings app, selecting “General,” and then tapping on “Software Update.”
- Clear some storage space: Document scanning can sometimes generate large files, especially if you are scanning multiple pages. To avoid running out of storage space, it’s a good idea to free up some space on your iPhone beforehand. You can do this by deleting unnecessary apps, photos, or files.
- Ensure adequate lighting: Good lighting is crucial for obtaining clear and readable scans. When scanning documents, make sure you are in a well-lit area or use additional lighting sources if necessary. Natural daylight or a bright room are ideal for optimal scan quality.
- Remove any protective coverings: If your iPhone is equipped with a protective screen cover or case, make sure to remove it before scanning. These coverings can interfere with the camera’s ability to capture the document accurately.
- Position your iPhone correctly: When scanning a document, hold your iPhone directly above the paper and align it parallel to the edges. This will help ensure that the document is captured in its entirety and minimize any distortions or shadows.
- Check for scanner app compatibility: If you plan on using a third-party scanning app, check if it is compatible with your iPhone model and iOS version. Some scanner apps offer additional features like OCR (optical character recognition) and cloud storage integration, which can enhance your scanning experience.
By taking these steps to prepare your iPhone for scanning, you can ensure a smoother and more efficient document scanning process. Now that your device is ready, let’s explore the different methods you can use to scan documents on your iPhone.
Method 1: Using the Notes App
If you’re an iPhone user, you have a powerful tool for document scanning right at your fingertips – the Notes app. Here’s how you can use it to scan documents with ease:
- Open the Notes app on your iPhone. If you can’t find it, you can simply swipe down on your home screen and use the search function to locate it.
- Create a new note by tapping on the “+” icon on the bottom middle of the screen or by selecting the “New Note” option. Alternatively, you can open an existing note if you prefer.
- Tap on the camera icon located near the bottom of the screen. This will give you the option to either take a new photo or scan a document.
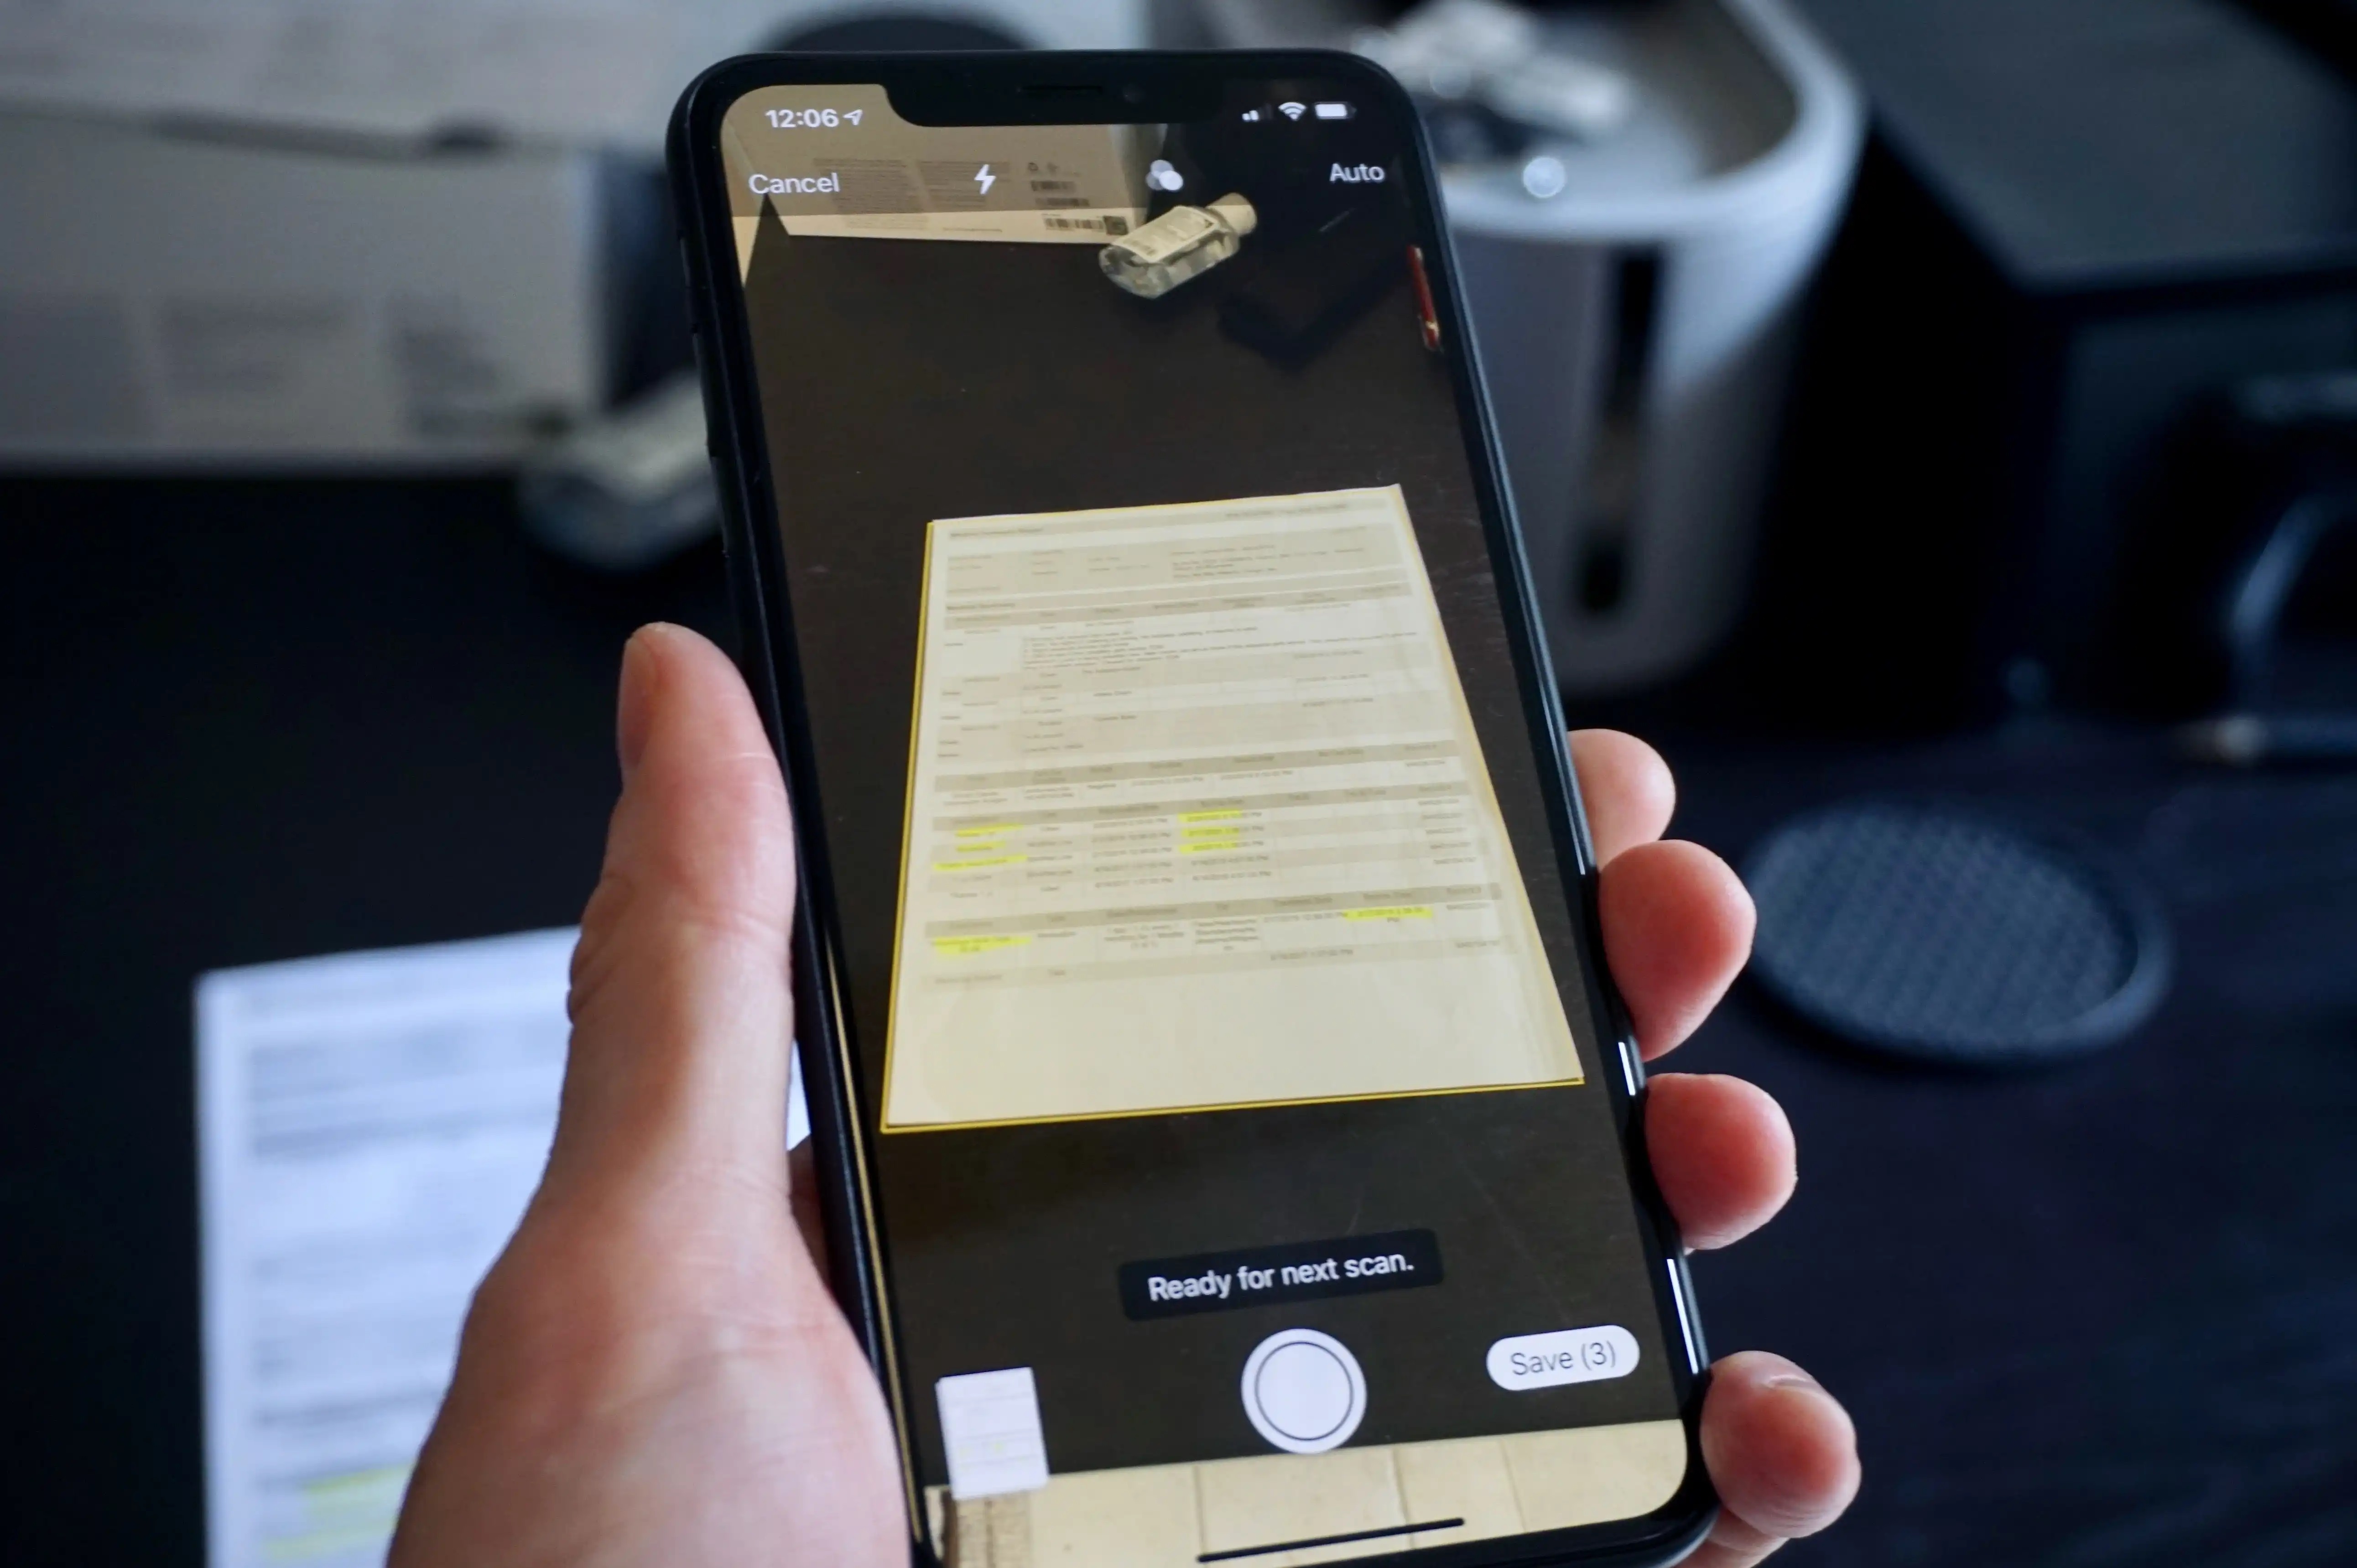
- Select the “Scan Documents” option. Your iPhone’s camera will open, and you’ll see a yellow box appear on the screen.
- Position the document you want to scan within the yellow box. Your iPhone will automatically detect the document and capture the image.
- If necessary, you can adjust the corners of the scanned document to ensure it appears correctly. Tap on each corner and drag it as needed.
- Once you’re satisfied with the scan, tap on the “Keep Scan” button. This will save the scanned document to your note.
- You can repeat the scanning process for multiple pages if needed. Simply tap on the “+” icon within the scan view to add additional pages to your document.
- Once you’ve finished scanning all the pages, tap on the “Save” button to save the note. You can then access the scanned document anytime within the Notes app.
Using the Notes app for document scanning is not only convenient but also allows you to easily organize and access your scanned documents. You can add titles, descriptions, and even annotate your scans within the app. Plus, with iCloud syncing, your scanned documents can be seamlessly accessed across all of your Apple devices.
Method 2: Using the Files App
The Files app on your iPhone is another built-in tool that can help you scan documents. To use the Files app for scanning, follow these steps:
- Open the Files app on your iPhone. It’s a blue folder icon.
- Navigate to the location where you want to save the scanned document. You can choose to save it locally on your device or in a cloud storage service like iCloud Drive or Dropbox.
- Tap on the “+” button at the top-right corner of the app.
- Select the “Scan Documents” option from the menu.
- Position your iPhone camera over the document you want to scan. The app will automatically detect the edges of the document and capture the image.
- Make any necessary adjustments to the scan, such as cropping or rotating the image.
- Tap on the “Keep Scan” button to save the scanned document.
- You can continue scanning additional pages if needed by tapping on the “+” button again.
- Once you have scanned all the necessary pages, tap on the “Save” button to finalize the scan and save it to the selected location.
The Files app provides a convenient way to scan documents directly into your preferred file storage location. It offers options to organize your scanned documents into folders and easily access them whenever you need them.
Method 3: Using a Third-Party Scanner App
If you’re looking for more advanced features and customization options, you can opt to use a third-party scanner app to scan documents on your iPhone. These apps offer a wide range of functionalities, including advanced image enhancement, OCR (Optical Character Recognition) capabilities, cloud storage integration, and more.
Here are the steps to use a third-party scanner app:
- Choose a scanner app: There are several popular scanner apps available on the App Store, such as CamScanner, Scanbot, and Adobe Scan. Download and install the app that suits your needs.
- Open the app: Launch the scanner app on your iPhone.
- Grant permissions: The app will likely request permission to access your camera and photo library. Allow the app to access these features to enable scanning functionality.
- Select the document type: Most scanner apps allow you to choose the document type that you’re scanning, such as receipts, business cards, or documents. Select the appropriate option for accurate scanning results.
- Position the document: Place the document you want to scan within the viewfinder of the app. Make sure the document is aligned and well-lit for optimal results.
- Capture the scan: Once the document is properly positioned, tap the capture button within the app to capture the scan. Some scanner apps may automatically detect the edges of the document for a precise scan.
- Adjust settings (optional): Depending on the app you’re using, you may have the option to adjust settings such as brightness, contrast, and color saturation. Explore the app’s settings to customize the scan according to your preferences.
- Save and share: After capturing the scan, the app will allow you to save it to your iPhone’s photo library or directly to a cloud storage service like iCloud, Google Drive, or Dropbox. Choose the desired saving location and then share the scanned document via email, messaging apps, or other file-sharing options.
Using a third-party scanner app gives you more flexibility in terms of document scanning and management. Take advantage of the app’s features to enhance the quality of your scans and streamline your document workflow.
Tips for Better Document Scanning
When scanning documents on your iPhone, it’s essential to keep a few tips in mind to ensure high-quality and accurate results. Here are some tips for better document scanning:
- Choose a well-lit environment: Good lighting is crucial for clear document scanning. Make sure you are in a well-lit area, or use additional lighting if needed. Natural light is ideal, but if that’s not possible, position your iPhone’s camera in a way that minimizes shadows.
- Hold your iPhone steady: To capture sharp and focused scans, hold your iPhone as steady as possible. You can use a tripod or prop it up on a stable surface if available. Alternatively, you can also use the volume buttons on your iPhone’s headphones as a remote shutter release.
- Position the document correctly: Align the document properly within the frame of your iPhone’s camera. Make sure all edges of the document are visible, and there is no part cut off. This will help prevent any missing or distorted information in your scanned document.
- Keep the document flat: Flatten the document as much as possible to avoid any creases or folds. If necessary, use your hands or a gentle weight to hold the document flat on the surface.
- Clean the camera lens: Dust or smudges on the camera lens can negatively impact the quality of your scans. Before scanning, wipe the lens using a clean, lint-free cloth to ensure a clear and sharp image.
- Adjust scan settings: The scanning apps on your iPhone may offer various settings for document scanning, such as adjusting the resolution or choosing a color mode. Experiment with these settings to find the ideal combination for your specific scanning needs. Higher resolution may be required for detailed documents, while grayscale or black and white modes can be useful for text-based documents.
- Rename and organize your scans: It’s a good practice to rename and organize your scanned documents. Give them descriptive names and store them in appropriate folders or cloud storage services for easy retrieval and future reference.
- Proofread and edit: After scanning a document, take the time to review the scan for any errors or missed sections. If necessary, use editing tools within the scanning app to crop, rotate, or enhance the scanned document before saving or sharing.
- Backup your scans: To ensure the safety of your scanned documents, consider backing them up regularly. You can use cloud storage services or transfer the files to your computer for added security and accessibility.
By following these tips, you can optimize your document scanning experience on your iPhone and achieve high-quality, accurate scans for your various needs.
Introduction
Mobile devices have become an integral part of our daily lives, serving as powerful tools that allow us to perform a wide range of tasks conveniently. Among these tasks is the ability to scan documents, turning our smartphones into portable scanners. Gone are the days of searching for a standalone scanner or photocopier when you need to digitize important paperwork. With the advancements in technology, scanning documents on your iPhone is now a breeze. In this article, we will explore various methods and guide you through the process of scanning documents on your iPhone.
Can You Scan Documents on iPhone?
Yes, absolutely! iPhones come equipped with a built-in camera that can be utilized to scan documents. Apple has incorporated features and apps that make it easy for users to capture and digitize documents, receipts, and even handwritten notes. Whether you need to create digital copies for archiving, share documents via email, or store them in the cloud, your iPhone can serve as a reliable scanning tool.
Preparing Your iPhone for Scanning
Before you embark on scanning documents, there are a few essential steps to ensure that your iPhone is ready for the task. Let’s take a look at what you need to do before you start scanning:
- Ensure that your iPhone has enough available storage space to store scanned documents. If needed, delete unnecessary apps or files to free up space.
- Clean the camera lens to avoid any smudges or dirt that may affect the quality of scanned documents.
- Make sure your iPhone is fully charged or connected to a power source to avoid interruptions during the scanning process.
- Consider using a document stand or tripod to stabilize your iPhone and eliminate any shaking while capturing the document.
Method 1: Using the Notes App
The first method utilizes the built-in Notes app on your iPhone. Here’s how you can scan documents using this app:
- Open the Notes app on your iPhone.
- Create a new note or open an existing one.
- Tap on the “+” button and select “Scan Documents.”
- Align the document within the frame that appears on the screen. The app will automatically detect the edges and capture the document.
- You can add additional pages or retake a scan if needed.
- Once you are satisfied with the scanned document, tap on “Save” to store it in the note or share it as desired.
Method 2: Using the Files App
The second method makes use of the Files app available on your iPhone. Follow these steps to scan documents using the Files app:
- Open the Files app on your iPhone.
- Navigate to the folder where you want to save the scanned document or create a new folder.
- Tap on the “+” button and select “Scan Documents.”
- Position the document within the frame and tap the capture button to scan the document.
- You can adjust the corners of the scanned document if needed.
- Tap on “Keep Scan” to save the document or retake the scan if necessary.
- Give a suitable name to the scanned document and tap “Save.”
Method 3: Using a Third-Party Scanner App
If you prefer more advanced scanning features or additional editing options, you can opt for third-party scanner apps available on the App Store. These apps offer various functionalities for document scanning, such as OCR (Optical Character Recognition) to convert scanned documents into editable text. Some popular scanner apps include CamScanner, Adobe Scan, and Microsoft Office Lens. Simply download and install your preferred app from the App Store, follow the app-specific instructions, and start scanning.
Tips for Better Document Scanning
To ensure the best possible quality when scanning documents on your iPhone, consider the following tips:
- Place the document on a contrasting background to ensure clarity and legibility.
- Ensure there is ample lighting to prevent shadows on the document.
- Hold the iPhone parallel to the document for an accurate scan.
- Utilize the built-in gridlines or guidelines to align the document properly.
- Make sure the entire document is within the frame and not cut off.
- Take multiple scans if necessary and choose the best one.
- Use the editing tools available in the scanning app to enhance the scanned document’s clarity and readability.
Conclusion
Scanning documents on your iPhone is a convenient and efficient way to digitize important paperwork. Whether you’re on the go or simply want to declutter your physical files, utilizing your iPhone’s scanning capabilities can save you time and effort. By following the methods and tips outlined in this article, you’ll be able to effortlessly scan and store your documents digitally, making them easily accessible whenever you need them. Embrace the power of your iPhone and take advantage of the scanning functionality to simplify your document management tasks.
Conclusion
In conclusion, scanning documents on your iPhone has never been easier. With the advancements in technology, you can now transform your smartphone into a portable scanner. Gone are the days of relying on bulky scanners and desktop computers to digitize your important documents.
The built-in scanning features in iPhone allow you to effortlessly capture and store documents on the go. You can now easily scan receipts, contracts, or any other paper documents directly from your phone. The high-quality scanning capabilities ensure that the scanned documents are clear, sharp, and easily readable.
Furthermore, the iPhone scanner apps offer additional functionalities such as document editing, OCR (Optical Character Recognition), and cloud storage integration. These features enable you to not only scan your documents but also organize and access them conveniently from anywhere.
So, whether you are a student, professional, or simply someone who needs to digitize documents on a regular basis, the ability to scan documents on your iPhone is a game-changer. Say goodbye to the hassles of traditional scanning methods and embrace the ease and convenience of mobile document scanning with your trusty iPhone. It’s time to unlock the full potential of your smartphone and make document scanning a breeze, right at your fingertips.
FAQs
1. Can I scan documents using my iPhone?
Yes, you can absolutely scan documents using your iPhone. With a built-in document scanning feature available in the Notes app, you can quickly and easily scan documents, receipts, or any other paper documents using just your iPhone camera.
2. How do I access the document scanning feature on my iPhone?
To access the document scanning feature on your iPhone, open the Notes app and create a new note or open an existing one. Tap on the (+) icon located above the keyboard and select “Scan Documents” from the available options. This will open the camera interface, allowing you to scan and capture the document.
3. Can I adjust the scan settings on my iPhone?
Yes, you have the option to adjust the scan settings on your iPhone. After capturing the document using the document scanning feature, you can tap on the screen to reveal various options such as automatic or manual scanning, adjusting the focus and exposure, and even choosing between color or grayscale scanning.
4. What formats can I save the scanned documents in?
The scanned documents can be saved in various formats on your iPhone. By default, the scanned documents are saved in PDF format, which is widely supported and easy to share. However, you also have the option to save the documents as JPEG files if needed.
5. Can I edit and share the scanned documents from my iPhone?
Absolutely! Once you have scanned the document and saved it, you can easily edit, annotate, and share the scanned document directly from your iPhone. The Notes app offers a range of editing tools, including the ability to add text, draw, and even sign documents. You can then share the document via email, messaging apps, or even save it to cloud storage platforms such as iCloud or Dropbox.