
Are you tired of checking multiple email accounts throughout the day? Are you struggling to keep track of important emails scattered across different platforms? Look no further – we have a solution for you! In this article, we will show you how to send or redirect emails to your primary Gmail inbox. With just a few simple steps, you can consolidate all your email communication in one convenient location, making it easier than ever to stay organized and respond promptly. Whether you are a business professional managing multiple accounts or a casual user looking to streamline your email management, this guide will help you stay on top of your inbox and never miss an important message again. So, let’s dive in and discover how to send or redirect email to your primary Gmail inbox!
Inside This Article
- Methods for Sending or Redirecting Email to Your Primary Gmail Inbox
- Using Filters
- Forwarding Emails
- Adding Senders to Your Contacts
- Adjusting Gmail Settings
- Conclusion
- FAQs
Methods for Sending or Redirecting Email to Your Primary Gmail Inbox
Are you tired of missing important emails because they get buried in your Gmail promotions or spam folder? Don’t worry; there are several methods you can use to ensure that all essential emails are delivered straight to your primary Gmail inbox. In this article, we will explore four effective techniques for sending or redirecting emails to your primary Gmail inbox, ensuring that you never miss an important message again. Let’s dive in!
1. Using Filters
The first method is to utilize Gmail’s powerful filtering feature. Filters allow you to automatically organize incoming mail based on specific criteria. To create a filter, go to your Gmail settings, click on “Filters and Blocked Addresses,” and then click on “Create a new filter.” From there, you can set various conditions such as the sender’s email address, subject line, or keywords in the email body. Once you’ve defined your filter criteria, choose the option to “Categorize as Primary” or “Never send it to Spam.” This will ensure that any email meeting the specified criteria is delivered to your primary inbox.
2. Forwarding Emails
If you receive emails in other email accounts or platforms, you can easily forward them to your primary Gmail inbox. Simply set up email forwarding in your external account’s settings and enter your primary Gmail address as the forwarding destination. Gmail will automatically receive these forwarded emails and place them in your primary inbox. This method is especially useful if you have multiple email accounts and want to consolidate all your incoming messages into one central location.
3. Adding Senders to Your Contacts
Gmail prioritizes emails from contacts and ensures they appear in your primary inbox. If you frequently receive important emails from specific senders that land in other Gmail tabs, like promotions or social, you can add them to your contacts. To do this, open an email from the sender, click on their email address, and select “Add to Contacts.” Gmail will recognize these senders as contacts and automatically deliver their emails to your primary inbox. It’s a simple yet effective way to ensure you never miss vital communications from important contacts.
4. Adjusting Gmail Settings
Gmail offers customizable settings that allow you to control how your emails are sorted and displayed. To access these settings, click on the gear icon in the top right corner of your Gmail account and select “See all settings.” From there, navigate to the “Inbox” tab and choose your preferred inbox type. By selecting “Primary,” you can ensure that all incoming mail lands directly in your primary inbox. You can also configure other settings such as enabling or disabling category tabs, which can affect how incoming emails are organized.
With these four methods, you can take full control of your Gmail inbox and ensure that important emails always find their way to your primary inbox. Whether you’re using filters, forwarding emails, adding senders to contacts, or adjusting Gmail settings, these techniques will help you streamline your email organization and prevent important messages from slipping through the cracks. Say goodbye to digging through multiple folders, and say hello to an organized and efficient Gmail inbox!
Using Filters
Filters are a powerful feature in Gmail that allows you to automatically manage incoming emails and sort them into specific categories or folders. By setting up filters, you can ensure that certain emails always go directly to your primary Gmail inbox.
To use filters, follow these steps:
- Open your Gmail account and click on the gear icon in the upper right corner.
- Select “Settings” from the drop-down menu.
- In the Settings menu, click on the “Filters and Blocked Addresses” tab.
- Scroll down and click on “Create a new filter” or edit an existing filter if you already have one.
- In the filter creation page, specify the criteria you want to use for filtering the emails. For example, you can filter emails from a specific sender, with certain keywords in the subject, or those addressed to a specific email address.
- Click on the “Create filter” button.
- In the next dialog box, check the box next to “Never send it to Spam” to ensure that the filtered emails always land in your primary inbox.
- Click on the “Create filter” button again to save your filter.
Once the filter is set up, any incoming emails that meet the specified criteria will be automatically filtered and sent directly to your primary Gmail inbox.
Forwarding Emails
Forwarding emails is another method you can use to send or redirect email to your primary Gmail inbox. With email forwarding, you can automatically forward emails from one email account to another, ensuring that all your important messages are consolidated in one place.
To set up email forwarding in Gmail, follow these steps:
- Open your Gmail account and click on the gear icon on the top-right corner of the screen.
- Select ‘Settings’ from the dropdown menu.
- Click on the ‘Forwarding and POP/IMAP’ tab.
- In the ‘Forwarding’ section, click on ‘Add a forwarding address’.
- Enter the email address where you want to forward your emails to and click ‘Next’.
- Click ‘Proceed’ to grant permission for Gmail to forward emails to the specified address.
- A verification code will be sent to the forwarding address you provided. Enter the code in the confirmation window.
- Select the option ‘Forward a copy of incoming mail to’ and choose your primary Gmail account from the dropdown menu.
- Click on ‘Save Changes’ to apply the forwarding settings.
Once you have completed these steps, any emails received in the original email account will be automatically forwarded to your primary Gmail inbox. This allows you to manage all your emails in one central location, making it easier to stay organized and never miss an important message.
It’s important to note that when using email forwarding, the original email will still remain in the original account in addition to being forwarded to your Gmail inbox. This means that you will have copies of the email in both accounts, which may occupy storage space.
If you no longer want to forward your emails, you can easily disable the forwarding feature by following the same steps and selecting the option to remove the forwarding address.
Forwarding emails is a convenient way to streamline your email management and ensure important messages are accessible in your primary Gmail inbox. Take advantage of this feature to simplify your email workflow and stay organized.
Adding Senders to Your Contacts
If you want to ensure that emails from specific senders always land in your primary Gmail inbox, adding them to your contacts is a simple and effective method. By doing so, Gmail recognizes these senders as trusted contacts, reducing the likelihood of their emails being directed to promotions or spam folders.
Adding senders to your contacts is a straightforward process. Here’s how you can do it:
- Open Gmail and locate the email from the sender you want to add to your contacts.
- Open the email or hover over the sender’s name.
- A pop-up box will appear with options related to the sender. Click on “Add to Contacts” or “Add Contact”.
- A new contact form will open where you can enter additional details if necessary.
- Click on the “Save” or “Add Contact” button to save the sender to your contacts list.
Once you have added the sender to your contacts, Gmail will recognize incoming emails from that sender and prioritize them in your primary inbox. This ensures that important communications are not missed and are easily accessible.
It’s important to note that adding senders to your contacts is only effective if the sender’s email address remains the same. If the sender uses a different email address, you may need to repeat the process for each new address they use.
By taking a few moments to add important senders to your contacts, you can have greater control over the emails you receive and ensure that important information always lands in your primary Gmail inbox.
Adjusting Gmail Settings
Adjusting the settings in your Gmail account can provide you with greater control over how emails are sent or redirected to your primary inbox. By customizing these settings, you can ensure that important emails and messages from specific senders always land in your primary Gmail inbox instead of being filtered into different categories.
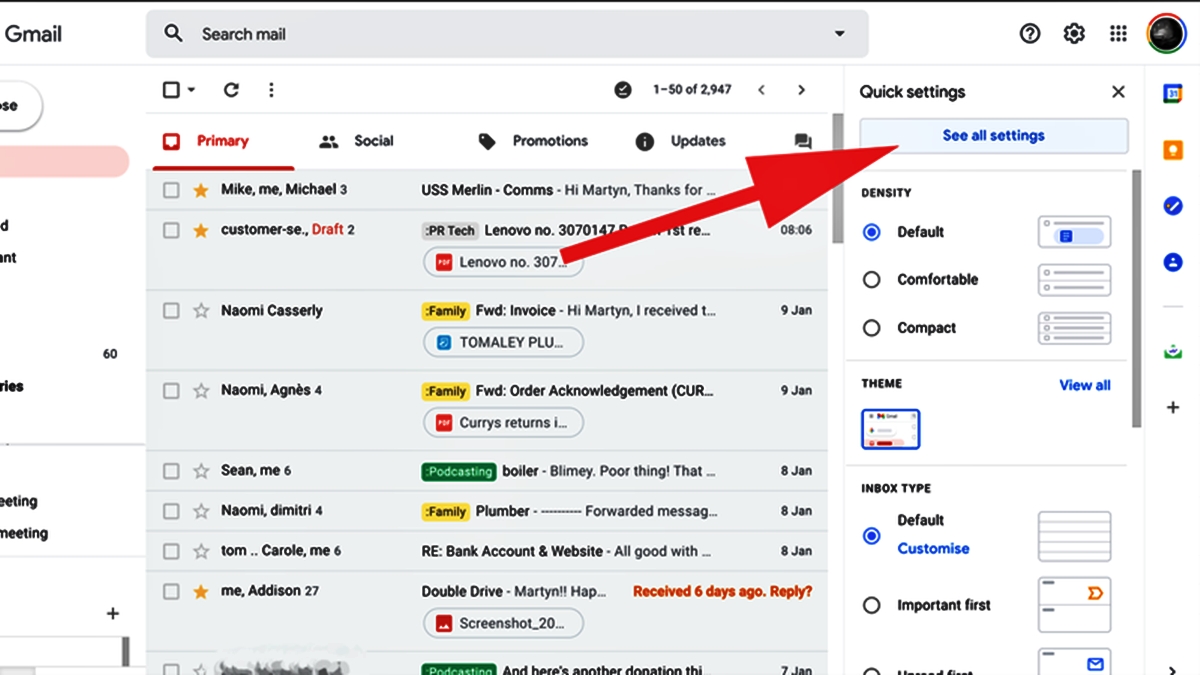
– To start, open your Gmail account and click on the gear icon located in the top right corner of the page. This will open the Settings menu.
– From the Settings menu, choose the “See all settings” option. This will take you to the full settings page where you can make various adjustments to your Gmail account.
– Look for the “Inbox” tab and click on it. Here, you’ll find different options for organizing and managing your inbox.
– Under the Inbox tab, you can choose the inbox type that suits your needs. For example, you can select the “Default” inbox type, which displays all incoming messages in a single list. Alternatively, you can choose the “Priority” inbox, which separates emails into different sections based on their importance.
– Scroll down to the section titled “Categories” and ensure that all the categories you want to receive emails from are selected. Uncheck any categories that you don’t want to receive emails from or add them as necessary.
– Additionally, you can adjust the importance markers for your inbox by going to the “Importance markers” section. Here, you can choose whether to show markers for important emails or not.
– If you have configured email filters (as mentioned in the previous section), make sure to review them under the “Filters and Blocked Addresses” tab. This will allow you to ensure that the filters you have set up are aligned with your desired email organization system.
– Once you have made all the necessary adjustments, remember to save your changes by clicking on the “Save Changes” button at the bottom of the page.
By adjusting your Gmail settings, you can take full advantage of the features and capabilities of your Gmail account. Customize your inbox to receive important emails directly in your primary inbox, helping you stay organized and never miss any crucial messages.
Now that you are familiar with the various methods for sending or redirecting email to your primary Gmail inbox, you can choose the approach that works best for you. Whether it’s using filters, forwarding emails, adding senders to your contacts, or adjusting Gmail settings, you have the tools to optimize your email experience. Take control of your inbox and enjoy seamless email management with Gmail.
Through this article, we have explored the process of sending or redirecting emails to your primary Gmail inbox. By following the steps outlined in this guide, you can easily manage your email accounts and have all your messages conveniently accessible in one place.
Sending or redirecting emails to your primary Gmail inbox offers numerous benefits, including improved organization and streamlined communication. Whether you have multiple email accounts or simply want to centralize your correspondence, Gmail provides a user-friendly solution.
With the ability to add multiple accounts and set up email forwarding, Gmail empowers you to control and streamline your email management. Take advantage of these features to enhance your productivity and simplify your digital life.
Don’t let scattered emails hinder your effectiveness. Utilize the tools available to you in Gmail and enjoy the convenience of having all your email communications in one place. Make the most of this powerful platform to optimize your workflow and stay on top of your digital correspondence.
FAQs
1. Can you send or redirect emails to your primary Gmail inbox?
Yes, it is possible to send or redirect emails to your primary Gmail inbox. Gmail provides various features and settings to help you manage your emails effectively and streamline your email workflow. By configuring certain settings in Gmail, you can ensure that emails from specific senders or with specific criteria are directly delivered to your primary inbox.
2. How can I send emails to my primary Gmail inbox?
To send emails directly to your primary Gmail inbox, you can create filters that specify certain criteria such as sender’s email address, subject line keywords, or specific labels. You can then choose the option to “Always mark it as important” and skip the inbox to ensure these emails are filtered directly into your primary inbox.
3. Can I redirect emails from another email account to my primary Gmail inbox?
Yes, Gmail provides the functionality to redirect emails from another email account to your primary Gmail inbox. You can set up email forwarding in the settings of your other email account and provide your Gmail address as the destination. This way, any emails received by the other account will be automatically forwarded to your primary Gmail inbox.
4. Can I set up multiple email redirects to my primary Gmail inbox?
Yes, Gmail allows you to set up multiple email redirects to your primary inbox. You can configure email forwarding for each individual email account that you want to redirect to your Gmail address. This feature is particularly useful for consolidating multiple email accounts into one inbox for better email management.
5. Are there any limitations to sending or redirecting emails to my primary Gmail inbox?
While Gmail offers robust email management features, there are some limitations to keep in mind. For example, if you redirect emails from another account to your primary Gmail inbox, it may take some time for the emails to appear due to the forwarding process. Additionally, depending on the email service or provider you are redirecting from, there may be certain restrictions or compatibility issues that could affect the seamless delivery of emails.