
Are you frequently using your MacBook late at night and finding the bright screen straining your eyes? If so, you’ll be delighted to know that there’s a solution to this problem: Night Shift. Night Shift is a feature available on MacBooks that adjusts the color temperature of the display, reducing the amount of blue light emitted. This not only makes it easier on your eyes but also promotes better sleep. In this article, we will guide you through the simple steps of turning on Night Shift on your MacBook, allowing you to comfortably use your device at night without any eye discomfort. So, let’s dive in and discover how to enjoy using your MacBook during those late-night study sessions or movie marathons without sacrificing your eye health.
Inside This Article
- Night Shift on MacBook
- Step 1: Accessing System Preferences
- Step 2: Enabling Night Shift
- Step 3: Adjusting Night Shift settings
- Step 4: Scheduling Night Shift
- Conclusion
- FAQs
Night Shift on MacBook
Are you tired of the harsh blue light emitted by your MacBook screen, especially at night? Apple’s Night Shift feature can help alleviate this issue by adjusting the color temperature of your display. In this article, we will explore how to turn on Night Shift on a MacBook and make your late-night work or browsing more comfortable.
Overview of Night Shift feature
Night Shift is a feature introduced by Apple in macOS that aims to reduce the exposure of blue light emitted by your MacBook’s display. Blue light can interfere with your sleep patterns and cause eye strain, especially when using your laptop in low light conditions. By enabling Night Shift, your MacBook will automatically adjust the color temperature of the screen to a warmer and more soothing tone, reducing the amount of blue light you are exposed to.
Step-by-step guide to enable Night Shift on a MacBook
Enabling Night Shift on your MacBook is a straightforward process. Follow these steps:
- Open the Apple menu by clicking on the Apple logo in the top-left corner of your screen.
- Select “System Preferences” from the dropdown menu.
- In the System Preferences window, click on “Displays.”
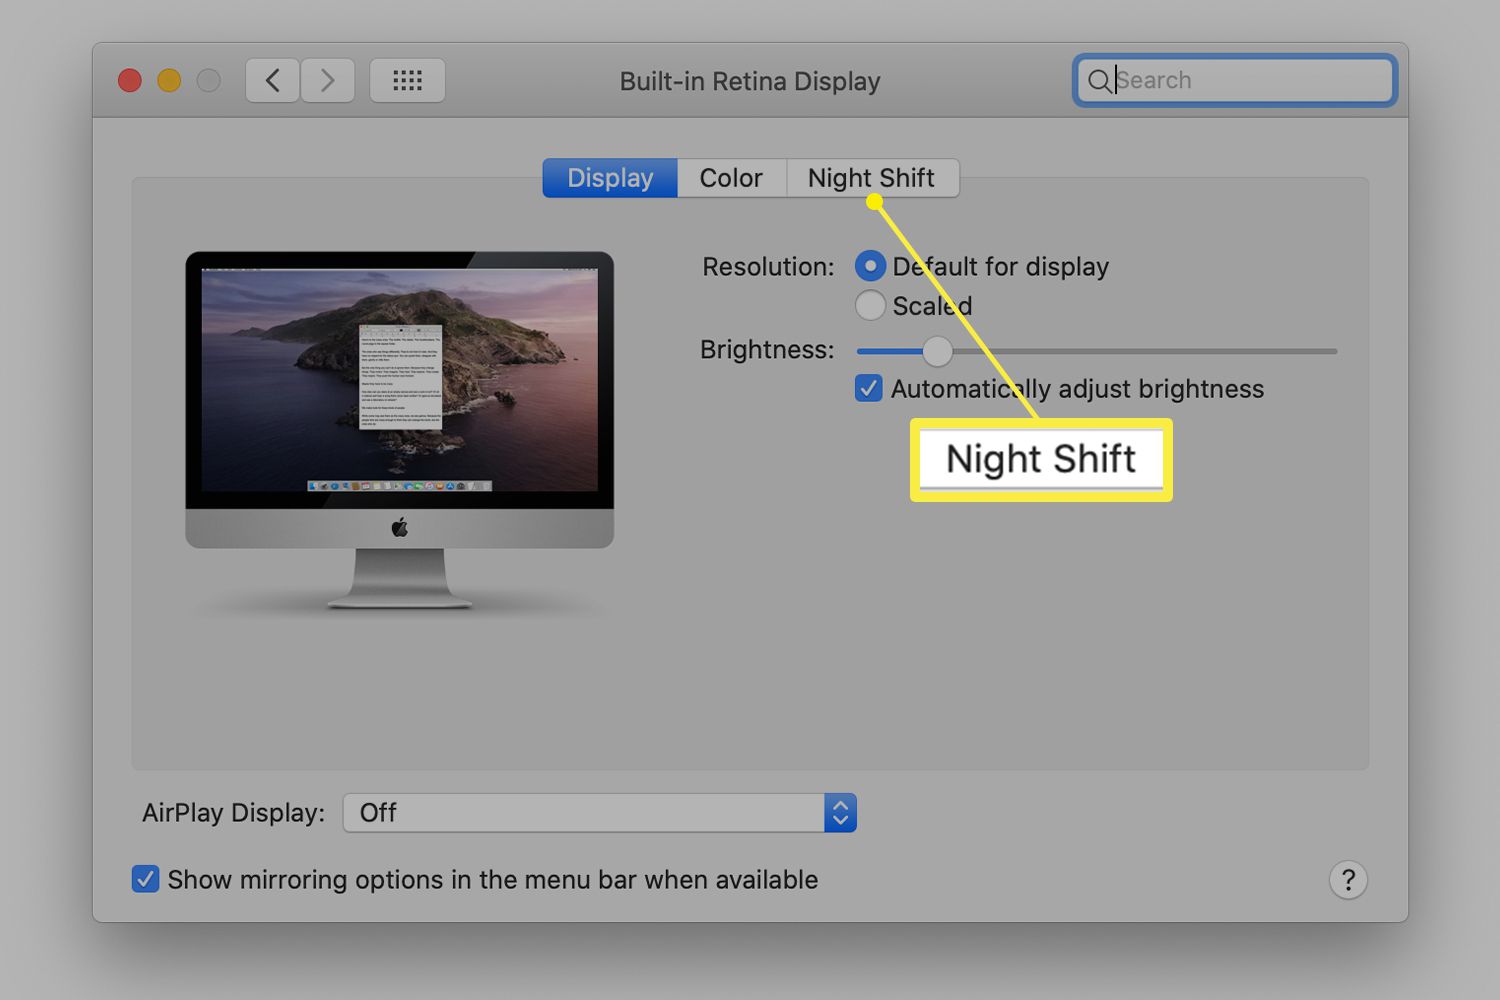
- Go to the “Night Shift” tab in the Displays window.
- Tick the box next to “Schedule” to enable Night Shift automatically or keep it off if you want to manually control Night Shift.
- If you choose to enable the schedule, select the “Custom” option to customize the Night Shift timing according to your preference.
- Adjust the “Color Temperature” slider to set the desired warmth of the display. Moving the slider to the left makes the screen cooler, while moving it to the right makes it warmer.
And there you have it! Night Shift is now enabled on your MacBook, and your display will adjust its color temperature accordingly.
Adjusting Night Shift settings
If you want to further customize your Night Shift settings, you can do so by following these steps:
- Open the System Preferences menu by clicking on the Apple logo in the top-left corner of your screen, and select “System Preferences.”
- Click on “Displays” in the System Preferences window.
- Go to the “Night Shift” tab in the Displays window.
- Adjust the “Color Temperature” slider to increase or decrease the warmth of your display.
- You can also drag the “Intensity” slider to control the strength of the Night Shift effect.
- Alternatively, you can use the “Sunset to Sunrise” option to have Night Shift automatically adjust the color temperature based on your local sunset and sunrise times.
Additional tips for using Night Shift on a MacBook
Here are some additional tips to make the most out of Night Shift on your MacBook:
- You can quickly enable or disable Night Shift by going to the Notification Center and clicking on the “Night Shift” button.
- Experiment with different Color Temperature and Intensity settings to find the optimal balance between reducing blue light and maintaining color accuracy.
- Night Shift is not available on all MacBook models. Check your MacBook’s model and specifications to ensure compatibility.
- If you prefer not to use Night Shift, you can always turn it off by unchecking the “Schedule” box in the Night Shift settings.
By following these steps and utilizing the additional tips, you can now effectively use Night Shift on your MacBook to reduce blue light exposure and make your late-night computing more comfortable. Say goodbye to eye strain and sleep disturbances caused by harsh blue light!
Step 1: Accessing System Preferences
Enabling Night Shift on your MacBook is simple and can be done through the System Preferences. To access the System Preferences, follow these steps:
1. Click on the Apple menu: Look for the Apple logo in the top-left corner of your screen and click on it. This will open a drop-down menu.
2. Select “System Preferences”: From the drop-down menu, click on “System Preferences” near the top of the list. This will open the System Preferences window.
3. Open the “Displays” preference: In the System Preferences window, locate and click on the “Displays” preference. This will open the Displays settings.
4. Go to the “Night Shift” option: Within the Displays settings, you will find a tab labeled “Night Shift.” Click on this tab to access the Night Shift options.
Once you have successfully accessed the Night Shift settings, you can proceed to the next step to enable Night Shift on your MacBook.
Step 2: Enabling Night Shift
Once you have accessed the Display preferences pane on your MacBook, you are ready to enable Night Shift. Follow these simple steps to activate this helpful feature:
-
In the Display preferences pane, you will see a tab labeled “Night Shift.” Click on it to access the Night Shift settings.
-
Now, you will have the option to choose the activation method for Night Shift. You can select either “Sunset to Sunrise” or “Custom Schedule.” The former allows Night Shift to automatically adjust according to your local sunrise and sunset times, while the latter enables you to set a specific time window for Night Shift.
-
Select your preferred activation method by clicking on the corresponding radio button.
-
If you choose the “Custom Schedule” option, you will see two additional dropdown menus to set the start and end times for Night Shift.
-
Select the desired start and end times from the dropdown menus. You can adjust the hours and minutes to precisely set the activation window.
-
After selecting your activation method and setting the appropriate times, Night Shift will be enabled on your MacBook.
That’s it! You have successfully enabled Night Shift on your MacBook. Now, your display will automatically adjust to the warmer color temperature during the specified time window.
Step 3: Adjusting Night Shift settings
After enabling Night Shift on your MacBook, you have the option to adjust the settings to customize your viewing experience. Here are a few settings you can modify:
1. Schedule: By default, Night Shift is set to turn on from sunset to sunrise. However, you can change this schedule to your preference. Click on the “Schedule” tab in the Night Shift settings. From there, you can select “Custom” and manually set the starting and ending times based on your desired schedule.
2. Color Temperature: Night Shift allows you to adjust the color temperature of your display, going from cooler blue light during the day to warmer yellow light at night. To change the color temperature, navigate to the “Color Temperature” section. Drag the slider to the left for a warmer display or to the right for a cooler display. Find the balance that suits your comfort level.
3. Intensity: If you want more or less of the yellow tint during Night Shift, you can adjust the intensity. Head to the “Intensity” section and move the slider accordingly. Moving it to the left reduces the intensity, while moving it to the right increases it. Experiment with different levels to find what works best for your eyes.
4. Manual Control: Sometimes, you may want to temporarily disable Night Shift or manually enable it outside of the scheduled times. To do this quickly, you can use the “Manual Control” option. It is accessible from the Notification Center or the Control Center. Simply click on the Night Shift icon to toggle it on or off as needed.
5. Turn it off for specific apps: If there are certain applications or programs in which you prefer to have the original color temperature, you can exclude them from Night Shift. In the Night Shift settings, select the “Options” tab and click on “Turn off until tomorrow” under “Apps.” From there, you can select specific apps in which Night Shift will be disabled.
By adjusting these Night Shift settings, you can find the perfect balance of reduced blue light and visual comfort for your MacBook display. Play around with the options and discover what works best for you.
Step 4: Scheduling Night Shift
Once you have enabled Night Shift on your MacBook, you can take it a step further by scheduling it to turn on and off automatically. This feature allows you to set a specific time period during which Night Shift will be active, ensuring that your screen adjusts its colors at the desired times.
To schedule Night Shift on your MacBook, follow these simple steps:
- Click on the Apple menu in the top-left corner of your screen and select “System Preferences” from the dropdown menu.
- In the System Preferences window, click on the “Displays” icon.
- Switch to the “Night Shift” tab at the top of the window.
- Under the “Schedule” section, you will see two options: “Turn On Until Tomorrow” and “Custom…”.
- If you want to use the default schedule of turning Night Shift on until the next day, simply click on the “Turn On Until Tomorrow” option.
- If you prefer to set a custom schedule, click on the “Custom…” option.
- A new window will appear, allowing you to choose the start and end time for Night Shift. Drag the sliders to select your desired times.
- Once you have set the schedule, click on the “OK” button to save the changes.
With Night Shift scheduled on your MacBook, you can rest assured that your screen will automatically adjust its color temperature according to your preferred times. This is especially useful if you have a consistent sleep schedule and want to minimize the exposure to blue light during the evening and night hours.
Remember, you can always toggle Night Shift on or off manually at any time, regardless of the schedule. Simply follow the previous steps to access the Night Shift settings and make the necessary adjustments.
Conclusion
Turning on Night Shift on your MacBook can greatly improve your viewing experience, especially in low light conditions. By reducing the amount of blue light emitted, Night Shift helps reduce eye strain and promote better sleep. The process is simple and can be done in just a few clicks.
Remember, Night Shift is not a substitute for proper sleep hygiene and should be used in conjunction with other strategies for getting a good night’s sleep. It’s also important to experiment with the intensity and schedule of Night Shift to find what works best for you.
So go ahead and give Night Shift a try on your MacBook. Your eyes will thank you for it!
FAQs
1. What is Night Shift on a MacBook?
Night Shift is a feature on a MacBook that adjusts the color temperature of the display to reduce eye strain and improve your sleep quality during nighttime use. It shifts the display towards warmer and less blue light to mimic the natural lighting conditions of the evening.
2. How does Night Shift work?
Night Shift uses the clock and geolocation features of your MacBook to determine the sunset time in your location. As the evening approaches, it gradually adjusts the display’s color temperature from blue to warmer tones. This reduces the exposure to blue light, which is known to disrupt sleep patterns.
3. How can I turn on Night Shift on my MacBook?
To turn on Night Shift on your MacBook, follow these steps:
a) Click on the Apple menu in the top-left corner of the screen.
b) Choose “System Preferences” from the drop-down menu.
c) Click on “Displays” from the System Preferences window.
d) Select the “Night Shift” tab.
e) Adjust the “Schedule” option to either “Sunset to Sunrise” or set a custom schedule.
f) Use the “Color Temperature” slider to choose the desired warmth of the display.
g) Close the System Preferences window to save the changes.
Once you have turned on Night Shift, your MacBook will automatically adjust the display colors according to the selected schedule.
4. Can I customize the schedule for Night Shift on my MacBook?
Yes, you can customize the schedule for Night Shift on your MacBook. Follow the steps mentioned in the previous answer and select the “Custom Schedule” option in the “Schedule” dropdown menu. You can then set the start and end times for Night Shift to activate according to your preference.
5. Can I adjust the intensity of Night Shift on my MacBook?
Yes, you can adjust the intensity of Night Shift on your MacBook. When you are in the Night Shift tab of the Display settings, you will find a slider called “Color Temperature,” which allows you to choose the desired warmth of the display. Moving the slider to the left makes the display cooler, while moving it to the right makes it warmer. Experiment with different settings to find the level of warmth that works best for you.