
Are you struggling to unzip files on your iPhone? Don’t worry, we’ve got you covered! In this article, we will show you how to unzip files on the iPhone using the Files app. The Files app, introduced in iOS 11, allows you to not only organize and manage your files but also open and extract compressed files. Whether you have received a zip file via email or downloaded one from the internet, we will guide you through the simple steps to extract its contents directly on your iPhone. So, if you’re ready to make the most out of your iPhone’s functionality and effortlessly unzip files, let’s dive right in!
Inside This Article
- Overview of the Files App
- Locating and Downloading Zip Files
- Unzipping Files in the Files App
- Managing Extracted Files
- Conclusion
- FAQs
Overview of the Files App
The Files app on the iPhone is a powerful and versatile tool that allows you to manage, organize, and access your files and documents in one central location. Introduced with iOS 11, this app provides a user-friendly interface for managing files stored on your device, iCloud Drive, and other cloud storage services.
With the Files app, you can easily browse through your files, create folders, move files between folders, and even search for specific documents. It offers support for various file formats, including images, videos, PDFs, presentations, spreadsheets, and more.
Not only does the Files app provide seamless integration with iCloud Drive, but it also supports third-party cloud storage services like Google Drive, Dropbox, and OneDrive. This means you can access files from multiple cloud storage providers and manage them all within the Files app.
Moreover, the Files app offers advanced features like file tagging, Favorites, and recent files. File tagging allows you to label your files with specific tags for easy organization and quick retrieval. You can mark frequently accessed files as Favorites to access them even faster. The app also keeps track of your recently accessed files, making it easier to find and open recently viewed documents.
Overall, the Files app simplifies the management of your files and offers a comprehensive solution for file organization, storage, and accessibility on your iPhone.
Locating and Downloading Zip Files
One of the first steps in unzipping files on your iPhone using the Files app is locating and downloading the zip files. Fortunately, the Files app makes it easy to access and manage your files, including zip files.
To locate zip files, you can start by opening the Files app on your iPhone. The app can usually be found on your home screen or in the app drawer. Once you open the app, you will be greeted with a sleek and user-friendly interface that allows you to navigate through your files and folders.
Next, you can browse through the available locations to find the zip file you want to download. The Files app allows you to access various locations such as iCloud Drive, On My iPhone, and third-party cloud storage services like Dropbox, Google Drive, and OneDrive.
If the zip file is stored in iCloud Drive, you can tap on the “iCloud Drive” option and navigate to the respective folder where the file is located. Alternatively, if the zip file is stored in a cloud storage service, you will need to tap on the respective service’s name and sign in to your account to access the zip file.
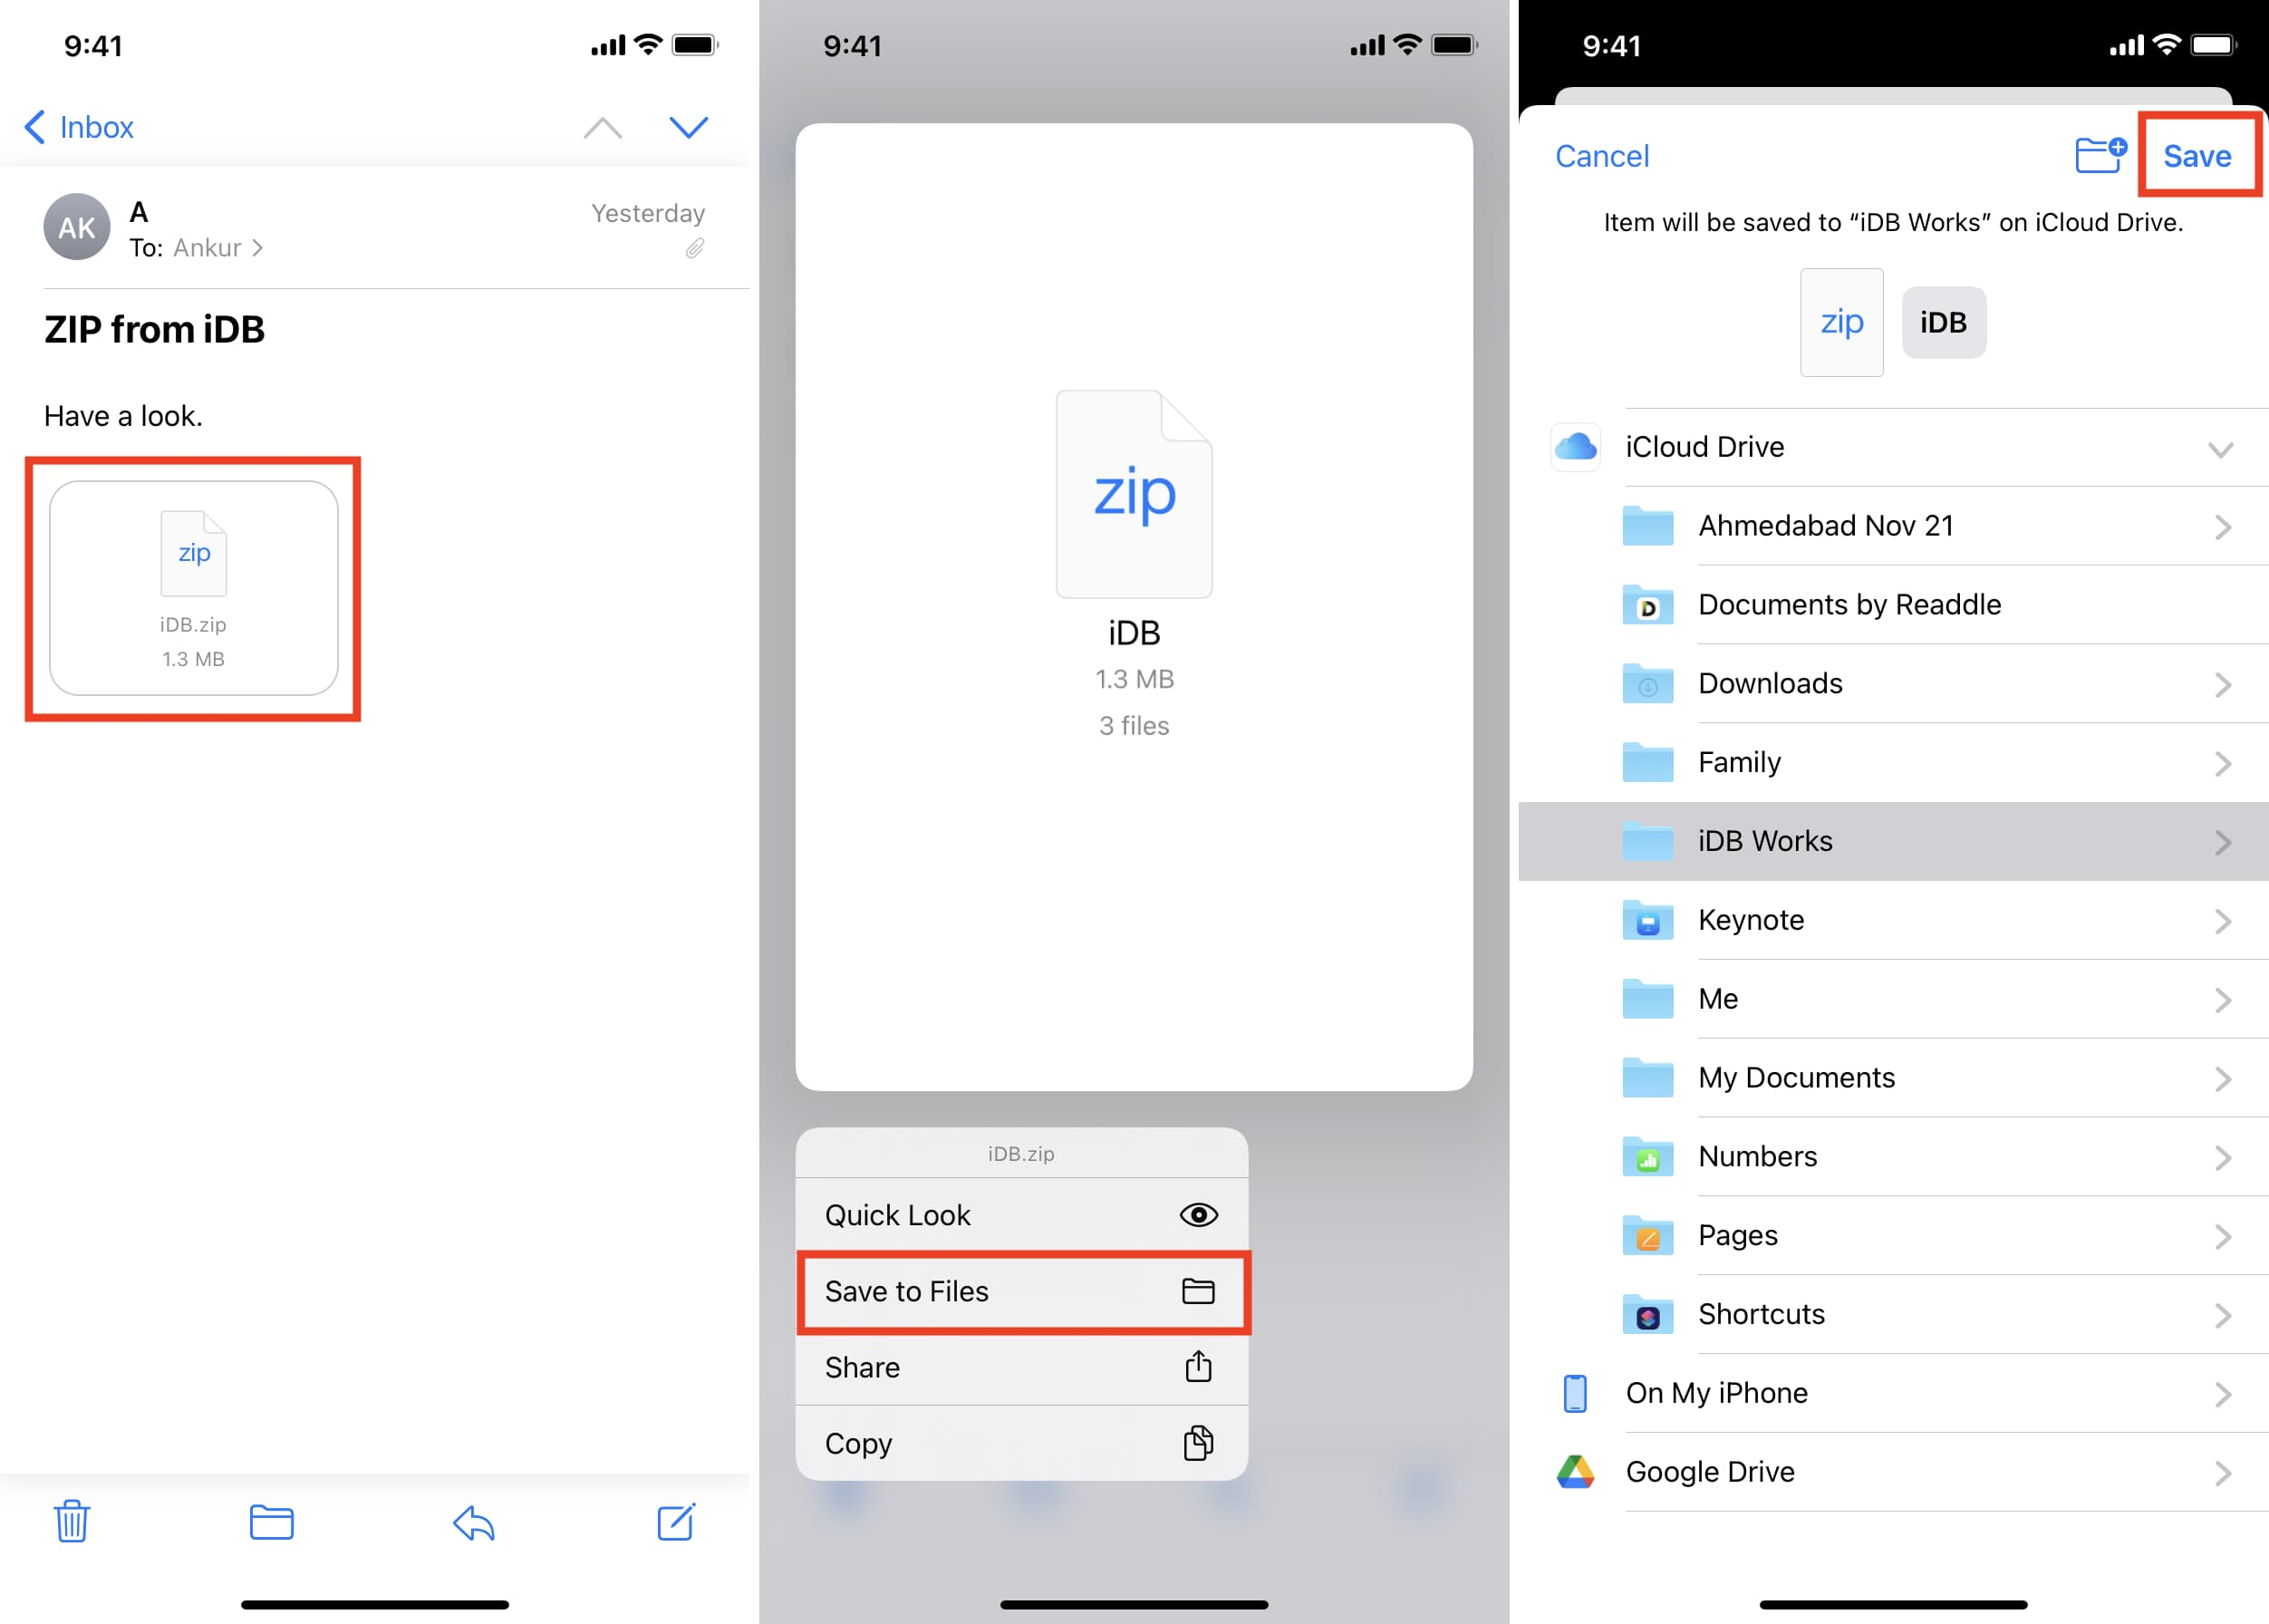
Once you locate the zip file, tap on it to select it. You will notice that the file is highlighted or a checkmark appears next to it. After selecting the zip file, you can tap on the share button, which looks like a square with an arrow pointing upwards. This will open a menu with various options to manage the file.
In the menu that appears, select the “Save to Files” option. This will prompt you to choose a destination folder where you want to save the zip file. You can select an existing folder or tap on the “New Folder” option to create a new folder specifically for the zip file.
Once you have selected the destination folder, tap on the “Save” button to initiate the download process. The zip file will now be saved to the chosen location in the Files app on your iPhone.
It is worth noting that the download speed and duration may vary depending on the size of the zip file and your internet connection. Larger files may take longer to download, so it’s advised to ensure you are connected to a stable and fast Wi-Fi network if possible.
Overall, locating and downloading zip files on your iPhone using the Files app is a straightforward process. By following these steps, you can easily access and download zip files, making it convenient to unzip them later using the Files app.
Unzipping Files in the Files App
Once you have downloaded a zip file onto your iPhone using the Files app, you may need to unzip it to access its contents. Fortunately, the Files app provides a simple and straightforward way to unzip files directly on your iPhone.
To unzip a file in the Files app, follow these steps:
- Locate and tap on the zip file you want to unzip. This will open the file preview.
- In the file preview, tap on the Share button located in the top-right corner of the screen. It looks like a square with an arrow pointing upward.
- From the Share menu, swipe horizontally until you see the “Unzip” option. Tap on it to begin the unzipping process.
- The Files app will now extract the contents of the zip file and create a new folder with the same name as the zip file, containing all the extracted files and folders.
- Once the extraction is complete, you can access the extracted files by navigating to the newly created folder in the Files app.
It’s important to note that the unzipped folder will be saved in the same location as the original zip file. If you need to move the unzipped files to a different location, you can simply drag and drop them within the Files app.
Additionally, if the zip file contains multiple nested folders, the Files app will recreate the same folder hierarchy during the extraction process, making it easy to access and organize the extracted files.
By providing a built-in unzipping feature, the Files app eliminates the need for third-party apps or software to unzip files on your iPhone. This makes it convenient and hassle-free to manage and access the contents of zip files directly from your device.
Managing Extracted Files
Once you have successfully unzipped a file in the Files app on your iPhone, you may want to explore options for managing the extracted files. Here are some ways you can effectively handle and organize your extracted files:
1. Rename Files: If you wish to give a more descriptive or meaningful name to the extracted files, you can easily rename them directly within the Files app. Simply locate the file you want to rename, tap on it and select the “Rename” option. Enter the new name and tap “Done” to save the changes.
2. Move or Copy Files: The Files app allows you to move or copy your extracted files to different folders or locations. To do this, select the files you want to move or copy, tap on the More Options icon (three dots) and choose either the “Move” or “Copy” option. Then, navigate to the desired destination folder and tap “Move” or “Copy” to complete the action.
3. Share Files: If you want to share your extracted files with others, the Files app provides easy sharing options. Simply select the file you want to share, tap the Share icon, and choose the sharing method, such as AirDrop, Messages, Mail, or any other compatible app. Follow the prompts to send the file to the desired recipient.
4. Delete Files: If you no longer need the extracted files, you can easily delete them from the Files app. To delete a file, select it and tap on the More Options icon (three dots), then choose the “Delete” option. Confirm the deletion by tapping “Delete” again in the confirmation pop-up.
5. Create Folders: To keep your extracted files organized, you can create folders within the Files app. Tap on the “Browse” tab at the bottom of the screen, navigate to the location where you want to create a new folder, tap the More Options icon (three dots), and select “New Folder.” Give the folder a name and tap “Done” to create it. You can then move your extracted files into the newly created folder for better organization.
6. Search Files: If you have a large number of extracted files and need to quickly locate a specific file, the Files app allows you to search for files by name. Simply tap the search bar at the top of the Files app, enter the name of the file you are looking for, and the app will display matching results.
7. Tag Files: The Files app also offers the option to tag your extracted files, making it easier to categorize and locate them later. To tag a file, select it, tap on the More Options icon (three dots), and select “Tags.” Choose the desired tags or create new ones, and the file will be labeled accordingly. You can then filter files based on their tags for convenient access.
By utilizing these various management options in the Files app, you can effectively handle and organize your extracted files on your iPhone, making it easier to stay organized and access your files when needed.
In conclusion, the Files app on the iPhone provides a convenient and user-friendly solution for managing and unzipping files. With just a few simple steps, users can easily unzip files directly on their iPhone without the need for third-party apps. The Files app offers a seamless and integrated experience, allowing users to organize and access their files in one central location.
By leveraging the power of the Files app, iPhone users can unzip compressed files and access their contents effortlessly. Whether it’s downloading attachments from emails, opening ZIP files from cloud storage services, or extracting files from archived folders, the Files app is a versatile tool that simplifies the process.
So, the next time you need to unzip files on your iPhone, remember to take advantage of the built-in Files app. Its intuitive interface and robust functionality make it an essential tool for managing and accessing your files on the go.
FAQs
Q: Can I unzip files directly on my iPhone?
A: Yes, you can unzip files directly on your iPhone using the Files app.
Q: How do I unzip files on my iPhone?
A: To unzip files on your iPhone, follow these steps:
1. Locate the zipped file in the Files app.
2. Tap on the file to open it.
3. You will see a preview of the zipped files.
4. Tap on the Share button (the square with an upward arrow) in the top right corner.
5. Scroll down and select “Save to Files” from the list of options.
6. Choose a location to save the unzipped files and tap “Add”.
7. The Files app will then extract the files from the zip archive and save them in the selected location.
Q: What file formats can be unzipped on the iPhone?
A: The iPhone’s Files app can unzip files in various formats, including .zip, .rar, .tar, and .7z among others.
Q: Can I unzip multiple files at once on my iPhone?
A: Yes, you can unzip multiple files at once on your iPhone. Simply select multiple zip files in the Files app and follow the same steps mentioned earlier to unzip them.
Q: What if I can’t find the Files app on my iPhone?
A: The Files app comes pre-installed on iPhones running iOS 11 and later. If you can’t find it on your device, try swiping down on your home screen and typing “Files” in the search bar. If you still can’t find it, make sure you have updated your iPhone to the latest iOS version or check if the app has been accidentally deleted.