
Welcome to our comprehensive guide on how to zip and unzip files on Mac using the latest MacOS Monterey update. Zipping files is a convenient way to compress and store large files or folders, making them easier to share and save storage space. Unzipping, on the other hand, allows you to extract the contents of a zipped file and access all the individual files within. With the release of MacOS Monterey, Apple has introduced new and improved features for file compression and extraction, making the process even more seamless and user-friendly. Whether you’re a seasoned Mac user or a newbie to the MacOS ecosystem, this article will walk you through the step-by-step process of zipping and unzipping files on your Mac, ensuring that you can confidently manage your files efficiently. Let’s dive in!
Inside This Article
- Zip Files on Mac
- Unzip Files on Mac
- MacOS Monterey Update: New Features for zipping and unzipping files
- Tips and Tricks for zipping and unzipping files on Mac
- Conclusion
- FAQs
Zip Files on Mac
Mac users have the convenient option of zipping files directly on their devices. Zipping files means compressing them into a single, smaller file. This makes it easier to send and store multiple files, as well as reduce their overall file size.
To zip files on a Mac, follow these simple steps:
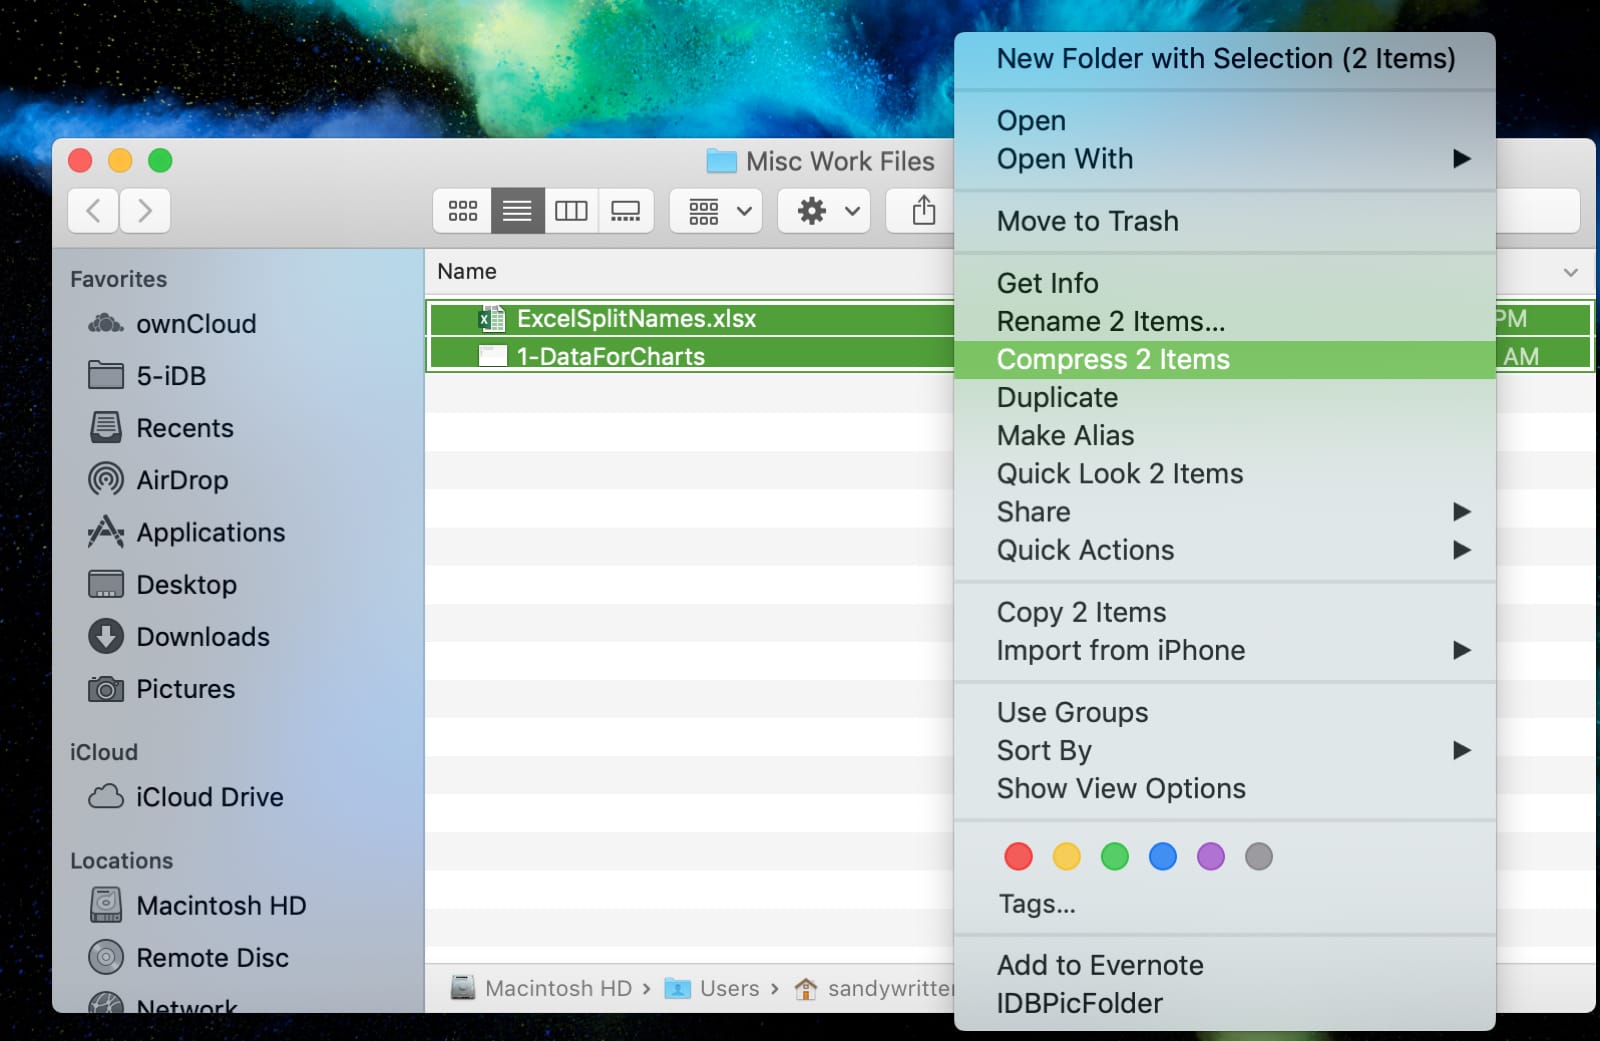
- First, select the files or folders you want to compress. You can do this by either clicking and dragging to select multiple items or holding the Command key and clicking on each individual file or folder.
- Once the files are selected, right-click on one of them and choose “Compress [X] Items” from the drop-down menu. X represents the number of files selected.
- A new compressed file will be created with a .zip extension. You can rename this file if desired.
And that’s it! You have successfully zipped your files on your Mac. You can now easily share or store them without taking up unnecessary storage space.
Keep in mind that zipping files may slightly reduce their quality, especially for media files like images or videos. However, the benefits of compression, such as easier file management and faster file transfers, often outweigh the minimal loss in quality.
Unzip Files on Mac
Unzipping files on a Mac is a simple and straightforward process. Whether you’ve received a zipped file via email or downloaded one from the internet, your Mac’s built-in Archive Utility makes it easy to extract the files contained within.
To unzip a file on Mac, follow these steps:
- Locate the zipped file on your Mac. It will typically have a .zip extension.
- Double-click on the file to open it using the Archive Utility. If the file is associated with a different application, you can right-click on the file and select “Open With” followed by “Archive Utility.”
- The Archive Utility will automatically extract the contents of the zip file and create a new folder with the same name as the zip file in the same location.
- You can now access the extracted files by navigating to the folder that was created.
It’s important to note that some zip files may contain password protection. If you encounter a password-protected zip file, you will need to enter the password to access its contents. However, if you do not have the password, you will be unable to unzip the file on your Mac.
The process of unzipping files on Mac has remained relatively unchanged over the years. However, with each new macOS update, Apple introduces improvements and additional features to enhance the user experience. In the latest macOS Monterey update, there are a few noteworthy features related to zipping and unzipping files.
Enhanced Preview and Quick Actions: MacOS Monterey introduces a revamped Quick Look feature that allows you to preview the contents of a zip file without actually having to unzip it. This makes it easier to quickly view the files within a zipped folder and decide whether you want to extract them.
Secure Unzipping: The latest update also includes enhanced security measures when unzipping files. MacOS Monterey ensures that potentially malicious files or files containing malware are detected and prevented from being extracted, protecting your Mac from potential threats.
Improved Compression Algorithms: With each macOS update, Apple works on improving compression algorithms to ensure maximum file size reduction without compromising quality. This means that when unzipping files on Mac, you can expect faster extraction times and optimized file sizes.
With these new features and improvements, unzipping files on Mac becomes even more efficient and secure. Whether you’re a casual user or a professional, the process of extracting files from a zip archive on your Mac is now even smoother and more user-friendly.
Remember, the steps provided above are applicable to the standard built-in Archive Utility on Mac. If you prefer using third-party applications for unzipping files, there are several options available on the Mac App Store, such as WinZip, StuffIt Expander, and The Unarchiver.
Now that you know how to unzip files on your Mac, you can easily access and utilize the contents of zipped archives without any hassle. Unzipping files on Mac has never been easier!
MacOS Monterey Update: New Features for zipping and unzipping files
The recent MacOS Monterey update brings exciting new features for zipping and unzipping files on Mac. With enhanced functionality and user-friendly improvements, the file compression and extraction process has become even more streamlined and efficient. Whether you’re a seasoned Mac user or a newcomer to the platform, these new features will make managing your files a breeze.
One of the notable additions in MacOS Monterey is the ability to zip and unzip files directly from the Finder. This eliminates the need for third-party apps or command-line tools, making it incredibly convenient for everyday users. Now, you can select multiple files or folders, right-click, and choose the “Compress” option to create a zip file instantly. Similarly, if you have a zip file that needs to be extracted, simply right-click on it and select “Open”. The files will be extracted to the current location.
Another enhancement in MacOS Monterey is the integration of Quick Look with zipped files. Quick Look allows you to preview the contents of a file without actually opening it. Now, with MacOS Monterey, you can use Quick Look to peek inside a zipped file and view its contents before extracting it. This is especially useful when you’re dealing with large zip archives or when you’re not sure which files you need to extract.
MacOS Monterey also introduces a feature called “Smart Zipping.” When you enable this option, macOS will automatically compress certain file types when you try to attach them to an email, save them to an external drive, or upload them to the cloud. This not only saves time but also reduces the file size, making it easier to transfer or share files. You can customize the file types that macOS automatically compresses, giving you control over this convenient feature.
In addition to these new features, MacOS Monterey offers improvements in performance and speed when zipping and unzipping files. The compression process is optimized to use fewer system resources, resulting in faster zip file creation and extraction times. This is particularly beneficial when dealing with large files or batches of files.
Lastly, MacOS Monterey brings enhanced security measures to the zipping and unzipping process. All zipped files are now automatically encrypted with your Mac’s Secure Enclave, ensuring that your files remain protected. This extra layer of security adds peace of mind, especially when sharing sensitive information or confidential files.
With these new features and enhancements, MacOS Monterey has revolutionized the way we zip and unzip files on Mac. It simplifies the process, increases efficiency, and enhances security, making file management a seamless experience. Whether you’re organizing your documents, sending files to colleagues, or simply managing your personal files, the zipping and unzipping capabilities in MacOS Monterey are bound to improve your productivity.
Tips and Tricks for zipping and unzipping files on Mac
Zip files provide a convenient way to compress multiple files into a single, easily manageable package. Unzipping files, on the other hand, allows you to access the contents of a compressed file. Whether you’re a beginner or a seasoned Mac user, here are some tips and tricks to help you zip and unzip files efficiently on your Mac.
1. Use the built-in Archive Utility: Mac offers a default application called Archive Utility, which is handy for both zipping and unzipping files. To compress files, right-click on the file or folder you want to zip, select “Compress [name of file/folder],” and it will create a zip file in the same location. To unzip a file, simply double-click on it, and the contents will be extracted.
2. Keyboard shortcuts: Save time with keyboard shortcuts. For zipping files, select the files you want to compress, then press Command + Shift + Z. To unzip files, select the zip file and press Command + Shift + A. These shortcuts make the process quick and easy.
3. Password protect your zip files: To add an extra layer of security, you can password protect your zip files. When creating a zip file using the Archive Utility, click on the “Options” button and select “Set Password.” Enter a strong password and confirm it. Now your zip file is password protected, and anyone trying to open it will need to enter the correct password.
4. Batch extraction of multiple zip files: If you have multiple zip files that you want to unzip at once, instead of manually extracting each one, you can use a third-party tool like The Unarchiver. Simply install the application, select all the zip files you want to extract, right-click, and choose “Open With” > “The Unarchiver.” It will automatically extract the contents of all the files simultaneously, saving you time and effort.
5. Customizing compression settings: If you want to customize the compression settings for your zip files, you can do so using third-party applications like Keka or BetterZip. These tools allow you to adjust the compression level, choose the archive format, split large zip files, and more. Explore the options and find the settings that best suit your needs.
6. Automate zipping and unzipping: If you frequently work with zip files, you can automate the process using AppleScript or third-party apps like Hazel. With these tools, you can create scripts or rules to automatically zip or unzip files based on specified criteria such as file names, locations, or file types. This can streamline your workflow and save you time in managing your files.
7. Verify the integrity of your zip files: To ensure that your zip files are not corrupted or damaged, it is a good practice to verify their integrity. Some third-party apps like Keka or BetterZip offer a built-in feature to verify the integrity of your zip files. Alternatively, you can use the Terminal command “unzip -t [path to zip file]” to check the integrity of a zip file.
8. Explore alternative zip file formats: While the default zip file format is widely supported, you may come across situations where you need to use alternative file formats like RAR or 7z. In such cases, you can use third-party apps like Unarchiver or Keka that support these formats. Keep in mind that the recipient of the file will also need compatible software to extract the contents.
With these tips and tricks, you’ll be able to zip and unzip files on your Mac efficiently and make the most out of the built-in tools and third-party applications available. Whether you’re organizing files, sharing them securely, or simply looking to save storage space, mastering the art of zipping and unzipping files will be a valuable skill in your Mac workflow.
Conclusion
In conclusion, zipping and unzipping files on Mac has become even more streamlined and convenient with the MacOS Monterey update. The built-in features and user-friendly interface make it easy for anyone to compress and decompress files effortlessly. Whether you want to save storage space, send multiple files as a single attachment, or organize your documents, zipping files on Mac is a valuable skill to have.
With just a few simple steps, you can now compress and extract files on your Mac, making it easier to manage and share your data. The improved functionality and enhanced performance of the MacOS Monterey update provide a seamless experience for Mac users.
So, if you’re looking to free up disk space, share large files, or simply organize your documents, give zipping and unzipping a try on your Mac. You’ll be amazed at how much it streamlines your file management process and boosts productivity.
FAQs
Q: How do I zip a file on Mac?
To zip a file on Mac, simply follow these steps:
- Locate the file or folder you want to zip.
- Right-click on the file or folder.
- In the context menu, hover over the “Compress” option, and click on it.
- A zip file will be created with the same name as the original file or folder.
Q: Can I password protect a zip file on Mac?
Yes, you can password protect a zip file on Mac. Here’s how:
- Select the file or folder you want to zip.
- Right-click on the file or folder.
- In the context menu, hover over the “Compress” option, and click on it.
- Once the zip file is created, right-click on it.
- Select the “Encrypt” option.
- Enter your desired password and click “Encrypt File”.
Q: How do I unzip a file on Mac?
To unzip a file on Mac, follow the steps below:
- Locate the zip file you want to unzip.
- Double-click on the zip file to extract its contents.
- The files will be extracted to the same location as the zip file.
Q: Can I unzip multiple files at once on Mac?
Yes, you can unzip multiple files at once on Mac. Here’s how:
- Locate the zip file you want to unzip.
- Double-click on the zip file to open it.
- Select multiple files or folders within the zip file.
- Drag and drop the selected items to the desired location on your Mac.
- The files will be extracted to the selected location.
Q: Are there any third-party applications for zipping and unzipping files on Mac?
Yes, there are several third-party applications available for zipping and unzipping files on Mac. Some popular options include “The Unarchiver,” “StuffIt Expander,” and “Keka.” These applications offer additional features and support for various compression formats beyond the default macOS zip functionality.