
A Virtual Private Network (VPN) is a crucial tool in today’s digital landscape, ensuring privacy, security, and unrestricted access to online content. If you’re an Android user looking to safeguard your online activities and protect your personal information, using a VPN on your Android device is a smart choice.
In this article, we will guide you through the process of setting up and using a VPN on your Android device, whether it’s a smartphone or tablet. We will explore the benefits of using a VPN, the steps to install and configure a VPN app on Android, and answer some frequently asked questions about VPNs.
So, whether you’re concerned about your online privacy or want to access region-restricted content, let’s dive into the world of VPNs on Android and discover how to ensure a secure and unrestricted digital experience.
Inside This Article
- Overview of VPNs on Android
- Step 1: Choosing a VPN Provider
- Step 2: Installing a VPN App on Android
- Step 3: Setting up a VPN Connection
- Step 4: Connecting to a VPN Server
- Step 5: Configuring VPN Settings
- Troubleshooting Common VPN Issues on Android
- Conclusion
- FAQs
Overview of VPNs on Android
In today’s digital age, protecting your online privacy and security is of utmost importance. One way to achieve this is by using a Virtual Private Network (VPN) on your Android device. VPNs create a secure and encrypted connection between your device and the internet, ensuring that your data remains safe from prying eyes.
When you connect to a VPN, your internet traffic is routed through a remote server operated by the VPN provider. This server acts as a middleman between your device and the websites or online services you access. By doing so, VPNs offer several key benefits:
- Enhanced Security: VPNs encrypt your internet traffic, making it virtually impossible for anyone to intercept or eavesdrop on your communications. This is especially crucial when using public Wi-Fi networks, as they are often vulnerable to hackers.
- Bypass Geographic Restrictions: VPNs allow you to change your virtual location by connecting to servers in different countries. This can help you bypass geo-blocking and access content that may be restricted in your region.
- Anonymity: When you browse the internet through a VPN, your IP address is masked, providing a higher level of anonymity. This can help protect your identity and online activities from being tracked by third parties.
Using a VPN on your Android device is relatively easy and straightforward. The following steps will guide you through the process of setting up and using a VPN:
- Choosing a VPN Provider: There are numerous VPN providers available, each with their own features and pricing plans. It’s important to research and choose a reputable provider that meets your specific needs.
- Installing a VPN App on Android: Once you’ve chosen a VPN provider, head to the Google Play Store and search for their official app. Download and install the app on your Android device. Ensure that the app is compatible with your device’s operating system version.
- Setting up a VPN Connection: Open the VPN app and sign in using your credentials. Some VPNs may require you to create an account first. Follow the on-screen instructions to set up the VPN connection.
- Connecting to a VPN Server: After setting up the VPN connection, you’ll be presented with a list of available server locations. Choose a server based on your needs, such as a specific country or region you want to connect through.
- Configuring VPN Settings: Some VPN apps allow you to customize settings like protocol selection, auto-connect features, and more. Explore the app’s settings to configure it according to your preferences.
While VPNs are generally reliable, there may be instances where you encounter issues. Common VPN problems on Android include connection failures, slow internet speeds, or app crashes. If you experience any of these problems, try reconnecting to the VPN server, switching to a different server location, or reinstalling the VPN app.
Remember, using a VPN on your Android device can greatly enhance your online privacy and security. By following these steps and utilizing a reputable VPN provider, you can surf the internet with peace of mind, knowing that your data is protected.
Step 1: Choosing a VPN Provider
When it comes to using a VPN on your Android device, the first step is to choose a reliable VPN provider. With countless options available in the market, it’s essential to select a provider that meets your specific needs and offers excellent security and performance.
Here are some factors to consider when choosing a VPN provider for your Android:
- Logging Policy: Look for a VPN provider that has a strict no-logs policy. This means that they do not collect or store any of your online activity data, ensuring your privacy.
- Server Locations: Check if the VPN provider has servers in multiple locations across the world. This will allow you to bypass geographical restrictions and access content from different regions.
- Speed and Performance: Opt for a VPN provider that offers fast and reliable connection speeds. This will ensure smooth browsing, streaming, and gaming experiences on your Android device.
- Security Features: Look for features like encryption protocols (such as OpenVPN or IKEv2), a kill switch, and DNS leak protection. These features will help protect your online data and ensure a secure VPN connection.
- User-Friendly Interface: Consider a VPN provider that offers an intuitive and easy-to-use app interface for Android devices. This will make it easier for you to connect to the VPN and navigate through the settings.
- Pricing and Payment Options: Compare the pricing plans offered by different VPN providers and choose one that fits your budget. Also, check the payment methods available to ensure secure and convenient transactions.
By considering these factors, you can narrow down your options and choose a VPN provider that suits your requirements. Remember to read user reviews and ratings to get a better understanding of the provider’s reputation and performance.
Now that you have selected a VPN provider, it’s time to move on to the next step – installing a VPN app on your Android device.
Step 2: Installing a VPN App on Android
Once you have chosen a VPN provider, the next step is to install a VPN app on your Android device. Most reputable VPN providers offer dedicated apps for Android that are available for download in the Google Play Store. To install a VPN app on Android, follow these steps:
- Open the Google Play Store on your Android device.
- Search for the VPN app by typing the name of the VPN provider in the search bar.
- Select the VPN app from the search results.
- Click on the “Install” button to initiate the installation process.
- Wait for the app to be downloaded and installed on your device.
- Once the installation is complete, open the VPN app.
It’s important to note that some VPN apps may require certain permissions to function properly. When prompted, grant the necessary permissions to the app. These permissions may include access to your device’s location, network information, and storage.
Additionally, make sure to download the VPN app from the official Google Play Store to avoid any potential security risks. Sideloading apps from third-party sources can expose your device to malware or compromise your privacy.
After successfully installing the VPN app on your Android device, you’re now ready to proceed to the next step: setting up a VPN connection.
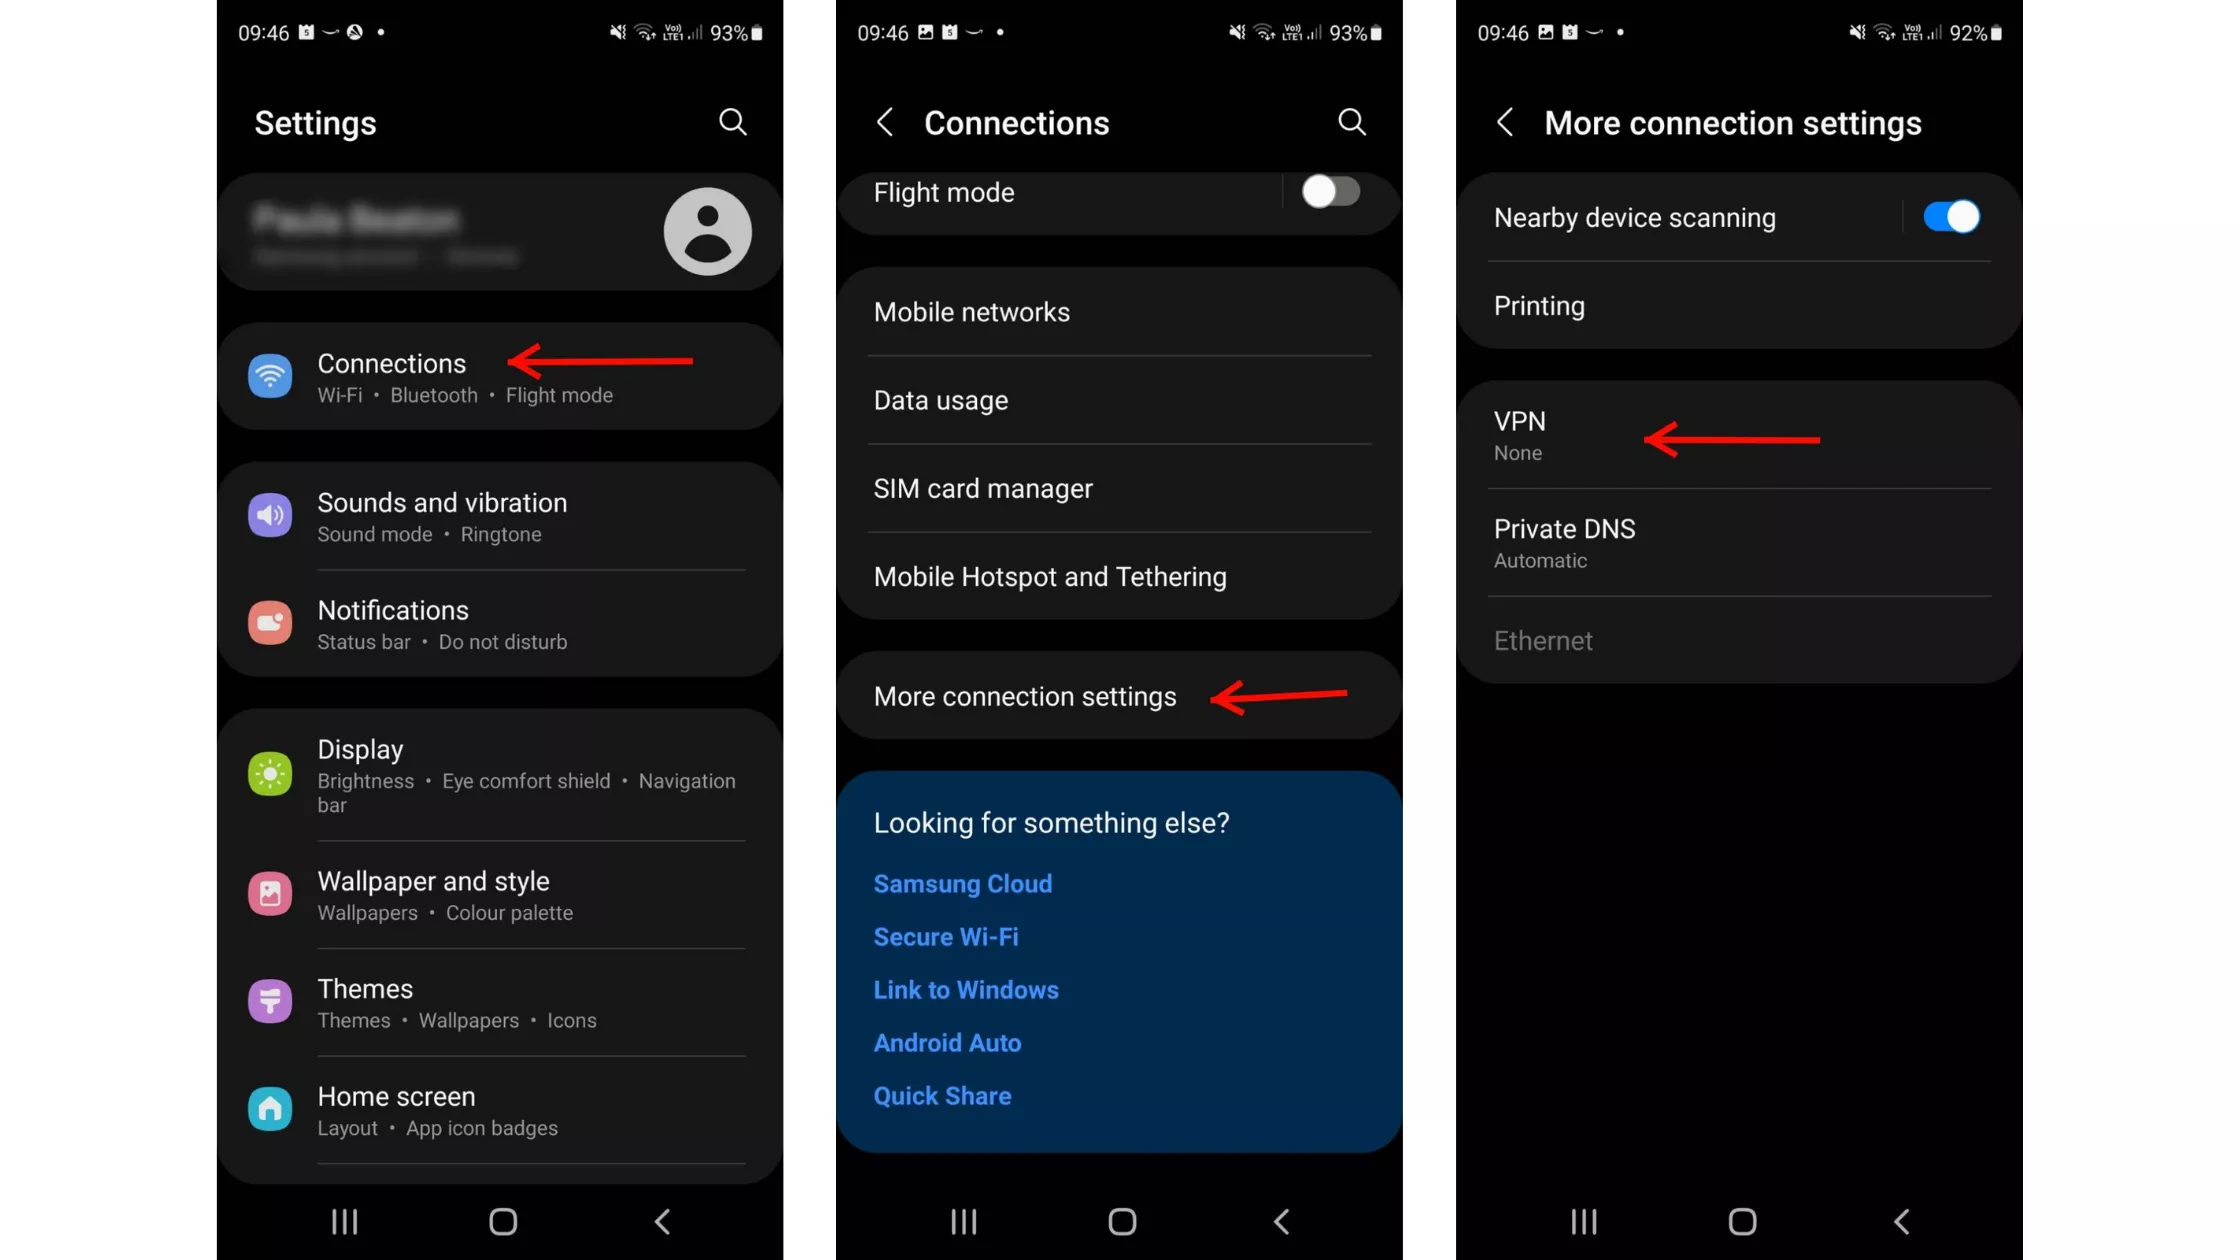
Step 3: Setting up a VPN Connection
Once you have installed a VPN app on your Android device, the next step is to set up a VPN connection. Here’s a step-by-step guide to help you:
- Launch the VPN app on your Android device.
- You will be prompted to log in or create a new account. If you already have a VPN account, simply log in using your credentials. Otherwise, follow the instructions to create a new account.
- Once you are logged in, you will be presented with a list of available VPN servers. These servers are located in different countries or regions around the world. Choose the server location that suits your needs.
- Some VPN apps also offer additional settings such as protocols, encryption levels, and other advanced options. If you are new to VPNs, you can leave these settings at their default values.
- Tap on the connect button to establish a VPN connection. The app will connect to the chosen server and encrypt your internet traffic.
- Once the VPN connection is established, you will see a notification in the status bar indicating that you are connected to the VPN.
It is important to note that some VPN apps may require additional permissions or configurations depending on the specific features they offer. Make sure to read any instructions or prompts carefully to ensure proper setup of your VPN connection.
Setting up a VPN connection on Android can vary slightly depending on the VPN provider and app you choose. However, the general process remains the same across most apps.
Now that you have successfully set up a VPN connection on your Android device, you can enjoy a more secure and private browsing experience. Your data will be encrypted, protecting it from potential hackers, government surveillance, and other online threats.
In the next step, we will discuss how to connect to a VPN server using the installed VPN app on your Android device.
Step 4: Connecting to a VPN Server
Now that you have installed a VPN app and set up a VPN connection, it’s time to connect to a VPN server. This step finalizes the process and allows you to enjoy the benefits of using a VPN on your Android device.
1. Open the VPN app: Locate the VPN app you installed on your Android device and open it. The app’s interface may vary depending on the provider, but the general steps for connecting should be similar.
2. Log in (if necessary): Some VPN services require you to log in with your credentials before you can connect to a server. Enter your username and password in the designated fields to proceed.
3. Choose a server location: Once you are logged in, you will typically see a list of server locations. Select the server location that suits your needs. For example, if you want to access region-restricted content, choose a server in the desired country.
4. Connect to the server: After selecting the server location, simply tap on the “Connect” or “Go” button to establish a connection to the VPN server. The app may display a message or animation to indicate that you are now connected.
5. Verify the connection: To make sure the connection is successful, you can check the status within the VPN app or go to your Android’s system settings. Look for the VPN icon in the status bar, which indicates that you are connected to the VPN server.
6. Enjoy a secure connection: Once connected to the VPN server, all of your internet traffic will be encrypted and routed through the server. This means your online activities are protected from prying eyes and your data is secure, even when using public Wi-Fi networks.
7. Disconnect when finished: When you no longer need to use the VPN, it’s essential to disconnect from the server to restore your regular internet connection. You can do this by opening the VPN app and tapping on the “Disconnect” or “Disconnect” button.
Remember to connect to a VPN server whenever you want to browse the web anonymously, access geo-blocked content, or enhance your online security and privacy. By following these steps, you can easily connect to a VPN server on your Android device and begin enjoying the benefits of using a VPN.
Step 5: Configuring VPN Settings
Once you have connected to a VPN server on your Android device, you may want to customize the VPN settings to suit your preferences. Here are some common VPN settings that you can configure:
- Protocol Selection: The VPN protocol determines the encryption and security level of your connection. Android devices usually support various VPN protocols such as OpenVPN, IPSec, or L2TP. You can choose the protocol that offers the best balance of security and performance for your needs.
- Automatic Connection: Some VPN apps allow you to set up automatic connections. This means that the VPN will automatically connect whenever you access the internet, providing a seamless and secure browsing experience. You can enable or disable this feature based on your preferences.
- Split Tunneling: Split tunneling is a feature that allows you to select which apps or websites will use the VPN connection while allowing others to bypass the VPN. This can be useful if you only want certain apps to be encrypted while others can directly access the internet. You can specify the apps or websites that should use the VPN connection in the settings.
- DNS Configuration: By default, your device uses the DNS (Domain Name System) provided by your internet service provider. However, you can choose to use a different DNS server, such as the one provided by your VPN provider, for enhanced privacy and security. Look for DNS settings in the VPN app and enter the preferred DNS server address.
- Kill Switch: A kill switch is a crucial feature that ensures your internet connection is blocked if the VPN connection drops unexpectedly. This prevents any unencrypted data from being transmitted, protecting your privacy. Check if your VPN app has a kill switch feature and enable it for added security.
- Server Selection: Depending on your VPN provider, there may be multiple server locations available for you to choose from. Different servers can offer varying levels of speed and performance. Experiment with different server locations to find the one that provides the best connection for you.
It’s important to note that these VPN settings may vary depending on the VPN app you are using. The options provided may differ, so consult the app’s documentation or support resources for specific instructions.
Configuring VPN settings on your Android device allows you to tailor the VPN experience to meet your specific needs and preferences. Take some time to explore the settings offered by your VPN app and customize them accordingly. By doing so, you can optimize your VPN connection to ensure a secure and seamless browsing experience.
Troubleshooting Common VPN Issues on Android
While using a VPN on your Android device can provide enhanced privacy and security, there may be times when you encounter issues. Here are some common VPN problems on Android and how to troubleshoot them.
1. Connection Issues
If you’re having trouble connecting to a VPN server, there are a few things you can try:
- Check your internet connection: Ensure that you have a stable internet connection before attempting to connect to the VPN server.
- Switch server locations: Try connecting to a different server location to see if the issue is specific to one server.
- Restart your device: Sometimes, simply restarting your Android device can resolve connection issues.
- Check VPN app permissions: Ensure that the VPN app has the necessary permissions to access the internet on your device.
2. Slow Connection Speed
If you notice a significant decrease in your internet speed after connecting to a VPN, here’s what you can do:
- Switch servers: Connect to a different VPN server that is closer to your physical location or has less traffic to improve your connection speed.
- Enable split tunneling: Some VPN apps allow you to enable split tunneling, which allows you to choose which apps or websites use the VPN connection while others use your regular internet connection.
- Upgrade your VPN subscription: If you’re using a free VPN, consider upgrading to a paid plan that offers faster connection speeds and more server options.
3. VPN App Crashes or Freezes
If your VPN app crashes or freezes frequently, follow these steps:
- Update the app: Make sure you have the latest version of the VPN app installed on your Android device.
- Clear app cache and data: Go to the app settings and clear the cache and data for the VPN app. This can help resolve any temporary issues.
- Reinstall the app: If the problem persists, try uninstalling and reinstalling the VPN app from the Google Play Store.
4. Incompatibility with Other Apps
Sometimes, certain apps or services may not work properly when you’re connected to a VPN. Here’s what you can do:
- Disable VPN for specific apps: Some VPN apps allow you to exclude certain apps from using the VPN connection. Check the app settings to see if this option is available.
- Contact VPN support: If you’re experiencing compatibility issues with a specific app or service, reach out to the VPN provider’s support team for further assistance.
5. Battery Drain
Using a VPN can sometimes have an impact on your device’s battery life. Here are a few tips to minimize battery drain:
- Disconnect when not in use: If you’re not actively using the VPN, disconnect from the server to conserve battery power.
- Enable battery optimization: In your device’s settings, enable battery optimization for the VPN app to prioritize power efficiency.
- Close unused apps: Close any unnecessary apps running in the background, as they can consume battery power.
By following these troubleshooting tips, you can resolve common VPN issues on your Android device and enjoy a seamless and secure browsing experience.
Conclusion
In today’s digital age, the need for privacy and security while using our smartphones has become increasingly important. Fortunately, Android users can ensure their online activities are protected with the use of a VPN (Virtual Private Network).
By following the simple steps outlined in this article, Android users can easily set up and use a VPN on their devices. Whether it’s accessing geo-restricted content or securing sensitive information while connected to public Wi-Fi networks, a VPN is a powerful tool that provides peace of mind and anonymity.
Remember, when selecting a VPN provider, it’s crucial to choose a reputable and reliable option to safeguard your data effectively. Consider factors such as server locations, speed, and customer support to ensure you have the best experience.
So, don’t compromise your privacy and security while using your Android device. Take advantage of the benefits offered by VPN technology and enjoy a safer and more private online experience. Stay protected and browse with confidence on your Android device by using a VPN today.
FAQs
1. What is a VPN?
A VPN, or Virtual Private Network, is a technology that allows you to create a secure and encrypted connection over the internet. It masks your IP address and encrypts your internet traffic, making it difficult for anyone to track your online activities or access your personal data.
2. Why should I use a VPN on my Android device?
Using a VPN on your Android device offers several benefits. It helps protect your privacy by encrypting your internet traffic, making it secure from cyber threats and hackers. It also allows you to bypass geographical restrictions and access blocked content, such as streaming services and websites, by changing your virtual location.
3. How do I set up a VPN on my Android device?
Setting up a VPN on your Android device is easy. First, download a VPN app from the Google Play Store. Open the app and follow the instructions to create an account. Once your account is set up, you can choose a server location and connect to the VPN. Some VPN apps may require additional permissions, such as accessing your device’s network settings.
4. Are there any free VPN apps for Android?
Yes, there are several free VPN apps available for Android. However, it’s important to note that while free VPNs may offer basic functionality, they often have limitations, such as limited server options, slow speeds, and data caps. Additionally, some free VPNs may collect and sell your data to third parties. If privacy and security are important to you, it’s recommended to opt for a reputable paid VPN service.
5. Can I use a VPN on multiple devices with a single subscription?
Yes, many VPN providers offer multi-device support, allowing you to use a single VPN subscription on multiple devices, including your Android phone or tablet. This can be convenient if you want to protect all your devices and secure your internet connection wherever you go. However, it’s important to check the specific terms and conditions of the VPN provider to ensure that multi-device use is allowed.