
Changing the IP address on an Android phone is a common need, whether it’s for troubleshooting network issues, bypassing geo-restricted content, or enhancing privacy. Your IP address is a unique identifier assigned to your device when connecting to the internet. By changing it, you can alter your online presence and access location-restricted content.
In this comprehensive guide, we will explore various methods to change the IP address on your Android phone. Whether you want to manually configure the IP settings or use third-party apps, we have got you covered. So, let’s dive into the world of IP addresses and discover how to change them on your Android device.
Inside This Article
- Why Change IP Address on Android Phone?
- Methods to Change IP Address on Android Phone
- Using a VPN (Virtual Private Network)
- Using a Proxy Server
- Changing IP Address via Wi-Fi Settings
- Restarting the Router
- Conclusion
- FAQs
Why Change IP Address on Android Phone?
Changing the IP address on your Android phone can offer several benefits and functionalities. Here are a few reasons why you might want to consider changing your IP address:
1. Bypassing Geographic Restrictions: Some online services and websites restrict access based on geographical location. By changing your IP address, you can trick these sites into thinking you’re accessing them from a different location, thus bypassing the restrictions.
2. Protecting Your Privacy: Your IP address is like your digital fingerprint, revealing your approximate location and online activities. Changing your IP address can help protect your privacy by making it more difficult for third parties to track your online behavior and gather personal information.
3. Accessing Blocked Content: If certain websites or online services are blocked in your country or region, changing your IP address can allow you to access that content by masking your original IP and circumventing the restrictions.
4. Preventing Network Monitoring: Changing your IP address can add an additional layer of security by avoiding network monitoring. Your original IP address can be identified and logged by your internet service provider (ISP), but by changing it, you can prevent tracking and monitoring of your online activities.
5. Avoiding Online Tracking: Online advertisers and marketers often track user behavior by logging IP addresses. By regularly changing your IP address, you can minimize the amount of data collected about you and reduce the targeted ads you encounter while browsing the internet.
With these reasons in mind, changing your IP address on your Android phone can provide you with enhanced privacy, access to blocked content, and greater control over your online activities. Let’s explore the methods for changing your IP address on an Android phone.
Methods to Change IP Address on Android Phone
Changing your IP address can be useful for many reasons, such as improving your online privacy, accessing region-restricted content, or troubleshooting network issues. If you’re wondering how to change the IP address on your Android phone, you’re in the right place. In this article, we’ll explore two popular methods that allow you to modify your IP address.
Method 1: Changing IP Address using a VPN
A Virtual Private Network (VPN) is a widely-used tool that enables you to mask your IP address and establish a secure connection to the internet. Here’s how you can change your IP address using a VPN on your Android phone:
- Download and install a reputable VPN app from the Google Play Store.
- Launch the VPN app and sign in with your credentials.
- Select a server location from the available options. Choosing a server in a different country can help you bypass geo-restrictions.
- Tap the connect button to establish a VPN connection.
- After the connection is established, your IP address will be changed to the IP address of the server you selected.
Method 2: Changing IP Address through Proxy server
Another method to change your IP address on an Android phone is by using a proxy server. A proxy server acts as an intermediary between your device and the internet, allowing you to browse the web with a different IP address. To change your IP address through a proxy server, follow these steps:
- Download a proxy app from the Google Play Store.
- Launch the proxy app and configure the settings according to your preference.
- Enter the IP address and port number of the proxy server you want to connect to.
- Save the settings and enable the proxy server.
- Your Android phone will now use the IP address assigned by the proxy server when accessing the internet.
It’s important to note that using a proxy server might affect the speed and performance of your internet connection. Additionally, not all proxy servers are secure, so make sure to choose a reliable option.
By utilizing these methods, you can easily change the IP address on your Android phone. Whether you decide to use a VPN or a proxy server, both options provide a practical way to modify your IP address and unlock a world of possibilities.
Using a VPN (Virtual Private Network)
One of the most effective methods to change the IP address on your Android phone is by using a VPN (Virtual Private Network). A VPN allows you to create a secure connection between your device and a remote server, encrypting your internet traffic and masking your IP address.
Here’s how you can change your IP address using a VPN on your Android phone:
- Choose a reputable VPN provider: You’ll need to select a VPN provider that offers reliable and secure server connections. Look for providers that have a large server network and good user reviews.
- Install the VPN app: Once you’ve chosen a VPN provider, download and install their app from the Google Play Store. Make sure you allow the necessary permissions for the app to function properly.
- Launch the VPN app: Open the VPN app on your Android phone and sign in using your credentials. If it’s your first time using the VPN, you may need to create an account.
- Select a server: After logging in, you’ll be presented with a list of available server locations. Choose a server location from a country or region you want to connect to, and tap on it to establish a connection.
- Connect to the VPN: Once you’ve selected a server, simply tap the “Connect” button to establish a secure VPN connection. Your device’s IP address will now be changed to the IP address of the server you’re connected to.
It’s important to note that using a VPN not only changes your IP address but also enhances your online privacy and security. It encrypts your internet traffic, protecting it from eavesdroppers and potential hackers.
However, keep in mind that some websites or online services may block certain VPN servers, so you may encounter restrictions or limitations when accessing certain content.
Using a Proxy Server
If you want to change your IP address on an Android phone, another method you can use is by using a proxy server. A proxy server acts as an intermediary between your device and the internet. Instead of connecting directly to websites, your device will first connect to the proxy server, which will then forward your requests to the destination website.
When you use a proxy server, it assigns you a new IP address, masking your original IP. This can be useful if you want to access region-restricted content or maintain anonymity while browsing.
Here are the steps to change your IP address on Android using a proxy server:
- First, you need to find a reliable proxy server. There are many free and paid options available. You can search for “proxy server” on the Google Play Store or do a web search to find suitable options.
- Once you have found a proxy server, install the corresponding app on your Android phone.
- Open the proxy server app and configure the connection settings. Typically, you’ll need to enter the IP address or domain name of the proxy server, as well as any required authentication details.
- After configuring the settings, enable the proxy server by toggling the switch or pressing the connect button in the app.
- Once the proxy server is enabled, your device will start routing its internet traffic through the server, and you will have a new IP address.
It’s important to note that using a proxy server may slightly decrease your internet speed since the connection has to go through an additional server. Additionally, some proxy servers may log your browsing activity, so choose a reputable provider if privacy is a concern.
It’s also worth mentioning that proxy servers may not be as secure as using a VPN. While a VPN encrypts your internet traffic, a proxy server only acts as a middleman. So if you require high security and privacy, it’s advisable to use a VPN instead.
By following these steps, you can effectively change your IP address on an Android phone using a proxy server. Just make sure to choose a reliable server and exercise caution when browsing sensitive websites.
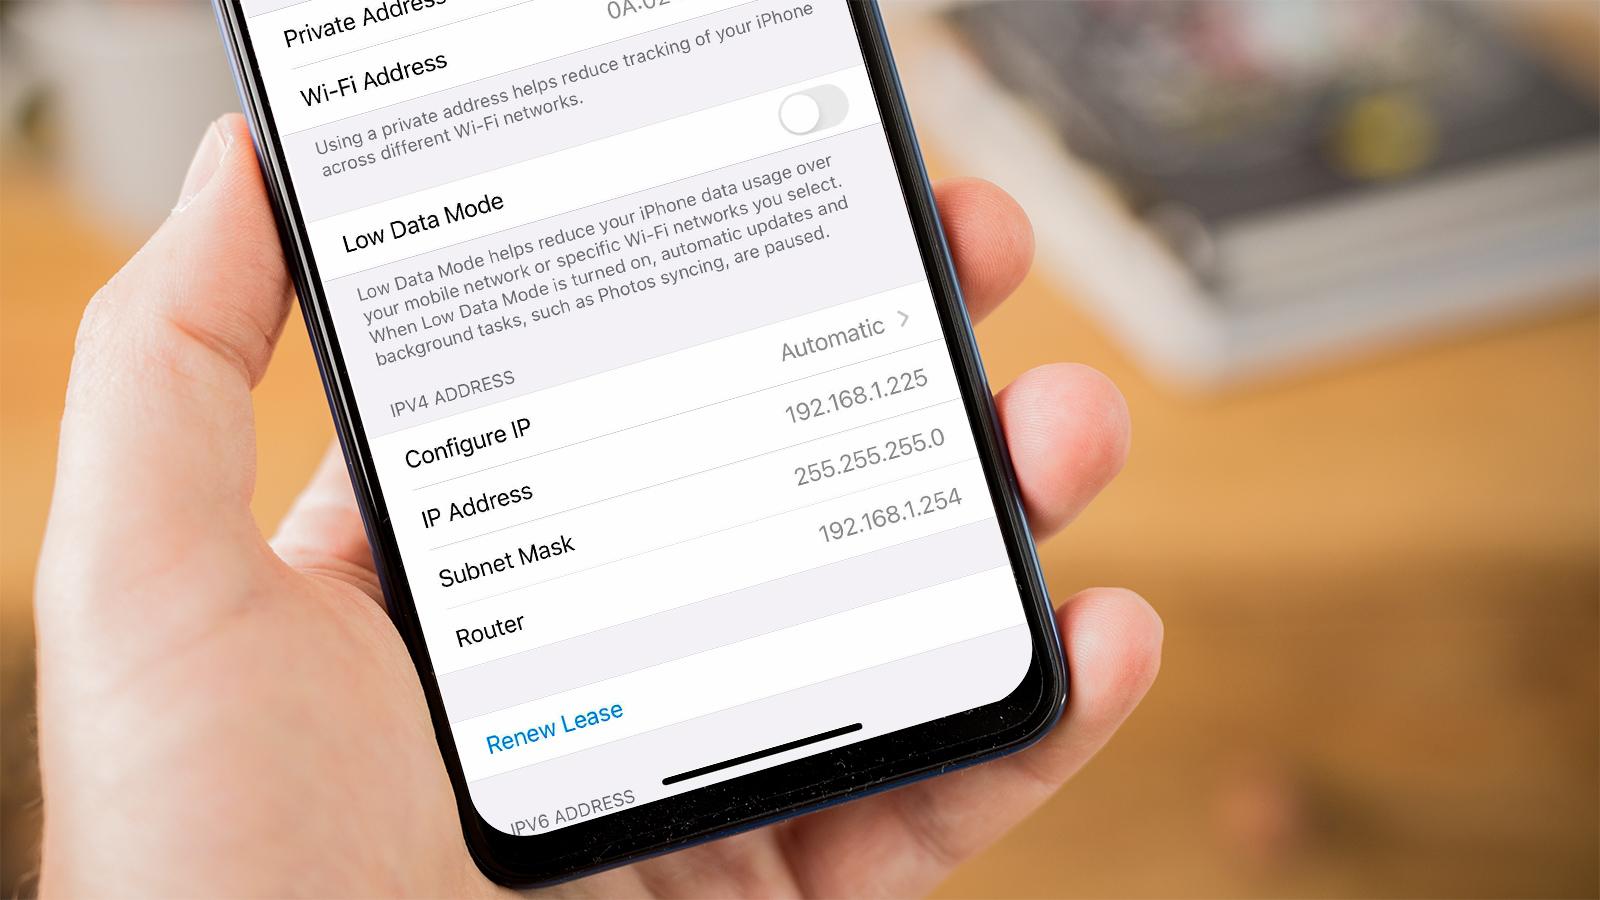
Changing IP Address via Wi-Fi Settings
If you want to change your IP address on an Android phone, you can do so by accessing the Wi-Fi settings. Here’s how you can go about it:
1. Start by opening the “Settings” app on your Android phone. This can typically be found in your app drawer or by swiping down from the top of the screen and tapping the gear icon.
2. Once in the “Settings” menu, scroll down and look for the “Wi-Fi” option. Tap on it to open the Wi-Fi settings.
3. In the Wi-Fi settings, you will see a list of available Wi-Fi networks. Find and tap on the network you are currently connected to.
4. A dialog box will appear with detailed information about the selected Wi-Fi network. Tap on the “Advanced” option or the gear icon, depending on your device.
5. In the advanced settings, look for the “IP settings” or “Static IP” option. Tap on it to make changes to your IP address configuration.
6. By default, your Android phone is most likely set to “DHCP” or “Obtain IP address automatically.” You can change this to “Static” to manually configure your IP address.
7. Enter the desired IP address, subnet mask, gateway, and DNS servers in the provided fields. Make sure to enter the correct values based on your network configuration.
8. Once you have entered the necessary information, tap on the “Save” or “Apply” button to save the changes.
9. Your Android phone will now attempt to connect to the Wi-Fi network using the new IP address configuration.
Please note that changing the IP address on your Android phone through Wi-Fi settings may require administrative access to the network or permission from your network administrator. Additionally, it is important to enter the correct IP address information to ensure proper network connectivity.
Restarting the Router
If you are still experiencing issues with your IP address on your Android phone after trying the previous methods, you can consider restarting your router. This can help refresh the network settings and assign a new IP address to your phone.
To restart your router, follow these steps:
- Locate your router and find the power button. It’s usually located on the back of the router or on the side.
- Press the power button to turn off the router. Wait for about 10-15 seconds.
- After the waiting period, press the power button again to turn the router back on.
- Wait for a few minutes for the router to fully restart and establish a connection with your internet service provider.
- Once the router is up and running, check the IP address on your Android phone to see if it has changed.
Restarting the router can help resolve IP address conflicts and other network-related issues. It’s a simple and effective method that can be tried if other options haven’t worked for you.
Conclusion
Changing the IP address on your Android phone can be a useful trick to overcome network restrictions, ensure privacy, and troubleshoot connectivity issues. By following the steps mentioned above, you can easily modify your IP address and take control of your online experience.
Remember, changing your IP address comes with certain caveats. Be mindful of the potential risks involved and consult with your network administrator or service provider if you have any concerns.
Whether you need to access geo-restricted content, protect your identity, or resolve networking complications, understanding how to change your IP address on your Android phone gives you the power to navigate the digital world with greater flexibility and control.
Stay informed and experiment with different methods to find the one that suits your needs best. With the ability to change your IP address, you can unlock a world of possibilities and ensure a seamless online experience.
FAQs
Here are some frequently asked questions about changing the IP address on an Android phone:
-
Why would I need to change my IP address on my Android phone?
There are a few reasons why you might want to change your IP address on your Android phone. It could be for privacy purposes, to bypass certain restrictions or blockages, or to troubleshoot network connectivity issues.
-
Can I change my IP address on my Android phone without using any third-party apps?
By default, Android phones obtain IP addresses automatically from the network they are connected to. To change your IP address without using third-party apps, you would typically need to modify the network settings on your device or connect to a different network.
-
What are some third-party apps that can help me change my IP address on my Android phone?
There are several apps available on the Google Play Store that allow you to change your IP address on your Android phone. Some popular options include VPN apps like NordVPN, ExpressVPN, and CyberGhost VPN.
-
How do I change my IP address using a VPN app on my Android phone?
To change your IP address using a VPN app on your Android phone, you would first need to download and install a VPN app from the Google Play Store. Once installed, open the app, choose a server location, and connect to the VPN. This will route your internet traffic through the selected server, effectively changing your IP address.
-
Is it legal to change my IP address on my Android phone?
Yes, it is generally legal to change your IP address on your Android phone. However, it’s important to note that the legality may vary depending on the reason for changing your IP address and the jurisdiction you are in. It’s always a good idea to familiarize yourself with the laws and regulations of your country or region before making any changes.