
Are you tired of constantly plugging your Android phone into your PC to transfer files, manage notifications, or access your phone’s content? Look no further than AirDroid, a powerful app that allows you to wirelessly connect your Android phone and PC with ease. With AirDroid, you can seamlessly transfer files between devices, receive and respond to notifications on your PC, and even access and control your Android phone’s screen from your computer. In this article, we will guide you through the process of setting up AirDroid and show you how to make the most of its features. Say goodbye to tangled cables and embrace the convenience of wireless connectivity with AirDroid!
Inside This Article
- Benefits of connecting your Android phone and PC wirelessly
- Step 1: Download and install AirDroid
- Step 2: Create an AirDroid account
- Step 3: Connect your Android phone and PC to the same Wi-Fi network
- Step 4: Open AirDroid on your Android phone and sign in
- Step 5: Open AirDroid web interface on your PC
- Step 6: Scan the QR code on your PC using AirDroid on your phone
- Step 7: Start wirelessly connecting your Android phone and PC
- Step 8: Explore AirDroid features and functionality
- Tips and troubleshooting for using AirDroid wirelessly
- Conclusion
- FAQs
Benefits of connecting your Android phone and PC wirelessly
Connecting your Android phone and PC wirelessly can bring a host of benefits and convenience to your daily life. Here are some key advantages of having this seamless connection:
1. Ease of file transfer: With a wireless connection between your Android phone and PC, you can effortlessly transfer files back and forth without the need for cables or manual transfers. Whether it’s photos, videos, documents, or any other type of file, you can quickly and easily send them between devices.
2. Streamline productivity: By connecting your Android phone and PC wirelessly, you can integrate your tasks and workflows more efficiently. You can access and manage your phone’s data and notifications directly from your PC, saving time and effort by eliminating the need to switch between devices constantly.
3. Remote access and control: One of the major advantages of wireless connectivity is the ability to remotely access and control your Android phone from your PC. Whether you want to send a text message, make a call, or access apps, you can do it conveniently from your PC screen, providing you with greater flexibility and accessibility.
4. Backup and synchronization: When you connect your Android phone and PC wirelessly, you can easily back up and synchronize your important data such as contacts, calendars, and messages. This ensures that your data remains secure and up to date across both devices.
5. Enhanced multimedia experience: By wirelessly connecting your Android phone and PC, you can enjoy a more immersive multimedia experience. You can stream music and videos from your phone to your PC, view your phone’s photos and videos on a larger screen, and even play mobile games with better graphics and controls using your PC’s resources.
6. Accessibility for individuals with mobility limitations: Wireless connectivity provides a greater level of accessibility for individuals with mobility limitations. By connecting your Android phone and PC wirelessly, you can perform various tasks on your phone using your PC, making it easier for people with disabilities to navigate and interact with their devices.
Overall, connecting your Android phone and PC wirelessly offers a range of benefits that enhance convenience, productivity, and accessibility in your daily life. It simplifies the way you manage your files, streamlines your workflows, and provides you with greater control over your Android phone from the comfort of your PC.
Step 1: Download and install AirDroid
Before you can wirelessly connect your Android phone and PC, you will first need to download and install AirDroid. AirDroid is a powerful mobile app that allows you to transfer files, manage notifications, and access various functions on your Android device from your PC.
To begin, follow the steps below to download and install AirDroid:
- Open the Google Play Store on your Android phone.
- Search for “AirDroid” in the search bar.
- Tap on the official AirDroid app from Sand Studio.
- Click on the “Install” button to start the download and installation process.
- Wait for the app to be downloaded and installed on your Android phone.
Once AirDroid is successfully installed on your Android phone, you are ready to proceed to the next step and create an AirDroid account.
Step 2: Create an AirDroid account
Creating an AirDroid account is essential for enjoying the full benefits of wirelessly connecting your Android phone and PC. Follow these steps to set up your account:
1. Open the AirDroid app on your Android phone: After downloading and installing AirDroid from the Google Play Store, locate the app icon on your phone’s home screen or app drawer and tap on it to open it.
2. Sign up for an account: You will be presented with the option to sign in with an existing account or sign up for a new one. To create a new account, tap on the “Sign Up” button.
3. Provide your email and password: Enter your email address and choose a strong password for your AirDroid account. Make sure to choose a password that is unique and secure to protect your personal information.
4. Verify your email address: AirDroid will send a verification email to the address you provided. Open your email inbox and locate the email from AirDroid. Follow the instructions in the email to verify your account.
5. Complete the registration process: Once you have verified your email, return to the AirDroid app on your Android phone. Follow the on-screen prompts to complete the registration process, which may include providing additional account details such as your name and profile picture.
6. Set up additional security measures (optional): AirDroid offers additional security features such as two-factor authentication and remote security settings. Consider enabling these features to further protect your account and personal data.
By completing these steps, you will have successfully created an AirDroid account. This account will serve as the gateway to connecting your Android phone and PC wirelessly.
Step 3: Connect your Android phone and PC to the same Wi-Fi network
Before you can wirelessly connect your Android phone and PC using AirDroid, it is essential to ensure that both devices are connected to the same Wi-Fi network. This step is crucial as it establishes a secure and stable connection between the two devices, allowing seamless communication and data transfer.
To connect your Android phone and PC to the same Wi-Fi network, follow these simple steps:
- Access the Wi-Fi settings on your Android phone by swiping down from the top of the screen and tapping on the Wi-Fi icon.
- Once in the Wi-Fi settings, scan for available networks and select the Wi-Fi network you want to connect to.
- If the network requires a password, enter the correct password to establish the connection.
- Once connected, your Android phone will display a Wi-Fi symbol near the top of the screen, indicating a successful connection to the Wi-Fi network.
- On your PC, navigate to the Wi-Fi icon located in the system tray or taskbar and click on it.
- A list of available Wi-Fi networks will appear. Select the same Wi-Fi network that your Android phone is connected to.
- Enter the network password, if required, to establish the connection.
- Once connected, your PC will display the Wi-Fi symbol in the system tray or taskbar, indicating a successful connection.
It is important to note that both devices must remain connected to the same Wi-Fi network throughout the process of using AirDroid. If either device disconnects from the network, the wireless connection between the Android phone and PC will be interrupted.
By connecting your Android phone and PC to the same Wi-Fi network, you lay the foundation for a smooth and efficient wireless connection using AirDroid. Now that both devices are on the same network, you can proceed to the next step and continue the setup process.
Step 4: Open AirDroid on your Android phone and sign in
Once you have downloaded and installed AirDroid, it’s time to open the app on your Android phone and sign in to your AirDroid account. Here’s how:
1. Locate the AirDroid app on your Android phone’s home screen or app drawer and tap on it to open it. The app’s icon usually resembles a white circle with a blue center, with the letter “A” inside.
2. If you haven’t created an AirDroid account yet, you will be prompted to do so. Tap on “Sign Up” to create a new account. You can either sign up using your email address or use your Google or Facebook account to sign in.
3. If you already have an AirDroid account, tap on “Sign In” and enter your email address and password to log in. Alternatively, you can sign in using your Google or Facebook account by tapping on the respective button.
4. After entering your credentials, tap on the “Sign In” button to proceed. AirDroid will verify your account details and log you in successfully.
5. Once you are logged in, you will see the AirDroid app’s main interface. From here, you can access various features and functionalities, such as file transfer, message management, and remote control.
It’s important to note that you must sign in to the same AirDroid account on both your Android phone and PC in order to establish a seamless connection between the two devices.
Now that you have successfully opened AirDroid on your Android phone and signed in to your account, you are ready to proceed to the next step and connect your Android phone and PC wirelessly using AirDroid’s web interface.
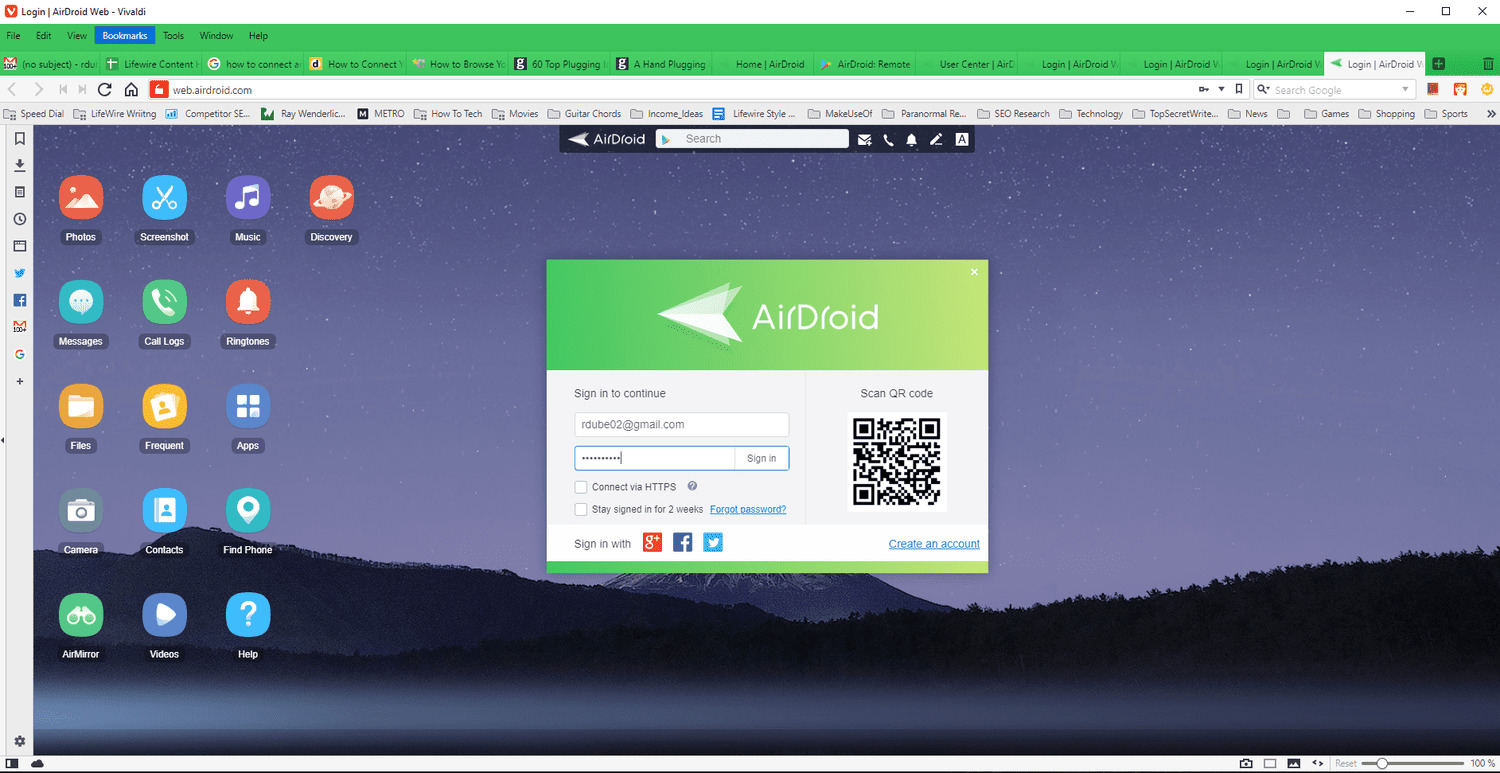
Step 5: Open AirDroid web interface on your PC
Once you have successfully signed in to AirDroid on your Android phone, it’s time to open the AirDroid web interface on your PC. This web interface will allow you to access various features and functionalities of AirDroid directly from your computer.
To open the AirDroid web interface, you need to launch a web browser on your PC. Whether you prefer Chrome, Firefox, Safari, or any other browser, AirDroid is compatible with all major web browsers.
Open your preferred web browser and type “web.airdroid.com” in the address bar. Press Enter to load the page. You will be directed to the AirDroid web interface.
Alternatively, you can also access the web interface by scanning the QR code displayed on the AirDroid app on your Android phone. Simply click on the “scan QR code” option on the app’s homepage, and point your phone’s camera towards the QR code displayed on the web browser. AirDroid will automatically detect the QR code and open the web interface on your PC.
Once the web interface is open, you may be prompted to sign in again using your AirDroid account credentials. This is an additional security measure to ensure that only authorized users can access your Android phone’s content from your PC.
After signing in, you will be greeted with a user-friendly interface that mirrors the features available on the AirDroid app on your Android phone. You can now easily manage, transfer, and control your Android device through your PC.
The AirDroid web interface provides a seamless and convenient way to interact with your Android phone while using the larger screen and keyboard of your PC. Whether you want to send text messages, access your phone’s media files, or even control certain aspects of your phone remotely, the web interface offers a wide range of functionalities to enhance your Android and PC integration.
With the AirDroid web interface open on your PC, you are now ready to proceed to the next step and connect your Android phone and PC wirelessly using AirDroid.
Step 6: Scan the QR code on your PC using AirDroid on your phone
Once you have successfully signed in to AirDroid on your Android phone and opened the web interface on your PC, it’s time to establish the wireless connection by scanning the QR code.
On your Android phone, you will find a QR code scanner within the AirDroid app. Tap on the “Scan QR Code” option to activate the scanner.
Hold your phone steady and align the camera with the QR code displayed on your PC screen. The scanner will quickly capture the code and establish the connection between your Android phone and PC.
It is important to ensure that your phone is held steady and the QR code is properly aligned within the scanning area. This will help in accurate and quick scanning of the code.
Once the code is successfully scanned, you will see a notification on both your Android phone and PC confirming the connection. At this point, you can begin accessing and controlling your Android phone through the web interface on your PC.
If you encounter any issues while scanning the QR code, make sure your camera lens is clean and there is adequate lighting in the room. If the problem persists, you can try restarting the AirDroid app and refreshing the web interface on your PC.
Remember, the QR code is unique and changes each time you login to AirDroid, ensuring the security of your connection. This means that you will need to scan a new QR code each time you want to connect your Android phone and PC wirelessly.
Scanning the QR code is a quick and convenient way to establish a wireless connection between your Android phone and PC using AirDroid. It eliminates the need for complicated setup processes or entering lengthy authentication codes.
Now that you have successfully scanned the QR code, you can move on to the next step and start enjoying the seamless connectivity and features offered by AirDroid.
Step 7: Start wirelessly connecting your Android phone and PC
Now that you have successfully signed in to AirDroid on both your Android phone and PC, it’s time to start wirelessly connecting them. Follow these simple steps:
1. On your PC, you should see the AirDroid web interface. This interface will allow you to access your Android phone’s content and features remotely.
2. On your Android phone, you will be greeted with the AirDroid home screen. Take a moment to familiarize yourself with the various options – you’ll soon discover how powerful AirDroid can be.
3. On the AirDroid web interface, you should see a unique code displayed. This code serves as the connection key between your Android phone and PC.
4. On your Android phone, tap on the “Scan QR Code” option. This will activate the phone’s camera, allowing it to scan the QR code on your PC.
5. Position your Android phone’s camera so that it can clearly see the QR code displayed on your PC screen. Once the QR code is successfully scanned, AirDroid will automatically establish a connection between your phone and PC.
6. You may be prompted to grant certain permissions on your Android phone to enable full access and control from your PC. Follow the on-screen instructions to grant the necessary permissions.
7. Congratulations! Your Android phone is now wirelessly connected to your PC via AirDroid. You can now access and manage your phone’s content, send messages, transfer files, and more, all from the convenience of your PC’s web browser.
With AirDroid’s seamless connectivity, you can now effortlessly transfer files between your Android phone and PC, send and receive messages, and even mirror your phone’s screen on your PC. The possibilities are endless!
Remember to keep both your phone and PC connected to the same Wi-Fi network for a smooth and uninterrupted connection with AirDroid.
Now that you have successfully connected your Android phone and PC wirelessly, it’s time to explore the plethora of features and functionality that AirDroid has to offer. Get ready to experience a whole new level of convenience and productivity!
Step 8: Explore AirDroid features and functionality
Once you have successfully connected your Android phone and PC wirelessly using AirDroid, you can start exploring the wide range of features and functionality it offers. Let’s take a look at some of the key features you can utilize:
1. File Transfer: AirDroid allows you to easily transfer files between your phone and PC. You can upload and download files, manage folders, and even transfer multiple files simultaneously. This makes it convenient to access and transfer documents, photos, music, and videos between your devices.
2. SMS and Contacts: With AirDroid, you can read, send, and receive SMS messages directly from your PC. This feature comes in handy when you are working on your computer and don’t want to constantly switch between devices. Additionally, you can manage and organize your contacts, making it easier to keep your phonebook up to date.
3. Notifications: AirDroid enables you to receive and manage your Android phone notifications in real-time on your PC. You can view and reply to messages, check app notifications, and even dismiss or clear them. This feature helps you stay updated and connected without having to constantly check your phone.
4. Remote Control: One of the standout features of AirDroid is the ability to control your Android device from your PC. You can remotely access and navigate your phone’s screen, control apps, and even take screenshots. This feature proves invaluable for troubleshooting, presentations, or simply accessing your phone’s content without physically holding it.
5. Camera and Clipboard: AirDroid allows you to use your Android phone’s camera directly from your PC, which is perfect for remotely capturing photos or scanning documents. In addition, you can conveniently copy and paste text between your phone and PC using the clipboard feature.
6. App Management: With AirDroid, you can install, uninstall, and update apps on your Android phone from your PC. It provides a centralized platform to manage your apps, making it easier to discover new ones and keep your existing apps up to date.
7. Find Phone: AirDroid includes a helpful feature called “Find Phone” that allows you to locate your Android device if it goes missing. You can make your phone ring at full volume, even if it is on silent mode, giving you the ability to find it quickly.
8. Secure File Transfer: AirDroid ensures the security of your file transfers by using encryption protocols. This means that your files are protected and kept private while being transferred between your Android phone and PC.
These are just a few of the many features and functionalities that AirDroid offers. Take some time to explore and experiment with the different options to fully unleash the potential of this powerful tool.
Tips and troubleshooting for using AirDroid wirelessly
Using AirDroid to connect your Android phone and PC wirelessly can greatly enhance your productivity and convenience. To ensure a smooth experience, here are some helpful tips and troubleshooting steps:
1. Keep your devices updated: Make sure you have the latest version of AirDroid installed on both your Android phone and PC. Updates often include bug fixes and performance improvements that can enhance the wireless connection.
2. Check your internet connection: A stable and reliable internet connection is crucial for seamless functionality. Ensure your Wi-Fi network is working properly and that both your phone and PC are connected to the same network.
3. Grant necessary permissions: AirDroid requires certain permissions to function properly. Double-check that you have granted the necessary permissions, such as access to your camera, storage, and notifications, on your Android phone.
4. Disable battery optimization: Some Android devices have battery optimization settings that may restrict certain background processes. To prevent AirDroid from being affected, disable battery optimization for the app.
5. Check firewall and antivirus settings: If you encounter connection issues, ensure that AirDroid is allowed through any firewall or antivirus software you have installed on your PC. Adjust the settings to enable AirDroid’s communication.
6. Clear cache and data: If you experience any glitches or performance issues, try clearing the cache and data of the AirDroid app on your Android phone. This can often resolve minor issues and improve overall performance.
7. Restart your devices: Sometimes, a simple restart can solve connectivity problems. Power off both your Android phone and PC, then turn them back on and try connecting again.
8. Enable Wi-Fi scanning: If you’re struggling to connect your devices, ensure that Wi-Fi scanning is enabled on your Android phone. This feature allows your device to automatically detect and connect to available networks.
9. Configure network settings: In some cases, adjusting network settings on your Android phone or PC can improve connectivity. Try changing the network mode or manually setting a specific IP address to see if it resolves any connection issues.
10. Contact AirDroid support: If you’ve tried all the above troubleshooting steps and are still experiencing issues, reach out to AirDroid’s customer support. They have a team of experts who can provide further assistance and guidance.
By following these tips and troubleshooting steps, you can maximize the benefits of using AirDroid to wirelessly connect your Android phone and PC. Enjoy the convenience of seamless file transfers, messaging, and more with this powerful application.
Conclusion
In conclusion, AirDroid is an excellent tool for wirelessly connecting your Android phone and PC. With its easy-to-use interface, seamless file transfer capabilities, and remote control features, it offers a convenient and efficient way to sync and manage your Android device from your computer.
Whether you need to transfer files, send messages, manage notifications, or even mirror your phone screen, AirDroid provides a range of functionalities that make it a must-have app for Android users. No longer will you be limited by cables or need to fuss with complicated software installations. AirDroid simplifies the process, allowing you to effortlessly connect, control, and communicate between your Android phone and PC.
So why wait? Give AirDroid a try and experience the convenience and freedom of wirelessly connecting your Android phone and PC today!
FAQs
1. What is AirDroid?
AirDroid is a mobile app that allows you to wirelessly connect your Android phone and PC. It provides a seamless and convenient way to access and manage your phone’s content using your PC’s web browser.
2. How does AirDroid work?
AirDroid works by creating a local connection between your Android phone and PC using the same Wi-Fi network. Once connected, you can use the AirDroid app on your phone and the AirDroid web interface on your PC to transfer files, manage contacts, send messages, receive notifications, and more.
3. Is AirDroid safe to use?
Yes, AirDroid is safe to use. It uses secure encryption protocols to protect your data during transmission between your phone and PC. However, it is always recommended to use a strong and unique password for your AirDroid account to ensure the highest level of security.
4. Can I use AirDroid to transfer files between my Android phone and PC?
Yes, AirDroid allows you to transfer files between your Android phone and PC. You can easily drag and drop files from your PC to your phone or vice versa using the AirDroid web interface. It supports various file types, including photos, videos, music, documents, and more.
5. Does AirDroid support other platforms besides Android?
While AirDroid primarily focuses on Android devices, it also offers limited support for iOS devices through the AirDroid web interface. However, iOS users may experience some limitations in terms of functionality compared to Android users. It is recommended to check the AirDroid website or app store for the latest compatibility information.