
In today’s fast-paced world, staying organized is key to managing our busy lives. And one useful tool for keeping track of important tasks and events is through reminders on our mobile devices. Whether it’s a personal to-do list or a work-related deadline, reminders are a lifeline for many of us. However, there may be times when we need to reorganize our reminders and move them to a different list. In this handy guide, we’ll explore the simple steps to move a reminder to a different list on your mobile device using a popular mobile app. So, if you’re ready to unlock the full potential of your reminder app and stay on top of your tasks, read on!
Inside This Article
- Tip of the Day: How to Move a Reminder to a Different List
- Moving a Reminder on Mobile Devices
- Moving a Reminder on Desktop
- Moving a Reminder through Voice Commands
- Moving a Reminder to a Different List Automatically
- Conclusion
- FAQs
Tip of the Day: How to Move a Reminder to a Different List
Keeping organized is essential for staying on top of your tasks and responsibilities. When it comes to managing reminders on your mobile device, being able to move them to different lists can make all the difference. Whether you’re using an iOS device, an Android device, or a Mac, there are various methods you can employ to easily move a reminder to a different list. In this tip of the day, we will explore three different methods that will help you accomplish this task seamlessly.
Method 1: Using the Reminder App on iOS
If you’re an iPhone or iPad user, the built-in Reminder app is a powerful tool that can be used to manage your tasks efficiently. To move a reminder to a different list in the Reminder app on iOS, follow these simple steps:
- Open the Reminder app and locate the reminder you want to move.
- Swipe left on the reminder to reveal the options.
- Tap “More” to access additional actions.
- From the menu that appears, tap “Move to.”
- Select the desired list from the available options.
By following these steps, you can easily transfer a reminder to a different list and keep your tasks organized according to your preferences.
Method 2: Using Google Keep on Android Devices
For Android users who prefer using Google Keep as their go-to app for reminders and note-taking, moving a reminder to a different list is a breeze. Here’s how you can do it:
- Open the Google Keep app and find the reminder you wish to move.
- Tap and hold the reminder until a checkbox appears on the left.
- Select the checkbox to activate the selection mode.
- Tap on the three-dot menu icon located at the top-right corner of the screen.
- Choose “Move to another list” from the menu.
- Select the desired list from the available options.
With these straightforward steps, you can effortlessly relocate reminders to different lists and keep your Google Keep app organized.
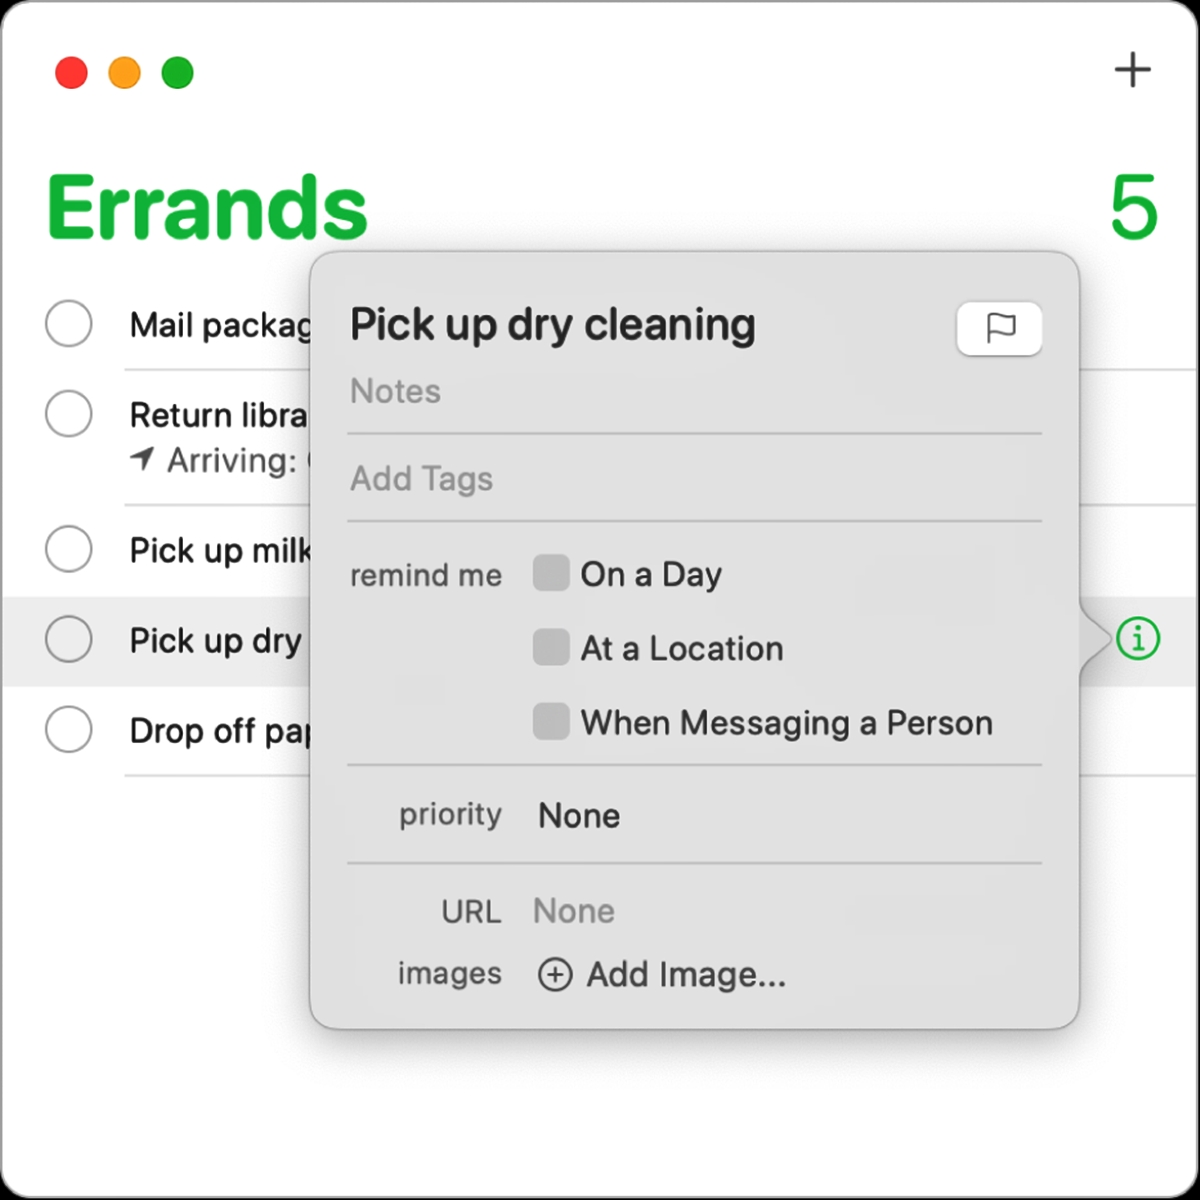
Method 3: Using the Reminders Feature on Mac
For Mac users, the Reminders feature provides a convenient way to manage tasks and set reminders. To move a reminder to a different list on your Mac, follow these steps:
- Open the Reminders app on your Mac.
- Locate the reminder you want to move and right-click on it.
- In the contextual menu that appears, select “Move to List”.
- Choose the desired list from the options provided.
By following these simple steps, you can easily reorganize your reminders on your Mac and ensure that your tasks are properly sorted.
With these three methods at your disposal, you can now move reminders to different lists with ease, regardless of whether you’re using an iOS device, an Android device, or a Mac. Keeping your reminders organized will not only help you stay on top of your tasks, but it will also contribute to a more efficient and productive workflow.
Frequently Asked Questions
- Can I move a reminder to a different list on my Android device without using Google Keep?
While Google Keep is a popular app for reminders on Android devices, some other apps might also offer similar functionality. Check the settings and options within your preferred app to see if it provides the ability to move reminders to different lists. - Can I create custom lists for my reminders on iOS?
Yes, you can create custom lists in the Reminder app on iOS. Simply tap on the “New List” option within the app and give your list a name. You can then move reminders to these custom lists following the method mentioned earlier in this article. - Is it possible to move multiple reminders to a different list simultaneously?
While the exact steps may vary depending on the app or device you’re using, many task management apps provide the ability to select and move multiple reminders at once. You can typically activate the selection mode and then choose the desired reminders to move them to a new list together.
With these useful methods and frequently asked questions addressed, you now have all the necessary tools to manage your reminders more effectively, ensuring that you stay organized and on track.
Moving a Reminder on Mobile Devices
Keeping track of tasks and important events is a crucial aspect of managing our daily lives. Fortunately, with the advancements in technology, we can easily set reminders on our mobile devices to ensure we never miss a beat. But what happens if we realize we’ve mistakenly added a reminder to the wrong list? No need to worry! In this article, we’ll explore various methods to help you move a reminder to a different list on your mobile device, whether you’re using iOS or Android.
Method 1: Using the Reminder App on iOS
If you’re an iOS user, the built-in “Reminders” app provides a simple solution to move reminders to a different list. Follow these steps:
- Open the “Reminders” app on your device.
- Select the list containing the reminder you wish to move.
- Tap on the reminder to open its details.
- Scroll down and tap on the “Move” option.
- A list of available lists will appear. Select the desired list.
- Your reminder will now be moved to the selected list.
Method 2: Using Google Keep on Android Devices
If you’re using an Android device, Google Keep offers a convenient way to move reminders between lists. Here’s what you need to do:
- Launch the Google Keep app on your device.
- Select the list that contains the reminder you want to move.
- Tap on the reminder to open its details.
- Tap on the three-dot menu icon at the top-right corner of the screen.
- From the options that appear, select “Move to another list”.
- Choose the desired list to move your reminder to.
- Your reminder will now be transferred to the selected list.
Method 3: Using the Reminders Feature on Mac
If you’re using a Mac computer, the Reminders feature allows you to seamlessly move reminders between lists. Follow these steps:
- Open the “Reminders” app on your Mac.
- Select the list that contains the reminder you’d like to move.
- Double-click on the reminder to view its details.
- Click on the “More” icon (represented by three dots) at the top of the window.
- A dropdown menu will appear. Select “Move to List” from the options.
- Choose the list where you want to move your reminder.
- The reminder will now be relocated to the selected list.
Whether you’re an iOS or Android user or prefer managing reminders on your Mac, these simple methods provide the flexibility to move reminders to different lists effortlessly. So, if you’ve accidentally added a reminder to the wrong list, follow the steps outlined above and keep your tasks organized and easily accessible.
Moving a Reminder on Desktop
If you’re someone who likes to stay organized, then reminders are your best friend. They help you remember essential tasks and events, ensuring that nothing slips through the cracks. But what happens when you need to move a reminder to a different list on your desktop? Well, lucky for you, it’s a breeze! Here are a few methods you can use to easily move a reminder on your desktop.
Method 1: Using the Reminder App on Windows
If you’re using a Windows computer, the built-in Reminder app is a fantastic option for managing your reminders. To move a reminder to a different list, follow these simple steps:
- Open the Reminder app on your Windows desktop.
- Select the reminder you want to move by clicking on it.
- Click on the “Edit” button, usually represented by a pen icon.
- In the editing window, you’ll find an option to select the list where you want to move the reminder. Choose the desired list from the drop-down menu.
- Click on the “Save” button to apply the changes.
And that’s it! Your reminder is now successfully moved to the new list, keeping your desktop organized and clutter-free.
Method 2: Using Google Keep on Desktop
If you prefer to use Google Keep for managing your reminders, it’s equally quick and straightforward to move a reminder to a different list. Follow these steps:
- Open Google Keep on your desktop by visiting https://keep.google.com and sign in with your Google account credentials.
- Locate the reminder you want to move and hover over it.
- Click on the three vertical dots that appear in the top-right corner of the reminder.
- In the drop-down menu, choose the “Move to…” option.
- Select the list where you want to move the reminder from the available options.
- Click on the “Move” button to complete the process.
Now your reminder is successfully moved to the desired list in Google Keep, ensuring a seamless and organized experience.
Method 3: Using the Reminders Feature on Mac
For Mac users, the Reminders app provides an excellent way to manage your tasks and events. To move a reminder to a different list on your Mac, follow these steps:
- Open the Reminders app on your Mac.
- Select the reminder you want to move by clicking on it.
- Right-click on the reminder, and a drop-down menu will appear.
- Choose the “Move” option from the menu.
- Select the list where you want to move the reminder.
- Click on the “Done” button to finalize the process.
Voila! Your reminder is now successfully moved to the new list, allowing you to stay organized and on top of your tasks with ease.
Next time you find yourself needing to move a reminder to a different list on your desktop, you’ll know exactly what to do. Whether you’re using the built-in apps on Windows or Mac or prefer the Google Keep experience, these methods will help you keep your reminders organized and easily accessible. Don’t fret over a cluttered desktop – take control with these simple steps and ensure a stress-free and productive day!
Moving a Reminder through Voice Commands
In today’s fast-paced world, convenience and efficiency are key when it comes to managing our tasks and schedules. Thankfully, with advancements in mobile technology, we now have the ability to control our devices through voice commands. This includes the ability to move a reminder to a different list using just your voice. Imagine how much time and effort you can save by simply speaking to your smartphone or smart speaker! In this article, we will explore how you can easily move a reminder using voice commands.
1. Make sure your device has voice command capabilities: Before you begin, ensure that your device, whether it is a smartphone or a smart speaker, is equipped with voice command functionality. Most devices today come with built-in voice assistants like Siri, Google Assistant, or Amazon Alexa.
2. Wake up your voice assistant: To initiate the voice command, simply wake up your device’s voice assistant by saying the designated activation phrase. For example, say “Hey Siri,” “Okay Google,” or “Alexa” to get the attention of the respective voice assistant.
3. Give the voice command to move the reminder: Once your voice assistant is activated, give the command to move the reminder to a different list. You can say something like “Move the reminder ‘Buy groceries’ to the ‘Shopping’ list” or “Change the list of the reminder ‘Doctor’s appointment’ to ‘Health’.”
4. Confirm and complete the action: After giving the voice command, your device’s voice assistant will process the request and confirm the action. Listen for the confirmation message and ensure that the reminder has been successfully moved to the desired list. If there are any discrepancies, you can always repeat the voice command or manually move the reminder through the app interface.
5. Enjoy the convenience: By utilizing voice commands to move reminders, you can streamline your productivity and make task management even more effortless. Whether you’re busy cooking in the kitchen, driving, or simply have your hands full, accessing and organizing your reminders becomes easier than ever before.
It’s important to note that the availability of this feature may vary across different devices and operating systems. Additionally, make sure to have a stable internet connection for the voice command to work effectively.
With the power of voice commands, managing your reminders becomes more efficient and hands-free. Embrace the convenience and explore the various functionalities that your device’s voice assistant offers, including the ability to move reminders to different lists with just a few spoken words.
Moving a Reminder to a Different List Automatically
Managing reminders can be a crucial task, especially when we have numerous tasks to keep track of. In such cases, being able to move reminders to different lists automatically can significantly streamline our organization process. Whether you use the Reminder app on iOS, Google Keep on Android devices, or the reminders feature on Mac, we’ve got you covered. Let’s explore three methods to achieve this effortlessly.
Method 1: Using the Reminder App on iOS
If you’re an iOS user, the built-in Reminder app offers a convenient way to move reminders to different lists. Follow the steps below:
- Open the Reminder app on your iOS device.
- Find the reminder you want to move and swipe left on it.
- Tap on the More button.
- Select the List option from the menu.
- Choose the desired list to move the reminder to.
By following these simple steps, you can easily move reminders to a different list on your iOS device, ensuring better organization and effective task management.
Method 2: Using Google Keep on Android Devices
If you’re an Android user and prefer using Google Keep for reminders, here’s how you can automatically move reminders to different lists:
- Launch the Google Keep app on your Android device.
- Locate the reminder you want to move and long-press on it.
- Tap the three-dot menu icon.
- Select the Move to option.
- Choose the desired list to move the reminder to.
With these steps, you can effortlessly organize your reminders on Google Keep by moving them to different lists according to your preferences.
Method 3: Using the Reminders Feature on Mac
If you’re using a Mac, Apple’s Reminders feature provides an easy way to move reminders to different lists automatically. Follow these steps:
- Open the Reminders app on your Mac.
- Locate the reminder you want to move and right-click on it.
- Select the Move To option from the context menu.
- Choose the desired list to move the reminder to.
By taking advantage of the Reminders app on your Mac, you can seamlessly organize your tasks and ensure they are in the right list for better management.
By using these three methods, you can easily move reminders to different lists automatically, irrespective of whether you’re an iOS, Android, or Mac user. Implementing these steps will help you stay organized, manage your tasks efficiently, and never miss a beat!
The process of moving a reminder to a different list is a simple yet very useful feature that can help you stay organized and efficient. Whether you want to group related reminders together, prioritize your tasks, or reorganize your lists, being able to move reminders can make a big difference.
By following the steps outlined in this article, you can easily move reminders to a different list on various platforms and devices. Remember to consider your specific app or platform and adjust the steps accordingly.
Having the ability to customize your reminder lists adds flexibility to how you manage your tasks. Take advantage of this feature to streamline your to-do lists and ensure everything is in its rightful place. With a few simple clicks or taps, you’ll be able to keep your tasks organized, stay on top of your priorities, and make the most of your time.
FAQs
1. Can I move a reminder to a different list in any mobile app?
Yes, you can move a reminder to a different list in most mobile apps that have a reminder feature. Check the specific app you are using for instructions on how to move reminders between lists.
2. How do I move a reminder to a different list in the iOS Reminder app?
To move a reminder to a different list in the iOS Reminder app, follow these steps:
– Open the Reminder app on your iPhone or iPad.
– Find the reminder you want to move to a different list.
– Swipe left on the reminder and tap the “More” button.
– Tap on “Move To” and choose the list you want to move the reminder to.
3. Can I move a reminder to a different list in the Google Keep app on Android?
Yes, you can move a reminder to a different list in the Google Keep app on Android. To do so, follow these steps:
– Open the Google Keep app on your Android device.
– Find the reminder you want to move to a different list.
– Tap and hold on the reminder until a menu appears.
– Tap on “Move to…” and select the list you want to move the reminder to.
4. Is it possible to move a reminder to a different list in the Microsoft To-Do app?
Yes, in the Microsoft To-Do app, you can easily move a reminder to a different list. Here’s how you can do it:
– Launch the Microsoft To-Do app on your smartphone.
– Locate the reminder you want to move.
– Swipe left on the reminder and tap the three-dot menu icon.
– Select “Move to” and choose the desired list to move the reminder to.
5. How do I move a reminder to a different list in the Evernote app?
Moving a reminder to a different list in the Evernote app is a simple process. Just follow these steps:
– Open the Evernote app on your device.
– Find the reminder you wish to move to another list.
– Tap and hold on the reminder to activate the editing mode.
– Tap on the “Move” option and select the desired list to move the reminder to.