
Accessing the SD card on your Android device is a crucial task that allows you to manage and transfer files seamlessly. Whether you want to view photos, play music, or access documents, having easy access to your SD card can make your Android experience even more convenient and efficient. In this article, we will guide you through the process of accessing the SD card on your Android device, providing step-by-step instructions and useful tips along the way. From understanding the different methods of accessing the SD card to troubleshooting common issues, this comprehensive guide will help you make the most out of your Android device’s storage capabilities. So, let’s dive in and learn how to access the SD card on Android!
Inside This Article
- Overview of SD Cards
- Different Types of SD Cards
- Inserting the SD Card into an Android Device
- Accessing the SD Card through the File Manager
- Conclusion
- FAQs
Overview of SD Cards
SD cards, short for Secure Digital cards, are a type of portable storage medium that is widely used in electronic devices. These small, removable memory cards have become popular due to their compact size and high storage capacity. SD cards come in various sizes and formats and are commonly used in smartphones, tablets, cameras, and other portable devices.
SD cards are essential for expanding the storage capacity of Android devices. They allow users to store and access a wide range of data, including photos, videos, music, documents, and apps. With an SD card, users can conveniently carry their files with them, freeing up valuable internal storage space on their Android devices.
One of the key advantages of SD cards is their ease of use. Inserting an SD card into an Android device is a simple process that can be done by anyone, even those with no technical knowledge. Once inserted, the SD card becomes an extension of the device’s internal storage, providing users with additional space to save their files.
SD cards are available in different storage capacities, ranging from a few gigabytes to several terabytes. This wide range of options allows users to choose the card that best suits their needs and budget. Additionally, SD cards are relatively affordable, making them a cost-effective solution for expanding the storage of Android devices.
It’s important to note that not all Android devices support SD cards. Some smartphones and tablets may have limited or no SD card slots, relying solely on internal storage. Therefore, it’s essential to check the specifications of your Android device to ensure compatibility with SD cards.
Different Types of SD Cards
SD cards, or Secure Digital cards, are portable storage devices widely used in smartphones, tablets, digital cameras, and other electronic devices. SD cards come in different sizes and formats, each with its own specifications and capabilities. Here are the most common types of SD cards:
1. SD (Secure Digital) card: The standard SD card is the original format, often referred to as SDSC (SD Standard Capacity). It has a storage capacity of up to 2GB and is primarily used in older electronic devices.
2. SDHC (Secure Digital High Capacity) card: SDHC cards, with storage capacities ranging from 4GB to 32GB, are commonly used in devices that require greater storage space. These cards are formatted in the FAT32 file system and can be used in most SDHC and SDXC compatible devices.
3. SDXC (Secure Digital eXtended Capacity) card: SDXC cards offer even higher storage capacities, ranging from 64GB up to a massive 2TB (terabytes). They use exFAT as the file system, allowing for larger file sizes and faster data transfer rates.
4. microSD card: microSD cards are smaller versions of SD cards, primarily used in smartphones, tablets, and other portable electronic devices. They are available in the same capacities as SDHC and SDXC cards and are often used with an adapter to fit in standard SD card slots.
5. miniSD card: The miniSD card is a less common variant and is larger than the microSD card but smaller than the standard SD card. It is now becoming obsolete due to the popularity of microSD cards.
6. SDIO (Secure Digital Input Output) card: The SDIO card is an SD card that provides additional functionality, such as wireless communication, GPS, Bluetooth, or digital TV reception. These cards are less common and are mostly used in specific devices that require the added functionality.
When purchasing an SD card, it is important to consider the storage capacity and compatibility with your device. Always check the device’s specifications to ensure that it supports the desired SD card type.
Inserting the SD Card into an Android Device
Inserting an SD card into your Android device is a simple process that allows you to expand your device’s storage capacity and store more photos, videos, and files. Follow these steps to successfully insert an SD card:
- Locate the SD card slot on your Android device. This is typically found on the side of the device or behind a small panel.
- Power off your Android device to ensure you don’t cause any damage when inserting or removing the SD card.
- Gently insert the SD card into the slot. Make sure the metal contacts on the card are facing down and aligned with the contacts in the slot.
- Apply light pressure until the card is securely inserted into the slot. Be careful not to force the card, as this could damage both the card and the device.
- If your device has a panel covering the SD card slot, carefully place the panel back into position and secure it.
- Power on your Android device. It will automatically detect the SD card and configure it for use.
Once the SD card is inserted, you can easily manage the files stored on it. Android devices typically include a built-in file manager that allows you to browse, copy, move, and delete files on the SD card. You can access the file manager by opening the App Drawer and searching for “File Manager” or “My Files”.
It’s important to note that some Android devices support hot-swapping of SD cards, which means you can insert or remove the card while the device is powered on. However, it’s always recommended to power off your device before inserting or removing the SD card to avoid any potential data loss or hardware damage.
By following these simple steps, you can easily insert an SD card into your Android device and expand its storage capacity. Enjoy the additional space for all your files, photos, and videos!
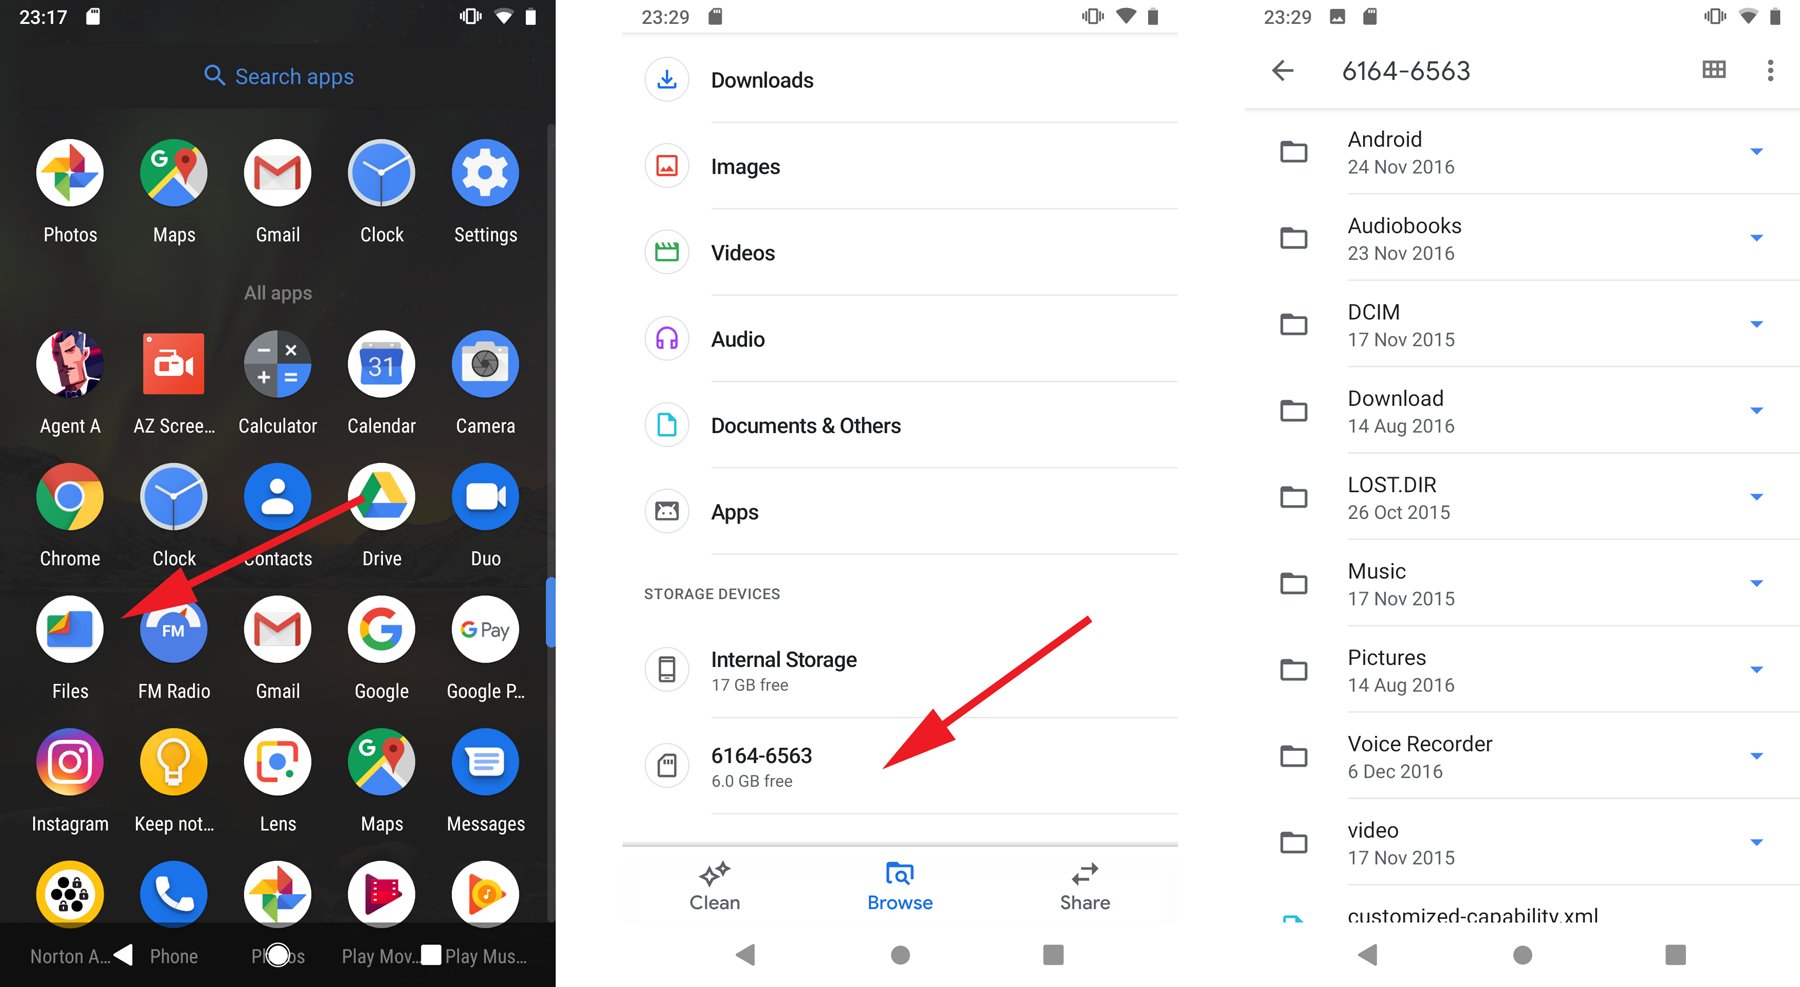
Accessing the SD Card through the File Manager
One of the easiest ways to access your SD card on an Android device is through the built-in File Manager app. The File Manager allows you to browse, manage, and organize files on both your device’s internal storage and external SD card.
To access the SD card through the File Manager, follow these simple steps:
- Open the File Manager app on your Android device. It is usually pre-installed, but if you don’t have it, you can download it from the Google Play Store.
- Navigate to the main page or home screen of the File Manager.
- Look for an option or icon labeled “SD Card” or “External Storage”. This may vary depending on the specific device and File Manager app you are using.
- Tap on the “SD Card” option to access the contents of your SD card.
Once you have accessed your SD card through the File Manager, you can perform various actions such as copying, moving, renaming, or deleting files and folders. You can also create new folders and organize your files as desired.
Keep in mind that the interface and features of the File Manager app may differ slightly between different Android devices and versions of the operating system. However, the general steps outlined above should apply to most devices.
By accessing your SD card through the File Manager, you have complete control over the files and folders stored on it. This provides you with the flexibility to manage your data effectively and ensure that everything is organized to your liking.
In conclusion, accessing the SD card on your Android device is a straightforward process that can greatly enhance your device’s storage capacity and functionality. Whether you want to transfer files, install apps, or simply store media, the SD card provides a convenient and versatile solution.
By following the steps outlined in this guide, you can easily access your SD card on Android devices, allowing you to fully utilize its potential. Remember to always back up important data and follow proper procedures when removing or inserting the SD card to avoid any potential data loss or damage to your device. With your SD card readily accessible, you can enjoy expanded storage space and a seamless user experience on your Android device.
FAQs
1. How can I access the SD card on my Android device?
To access the SD card on your Android device, follow these steps:
- Insert the SD card into the SD card slot of your Android device. The location of the SD card slot may vary depending on the device model.
- Swipe down from the top of your screen to open the notification panel and then tap on the gear or settings icon to open the Settings menu.
- In the Settings menu, scroll down and locate the “Storage” or “Storage & USB” option.
- Tap on the “Storage” option and you should see the available storage options, including your SD card.
- To access the contents of your SD card, tap on the SD card option and you will be able to view and manage the files stored on the SD card.
2. Can I transfer apps to the SD card?
Yes, in most cases, you can transfer compatible apps to the SD card. However, this feature may vary depending on the Android version and device manufacturer. To transfer apps to the SD card, go to the Settings menu, select “Apps” or “Applications”, find the app you want to transfer, and tap on it. Look for the “Move to SD card” option and if available, tap on it to transfer the app to your SD card. Keep in mind that not all apps can be moved to the SD card and some essential system apps cannot be moved at all.
3. How do I safely remove the SD card from my Android device?
To safely remove the SD card from your Android device, follow these steps:
- Go to the Settings menu on your device.
- Scroll down and tap on the “Storage” or “Storage & USB” option.
- Tap on the option that represents your SD card (e.g., “SD Card” or the manufacturer’s name).
- Tap on the three-dot menu icon at the top-right corner of the screen.
- From the menu that appears, select “Eject” or “Unmount” to safely remove the SD card from your device.
- Once you see the notification confirming that it’s safe to remove the SD card, you can physically eject it from the SD card slot.
4. Can I use my SD card as internal storage on Android?
Yes, with certain Android devices and versions, you have the option to format your SD card as internal storage. This allows you to use the SD card as an extension of your device’s internal memory, providing more space for apps, photos, and other data. However, it is important to note that once you format the SD card as internal storage, it becomes encrypted and tied to your device. To do this, go to the Settings menu, select “Storage” or “Storage & USB”, tap on your SD card, and follow the on-screen instructions to format it as internal storage. Keep in mind that this process will erase all data on the SD card.
5. What should I do if my Android device doesn’t recognize the SD card?
If your Android device doesn’t recognize the SD card, there are a few troubleshooting steps you can try:
- Ensure that the SD card is properly inserted into the SD card slot.
- Restart your device to refresh the system.
- Clean the SD card and the SD card slot using a soft, dry cloth to remove any dust or debris that may be causing a poor connection.
- If possible, try inserting the SD card into another Android device or a card reader to determine if the issue is with the card or the device.
- If none of the above steps work, it is possible that the SD card is faulty or incompatible with your device. In this case, you may need to replace the SD card.