
Connecting to Wi-Fi on your Android device is a simple and essential task that allows you to access the internet, download apps, and stay connected with friends and family. Whether you’re at home, work, or in a public place, having a reliable Wi-Fi connection can help you save on mobile data and enjoy faster internet speeds.
In this article, we’ll guide you through the process of connecting to Wi-Fi on your Android device. We’ll cover everything from finding available networks to entering passwords and troubleshooting common issues. So, whether you’ve just purchased a new Android phone or need a refresher on how to connect to Wi-Fi, we’ve got you covered.
Inside This Article
- How To Connect To Wi-Fi On Android
- Enable Wi-Fi on your Android device
- Search for available Wi-Fi networks
- Select and connect to a Wi-Fi network
- Enter the Wi-Fi network password
- Conclusion
- FAQs
How To Connect To Wi-Fi On Android
Connecting your Android device to a Wi-Fi network can provide you with faster internet speeds and save your mobile data usage. Whether you’re at home, at work, or in a public place, setting up a Wi-Fi connection on your Android device is a simple and straightforward process.
Enabling Wi-Fi on your Android device
The first step in connecting to Wi-Fi on your Android device is to make sure that the Wi-Fi feature is enabled. Here’s how:
- Swipe down from the top of your screen to access the notification panel.
- Look for the Wi-Fi icon and tap on it to turn it on. The icon should turn blue, indicating that Wi-Fi is now enabled.
Alternatively, you can enable Wi-Fi by going to the Settings menu on your Android device and selecting the “Wi-Fi” option. Toggle the switch to turn it on.
Scanning for available Wi-Fi networks
Once Wi-Fi is enabled, your Android device will automatically scan for available Wi-Fi networks in the vicinity. To manually initiate a scan, follow these steps:
- Go to the Settings menu on your Android device.
- Select the “Wi-Fi” option.
- Tap on the “Scan” button or the refresh icon to start scanning for available networks.
A list of available Wi-Fi networks will be displayed on your screen, along with their signal strength and security status.
Connecting to a Wi-Fi network
Now that you have a list of available Wi-Fi networks, follow these steps to connect to a specific network:
- Select the Wi-Fi network you want to connect to from the list.
- If the network is secured, you will be prompted to enter the password. Enter the correct password and tap “Connect”.
- Your Android device will attempt to connect to the selected network. Once connected, the Wi-Fi icon in the notification panel should display the network’s name or symbol.
Depending on the network’s security settings, you may also be required to provide additional information such as a username or certificate.
Troubleshooting common Wi-Fi connection issues
If you encounter any issues while trying to connect to a Wi-Fi network on your Android device, here are a few troubleshooting tips:
- Ensure that the Wi-Fi network you’re trying to connect to is within range and functioning properly.
- Double-check the password you entered for the network. Make sure it’s correct and entered without any typos.
- Restart your Android device and try connecting to the Wi-Fi network again.
- If the issue persists, remove the Wi-Fi network from your device’s saved networks list and add it again from scratch.
- Consider contacting your network provider or IT support for further assistance if the problem continues.
Now that you know how to connect to a Wi-Fi network on your Android device, you can enjoy faster internet speeds and conserve your mobile data. So, next time you’re within reach of a reliable Wi-Fi network, be sure to take advantage of it.
Enable Wi-Fi on your Android device
One of the first steps to connect to Wi-Fi on your Android device is to enable Wi-Fi. Here’s how:
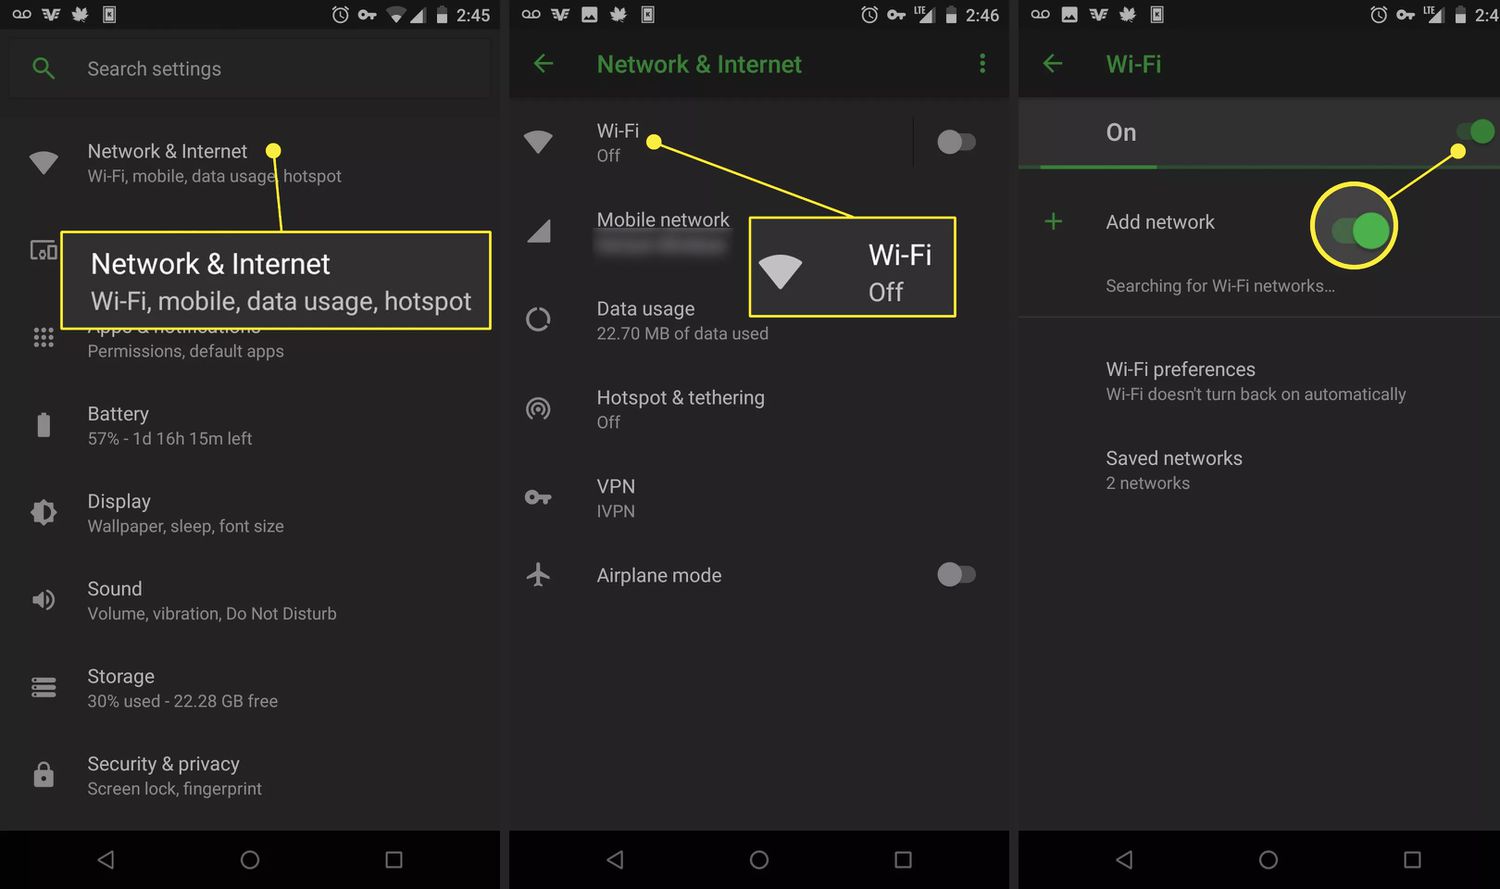
1. Open the Settings app on your Android device. You can usually find it in the app drawer or by swiping down from the top of the screen and tapping the gear icon.
2. In the Settings menu, look for the “Wi-Fi” option and tap on it. This will take you to the Wi-Fi settings page.
3. On the Wi-Fi settings page, toggle the switch at the top of the screen to turn on Wi-Fi. The switch will turn blue or green, indicating that Wi-Fi is enabled.
4. Once Wi-Fi is enabled, your Android device will start scanning for available Wi-Fi networks in the vicinity.
Enabling Wi-Fi on your Android device is a prerequisite to connect to any Wi-Fi network. By following these simple steps, you’ll have Wi-Fi enabled and ready to connect to a network.
Search for available Wi-Fi networks
Once you have enabled Wi-Fi on your Android device, the next step is to search for available Wi-Fi networks. This process allows your device to scan and display a list of networks in your vicinity.
To search for Wi-Fi networks, follow these steps:
- Open the settings menu on your Android device. You can usually do this by swiping down from the top of the screen and tapping on the gear icon or by navigating to the settings app in your app drawer.
- Scroll down and tap on the “Wi-Fi” option. This will open the Wi-Fi settings page.
- Your device will start scanning for available Wi-Fi networks. This process may take a few seconds to complete.
- Once the scan is complete, you will see a list of available Wi-Fi networks. The networks will be displayed with their names (also known as SSIDs) and signal strength indicators.
- Scroll through the list to view all the available networks. You can use the signal strength indicator to determine the proximity of each network.
The list may include both private and public Wi-Fi networks. Private networks are password-protected and require a password to connect. Public networks, on the other hand, are usually open and do not require a password. However, it is important to exercise caution when connecting to public networks, as they may not be secure.
Once you have identified the network you want to connect to, proceed to the next step to establish a connection.
Select and connect to a Wi-Fi network
Once you have scanned for available Wi-Fi networks on your Android device, it’s time to select and connect to the network of your choice. Follow the steps below to seamlessly connect to a Wi-Fi network:
1. From the list of available networks, tap on the network you want to connect to. The networks will be listed with their names (SSID) and signal strengths.
2. If the Wi-Fi network you selected is secured with a password, you will be prompted to enter the password. Tap on the password field to bring up the keyboard and enter the password accurately. Make sure to pay attention to uppercase and lowercase letters, as passwords are case-sensitive.
3. If the password is correct, your Android device will attempt to connect to the Wi-Fi network. Allow a few moments for the connection to establish.
4. Once connected, you will see a “Connected” status next to the Wi-Fi network name in the list of available networks. Additionally, an icon indicating a successful Wi-Fi connection will appear on the notification bar at the top of your screen.
5. Congratulations! You are now connected to the Wi-Fi network. You can now enjoy fast internet access and make use of various online services, such as browsing the web, streaming videos, and downloading apps.
Note: If the Wi-Fi network you selected is open and does not require a password, your Android device will automatically connect to it without prompting for a password.
If you encounter any issues while connecting to a Wi-Fi network, such as authentication errors or connection failures, refer to the troubleshooting section of this guide for possible solutions.
Now that you are connected to a Wi-Fi network on your Android device, let’s learn about some common issues you may encounter and how to resolve them.
Enter the Wi-Fi network password
After selecting the desired Wi-Fi network, you will be prompted to enter the password to establish a connection. This step ensures that only authorized users can access the Wi-Fi network and keeps your information secure.
When entering the password, make sure to double-check for any typographical errors, as passwords are case-sensitive. If you’re unsure about the password, you can ask the network owner or refer to the documentation provided with the network.
In some cases, you might encounter a password prompt upon connecting to a secured network for the first time. This usually happens when the Wi-Fi network requires a captive portal login, which is common in public places like hotels, airports, and coffee shops. Simply enter the provided username and password to proceed.
If you’ve previously connected to the same Wi-Fi network and saved the password, your Android device will automatically connect without requiring you to enter the password again. This is convenient for frequently used networks, as you won’t need to go through the process each time you want to connect.
However, if you’re connecting to a new network or need to update the saved password, you can do so by accessing the Wi-Fi settings on your Android device. Locate the network in the list of saved networks and select it to enter the new password.
If you accidentally input the wrong password, your device will display an error message indicating that the connection was unsuccessful. In this case, you can try again, ensuring that you have the correct password. If you’re still unable to connect, it’s possible that the Wi-Fi network is temporarily unavailable or that there may be other issues with your device or network settings.
By entering the Wi-Fi network password correctly, you will establish a secure and reliable connection to the network. Enjoy uninterrupted internet access and take advantage of all the online activities and services offered!
Conclusion
Connecting to Wi-Fi on your Android device is a straightforward process that allows you to enjoy faster and more reliable internet connectivity. Whether you’re at home, in the office, or at a public hotspot, having a stable Wi-Fi connection can greatly enhance your browsing experience and make it easier to access online services and content.
By following the steps mentioned in this article, you can easily connect your Android device to a Wi-Fi network. Remember to keep your Wi-Fi settings up to date, select a network with a strong signal, and enter the correct password if required. Wi-Fi connectivity offers numerous benefits, such as faster download speeds, better video streaming quality, and the ability to connect multiple devices simultaneously.
So next time you want to hop onto a Wi-Fi network, don’t hesitate to use your Android device’s built-in Wi-Fi features. Stay connected, enjoy high-speed internet, and unlock a whole new world of online possibilities on your Android phone or tablet.
FAQs
1. Why can’t I connect to Wi-Fi on my Android device?
There could be several reasons why you’re unable to connect to Wi-Fi on your Android device. Firstly, make sure that you’re within range of a Wi-Fi network and that the network is functioning properly. Sometimes, resetting your Wi-Fi router can also help resolve connectivity issues. Additionally, check if your device’s Wi-Fi is turned on and that Airplane Mode is disabled. If the problem persists, try forgetting the Wi-Fi network and reconnecting to it.
2. How can I find available Wi-Fi networks on my Android device?
To find available Wi-Fi networks on your Android device, go to the Settings menu and tap on “Wi-Fi.” The device will automatically scan for nearby Wi-Fi networks. Once the scan is complete, a list of available networks will be displayed. Simply tap on the network you want to connect to and enter the password if required.
3. Can I connect to a secured Wi-Fi network on my Android device?
Yes, you can connect to a secured Wi-Fi network on your Android device. When you select a secured network from the list of available networks, you will be prompted to enter the network’s password. Once the correct password is entered, your device will establish a secure connection to the Wi-Fi network.
4. How can I improve the Wi-Fi signal strength on my Android device?
If you’re experiencing weak Wi-Fi signal on your Android device, there are a few things you can try to improve the signal strength. Firstly, move closer to the Wi-Fi router to ensure that you’re within range. You can also try rebooting the Wi-Fi router, as this can sometimes resolve signal issues. Additionally, minimizing interference from other electronic devices, such as microwaves or cordless phones, can help improve Wi-Fi signal strength.
5. Is it possible to connect to a hidden Wi-Fi network on my Android device?
Yes, you can connect to a hidden Wi-Fi network on your Android device. In the Wi-Fi settings, tap on “Add Network” or “Manual Add” and enter the network’s SSID (name) and security settings. Once the information is entered correctly, your device will be able to connect to the hidden Wi-Fi network.