
Having a working microphone on your Android device is essential for various tasks such as making phone calls, recording voice memos, using voice commands, or engaging in video conferences. However, sometimes the microphone may not be turned on by default or may encounter issues that prevent it from functioning correctly. In this article, we will guide you through the steps to turn on the microphone on your Android device and troubleshoot any potential problems you may encounter along the way. Whether you’re a professional seeking seamless communication or a casual user looking to utilize voice features, understanding how to enable your Android’s microphone is crucial. Let’s dive in and ensure that your microphone is activated and ready to capture your voice with utmost clarity.
Inside This Article
- Why Do You Need to Turn on Your Microphone on Android?
- Methods to Turn on Microphone on Android
- Using the Settings Menu
- Using the Quick Settings Panel
- Granting Microphone Permission to Apps
- Troubleshooting Microphone Issues on Android
- Conclusion
- FAQs
Why Do You Need to Turn on Your Microphone on Android?
Turning on your microphone on your Android device is essential for a variety of reasons. Whether you’re using voice commands, making voice calls, recording audio, or utilizing voice-to-text features, having your microphone turned on is crucial for optimal functionality.
One of the main reasons you need to turn on your microphone is to take advantage of voice commands. With virtual assistants like Google Assistant or Samsung’s Bixby, you can simply speak to your device to perform tasks such as making phone calls, sending messages, checking the weather, setting reminders, and so much more. By turning on your microphone, you open up a world of convenience and hands-free control.
In addition to voice commands, turning on your microphone allows you to make voice calls. Whether you’re using the stock dialer app or third-party applications like WhatsApp or Skype, having your microphone activated enables you to communicate with your contacts effortlessly. From important business calls to catching up with friends and family, your microphone becomes your voice.
Recording audio is another popular use case for having your microphone turned on. Whether you want to capture a memorable moment, conduct an interview, or simply record a voice memo, your Android device’s microphone serves as a handy tool. By enabling your microphone, you can easily record high-quality audio without the need for additional equipment.
Furthermore, having your microphone turned on is crucial for utilizing voice-to-text features. Many messaging apps, note-taking apps, and email clients offer voice-to-text functionality, allowing you to dictate your messages or notes instead of typing them manually. By enabling your microphone, you can effortlessly convert your spoken words into written text, saving time and making communication more efficient.
Overall, turning on your microphone on Android is essential to take advantage of voice commands, make voice calls, record audio, and use voice-to-text features. By activating your microphone, you unlock a world of convenience, hands-free control, and seamless communication.
Methods to Turn on Microphone on Android
Android smartphones offer a multitude of features and functionalities, one of which is the built-in microphone. Whether you want to record audio, make voice calls, or use voice commands, having your microphone turned on is essential. In this article, we will explore different methods to turn on the microphone on your Android device.
Turning on the microphone on Android can be easily done using the settings menu. Here’s how:
- Open the “Settings” app on your Android device.
- Scroll down and tap on “Sound & Vibration” or “Sound” depending on your device.
- Select “Audio settings” or a similar option.
- Toggle the switch next to “Microphone” to turn it on.
If your Android device supports the quick settings panel, you can also enable the microphone from there. Here’s how:
- Swipe down from the top of the screen to open the notification panel.
- Look for the “Quick Settings” icon (usually represented by a gear or a grid of squares) and tap on it.
- Scroll through the quick settings until you find the microphone icon.
- Tap on the microphone icon to turn it on.
In order to use the microphone with apps, you may need to grant microphone permission. Follow these steps:
- Go to the “Settings” app on your Android device.
- Tap on “Apps & Notifications” or “Apps” depending on your device.
- Select the app you want to grant microphone permission to.
- Tap on “Permissions” or a similar option.
- Toggle the switch next to “Microphone” to grant permission.
Despite these methods, you may encounter issues with your microphone on Android. In such cases, you can try these troubleshooting steps:
- Restart your Android device.
- Make sure the microphone is not blocked or covered by a case or your hand.
- Check if the microphone is not physically damaged.
- Try using a different microphone or headset.
- Perform a factory reset as a last resort.
Now that you know how to turn on the microphone on your Android device using various methods and deal with common issues, you are all set to utilize its full potential. So go ahead, record high-quality audio, make crystal-clear voice calls, and enjoy the convenience of voice commands on your Android smartphone!
Using the Settings Menu
One of the most straightforward ways to turn on your microphone on an Android device is by using the Settings menu. Follow these steps:
1. Open the Settings app on your Android device. You can usually find it in your app drawer or by swiping down from the top of the screen and tapping on the gear icon.
2. Scroll down and tap on “Sound & vibration” or “Sound & notifications,” depending on your device model.
3. Look for the “Audio settings” or “Sound” options and tap on it.
4. In the Audio settings or Sound menu, you should see an option for “Microphone.” Tap on it to access the microphone settings.
5. Enable the microphone by toggling the switch to the “On” position.
6. Once you have done this, your microphone should be turned on and ready to use.
This method allows you to easily access and control the microphone settings on your Android device. It provides a simple, step-by-step process that anyone can follow.
Using the Quick Settings Panel
If you want to turn on your microphone quickly, using the Quick Settings Panel is the way to go. The Quick Settings Panel is a convenient feature available on most Android devices that allows you to access commonly used settings with just a swipe and a tap.
To access the Quick Settings Panel, swipe down from the top of your screen to open the Notifications panel. Then, swipe down again to reveal the Quick Settings Panel. On some devices, you may need to swipe down with two fingers to access the panel.
Once you have opened the Quick Settings Panel, you will see a grid of different settings icons. Look for the microphone icon, which represents the microphone feature. It may be labeled as “mic” or “voice” on your device.
Tap on the microphone icon to turn on the microphone. The icon will change color or show a status indicator to indicate that the microphone is now active. You may also see a small pop-up notification confirming the microphone is turned on.
After enabling the microphone from the Quick Settings Panel, you can start using it in any app that requires audio input, such as voice recording apps, video conferencing apps, or voice messaging apps.
If you want to turn off the microphone, simply access the Quick Settings Panel again and tap on the microphone icon to disable it. The icon will change back to its original state or show a status indicator to indicate that the microphone is now inactive.
Using the Quick Settings Panel is a convenient way to quickly enable or disable the microphone on your Android device without having to navigate through the settings menu. It’s a great option for those moments when you need to switch back and forth between using the microphone and muting it.
However, please note that some Android devices may have slightly different access methods or variations in the appearance of the Quick Settings Panel. If you don’t see a microphone icon or have trouble finding it, you can refer to your device’s user manual or search online for specific instructions for your make and model.
Granting Microphone Permission to Apps
Granting microphone permission to apps on your Android device is essential for allowing them to access and use the microphone. Whether it’s a voice recording app, a video call app, or any other app that requires audio input, you’ll need to grant microphone permission for it to function properly.
Here’s how you can grant microphone permission to apps on your Android:
- Open the Settings menu on your Android device.
- Scroll down and tap on “Apps” or “Applications” (depending on your device).
- Find the specific app for which you want to grant microphone permission and tap on it.
- On the app’s information page, tap on “Permissions.”
- Look for the “Microphone” permission and make sure it is toggled on.
By following these steps, you can ensure that the selected app has permission to access your device’s microphone. Remember that you have control over which apps can use your microphone, so it’s important to review and manage these permissions regularly.
If you want to grant microphone permission to multiple apps at once, you can do so by following these steps:
- Open the Settings menu on your Android device.
- Scroll down and tap on “Apps” or “Applications” (depending on your device).
- Tap on the three-dot menu icon in the top-right corner of the screen and select “App permissions” from the dropdown menu.
- Tap on “Microphone.”
- You will see a list of all the apps that have requested microphone permission. Toggle on the ones you want to grant permission to.
Granting microphone permission to apps on your Android device might be necessary for certain features to work, such as voice commands and call recording. However, it’s crucial to be mindful of the apps you grant permission to, as some malicious apps could misuse this access to invade your privacy or record audio without your consent.
Therefore, it’s always a good practice to only grant microphone permission to trusted and reliable apps from reputable developers.
Troubleshooting Microphone Issues on Android
If you’re experiencing microphone issues on your Android device, you’re not alone. Many users encounter problems where their microphone stops working or produces poor audio quality. Fortunately, there are several troubleshooting steps you can take to resolve these issues. Here are some effective methods to help you troubleshoot microphone problems on your Android device.
1. Check for Physical Damage: The first step is to ensure that your microphone is not physically damaged. Inspect the microphone port for any dirt, debris, or damage. Clean the port using a soft brush or cloth and remove any obstructions that might be affecting the microphone’s performance.
2. Restart Your Device: Sometimes, a simple restart can fix microphone problems. Restart your Android device to refresh its system and potentially resolve any software glitches interfering with the microphone’s functionality.
3. Test Microphone with Different Apps: Test your microphone with different apps to determine if the issue is app-specific. Open the voice recorder or any other app that uses the microphone and check if it functions properly. If the microphone works with some apps but not others, the problem may be with the app’s settings or compatibility.
4. Update Your Android Operating System: Keeping your device’s operating system up to date can resolve many software-related issues, including microphone problems. Go to the settings menu, select “Software update” or “System update,” and install any available updates to ensure your device is running on the latest version.
5. Clear App Cache and Data: Clearing the cache and data of specific apps can sometimes fix microphone issues. Go to the settings menu, select “Apps” or “Applications,” choose the app experiencing microphone problems, and click on “Clear cache” and “Clear data.” Keep in mind that clearing data will remove any stored preferences or login information for that app.
6. Disable Third-Party Apps and Features: Certain third-party apps or features can interfere with the microphone’s functionality. To identify if this is the case, boot your Android device in safe mode where only system apps are running. If the microphone works fine in safe mode, then a third-party app or feature may be causing the problem. Uninstall recently installed apps or disable features to isolate the issue.
7. Reset App Preferences: Resetting app preferences can help resolve microphone issues related to app settings. Go to the settings menu, select “Apps” or “Applications,” and click on the three-dot menu or “Reset app preferences” option. Confirm the action, and this will reset all app permissions, restrictions, and preferences to their default state.
8. Perform a Factory Reset: If all else fails and you’re still experiencing microphone problems, you can perform a factory reset on your Android device. Before doing this, make sure to back up all important data as a factory reset will erase everything on your device. Go to the settings menu, select “System,” “Reset options,” and choose “Factory data reset.” Confirm the action and follow the on-screen instructions to complete the reset.
By following these troubleshooting steps, you should be able to identify and resolve most microphone problems on your Android device. If the issue persists even after trying these methods, it might be a hardware problem, and it’s recommended to reach out to a professional technician or your device’s manufacturer for further assistance.
In conclusion, turning on the microphone on an Android device is a simple yet essential feature that allows users to make calls, record audio, and interact with various apps and voice assistants. Whether you need to use it for voice commands, voice memos, video calls, or any other audio-related activity, having a functional microphone on your Android device is crucial. By following the steps mentioned in this article, you can easily locate the microphone settings and ensure it is turned on for optimal functionality. Remember to check for any software updates, permissions, or app-specific settings that may affect the microphone’s performance. With a working microphone, you can take full advantage of the many features and conveniences that Android devices have to offer.
FAQs
1. How do I turn on the microphone on my Android device?
To turn on the microphone on your Android device, follow these steps:
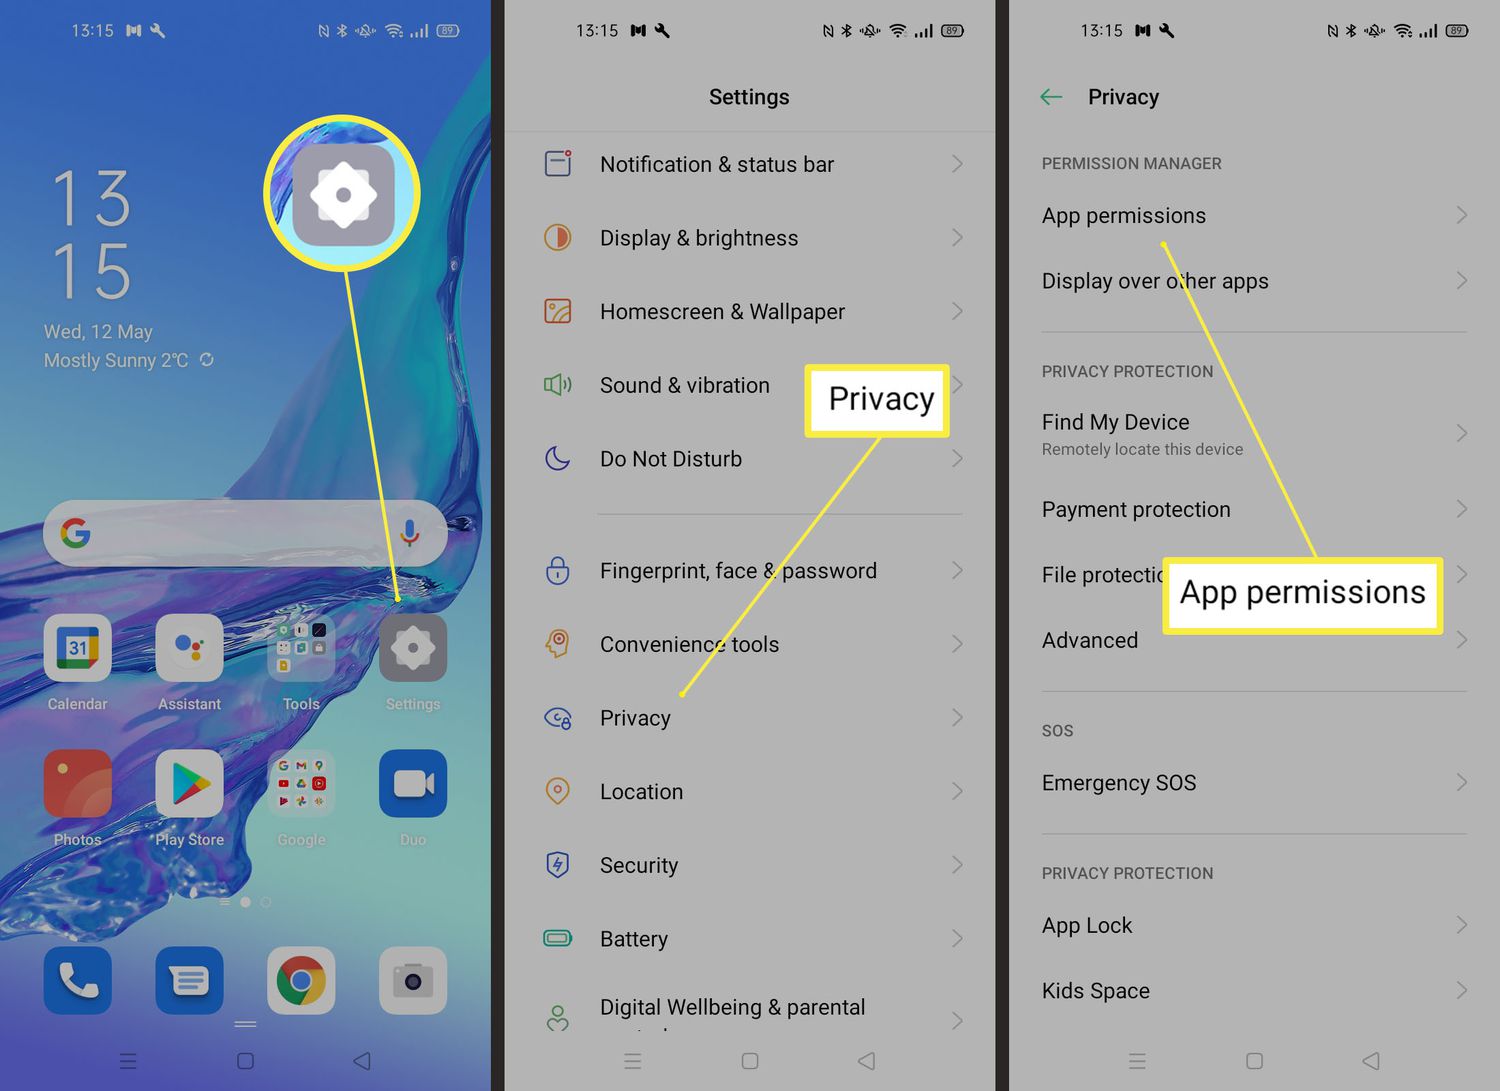
– Go to the Settings menu on your device.
– Scroll down and tap on “Privacy” or “Security & Privacy,” depending on your device.
– Look for the “Permission Manager” or “App Permissions” option and tap on it.
– Choose “Microphone” from the list of app permissions.
– Make sure the toggle next to the microphone permission is switched on.
– You can also individually manage microphone permissions for each app in the “App Permissions” menu. Simply tap on the app you want to allow or deny microphone access to and toggle the microphone permission accordingly.
By following these steps, you will be able to turn on the microphone and grant necessary permissions to apps that need access to it for various functionalities, such as voice recording, voice commands, or video calls.
2. Why is my Android microphone not working?
If your Android microphone is not working, several factors could be causing the issue:
– Check if the microphone is physically obstructed by dirt, debris, or a protective case. Clear any obstructions and test it again.
– Ensure that the microphone permission is granted to the app you are using. Go to the app settings and verify the microphone permission is enabled.
– Restart your device, as a temporary glitch may be affecting the microphone functionality.
– Test the microphone using different apps to determine if the issue is app-specific or consistent across various applications.
– If none of the above steps work, it is possible that there is a hardware problem with your microphone. In such cases, it is recommended to contact your device manufacturer or visit an authorized service center for assistance.
3. Can I use an external microphone with my Android device?
Yes, many Android devices support the use of external microphones. To use an external microphone with your Android device, you will need an appropriate adapter, such as a USB-C to 3.5mm audio jack adapter, if your device lacks a dedicated audio input. Once you have the necessary adapter, simply connect the external microphone to your device and make sure the microphone permission is granted to the app you are using. External microphones can be useful for situations where enhanced audio quality or specialized recording needs are required.
4. How do I test if my Android microphone is working?
To test if your Android microphone is working properly, you can follow these steps:
– Go to the Google Play Store and search for a microphone testing app, such as “Mic Test” or “Microphone Tester.”
– Install the app and open it on your device.
– Follow the on-screen instructions provided by the app to test your microphone.
– The app will typically guide you through tasks such as speaking into the microphone or recording a short audio clip to evaluate the microphone’s performance.
– Based on the app’s feedback and your own assessment, you can determine if the microphone is functioning correctly or if further troubleshooting is required.
5. How do I disable the microphone on my Android device?
If you want to disable the microphone on your Android device, you can do so by:
– Going to the Settings menu on your device.
– Scroll down and tap on “Privacy” or “Security & Privacy,” depending on your device.
– Look for the “Permission Manager” or “App Permissions” option and tap on it.
– Choose “Microphone” from the list of app permissions.
– Disable or toggle off the microphone permission for the apps you want to restrict microphone access to.
– Alternatively, you can toggle on the “Mute” or “Do Not Disturb” mode on your device, which will also temporarily disable the microphone functionality.
By following these steps, you can effectively disable the microphone on your Android device and prevent apps from accessing it.