
Are you having trouble connecting your Android phone to your computer or other devices via USB? You’re not alone! Many Android users often face difficulties when trying to enable the USB connection on their devices. Luckily, we’re here to help you solve this problem.
In this article, we will guide you through the process of turning on USB on your Android phone. We’ll provide you with step-by-step instructions, troubleshooting tips, and other useful information to ensure a seamless connection between your phone and external devices.
Whether you want to transfer files, install new software, or simply charge your phone, enabling USB connectivity is a crucial step. So, let’s dive in and explore how you can enable USB on your Android phone effortlessly.
Inside This Article
- Enabling USB Debugging Mode
- Connecting Android phone to the computer
- Enabling Developer Options on Android
- Enabling USB Debugging on Android phone
- Conclusion
- FAQs
Enabling USB Debugging Mode
If you want to explore the full potential of your Android phone and perform advanced tasks such as rooting or debugging, it’s essential to enable USB debugging mode on your device. USB debugging allows your Android phone to communicate with your computer and gives you more control over the device’s software and settings.
Enabling USB debugging mode may vary slightly depending on the version of Android you have, but the general steps remain the same. Follow the simple steps below to enable USB debugging mode on your Android phone:
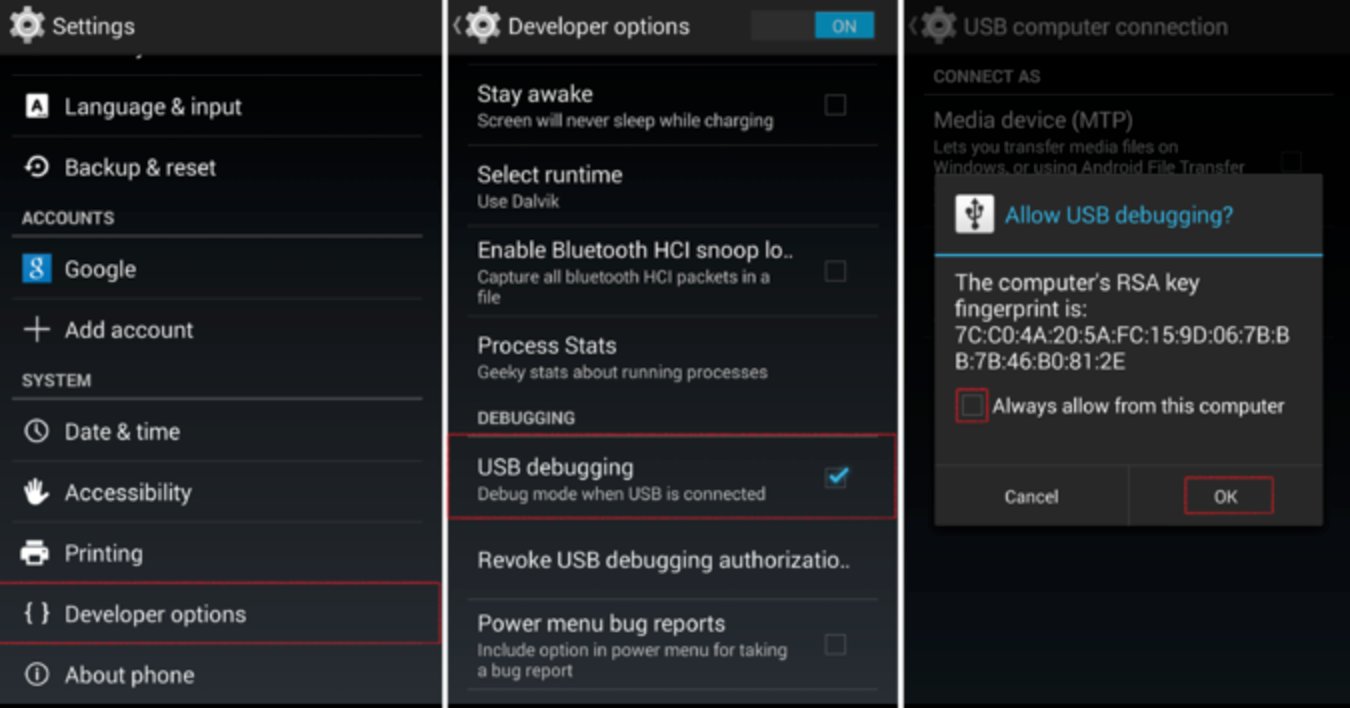
- Unlock your Android phone and go to the Settings menu.
- Scroll down and tap on About phone or About Device.
- Locate the Build number or Build version option.
- Tap on the Build number option repeatedly, around seven times or until you see a message indicating that you are now a developer.
- Go back to the main Settings menu and look for the newly unlocked Developer options.
- Tap on Developer options to access the developer settings.
- Scroll down and find the USB Debugging option.
- Toggle the switch next to USB Debugging to enable it.
- You’ll see a warning message explaining the potential risks associated with enabling USB debugging. Read it carefully and tap OK to proceed.
Once you have successfully enabled USB debugging mode on your Android phone, you can now connect it to your computer and utilize various developer tools, such as Android Studio, ADB (Android Debug Bridge), or other debugging utilities.
Remember that USB debugging mode gives you access to the inner workings of your phone’s software, so it’s crucial to exercise caution and only enable it when necessary. Leaving it enabled all the time can pose a security risk as it allows unrestricted access to your device’s data.
Therefore, it’s recommended to disable USB debugging mode once you have finished using it or when you no longer need to perform advanced tasks. This can be done by simply toggling off the USB debugging option in the developer settings.
Enabling USB debugging mode is a simple yet vital step for any Android user who wants to take full advantage of their device’s capabilities. It opens up a world of possibilities for customization, troubleshooting, and app development. So, why wait? Go ahead and enable USB debugging on your Android phone today!
Connecting Android phone to the computer
Connecting your Android phone to the computer allows you to transfer files, flash ROMs, or even mirror your phone’s screen on a larger display. It’s a useful feature that can streamline your workflow and make managing your device easier.
To connect your Android phone to the computer, follow these simple steps:
- First, locate the USB cable that came with your Android phone. This cable is typically included in the packaging of your device and has a USB Type-A connector on one end and a USB Type-C or Micro-USB connector on the other end.
- Next, plug in the USB cable into your computer’s USB port. Ensure that the USB port is functioning properly.
- Take the other end of the USB cable and insert it into the corresponding port on your Android phone. The location of the port may vary depending on the make and model of your device, but it is usually located at the bottom or the side of the phone.
- Once the cable is securely connected, your Android phone should display a notification indicating that it is connected to a computer.
- On your computer, the operating system should automatically detect the connection and install the necessary drivers. In some cases, you may need to manually install the drivers from the manufacturer’s website.
- After the drivers are installed, you can now access your Android phone’s files and folders from your computer. You can transfer files by simply dragging and dropping them between the phone and the computer, or use specialized software for more advanced features.
It’s important to note that some Android phones may require additional steps to enable file transfer or debugging modes. If you encounter any issues, consult your phone’s user manual or visit the manufacturer’s website for troubleshooting steps specific to your device.
Now that you know how to connect your Android phone to the computer, you can easily transfer files, perform software updates, and perform other tasks with ease. It’s a simple process that can greatly enhance your Android experience.
Enabling Developer Options on Android
Developer Options is an advanced feature in Android that provides users with additional settings and controls. By default, this option is hidden to prevent accidental changes that can affect the normal functioning of the device. However, if you are an advanced user or a developer looking to customize and optimize your Android experience, enabling Developer Options can be a game-changer.
To enable Developer Options on your Android phone, follow these steps:
- Open the Settings app on your Android device. You can usually find it in the app drawer or by swiping down from the top of the screen and selecting the gear icon.
- Scroll down and tap on the “About phone” or “About device” option. The exact name may vary depending on your device manufacturer.
- Look for the “Build number” or “Build version” entry on the About phone page. Tap on it repeatedly, around seven times, until a pop-up message appears indicating that you are now a developer.
- Once you see the “You are now a developer” message, go back to the main settings menu. You should now see a new option called “Developer Options” or “Developer settings.”
- Tap on “Developer Options” to access the advanced settings.
Congratulations! You have successfully enabled Developer Options on your Android device. Now you can explore and customize various settings that were previously hidden from regular users.
It’s important to note that enabling Developer Options gives you access to powerful options that can have a significant impact on your device’s performance and functionality. Therefore, it is recommended to be cautious while making any changes and understand the consequences of each setting before modifying it.
Enabling USB Debugging on Android phone
USB debugging mode is a feature on Android phones that allows the device to communicate with your computer using the Android Debug Bridge (ADB) to facilitate advanced tasks such as app development, debugging, and data transfer. By default, USB debugging is disabled to ensure the security and privacy of the device. However, if you want to unlock the full potential of your Android phone and perform advanced operations, it’s crucial to know how to enable USB debugging.
Here is a step-by-step guide to enable USB debugging on your Android phone:
- Go to the “Settings” of your Android phone. You can access it by swiping down from the top of the screen and tapping the gear icon or by finding the “Settings” app in the app drawer.
- Scroll down and tap on “About phone” or “About device” (the exact wording may vary depending on your Android version and device manufacturer).
- In the “About phone” section, locate the “Build number” or “Build version” option. Tap on it seven times repeatedly. You will see a message indicating that you are now a developer.
- Go back to the main “Settings” menu and scroll down to find the newly unlocked “Developer options” or “Developer settings” menu. Tap on it.
- In the “Developer options” menu, scroll down and locate the “USB debugging” option. Toggle the switch to enable USB debugging. You may see a warning message about potential security risks – but rest assured, USB debugging is safe as long as you enable it only when needed and keep your device secure.
- A confirmation pop-up will appear on your screen. Tap “OK” to confirm and enable USB debugging on your Android phone.
With USB debugging enabled, you can now connect your Android phone to the computer and perform a variety of tasks such as installing custom firmware, capturing screenshots, recording screen videos, accessing system logs, and much more.
It’s important to note that the exact steps and naming conventions might vary slightly depending on your Android version and device manufacturer. If you are unable to locate the “Developer options” or “USB debugging” settings, refer to the user manual of your device or perform a web search with your device model for specific instructions.
Remember, it’s always recommended to disable USB debugging once you have finished using it to ensure the security of your Android phone and prevent unauthorized access to your device.
Conclusion
In conclusion, being able to turn on USB on your Android phone is a crucial function that allows you to connect your device to other devices, such as computers or external storage devices. By following the steps outlined above, you can easily enable USB connectivity and take advantage of various features, such as file transfer, charging, and debugging.
Remember, depending on your Android device’s make and model, the specific steps to turn on USB may vary slightly. Make sure to refer to your device’s user manual or consult the manufacturer’s support documentation for detailed instructions.
Having USB connectivity can greatly expand the capabilities of your Android phone and make it more versatile in various scenarios, whether it’s transferring files, getting a quick charge, or even accessing advanced developer options. So don’t hesitate to explore the possibilities that enabling USB on your Android device can offer!
FAQs
1. Can I turn on USB on my Android phone?
Yes, you can turn on USB on your Android phone. It’s a built-in feature that allows you to connect your phone to other devices using a USB cable.
2. How do I turn on USB on my Android phone?
To turn on USB on your Android phone, follow these steps:
- Go to the Settings app on your phone.
- Scroll down and tap on “Connected devices” or “Connected devices & USB”.
- Tap on “USB preferences” or “USB connection preferences”.
- Select “File transfer” or “Transfer files” from the list of options.
3. Why would I need to turn on USB on my Android phone?
You may need to turn on USB on your Android phone for various reasons, such as transferring files to or from your computer, charging your phone with a USB cable, or connecting your phone to other devices like a printer or a game controller.
4. What happens if I don’t turn on USB on my Android phone?
If you don’t turn on USB on your Android phone, you won’t be able to connect it to other devices using a USB cable. This means you won’t be able to transfer files, charge your phone with a USB cable, or use your phone with compatible peripherals.
5. Can I turn off USB on my Android phone?
Yes, you can turn off USB on your Android phone. In the same settings menu where you turned it on, you will find an option to turn it off. This can be useful if you want to disconnect your phone from other devices or if you’re experiencing any issues related to USB connectivity.