
Whether you’re a newbie or a pro, Android is a haven for people who prefer tweaking their smartphones in numerous ways through Android’s Developer Options. As its name indicates, these features are essential for developers creating Android apps; however, they aren’t as crucial for the average Android user.
One of the most popular Android developer mode features is USB Debugging. You may have probably encountered this menu option several times and wondered whether it’s worth enabling it or not.
Let’s discover what Android’s USB Debugging mode is all about, its purpose, and your verdict on whether to keep it disabled or enabled for a change.
What Is USB Debugging?

USB Debugging enables an Android device to communicate with your PC executing the Android Software Development Kit (SDK) to use the more advanced operations or features.
When you create Android applications, you need to install the Android SDK on your computer. An SDK provides the developers with the necessary tools and resources to develop apps for a specific platform.
In most cases, you generally install it together with the Android Studio. It is a development environment for Android apps and programs. It has a collection of tools, and resources that’s important for any developer such as a visual editor, and a debugger for resolving issues and bugs.
Libraries are another key module of the SDK. These enable developers to work on common functions without having to re-program or re-code them. For instance, Android is integrated with a printing function; therefore, when developing an app, you don’t need to create a new method to print. Instead, you simply call or integrate the built-in function found in that specific library when it’s needed.
You can perform numerous procedures with the Android platform; however, developers require more options. It would be a huge inconvenience to transfer files between different devices, execute commands, and perform other actions manually. As a result, they utilize tools integrated with the Android SDK, and the Android Studio to make their work easier, faster, and more productive.
If you don’t require an Android Studio, you can simply install the Android SDK only. You’ll just perform this if you want to root your Android smartphone or perform other advanced processes.
As mentioned, enabling USB Debugging lets your smartphone communicate with a computer so you can have the benefits of using these tools.
What Android Versions Have USB Debugging and How to Enable It?
On modern smartphones running on the latest Android OS, you’ll find the USB Debugging in Android’s Developer Options menu. By default, USB Debugging is hidden from the menu.
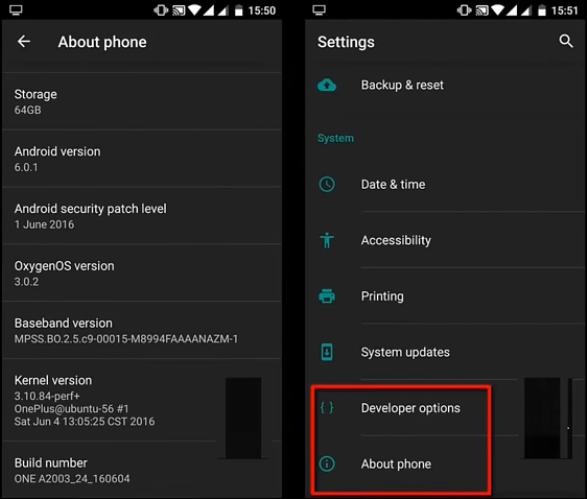
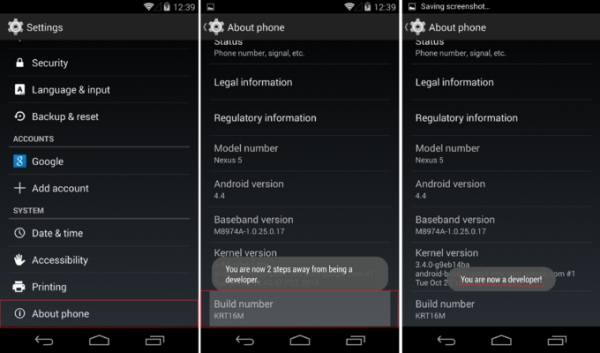
To access it, navigate to Settings and scroll down to About Phone. After that, scroll down further until you see a Build Number at the lowest part of the menu. Tap on “Build Number” seven times until you see a prompt letting you know that you’re on Android developer mode.
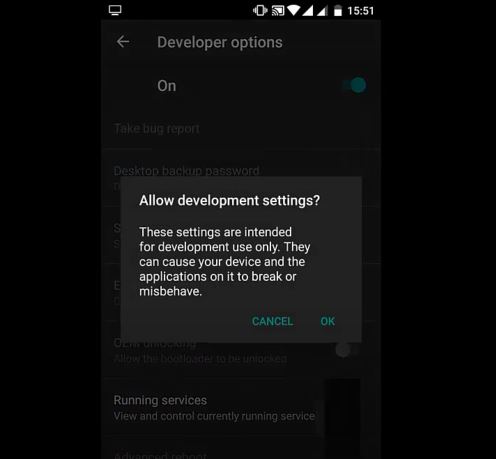
Navigate back to the Settings menu and scroll down to the lower part where you’ve seen the About Phone menu. On Android Pie and later versions, you’ll need to launch the System entry and expand the Advanced menu. That said, you’ll access a new panel named Developer Options. On older versions, you can access the Developer Options menu listed next to About Phone instead.
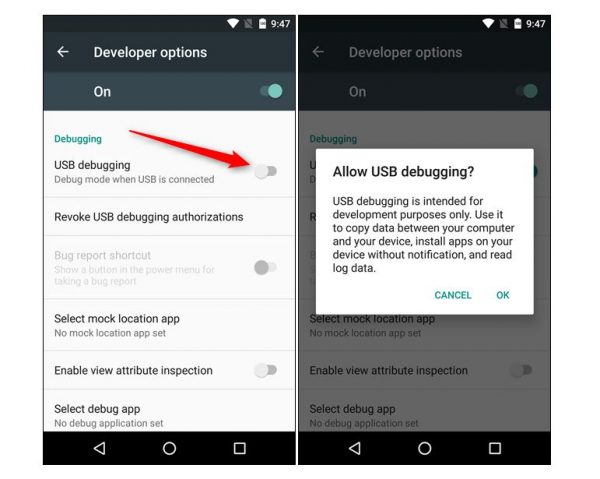
Regardless of the version, once you’re already inside the prior menu, navigate to USB Debugging under the Debugging header. Tap on the slider to enable USB Debugging and confirm Android’s prompt message to proceed.
By this time, USB Debugging is already enabled. To use it, you simply plug your smartphone into your computer using a USB cable. When you perform this process, you will see a prompt on your mobile device asking if you want to grant USB Debugging for that particular PC. This is a security measure developed to keep your smartphones safe from cyberattacks and vulnerabilities. Ensure that you trust your PC before accepting this process.
If you’ve accepted the prompt by mistake, choose Revoke USB Debugging Authorizations to reset all trusted devices.
In a nutshell, here are simplified steps of enabling the USB Debugging Mode for different Android OS versions:
How to Enable USB Debugging on Android KitKat and Jelly Bean
- Open the Settings > About Phone
- Navigate to the bottom part until you see the About Phone section
- Under the About Phone section, find Build Number and tap on it seven times
- A prompt message will display notifying you that you’re already on Developer Mode
- Navigate back to the Settings menu, tap o Developer Options
- Tick the USB Debugging checkbox
- Click on OK when prompted with Allow USB Debugging menu
How to Enable USB Debugging on Android 4.1 and 4.0
- Open Settings > System
- Scroll down and tap on About Phone
- Under About Phone, scroll down and tap on Build Number seven times
- Navigate back to the previous screen and scroll down to Developer Options
- Navigate to the USB Debugging field, and tick the checkbox to enable it
- A pop-up window will display that indicates you’re now on Developer mode
How to Enable USB Debugging on Android 2.3 (Gingerbread) and Earlier
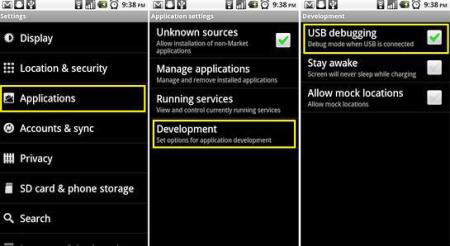
- Open the Settings app
- Tap on Applications > Development > USB Debugging
How to Enable USB Debugging on Kindle Fire Devices

- Tap on Settings
- Go to Security
- Set Enable ADB to On
How to Enable USB Debugging on Locked Android Smartphones
If you have a working Android phone without issues, then good for you. It’s easier to enable USB Debugging on Android with no software hiccups; however, it’s entirely different for locked phones. The good news is that there are also numerous ways to enable USB Debugging on locked Android. Regardless of the reason why you have a locked phone such as Pattern or PIN Lock Code, or perhaps a forgotten screen lock code, here are effective methods that you can perform to enable USB Debugging on your locked device:
How to Bypass Screen Lock Using Android Lock Screen Removal Apps to Enable USB Debugging
If you forgot or don’t know your phone’s screen lock password/pattern, the first step is you should remove the screen lock of your device. For quick solutions, you can download any Android Screen Lock Removal App such as Dr.Fone- Screen Unlock so you can conveniently and quickly bypass Android lock codes on your screen without encountering hiccups or without unnecessary steps.
Step 1: Connect Your Android Smartphone
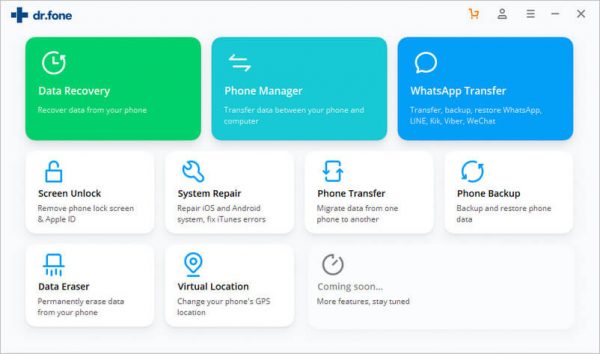
- Download Dr.Fone- Screen Unlock and install on your computer
- Choose the “Unlock” option among the available options
- Connect your Android smartphone to your PC using a USB cable
- Click on Start on the Android Lock Screen Removal app
Step 2: Choose a Device Model to Install Recovery Package
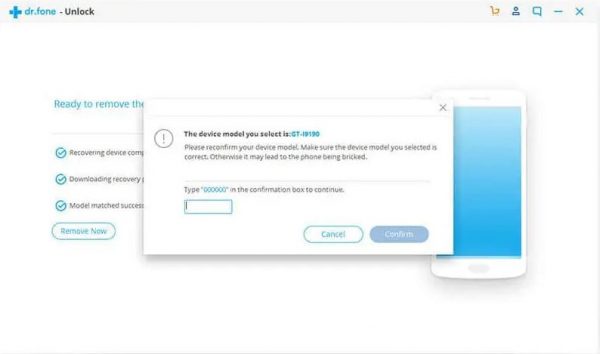
- Choose the right mobile device model by selecting the correct Brand, Device Name, and Device Model
- Click on Next
- In the next panel, input “Confirm” to ensure that you have chosen the right device model that you want to unlock the screen of
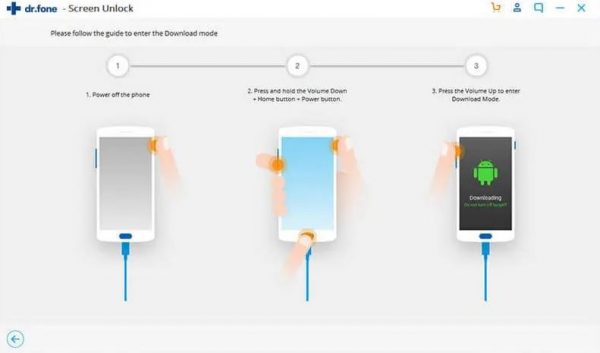
Step 3: Activate Download Mode
- Follow the on-screen instruction to enter into Download Mode
- Turn OFF your phone
- Press and hold the Volume Down + Home + Power buttons all at once
- Press the Volume Up button to activate Download Mode
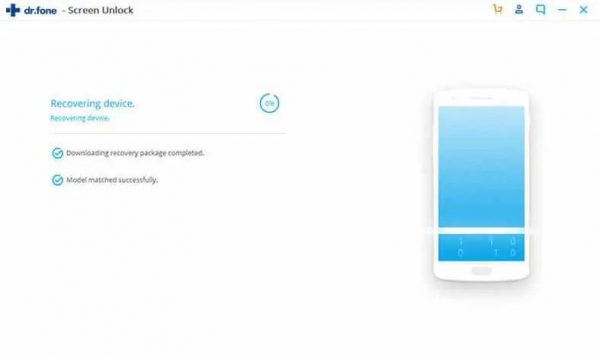
Step 4: Download and Install Recovery Package
- Once your Android device enters into Download Mode, it starts downloading the Recovery Package. Wait until the download to be completed.
Step 5: Remove Android Locked Phone Without Data Loss
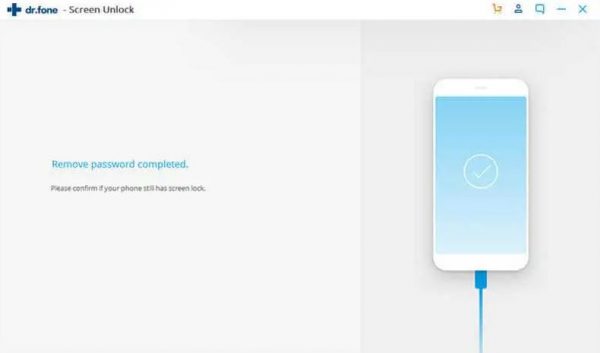
- When the recovery package download has been completed, the Android lock screen removal app will start the process to remove the screen lock or password. Once the process has been completed, you can now access your Android device as usual and you don’t need to input any pattern lock, PIN, or password.
Now that you have bypassed/removed the password, PIN, or pattern lock on your screen, you can now proceed with the steps below to easily enable USB Debugging on Android smartphones or tablets.
- Launch the Settings app
- Go to About Phone > Build Number
- Tap on Build Number seven times. You will eventually be prompted with “You are now a developer!”
- Navigate back to Settings and you can now see the extra menu “Developer Options”
- Tap on Developer Options
- Tick the USB Debugging checkbox
- Click on OK when prompted with “Allow USB Debugging?” message
How to Bypass Screen Lock Using “Find My Mobile” Feature
If you’re not comfortable with downloading and installing screen lock removal applications on your PC, you can try Samsung’s service such as Find My Mobile. The new Samsung smartphones and tablets are integrated with the “Find My Mobile” feature. That said, if you’ve already set up your Samsung account prior to getting your smartphone locked, then you can conveniently bypass your phone’s PIN, password, fingerprint, or lock screen pattern.
To perform this, here are the steps:
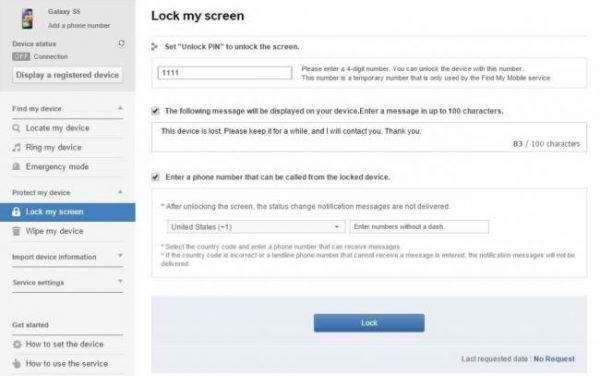
- Sign in to your Samsung account
- Click on “Lock My Screen” located on the leftmost part of the screen
- Input a new PIN
- Click on the Lock button located on the bottom part of the panel
After several minutes, it will modify your current screen lock pattern, fingerprint, or PIN with the new PIN that you just recently inputted. You can now use the newly-registered PIN to unlock your phone without resetting your device and Google account.
Now that you’ve bypassed your locked screen using the “Find My Mobile” service, you may follow the aforementioned instructions in this article for the suitable steps on how to enable USB Debugging on your Android phone.
How to Perform Factory Reset/Wipe Data to Enable USB Debugging on Locked Phone
Wiping data or resetting your phone is recommended to be the last option since this process will delete all data from your Android phone. For this process, you need to remove the locked screen first by entering into Recovery Mode on your phone, and then you can proceed with the next steps.
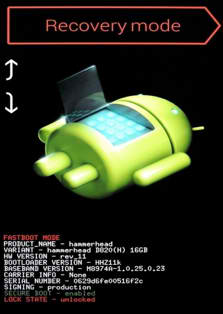
- Turn OFF your Android device
- Now enter into Recovery Mode by pressing Power + Volume Up + Volume Down buttons all at once
Note: Make sure that your phone’s key combination is suitable for a specific device since it varies from device to device. As a result, it is strongly recommended that you initially check on the internet which key combinations work for your device model.

- After pressing the combination of keys, the Android bootloader will display on the screen. Choose “Recovery Mode” and press the Power button for confirmation and enter into Recovery Mode.
- Once Recovery Mode is activated, use the Volume Down button and press the Power button to choose the “Wipe Data/Factory Reset” option.
- Once the factory reset process has been completed, select “Reboot System Now”
Your Android phone has a clean slate and is like newly bought from the store. It won’t ask for your fingerprint, pattern, PIN, and screen lock password.
At this point, you can now proceed with the applicable steps mentioned to enable USB Debugging on your Android phone after bypassing the screen lock feature.
Final Word
As of now, you are already aware of the different methods, and solutions that you can follow to enable USB Debugging across the Android platform, even on a locked phone. Some of these procedures might be overwhelming and complex for beginners; however, if you follow the comprehensive instructions thoroughly and carefully, then you can easily perform these steps and get things done perfectly without encountering any challenges.
Do you have other methods on how to enable USB Debugging on your Android smartphone? If yes, feel free to share your recommendations and insights below.
However, if this article has significantly helped you in enabling USB Debugging on your phone, then please share this guide as it can greatly help someone who might need it.