
Are you concerned about the security of your personal data on your iPhone or iPad? Encrypting your local backups can provide an extra layer of protection against unauthorized access and safeguard your sensitive information. While encrypting your backups on a Windows computer might seem like a daunting task, fear not! In this article, we will guide you through the process step-by-step, ensuring that your personal data remains secure. Whether you’re worried about potential data breaches or simply want to add an extra level of security to your device, encrypting your local backups is a crucial step in keeping your information safe. So let’s dive in and learn how to encrypt your iPhone or iPad backups on a Windows computer.
Inside This Article
- Enabling Encryption for Local Backups on Windows
- Using iTunes to Encrypt Local Backups on Windows
- Setting a Strong Password for Encrypted Local Backups on Windows
- Restoring Encrypted Local Backups on Windows
- Conclusion
- FAQs
Enabling Encryption for Local Backups on Windows
Backing up your iPhone or iPad is an essential step to protect your data from unforeseen circumstances like device loss or damage. While regular backups are recommended, it’s also crucial to ensure the security of your backups. One way to do this is by encrypting your local backups on Windows. By enabling encryption, you can add an extra layer of protection to your backup files, ensuring that only you have access to your sensitive data.
Before proceeding with the process of encrypting your local backups, make sure you have a few prerequisites in place. Firstly, you will need to download and install iTunes on your Windows computer. iTunes is Apple’s official software for managing and syncing iOS devices. Make sure you have the latest version of iTunes installed to ensure compatibility with your iPhone or iPad.
Next, connect your iPhone or iPad to your computer using the USB cable that came with your device. Once connected, you will need to establish trust between your device and the computer. A trust prompt will appear on your device’s screen, asking you to confirm trust for the connected computer. Simply follow the on-screen instructions and tap “Trust” to proceed.
Now that your device is connected and trusted, it’s time to enable encryption for your local backups. Open iTunes on your Windows computer and select your device from the list of available devices. You will find this option in the upper-left corner of the iTunes window. Once you have selected your device, navigate to the Summary tab, which provides an overview of your device’s information.
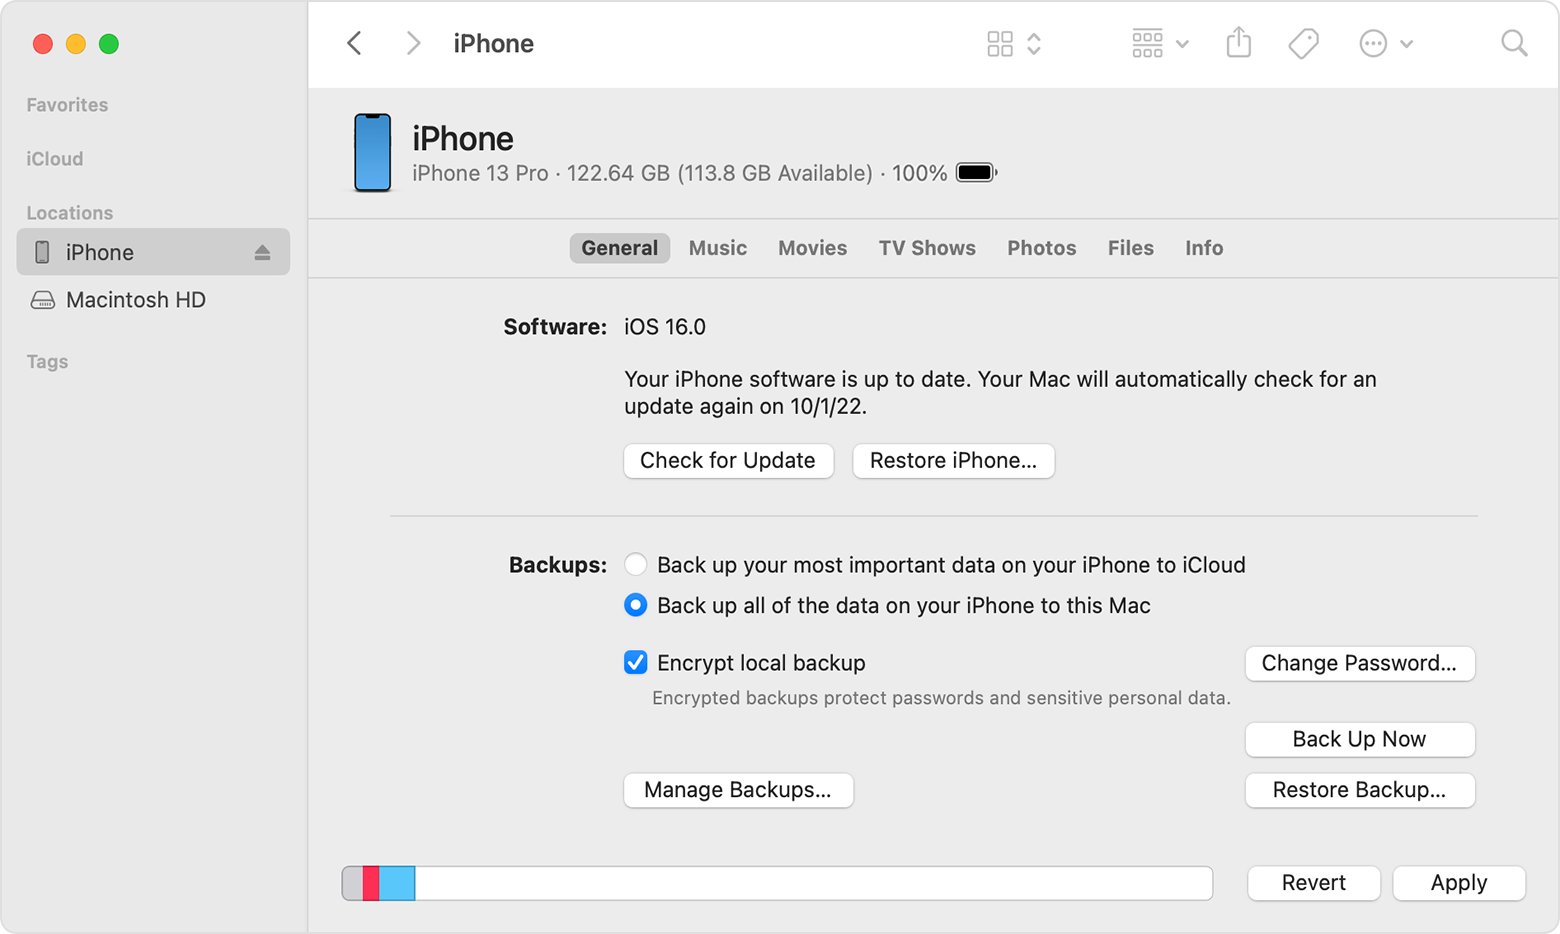
In the Summary tab, scroll down to the “Backups” section. Here, you will find the option to “Encrypt local backup.” Tick this checkbox to enable encryption for your backups. Keep in mind that once encryption is enabled, iTunes will require you to set a password for your encrypted backup.
Set a strong password for your encrypted backup. Make sure to choose a password that is difficult for others to guess but easy for you to remember. Remember that a strong password typically includes a mix of upper and lowercase letters, numbers, and special characters. Do not use simple passwords or personal information that could be easily guessed.
Once you have set your password, it’s time to create your encrypted backup. Click the “Back Up Now” button in the “Backups” section to start the backup process. iTunes will create a full backup of your device, including all your data, settings, apps, and other content, protected by encryption. Be patient, as the backup process may take some time, depending on the size of your data and the speed of your computer.
It’s crucial to regularly perform encrypted backups of your iPhone or iPad to ensure the safety of your data. Schedule regular backups, or manually initiate backups whenever you make significant changes to your device, such as installing new apps or updating software.
Using iTunes to Encrypt Local Backups on Windows
When it comes to securing your iPhone or iPad data, encrypting your local backups is a crucial step. This ensures that even if unauthorized access or a data breach occurs, your personal information remains safeguarded. In this article, we will guide you through the process of encrypting local backups of your iPhone or iPad using iTunes on a Windows computer.
Before we dive into the steps, there are a few prerequisites you should be aware of. Firstly, make sure you have the latest version of iTunes installed on your Windows computer. You can download iTunes from the official Apple website.
Once you have downloaded and installed iTunes, it’s time to connect your iPhone or iPad to your computer using a USB cable. Ensure that the cable is in good condition to establish a stable connection.
After connecting your device, you might see a prompt on your iPhone or iPad asking you to “Trust this Computer.” It is important to trust the computer to establish a secure connection between your device and iTunes. Tap “Trust” to proceed.
Now that your device is connected and trusted, you can proceed with encrypting your local backup. Open iTunes on your computer and navigate to the device icon located at the top-left corner of the iTunes window. Click on the device icon to access the device summary page.
On the device summary page, scroll down to the “Backups” section. Under the “Manually Back Up and Restore” option, you will find a checkbox labeled “Encrypt iPhone (or iPad) backup.” Check this box to enable encryption for your local backups. You will then be prompted to set a password for the encrypted backup.
When setting your password, ensure it is strong and secure. Use a combination of upper and lowercase letters, numbers, and special characters. Remember to keep your password in a safe place as it will be required every time you restore your device or access the encrypted backup.
Once you have set a password, click on the “Back Up Now” button to initiate the backup process. iTunes will start creating an encrypted backup of your iPhone or iPad on your Windows computer. The time required for the backup will depend on the amount of data stored on your device.
After the backup process is complete, you can verify if your backup is encrypted by clicking on the “Edit” menu in iTunes (Windows) or the “iTunes” menu (macOS), and selecting “Preferences.” In the Preferences window, navigate to the “Devices” tab. You will see a list of backups, and encrypted backups will be indicated by a lock icon.
Setting a Strong Password for Encrypted Local Backups on Windows
When it comes to securing your personal data stored on your iPhone or iPad, one effective measure you can take is to encrypt your local backups. Encrypting your backups ensures that even if someone gains unauthorized access to your computer, they won’t be able to decipher the sensitive information contained within your backups. A crucial part of encrypting your local backups is setting a strong password that will provide an additional layer of security. In this article, we will guide you through the process of setting a strong password for encrypted local backups on Windows.
1. Open iTunes on your Windows computer and connect your iPhone or iPad using a USB cable. Once connected, select your device icon located at the top left corner of the iTunes window.
2. In the Summary tab, scroll down to the “Backups” section. Enable the option “Encrypt iPhone (or iPad) backup” by checking the box next to it.
3. A pop-up window will appear prompting you to set a password for the encrypted backup. It is crucial to set a strong password that is not easily guessable. Include a combination of uppercase and lowercase letters, numbers, and special characters. Avoid using common words or personal information that can easily be associated with you.
4. Once you have entered a strong password, reconfirm it by entering it again in the “Verify Password” field. Make sure you accurately input the password to avoid any issues when accessing your encrypted backups in the future.
5. Click on the “Set Password” button to finalize the encryption process. Your local backups will now be encrypted with the password you have set.
It is important to remember the password you have set for your encrypted local backups. Losing or forgetting the password can result in permanent loss of access to your backup data. Therefore, it is advisable to store the password in a secure location or consider using a trusted password manager to keep track of your passwords securely.
By setting a strong password for your encrypted local backups, you add an extra layer of security to protect your personal data. Whether it’s important documents, personal photos, or sensitive messages, you can have peace of mind, knowing that your data is safeguarded from unauthorized access.
Remember to regularly create new backups with updated encryption passwords, especially if you change your password or suspect that your current password has been compromised. By doing so, you ensure the ongoing protection of your data and maintain the highest level of security for your iPhone or iPad backups on your Windows computer.
Restoring Encrypted Local Backups on Windows
So, you’ve taken the necessary steps to encrypt your local backups of your iPhone or iPad on your Windows computer. But what happens when you need to restore your device from one of these encrypted backups? Rest assured, the process is relatively straightforward. In this section, we’ll guide you through the steps to restore your encrypted local backups on Windows.
Before diving into the restoration process, there are a few prerequisites you should keep in mind:
- Your Windows computer should have the latest version of iTunes installed.
- You should have the encrypted backup file saved on your computer.
- An active internet connection is required.
With these requirements in place, you’re ready to move forward with restoring your encrypted local backups. Follow the steps below:
Step 1: Launch iTunes on your Windows computer. Ensure that you are using the latest version by checking for any available updates.
Step 2: Connect your iPhone or iPad to your computer using a USB cable. Make sure to use the same cable that you used to create the encrypted backup.
Step 3: Trust the computer: When prompted on your device, tap “Trust” to establish a connection between your iPhone or iPad and the computer. This will allow iTunes to access your device for restoration.
Step 4: In iTunes, locate and select your device. This can be done by clicking on the device icon in the upper left corner of the iTunes window.
Step 5: Under the “Backups” section in the Summary tab, click on the “Restore Backup” button.
Step 6: A pop-up window will appear, displaying a list of available backups. Select the encrypted backup file that you want to restore and click “Restore.”
Step 7: You will be prompted to enter the password that you set for the encrypted backup. Enter the password and click “OK” to proceed with the restoration process.
Step 8: Sit back and relax while iTunes restores your iPhone or iPad from the encrypted backup. This may take some time depending on the size of the backup.
Step 9: Once the restoration process is complete, your iPhone or iPad will restart. You can then disconnect your device from the computer and begin using it as usual.
And there you have it! You have successfully restored your encrypted local backup on your Windows computer. Your device should now be up and running with all the data and settings from the encrypted backup.
Remember, keeping your local backups encrypted adds an extra layer of security to your personal information. It ensures that your data remains protected, even if your device falls into the wrong hands.
Now that you know how to encrypt and restore your local backups on Windows, you can confidently manage your iPhone or iPad data while prioritizing your privacy and security.
Conclusion
In conclusion, encrypting the local backups of your iPhone or iPad on Windows is a crucial step to ensure the security and privacy of your data. By encrypting your backups, you add an extra layer of protection, making it difficult for unauthorized access to your personal information.
With the help of iTunes or third-party software like iMazing, encrypting your iPhone or iPad backups on Windows is a straightforward process. Simply enable the encryption option when creating a backup, set a strong password, and securely store it for future use.
Remember, encrypting your backups not only safeguards your sensitive data but also protects your device in the event of loss or theft. It’s always better to be proactive in securing your digital life, and encrypting your local backups is an essential step towards that goal.
To ensure the highest level of data protection, be sure to regularly update your device’s software along with any necessary security patches provided by Apple. By combining encryption with software updates, you can stay one step ahead of potential threats and keep your iPhone or iPad safe and secure.
FAQs
1. How do I encrypt local backups of iPhone or iPad on Windows?
To encrypt local backups of your iPhone or iPad on Windows, you will need to use iTunes, the official software for iOS devices. Connect your device to your Windows computer using a USB cable, and open iTunes. Select your device from the iTunes sidebar, then go to the “Summary” tab. Under the “Backups” section, check the box that says “Encrypt iPhone (or iPad) backup” and set a strong password. Click on “Apply” to enable encryption for your backups.
2. Why is it important to encrypt local backups?
Encrypting local backups adds an extra layer of security to your iPhone or iPad data. It ensures that your personal information, such as app data, photos, messages, and settings, is protected in case your backups fall into the wrong hands. Without encryption, anyone who has access to your backup files could potentially access sensitive information, compromising your privacy and security.
3. Can I access encrypted backups without the password?
No, you cannot access encrypted backups without the password. The password is used to encrypt and decrypt the backup, ensuring that only authorized individuals can access the data. It’s important to choose a strong password and keep it secure to prevent unauthorized access and maintain the confidentiality of your data.
4. Can I change the encryption password for my backups?
Yes, you can change the encryption password for your backups. To do this, connect your device to your computer, open iTunes, and select your device from the sidebar. Go to the “Summary” tab and under the “Backups” section, click on “Change Password”. Enter your current password, then choose a new password and confirm it. Click on “Change Password” to update the encryption password for your backups.
5. Can I encrypt backups if my iPhone or iPad is already synced with iCloud?
Yes, you can encrypt local backups even if your iPhone or iPad is already synced with iCloud. iCloud backups and local backups are separate and independent from each other. By encrypting your local backups, you add an extra layer of security that is specific to your Windows computer. This allows you to have a secure backup of your data on your computer, even if you also have backups stored in iCloud.