
iPhone storage, especially on older devices, can be a pain to deal with. When it reaches full capacity, you can no longer download apps or take photos and videos. What’s more is that your device can become a lot slower when it’s running low on storage space. But sometimes, it’s not your apps, messages, or media files that are hogging the space. Rather, it’s the mysteriously labeled “Other” storage that’s taking up most of your device’s memory. If this category of your iPhone storage has gotten abnormally high, we’ve got you covered. In this guide, we show you how to clear “Other” storage on your iPhone or iPad in nine different ways. Follow our tutorials, so you’ll have room for more important files afterward.
Also read: How to Free Up Space on Apple Watch Safely
Inside This Article
- What Is ‘Other’ Storage on iPhone?
- How to Check ‘Other’ Storage
- How to Clear ‘Other’ Storage on Your iPhone or iPad
- FAQs
What Is ‘Other’ Storage on iPhone?
Your iPhone’s storage is divided into different categories, including Apps, Mail, and Media. But there’s also the “Other” category at the end of the device storage bar, which can sometimes take up considerable space. The “Other” storage — “System Data” in newer iPhones — is where your device keeps a wide array of miscellaneous files. These include logs, updates, saved messages, settings preferences, Siri voices, fonts, dictionaries, and a whole lot more.
Apart from those files and data, a huge chunk of the “Other” storage on your iPhone or iPad consists of cache data from your apps, messages, and media files. Your device stores these caches so that it can load web pages and other content faster. Normally, you won’t have to worry about the data in the “Other” storage of your iPhone or iPad; your device is supposed to handle these files so that they don’t end up hogging all of the storage space. However, the job can sometimes be unmanageable, especially if you use your phone often to stream and browse the web. In such cases, you’ll have to clear some files from the “Other” storage on your iPhone or iPad so that you’ll get more room in your storage space.
How to Check ‘Other’ Storage on an iPhone or iPad
There are two methods for checking the used and remaining space in your iPhone or iPad’s “Other” storage. Both will take just a few steps.
View Storage Status via the Settings App
You can view storage space via your gadget’s settings menu. Follow these instructions:
- Access Settings from your iPhone’s or iPad’s app dashboard.
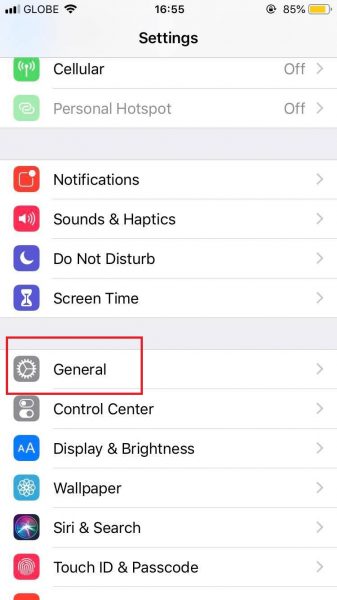
- Swipe up until you see “General.” Tap on this option.
- Head over to iPhone Storage.
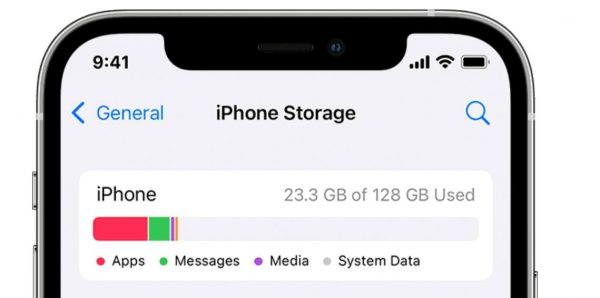
- Wait for your device to load the storage graph fully. This can take a few seconds or minutes, depending on your gadget.
Once the graph has fully loaded, check the gray portion at the far right of the graph to see how much space the “Other” storage is taking up. On iOS 15, “Other” storage is labeled “System Data.
Check ‘Other’ Storage through Finder or iTunes
You can also check your iPhone or iPad’s “Other” storage using a Mac or a PC. If you have a Mac running on macOS Catalina 10.15 or later, you can view your device’s storage through Finder. If you have a PC or Mac with macOS Mojave 10.14 or earlier, you can use iTunes to view your mobile device’s “Other” storage. We walk you through the steps below:
- Access either Finder or iTunes on your Mac or PC.
- Use a lightning cable to link your iPhone or iPad to your PC.
- If you’re on Finder, click your connected gadget’s name on the left side of the interface. If you’re utilizing iTunes, click on the device icon at the top bar, and then select your device. Finder or iTunes will display how much storage space you’ve used up, represented by a bar. This bar is divided into categories.
- Place your cursor over the rightmost gray portion of the bar to see how much storage space the “Other” category is using.
How to Clear ‘Other’ Storage on Your iPhone or iPad
The files in your iPhone or iPad’s “Other” storage can pile up pretty quickly. Luckily, there are a number of easy ways you can clear them up to make room for more important files. We discuss them in detail below:
1. Delete Safari Cache
Deleting your Safari cache is the easiest way you can clear the “Other” storage on your iPhone or iPad. You should do this from time to time, as these cached files can overgrow, especially if you often browse the web through Safari.
To clear your Safari caches, here’s what you have to do:
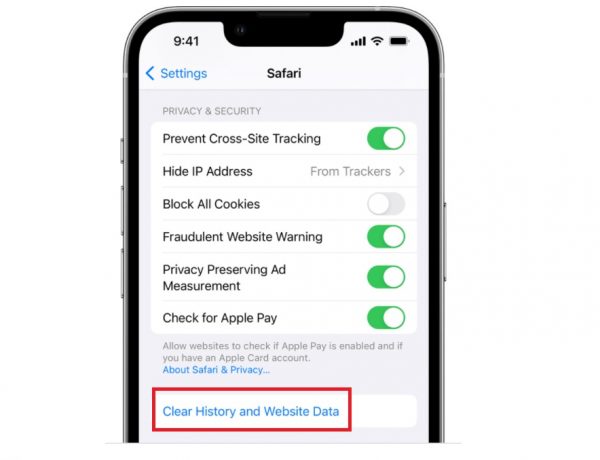
- Boot up the Settings app on your iPhone or iPad.
- Swipe up on the screen to find Safari. Tap on this option.
- Swipe up again until you see “Clear History and Website Data.” Select this option.

Photo from Apple Support - In the pop-up message, tap the “Clear History and Data” button to clear your Safari cache.
2. Close Unused Safari Tabs
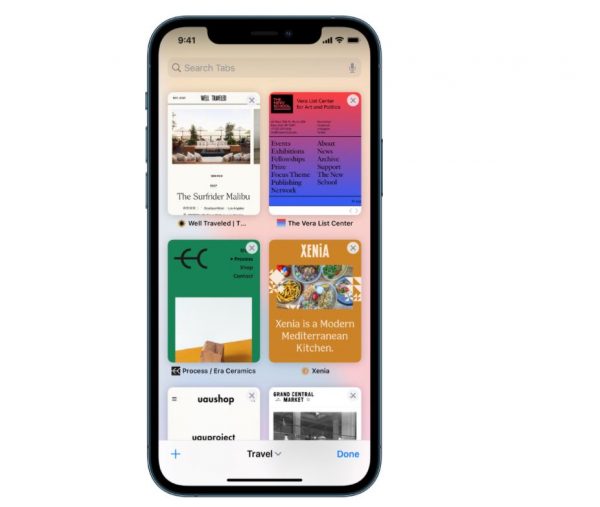
Open tabs in your Safari browser can also cause cached files in the “Other” storage to pile up. While you can manually close these tabs, you can also configure your iPhone or iPad to close them after a set period automatically. However, note that the latter is possible only on iOS 13 and up. You can make tabs in Safari close instantly through our tutorial:
- From your iPhone’s or iPad’s app dashboard, tap Settings.
- Scroll through the menu until you see Safari, and then tap on this option. Alternatively, you can type in “Safari” in the search bar.
- Look for the Tabs section.
- Tap on “Close Tabs.”
- Select how regularly you want the device to instantly close your active Safari tabs. You have three other options: daily, weekly, or monthly.
3. Stream Less

Streaming less can also help you clear your iPhone or iPad’s “Other” storage. When you use apps like Netflix and Apple Music to stream videos, music, and podcasts, your device stores cache files to ensure you can stream online content more seamlessly. These caches are categorized as “Other” in your device’s storage. So, if you want to clear your iPhone’s “Other” storage, try to at least cut down on streaming. You can instead download videos, music, and podcasts onto your device. That way, these files will be classified as Media and won’t take up space in your device’s “Other” storage.
4. Offload Apps
Another easy way you can clear the “Other” storage on your iPhone is by offloading apps. Now, note that when an app is offloaded, everything associated to it isn’t gone from your gadget yet. Program and user data, configurations, and settings are kept. Given that, you won’t have to start from the very beginning when you decide to use the app again.
To offload an app, proceed with these steps:
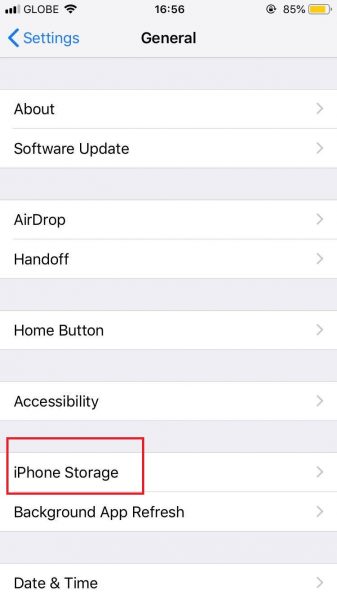
- Navigate to your phone’s or tablet’s Settings app.
- Head over to General.

© Cellular News - Tap on iPhone Storage and wait for your device to load a full list of your installed apps.
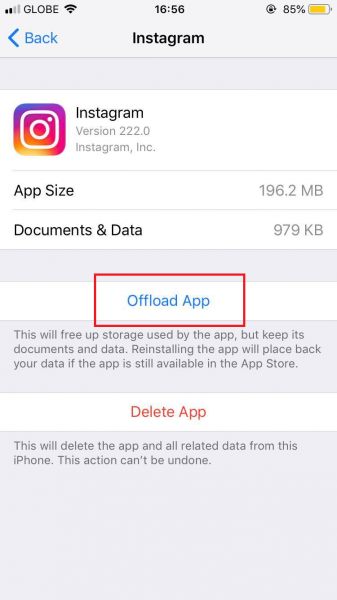
© Cellular News - Select an app you want to offload. Look at the number next to the app to help you decide which ones to offload. This value indicates how much space the app takes up.
- Tap on Offload App.
© Cellular News
5. Delete Old Text Messages and iMessages
By default, your device’s Messages app keeps all of the SMS and MMS messages you send and receive forever. While keeping all of these messages can sometimes be helpful, it can eat up a lot of space in your iPhone or iPad’s “Other” category. You can manually delete individual messages by doing the following:
- Access the Messages app on your iPhone or iPad.
- Pick the conversation you wish to erase content from.
- Long-press on a specific message bubble until a menu appears.
- Press More afterward.
- Press the Trash symbol, then Delete Message to verify your action.
- Repeat these steps for all the other messages you want to delete.
If you want to delete an entire conversation, here’s what you have to do:
- Head over to your iPhone’s or iPad’s Messages app.
- Left-swipe on the conversation you no longer want to keep.
- Press the red Delete button afterward.
- Hit Delete once more to finalize the action.
However, if you’ve accumulated several years’ worth of messages, it might be tedious to delete them one by one. You can enable your iPhone or iPad to delete messages automatically to make things easier. That way, you won’t have to worry about messages piling up over time.
- Launch your gadget’s Settings app.
- Scroll down until you see “Messages.” Tap on this option.
- Look for the Message History heading in the menu, then press “Keep Messages.”
- Set the timeframe for storing messages to 30 days or one year.
Once you’re done, your phone or tablet will automatically delete messages after your set period.
6. Tidy Up Your Email Inbox
You can also clear your iPhone or iPad’s “Other” storage by tidying up your email inbox. If you want to delete individual emails, follow these steps:
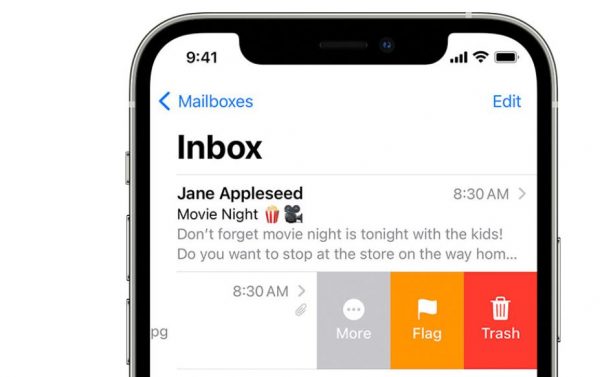
- Boot up the Mail app on your iPhone or iPad.
- Browse your Inbox.
- Long-press on the email you want to erase.
- From the menu that shows up, select the dark orange Trash button.

Photo from Apple Support
You can also erase multiple messages in one go. Here’s how:
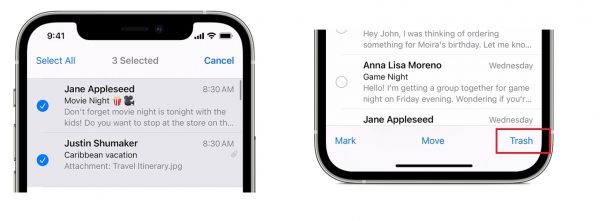
- Boot up the Mail app on your Apple device.
- Navigate to your Inbox.
- Press the Edit option, which is on the top-right portion of the interface.
- Pick the emails that should be discarded from your Inbox. Alternatively, you can tap on the Select All option.
- Tap on the Trash button on the display’s lower-right portion. If you only see “Archive” instead, tap and hold this option until a menu pops up. From this menu, select “Trash Selected Messages.”

Photo from Apple Support
7. Reset the Mail App
The Mail app on your iPhone can significantly add to the cached files in your “Other” storage, especially if you send and/or receive large attachments regularly. While there isn’t a “Clear Cache” option for the Mail app, you can still empty the cache by resetting it. That way, you’ll be able to free space in your device’s “Other” storage. You’ll have to unlink your email accounts and add them back in. Removing your email accounts from the Mail app doesn’t delete those accounts. Also, your emails remain intact on the server even after you remove your account from the app.
Remove an Email Account from the Mail App
Proceed with these steps to unlink your account from the Mail app hassle-free:
- Navigate to the Settings app on your phone or tablet.
- Look for Mail in the menu, and then tap on it.
- Navigate to Accounts.
- Pick the email account you wish to unlink.
- Hit the Delete Account option.
- Press Delete Account again to finalize the action.
- Repeat these steps for the other accounts you’ve added to the Mail app.
How to Add Your Email Accounts to the Mail App
Now that you’ve successfully cleared the Mail app’s cache, you can add your email accounts back in:
- Head over to your iPhone’s or iPad’s Settings app.
- Swipe up until the Mail option is visible. Then, press it.
- Navigate to Accounts.
- Go for the option labeled Add Account. Then, choose your email account provider (e.g. Gmail, Yahoo, or iCloud).
- In the provided fields, type in your email address and password.
- Tap on the Next button if you see it.
- Once the Mail app confirms your email account, tap Save to add the account.
- Repeat the process for all other email accounts you want to add to the Mail app.
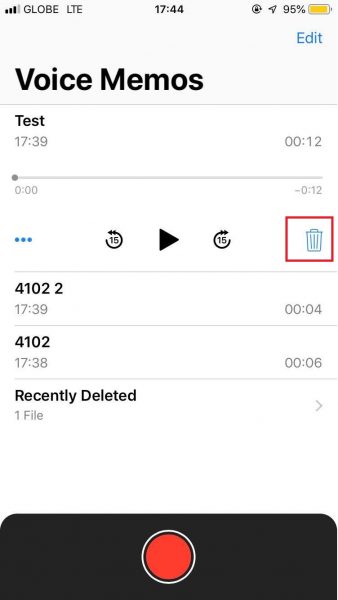
8. Delete Voice Memos You No Longer Need
Voice Memos are also categorized as “Other” in your iPhone storage. So, if you have recordings in their respective app that you no longer need, it’s best to delete them so that you can clear the “Other” storage on your iPhone. To erase one Voice Memo at a time, do these:
- Locate and access the Voice Memos app on your phone or tablet PC.
- Pick the Voice Memo you don’t like to keep anymore.
- Hit the Delete button for it.
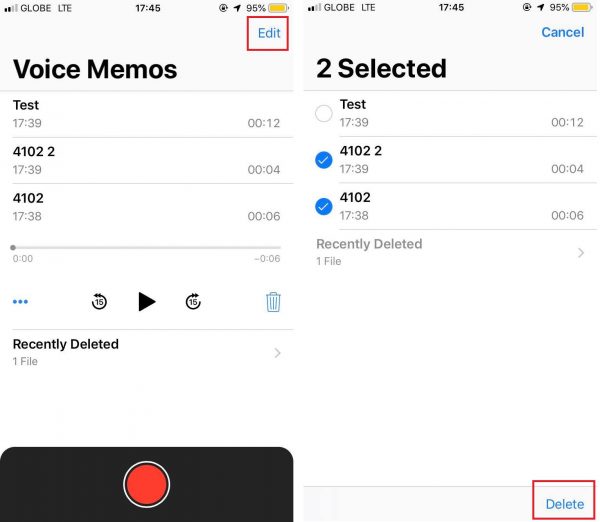
If you want to delete multiple recordings in one go, here’s what you have to do:
- Access the Voice Memos app.
- Tap on the Edit option in the interface’s top-right corner.
- Select the Voice Memos you want to erase from your device.

© Cellular News
Keep in mind that, by default, the Voice Memos you delete won’t be removed permanently from your device right away. By default, deleted recordings are kept in the Recently Deleted folder of the Voice Memos app for 30 days. If you want to change how long they stay in the Recently Deleted folder, do the following:
- Head over to the Settings app on your phone or tablet.
- Scroll down to Voice Memos, and then tap on it.
- Under “Voice Memos Settings,” select “Clear Deleted.”
- Choose how soon you want your device to permanently clear Voice Memos after they’ve been deleted. You have three other options: immediately, after one day, and after seven days.
9. Back Up and Reset Your iPhone or iPad
If you want to clear a huge chunk of the “Other” storage on your iPhone or iPad, resetting your device is the best way you can do so. Resetting wipes your phone or tablet clean. It clears your photos, documents, apps, settings, browsing history, contacts, and all other data stored on your device. Thus, you’ll have to back up your iPhone or iPad if you want to recover your files after reset.
How to Back Up Your iPhone or iPad
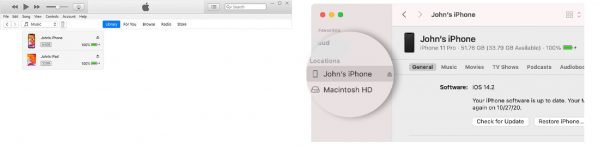
You can iCloud backup your Apple device or back it up using an external hard drive. But in this guide, we’re going to show you how to use your Mac or PC to backup your iPhone or iPad:
- If you’re on a Mac running on macOS Catalina or later, utilize Finder. Use iTunes for those with a PC or a Mac that integrates macOS Mojave or earlier.
- Plugin your device into your computer using a lightning cable.
- You might get asked for your device passcode or if you want to “Trust This Computer.” If this happens, follow the instructions you see on your screen.
- Select your device on your computer. If you’re on iTunes, you’ll be able to do so after clicking on the device icon at the iTunes window’s top-right portion. If you’ve accessed Finder, pick your gadget from the sidebar options.

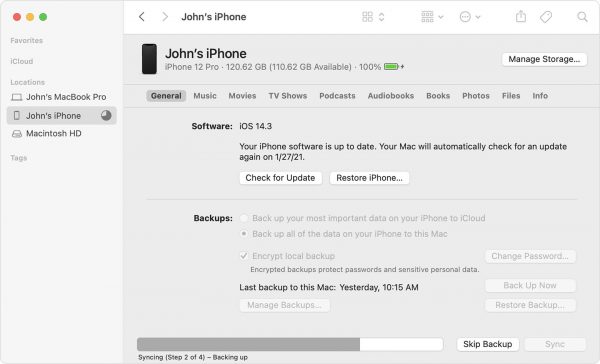
Photos from Apple Support - You’ll want to select the checkbox next to “Encrypt local backup” if you want to keep your device’s Health and Activity data. This requires you to create a password for recovering the backup later on.
- Select the “Back Up Now” button to initiate the process.

Photo from Apple Support
Check the last backup date and time to check if you’ve successfully backed up your device.
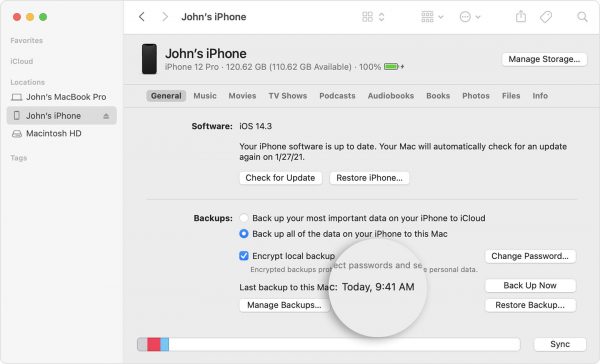
Once you’ve confirmed that the backup was successful, you’re free to unlink your gadget from your PC.
How to Reset and Restore Your iPhone or iPad
Now, to reset your iPhone or iPad, go to Settings, then to General, and then tap on Reset. Then, select “Erase All Content and Settings.” Wait for the reset to finish and for your gadget to reboot. Once you’ve reached the initial setup stage, do the following:
- Access Finder (for computers running on macOS Catalina or later) or iTunes (for PCs or Macs running on macOS Mojave or earlier).
- Link your device to your computer via a lightning cable.
- Enter your passcode or select “Trust This Computer” if asked.
- Select your device on the Finder or iTunes window when it appears.

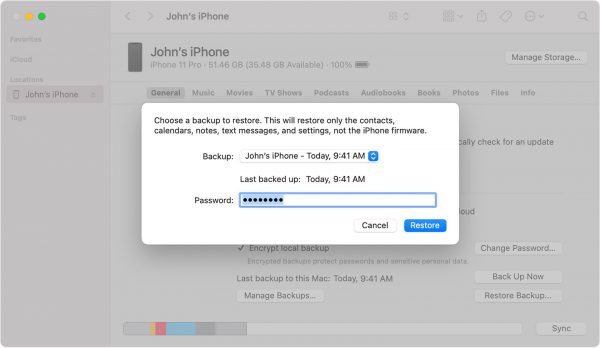
Photo from Apple Support - Click on the “Restore Backup…” button.
- On the pop-up pane, click the drop-down menu next to “Backup.” Then, select which backup you wish to retrieve.
- Press the Restore option. Then, wait until the backup has been fully restored. If you encrypted your backup, type in the password when asked.
Photo from Apple Support - The syncing process between your mobile device and computer will begin. Once it’s finished, you can disconnect the former from the latter.
FAQs
Below, we answer the most frequently asked questions about clearing the “Other” storage on your iPhone or iPad: