
Are you a Mac user who wants to backup your iPhone data to iTunes? Look no further, as we have got you covered! It’s always a good idea to have a backup of your precious iPhone data, such as contacts, photos, messages, and apps, in case of any unexpected incidents. By backing up your iPhone to iTunes on your Mac, you can ensure that your data is safely stored and easily recoverable. In this article, we will guide you through the simple steps to backup your iPhone to iTunes on your Mac. Whether you are a newbie to the iPhone world or a seasoned user, this tutorial will help you safeguard your data while providing you with peace of mind. So, let’s get started and learn how to backup your iPhone to iTunes on your Mac!
Inside This Article
- Pre-requisites for backing up iPhone to iTunes on Mac
- Step 1: Connect your iPhone to Mac
- Step 2: Launch iTunes on your Mac
- Step 3: Select your iPhone in iTunes
- Step 4: Choose to backup your iPhone to Mac
- Step 5: Monitor and verify the backup process
- Step 6: Encrypt your backup (optional)
- Step 7: View or Restore Your iPhone Backup
- Conclusion
- FAQs
Pre-requisites for backing up iPhone to iTunes on Mac
Before you begin the process of backing up your iPhone to iTunes on your Mac, there are a few pre-requisites you need to ensure are in place. These pre-requisites will help ensure a smooth and successful backup. Here’s what you need:
- An iPhone: Obviously, you will need an iPhone that you want to back up. Make sure it is charged or connected to a power source to avoid any interruptions during the backup process.
- A Mac computer: You will need a Mac computer to use iTunes for the backup process. Ensure that your Mac is updated to the latest operating system version to avoid any compatibility issues.
- Latest version of iTunes: Make sure you have the latest version of iTunes installed on your Mac. You can check for updates in the App Store or by visiting the Apple website. Keeping your iTunes up to date ensures you have access to the latest features and improvements.
- A USB or Lightning cable: To connect your iPhone to your Mac, you will need a USB cable (older iPhones) or a Lightning cable (newer iPhones). Ensure that the cable is in good condition to establish a stable connection.
- Enough storage space on your Mac: The backup process requires storage space on your Mac to store the backup file. Make sure you have enough free space on your Mac’s hard drive before starting the backup.
- Strong and stable internet connection: Although the backup process is performed locally on your Mac, a good internet connection is often required for iTunes to verify your Apple ID and encryption settings.
With these pre-requisites in place, you are ready to proceed with backing up your iPhone to iTunes on your Mac. Once the necessary conditions are met, you can follow the step-by-step instructions to ensure a successful and secure backup process.
Step 1: Connect your iPhone to Mac
To start the process of backing up your iPhone to iTunes on your Mac, the first step is to connect your iPhone to your Mac using a Lightning to USB cable. The Lightning connector should be inserted into the charging port at the bottom of your iPhone, while the USB end should be plugged into an available USB port on your Mac.
Once the iPhone is connected to your Mac, ensure that your iPhone is unlocked. If prompted on your iPhone to “Trust This Computer,” tap “Trust.” This will establish a secure connection between your iPhone and the Mac.
If your iPhone is not recognized by your Mac, try using a different USB cable or USB port. Additionally, make sure you have the latest version of iTunes installed on your Mac, as outdated versions may not support the latest iPhone models.
After connecting your iPhone to your Mac, you should see the iTunes icon appear on your Mac’s dock or in the Applications folder. If it doesn’t open automatically, go ahead and launch iTunes manually.
Step 2: Launch iTunes on your Mac
Once you have successfully connected your iPhone to your Mac, it’s time to launch iTunes. iTunes is a powerful media player and synchronization tool developed by Apple that also allows you to manage your iPhone backups.
To launch iTunes on your Mac, simply locate the iTunes icon in your Applications folder or click on the Launchpad and type “iTunes” in the search bar. Once you see the iTunes icon, click on it to open the application.
Alternatively, you can also use the Spotlight feature on your Mac to quickly find and open iTunes. Just press the Command + Spacebar keys on your keyboard to open Spotlight, then type “iTunes” and press Enter to launch the application.
After launching iTunes, you will see its main interface, which provides access to various features and functions. This includes the ability to sync and backup your iPhone, manage your media library, access the iTunes Store, and much more.
If this is your first time launching iTunes on your Mac, you may be prompted to sign in with your Apple ID. Signing in is optional but recommended, as it allows you to access additional iTunes features and make purchases from the iTunes Store.
Once you’re signed in and have launched iTunes successfully, you’re ready to proceed to the next step of backing up your iPhone to your Mac using iTunes.
Step 3: Select your iPhone in iTunes
Once you have successfully launched iTunes on your Mac, it’s time to locate and select your iPhone within the application. Follow these simple steps:
- Look for the iPhone icon in the upper left corner of the iTunes window.
- If you have multiple devices connected to your Mac, click on the device icon drop-down menu and select your iPhone from the list.
- If you only have one device connected, the iPhone icon will be automatically selected, and you can proceed to the next step.
By selecting your iPhone in iTunes, you establish a connection between your device and the application. This enables you to perform various tasks, including backing up your precious data.
It is important to ensure that your iPhone is properly connected to your Mac and recognized by iTunes. This step ensures a smooth backup process and allows you to proceed to the next step with confidence.
Before moving on, take a moment to verify that your iPhone’s name and details are correctly displayed in iTunes. This will help you identify your device easily and avoid any confusion during the backup process.
Once you have selected your iPhone in iTunes and confirmed the device details, you are ready to proceed to the next step, where you will choose to backup your iPhone to your Mac.
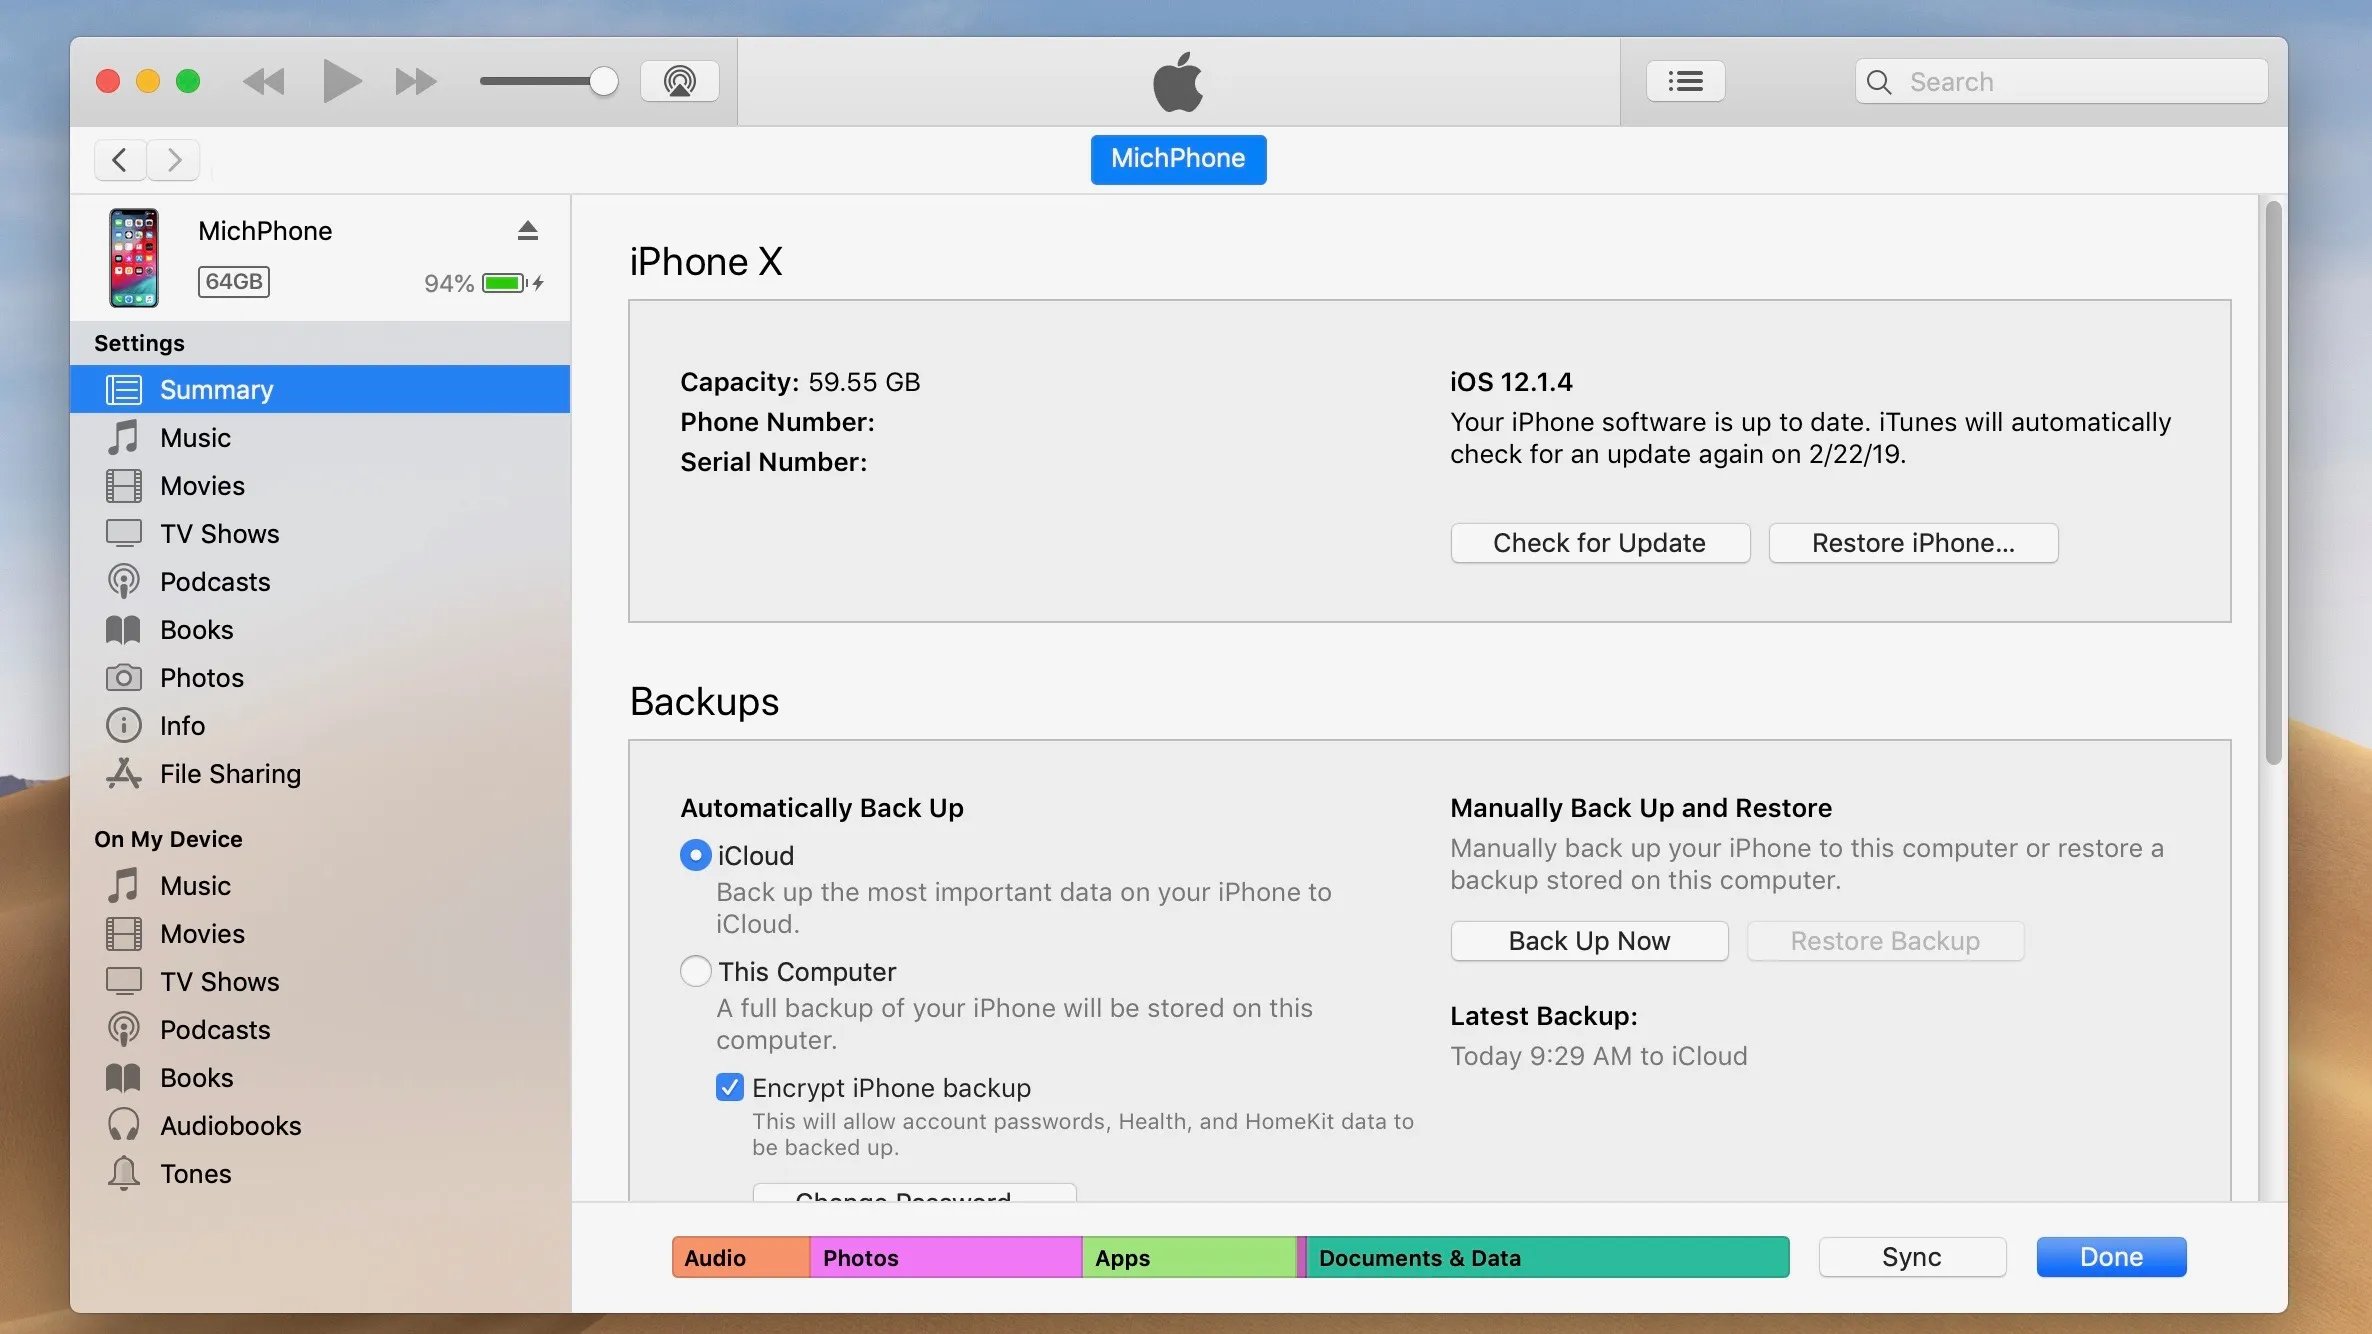
Step 4: Choose to backup your iPhone to Mac
Once your iPhone is recognized by iTunes on your Mac, you can proceed to choose the backup option. This step allows you to initiate the backup process and ensure that all your important data is securely stored on your Mac.
To choose the backup option, follow these steps:
- Navigate to the “Summary” tab, which is located at the top of the iTunes window. This tab provides an overview of your iPhone’s settings and storage information.
- Under the “Backups” section, you will see a “Back Up Now” button. Click on this button to initiate the backup process.
- Depending on the size of your iPhone’s data, the backup process may take a few minutes to complete. During this time, make sure that your iPhone stays connected to your Mac and do not disconnect it until the backup is finished.
- Once the backup process is complete, you will see a confirmation message in iTunes. This message confirms that your iPhone has been successfully backed up to your Mac.
It is important to note that while iTunes offers a standard backup option, you can also customize your backup settings. For example, you can choose to exclude certain types of data from the backup, such as app data or specific media files.
Additionally, if you prefer to encrypt your backup for added security, you will have the option to set a password during the backup process. This will ensure that only you have access to the encrypted backup file.
Choosing to backup your iPhone to your Mac using iTunes is a simple and effective way to protect your data. By regularly backing up your iPhone, you can safeguard against data loss due to device damage, software issues, or accidental deletion.
Now that you have successfully completed the backup process, you can proceed to the next step, which involves monitoring and verifying the backup to ensure its integrity.
Step 5: Monitor and verify the backup process
Once you have initiated the backup process, it is important to monitor and verify its progress to ensure that your iPhone’s data is safely backed up to iTunes on your Mac. Follow these steps to effectively monitor the backup process:
1. Stay connected: Keep your iPhone connected to your Mac throughout the backup process. Disconnecting the device prematurely can interrupt the process and result in an incomplete backup.
2. Check the progress bar: In the iTunes window on your Mac, you will see a progress bar indicating the status of the backup. This bar will update as the backup continues, providing you with a visual representation of the process.
3. Be patient: The backup process can take some time, depending on the amount of data on your iPhone. It is important to be patient and allow the backup to complete without interruptions.
4. Avoid using your Mac or iPhone: To ensure a smooth backup process, it is advisable to avoid using your Mac or iPhone excessively while the backup is in progress. This reduces the risk of interruptions or conflicts that can impact the backup process.
5. Check for completion: Once the backup process is complete, you will see a notification in iTunes indicating that the backup was successful. Additionally, you can check the backup status by clicking on the “Summary” tab in iTunes and looking for the “Latest Backup” date and time.
6. Test the backup: After the backup is completed, it is a good practice to verify its integrity by restoring your iPhone from the backup. You can do this by going to the “Summary” tab in iTunes, clicking on the “Restore Backup” button, and selecting the latest backup. This ensures that the backup contains all the necessary data and can be successfully restored if needed.
By following these steps, you can effectively monitor and verify the backup process of your iPhone to iTunes on your Mac. This will give you peace of mind knowing that your valuable data is securely backed up and can be restored if necessary.
Step 6: Encrypt your backup (optional)
When it comes to backing up your iPhone to iTunes on your Mac, one additional step you can take to enhance your data security is to encrypt your backup. This optional feature allows you to add an extra layer of protection to your backup file, ensuring that only those with the encryption password can access its contents.
To encrypt your iPhone backup, follow these simple steps:
- Open iTunes on your Mac and connect your iPhone.
- Select your iPhone in the iTunes interface.
- In the Summary tab, under the Backups section, tick the checkbox that says “Encrypt local backup”.
- You will be prompted to set a password for your backup. Make sure to choose a strong and memorable password.
- Click on “Set Password” to confirm your encryption settings.
- Allow the backup process to complete. The encryption process may take a bit longer than usual due to the added security measures.
By encrypting your backup, you ensure that your personal information, app data, passwords, and other sensitive data remain secure in case your backup file falls into the wrong hands. It is important to choose a strong password and remember it, as there is no way to access your encrypted backup without it.
However, it is worth noting that if you forget your encryption password, you will not be able to access the data in your backup. Therefore, it is crucial to keep the password in a safe place or use a password manager to avoid any future issues.
Remember, encryption is an optional step, but it offers an added level of security for your iPhone backup. If you value privacy and want to ensure that your data is protected, taking the time to encrypt your backup is a wise choice.
Step 7: View or Restore Your iPhone Backup
After successfully backing up your iPhone to your Mac using iTunes, you may need to view or restore specific data from the backup in the future. This step will guide you through the process of accessing and utilizing your iPhone backup.
To view or restore your iPhone backup, follow these simple steps:
1. Connect your iPhone to your Mac:
Using your iPhone’s USB cable, connect it to your Mac computer.
2. Launch iTunes on your Mac:
Open the iTunes application on your Mac computer. It should automatically detect your connected iPhone.
3. Select your iPhone in iTunes:
In the iTunes interface, locate and select your iPhone from the list of devices. This will bring up the device summary page.
4. Choose to view or restore your iPhone backup:
In the “Backups” section of the device summary page, you will see different options to view or restore your iPhone backup.
5. View your iPhone backup:
If you simply want to browse the content of your backup without restoring it, click on the “Restore Backup” button. A window will appear displaying the available backup files. Select the desired backup and click on the “View” button.
6. Restore your iPhone backup:
If you want to restore your iPhone to a previous backup, click on the “Restore Backup” button. A window will appear displaying the available backup files. Select the desired backup and click on the “Restore” button.
7. Monitor and verify the restore process:
Once you initiate the restore process, iTunes will begin restoring your iPhone using the selected backup. Ensure that your iPhone remains connected until the process is complete. You can monitor the progress in the iTunes interface.
8. Complete the setup process:
After the restore process finishes, your iPhone will restart. Follow the on-screen instructions to complete the setup process.
By following these steps, you will be able to either view the content of your iPhone backup or restore your iPhone to a previous backup using iTunes on your Mac.
Conclusion
Backing up your iPhone to iTunes on a Mac is a simple and effective way to protect your valuable data. Whether you want to safeguard your contacts, photos, videos, or other important files, regularly creating backups can provide you with peace of mind. By following the steps outlined in this guide, you can ensure that your iPhone’s data is securely copied to your Mac, allowing you to easily restore it in case of any unforeseen events.
Remember, regularly backing up your iPhone is crucial, as it allows you to recover your data and settings in the event of loss, damage, or upgrading to a new device. It’s always a good practice to make backups a part of your regular routine, so you don’t lose any important memories or information. So, take a few minutes today to back up your iPhone to iTunes on your Mac and keep your data safe and sound.
FAQs
Q: Can I back up my iPhone to iTunes on a Mac?
A: Absolutely! You can easily back up your iPhone using iTunes on your Mac. iTunes offers a simple and reliable way to create backups of your device’s data, including contacts, messages, photos, and more.
Q: How do I back up my iPhone to iTunes on a Mac?
A: To back up your iPhone to iTunes on a Mac, follow these steps:
- Connect your iPhone to your Mac using a Lightning cable.
- Open iTunes on your Mac.
- Click the device icon in the top-left corner of the iTunes window.
- In the “Backups” section, select “This Computer” to ensure that the backup is saved locally.
- Click on the “Back Up Now” button to start the backup process.
- Wait for iTunes to complete the backup. Once it’s done, you can verify the backup by going to iTunes Preferences > Devices. Your iPhone backup should be listed there.
Q: Can I encrypt my iPhone backup in iTunes?
A: Yes, you can encrypt your iPhone backup in iTunes to add an extra layer of security to your data. When you encrypt your backup, it will require a password to access and restore the backup. To enable encryption, simply check the “Encrypt iPhone backup” option in the iTunes backup settings before initiating the backup process.
Q: How long does it take to back up an iPhone to iTunes on a Mac?
A: The time it takes to back up an iPhone to iTunes can vary depending on the amount of data on your device and the speed of your Mac. Generally, it takes a few minutes to an hour to complete the backup process. If you have a large amount of data, such as many photos and videos, it may take longer to back up. It’s advisable to ensure that your Mac is connected to a stable power source and has enough free storage space to accommodate the backup.
Q: Can I restore my iPhone from an iTunes backup on a Mac?
A: Yes, you can restore your iPhone from an iTunes backup on a Mac. To do so, connect your iPhone to your Mac, open iTunes, and click on the device icon. Then, go to the “Summary” tab and click on the “Restore Backup” button. Select the desired backup from the list, enter the necessary password if it’s an encrypted backup, and click “Restore.” Keep in mind that restoring an iPhone from a backup will erase all existing data on your device and replace it with the data from the backup.