
iPads are some of the best gadgets that you can have. Not only does it make a great work companion but it also provides ways to pass the time. However, the device isn’t at all safe from errors that may come with years of use or the apps that you download. While some problems can be solved with a simple reset, there are times when you have to consider factory resetting your iPad to ensure that it continues to work properly.
In this article, we’ll be looking at safe ways on how you can perform various resets on your iPad.
Factory Reset VS Soft Reset VS Hard Reset

Much like resetting on an iPhone, there are also different types of resets that you will encounter if you’re looking to reset an iPad. Depending on the type of problem that you’re experiencing or your purpose of resetting, a different type usually matches a different purpose.
What’s the Difference?
There are three types of resetting that you should know before performing a reset on your iPad. Each type will affect your device differently so it pays to know the difference so you don’t accidentally erase data or the sort.
The first of the three is a soft reset, which also goes by the words restart or reboot. This is when you simply turn your iPad on and off. This usually fixes basic problems like lagging or loading issues. A soft reset does not affect your device’s settings or data when you perform it. This is usually the first step in fixing any issues that might occur on your iPad.
Up next is a hard reset or force restart. This type of reset is usually done if your iPad freezes or is not responding properly to commands. If you might not be able to perform a soft reset, the hard reset is your next option to try and fix any issues. This can be done by holding the power button until the device shuts down or removing the battery (not applicable to iPad) if you still using a phone with a removable battery. Much like the soft reset, this won’t affect your device’s data and settings so you don’t have to worry.
Lastly, we have the factory reset. Compared to the previous two types, a factory reset will wipe out everything that is on your device. This is usually the last result to fix issues if a soft or hard reset doesn’t work. From your music to your apps, a factory reset returns your iPad to its state when you first got it from the store or as if it just got out of the factory.
It’s best to figure out which type of reset you need to do first before you perform it. Think about which process you need to do properly before proceeding to not accidentally get rid of your device’s data.
When to Reset an iPad?
It’s essential to know when to perform a reset as it’s also advised to do so sparingly because frequent resets might damage your device.
Perform a soft or hard reset if you’re encountering basic problems with your iPad. Issues such as a lagging screen, an app refusing to load, or slow device performance are usually the reasons why you should consider performing a soft or hard reset. Try to perform a soft reset first and then a hard reset when the former doesn’t work.
Perform a factory reset if you’re still having issues after performing a soft and a hard reset. You’ll also want to perform this if you’re planning to sell or give away your iPad as this will help to clear out any data that you might have missed out on during manual erasure.
Before You Factory Reset iPad
Since a soft and a hard reset won’t do anything to your device except fix minor issues, the type of reset that you should prepare for is the factory reset. Before performing a factory reset, you might want to do the following to make sure that your data and other important information is kept safe even if you decide to give your device away.
A.) Backup Your Data

You can backup your iPad using two ways but doing an iCloud backup is what we recommend. It allows you to create and access your back-ups from anywhere as long as you have Wi-Fi. To back-up your iPad with iCloud, simply follow the steps below:
- Go to Settings then click on your Apple ID.
- Select iCloud then iCloud Backup.
- Turn on iCloud Backup.
- Tap Backup Now.
After that, your iPad should automatically start the back-up process.
Alternatively, you can also choose to backup your iPad with your computer. This is especially helpful if you need more storage for your files as an iCloud backup only has a limit of up to 5GB if you’re using it for free.
- To back-up with a Mac, simply follow the indicated steps below:
- Connect your iPad to the computer via USB.
- Select your iPad from the Finder. Note that you will have to use iTunes if you have the earlier versions of the macOS.
- Tap on General at the top of the Finder window.
- You can now choose to back-up all of your data to your Mac.
Tap on Backup Now. The process should start immediately after this.
If your using a Windows PC, these are the steps that you should follow:
- Connect your iPad to your PC via USB.
- Open the iTunes app and tap on the iPad button on the top left portion of the window.
- Tap on Summary.
- Under backups, click on Backup Now.
For more information on whether you should back-up with a PC or iCloud, you can always refer to Apple’s official website for more information.
B.) Remove Your Personal Information
After backing-up your device, the next thing that you want to do is to remove all your data from your device to prevent them from falling into the wrong hands.
To do this, all you have to do is to follow the procedure below:
- Sign out of iCloud, iTunes, and the App Store.
- Go to Settings and tap on General.
- Click on Reset then Erase All Content and Settings.
- Tap on Erase. You may be asked to key-in your passcode before you can erase the data.
Additionally, you might also want to remove your cards from Apple Pay as this procedure is quite different from removing the data. Just make sure that you do it before you start removing all your personal information so that you don’t encounter errors.
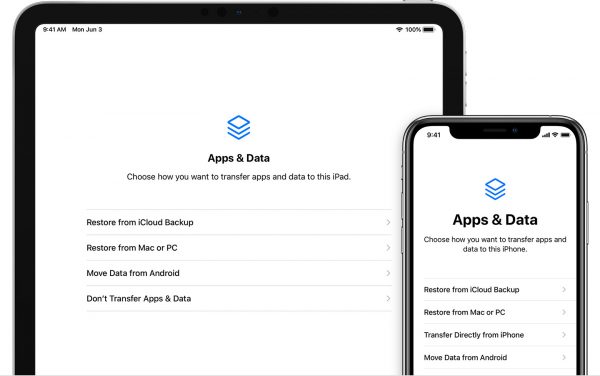
C.) Transfer Information to a New Device
Once you’re done with the back-up process and with removing your personal information, the next thing that you can consider doing is to transfer the information to your new device.
If you have a new Apple device, you can use Quick Start to transfer your data to your new device. However, if you don’t have an Apple device or if you used your Mac or PC to back-up your iPad, you can also use iTunes to transfer your data to your new device.
How to Factory Reset iPad
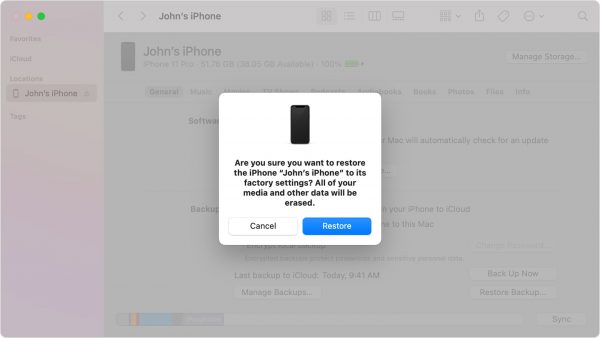
Once you’re done backing up your files and removing your accounts, you’re now ready to factory reset your iPad. It’s a fairly simple process and all you will need is your iPad and your PC or Mac using iTunes or Finder for the older Mac versions.
- Launch iTunes or Finder on your computer.
- Connect your device to your computer.
- Follow the prompts on your computer. It might ask for your device passcode before your iPad gets recognize.
- Select your device when it appears on the iTunes or Finder’s side bar.
- Under General, tap on Restore.
- A window will pop-up, tap on Restore to confirm your choice.
- After the device has restarted, set it up as you desire.
Alternatively, you can also perform the process on your device itself if you don’t have access to a computer. The steps are as follows:
- Go to Settings and tap on General.
- Click on Reset then tap on Erase All Content and Settings
- Key-in your passcode or Apple ID password if needed.
- Wait for the device to erase.
Depending on the amount of data that you have on your device, this should only take a few minutes. Afterward, your device will restart and you can set it up as you want.
How to Perform a Soft Reset on an IPad
Contrary to the factory reset on an iPad, there isn’t a lot that you need to do when you just want to soft reset. The process is much simpler and all you have to do is to perform the following steps:
- Press and hold down on the Power button until the slider appears on the screen.
- Release the Power button and drag the slider to turn your iPad off.
- Once your iPad has turned off, wait a few minutes.
- Press and hold on the Power button again until the device starts up.
How to Hard Reset an IPad
A hard reset requires just a little bit more effort than a soft reset but it should have the same effects. This particular process saves the day when the screen lags or freezes as you don’t need to drag a slider to perform a hard reset. The process differs slightly between iPad models as some of them have or don’t have a home button which you will need to be able to perform a hard reset.
If your iPad has a home button, you can simply:
- Simultaneously hold down on the Power and Home button until the iPad turns-off.
- Wait for the iPad to turn-off and reboot completely.
- Let go of the buttons when the Apple logo flashes on the screen.
If your iPad doesn’t have a home button, you will have to do these steps instead:
- Press down and quickly release the Volume Up button.
- Similarly, you will also have to press down and quickly release the Volume Down button.
- Release the Volume buttons then press and hold down on the Power button.
- Wait for the device to restart.
Takeaways
Knowing how to safely reset your iPad is crucial to make it function properly. Learning how to safely factory reset iPad is also essential as it will help protect your device, as well as any personal information that you might have on it. While performing a reset can get a bit grueling, it’s worth taking an extra measure to make sure that the device works properly and that your data is safe.
If you’re looking to factory reset an Android phone, the process might be a little bit different. Fortunately, we have an article on how to factory reset Samsung devices so you can check it out.