
Are you wondering where to find your screenshots on your Mac? Look no further! In this article, we will guide you through the process of finding your screenshots on macOS Monterey. Whether you need to access a screenshot for work, share a funny moment with a friend, or simply organize your files, knowing where to find your screenshots is essential.
With the latest update to macOS Monterey, Apple has made some changes to the way screenshots are stored and managed. Knowing the new location and the steps to access your screenshots can save you valuable time and frustration.
So, let’s dive into the world of screenshot storage on your Mac and discover the new and improved ways to find and manage your precious screen captures.
Inside This Article
- How to Take Screenshots Using Keyboard Shortcuts
- Capturing Screenshots with the Grab App
- Using the Screenshot Toolbar in macOS Monterey
- Utilizing the Preview App to Capture Screenshots
- Conclusion
- FAQs
How to Take Screenshots Using Keyboard Shortcuts
Taking screenshots on your Mac is a breeze when you know the right keyboard shortcuts. These shortcuts allow you to capture your screen or specific areas with just a few key combinations. Whether you want to capture the entire screen or a specific window, these keyboard shortcuts will save you time and effort.
Here are the essential keyboard shortcuts to take screenshots on your Mac:
- Command + Shift + 3: This keyboard shortcut captures the entire screen and saves it as a file on your desktop.
- Command + Shift + 4: Pressing this combination turns your cursor into a crosshair, allowing you to click and drag to select a specific area to capture. Release the cursor to capture the selected area.
- Command + Shift + 4 + Spacebar: This keyboard shortcut allows you to capture a specific window. After pressing the combination, your cursor will turn into a camera icon. Simply click on the window you want to capture, and it will be saved as a file on your desktop.
Once you have taken a screenshot using the keyboard shortcuts mentioned above, you can find the saved files on your desktop. By default, macOS names the files as “Screen Shot [date] at [time].png”. You can easily rename the files to your desired name by simply right-clicking on the file and selecting “Rename”.
Now you know how to take screenshots using keyboard shortcuts on your Mac. These shortcuts are not only convenient, but they also save you the hassle of opening third-party applications or going through complex menus. Start using these shortcuts today and capture your screen effortlessly!
Capturing Screenshots with the Grab App
If you’re looking for a simple and convenient way to capture screenshots on your Mac, the Grab app is a great option. This handy tool comes pre-installed on macOS Monterey and provides several useful features for taking screenshots.
To access the Grab app, you can either search for it in Spotlight or navigate to the “Applications” folder and look for it there. Once you’ve opened the app, you’ll see a clean and straightforward interface with a few options.
The Grab app allows you to take screenshots in three different modes: Selection, Window, and Screen. The Selection mode allows you to capture a specific area of the screen by dragging your cursor over it and releasing. The Window mode will let you capture the entire contents of a specific window, while the Screen mode captures the entire screen.
Once you’ve selected the desired mode, you can choose whether to include the mouse pointer in the screenshot or not. This can be useful when demonstrating a specific action or providing visual guidance. Simply check or uncheck the “Cursor” option from the menu.
Another useful feature of the Grab app is the ability to set a timer. This can be handy if you need to capture a screenshot of a menu or a drop-down list that disappears quickly. By setting a delay of a few seconds, you can open the menu or perform the action and have enough time for the app to capture the screenshot.
After taking a screenshot, the Grab app will display the captured image in a new window. From there, you can save it to your desired location on your Mac. You also have the option to copy the screenshot to the clipboard or open it in the Preview app for further editing or annotation.
If you find yourself frequently using the Grab app to capture screenshots, you can also assign a keyboard shortcut for quick access. Simply go to the “Utilities” folder in the “Applications” folder, open the “Grab” app, and select “Preferences” from the menu. From there, you can assign a shortcut by clicking on the “Set Key…” button.
The Grab app is a simple yet powerful tool for capturing screenshots on your Mac. Give it a try and see how it enhances your productivity when it comes to capturing and saving images of your screen.
Using the Screenshot Toolbar in macOS Monterey
macOS Monterey introduces a convenient and user-friendly way to capture screenshots through the Screenshot Toolbar. This new feature allows you to access various screenshot options with just a few clicks, making it easier than ever to capture and save screenshots.
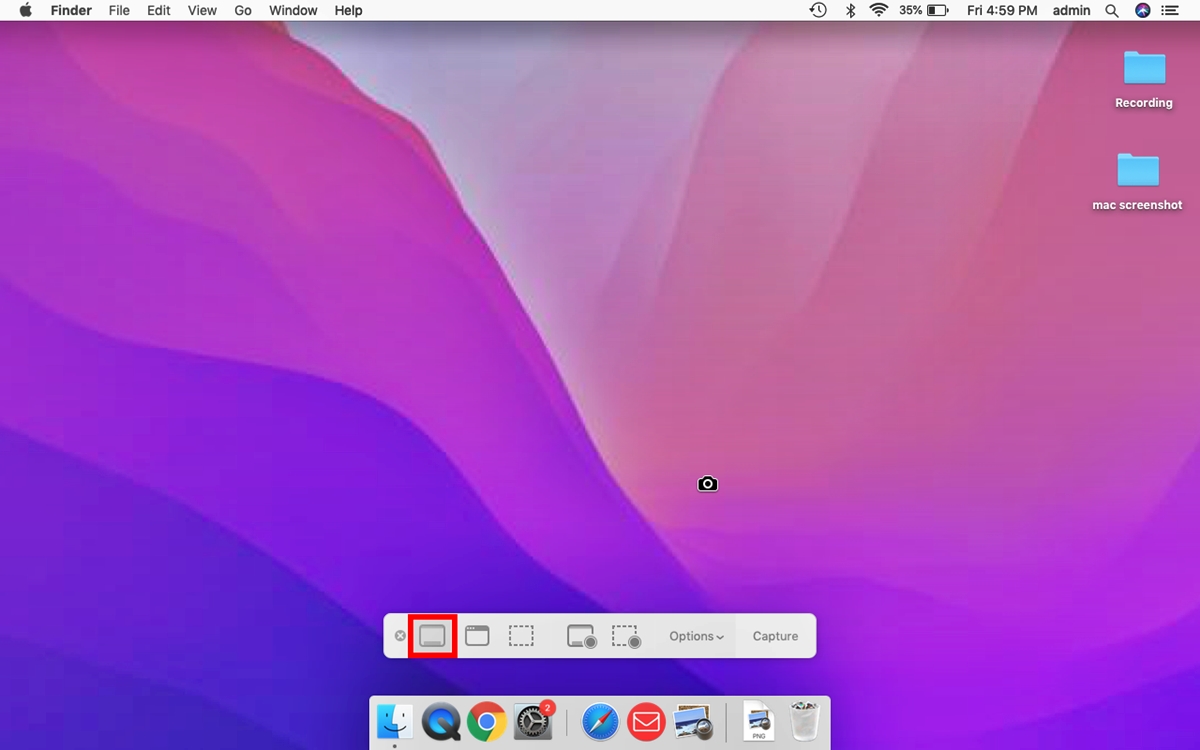
To access the Screenshot Toolbar, simply press and hold the Control, Shift, and Command keys simultaneously. This will display a small toolbar at the bottom of the screen, with several screenshot options to choose from.
One of the options available on the Screenshot Toolbar is the ability to capture a full-screen screenshot. By selecting this option, your Mac will instantly capture an image of the entire screen, including any open windows or applications.
If you need to capture a specific area of the screen, the Screenshot Toolbar also provides an option for that. By clicking on the “Capture Selected Portion” option, you can easily drag and select the desired area to capture as a screenshot.
Another useful feature of the Screenshot Toolbar is the option to capture a window screenshot. If you have multiple windows open on your Mac, selecting this option will allow you to capture an image of the currently active window only, excluding other open windows from the screenshot.
If you prefer capturing screenshots of a specific menu or menu bar item, the Screenshot Toolbar has an option for that too. By selecting the “Capture Menu” option, you can easily capture the desired menu or menu bar item as a screenshot.
It’s worth noting that the Screenshot Toolbar also provides options for taking timed screenshots. This is especially handy when you need to capture a screenshot of a dropdown menu or a tooltip, as it allows you to set a timer before the screenshot is taken.
Once you’ve selected your preferred screenshot option from the Screenshot Toolbar, your Mac will instantly capture the screenshot and save it to your desktop. You can then access the screenshot from your desktop and use it as needed.
The Screenshot Toolbar in macOS Monterey is a valuable addition that simplifies the process of capturing screenshots on your Mac. With its easy accessibility and various options, you’ll be able to capture and save screenshots quickly and efficiently.
Utilizing the Preview App to Capture Screenshots
If you’re looking for a powerful and versatile tool to capture screenshots on your Mac, look no further than the Preview app. This built-in application not only allows you to view and edit images and PDFs but also enables you to take screenshots with ease.
To start capturing screenshots using the Preview app, follow these simple steps:
- Open the Preview app by searching for it in Spotlight or locating it in the Applications folder.
- Once the app is open, go to the menu bar at the top of your screen and click on “File”. From the dropdown menu, select “Take Screenshot”.
- You will see three options: “From Selection”, “From Window”, and “From Entire Screen”. Choose the option that suits your needs.
If you select “From Selection”, your cursor will turn into a crosshair. Click and drag to select the specific portion of the screen you want to capture. When you release the mouse button, the screenshot will be automatically taken and displayed in the Preview app.
If you choose “From Window”, your cursor will transform into a camera icon. Click on the window you want to capture, and the screenshot will be saved in the Preview app.
Lastly, if you opt for “From Entire Screen”, the Preview app will capture the entire screen when you click on it. The screenshot will then be opened in the Preview app for you to edit or save.
After taking a screenshot, you can use the various editing tools available in the Preview app to annotate, crop, resize, or add text to the image. This makes it a convenient option for those who need to make quick edits to their screenshots before sharing or using them.
Once you’re satisfied with your edits, you can save the screenshot in various formats, such as JPEG, PNG, or TIFF, by going to the “File” menu and selecting the “Save” or “Export” option.
Utilizing the Preview app to capture screenshots on your Mac gives you the flexibility to quickly and easily capture and edit images, making it a valuable tool for a wide range of tasks.
So the next time you need to capture a screenshot on your Mac, give the Preview app a try and take advantage of its powerful features.
Conclusion
In conclusion, knowing where to find screenshots on Mac (macOS Monterey) is essential for every Mac user. Whether you need to capture a moment, share information, or troubleshoot technical issues, having quick access to your screenshots is incredibly convenient.
With the new features introduced in macOS Monterey, you can take advantage of the updated screenshot tools, such as the redesigned floating toolbar and the enhanced options for capturing specific portions of the screen. Additionally, the unified location of the Screenshots folder in the Finder makes it easier than ever to locate and organize your captured images.
By following the simple methods outlined in this article, you can effortlessly find your screenshots on Mac and unleash the full potential of your capture capabilities. So, the next time you take a screenshot, rest assured that you will be able to locate it quickly and efficiently, making your Mac experience even more enjoyable and productive.
FAQs
1. Where can I find screenshots on Mac?
To find screenshots on your Mac running macOS Monterey, you can follow these steps:
- Open Finder from your dock.
- In the menu bar at the top of the screen, click on “Go”.
- Select “Go to Folder” from the drop-down menu.
- Type in the following path: /Users/[Your Username]/Desktop
- Press Enter or click on the “Go” button.
- Your screenshots will be displayed in the Desktop folder.
2. Can I change the default location for saving screenshots on Mac?
Yes, you can change the default location for saving screenshots on your Mac. Here’s how to do it:
- Open Finder and go to your preferred location for saving screenshots.
- Press Command + Shift + 5 to open the screenshot menu.
- Click on “Options” in the menu bar.
- Choose “Other Location” from the “Save To” drop-down menu.
- Select the desired folder or create a new one.
- Click “Choose” to set the new location as the default for saving screenshots.
3. How can I change the screenshot file format on Mac?
By default, Mac saves screenshots in the PNG (Portable Network Graphics) file format. However, if you prefer a different file format like JPEG or GIF, you can change it by following these steps:
- Press Command + Shift + 5 to open the screenshot menu.
- Click on “Options” in the menu bar.
- Choose your desired file format from the “Format” drop-down menu.
4. How can I take a screenshot of a specific window on Mac?
To take a screenshot of a specific window on your Mac, follow these steps:
- Open the window you want to capture.
- Press Command + Shift + 4.
- Press the space bar.
- Your cursor will turn into a camera icon.
- Move the camera icon over the window you want to capture and click on it.
5. Can I take a screenshot on Mac without using the keyboard?
Yes, you can take a screenshot on your Mac without using the keyboard. Here’s how:
- Press Command + Shift + 5 to open the screenshot menu.
- In the floating screenshot toolbar, click on the “Options” button.
- Choose “Capture Entire Screen” or “Capture Selected Portion” depending on your preference.
- Click on the camera icon to capture the screenshot.