
In today’s fast-paced world, our smartphones have become essential tools for staying connected and managing our daily lives. One of the most useful features that smartphones offer is the ability to track time zones and set up world clocks. This becomes particularly handy when you frequently communicate or work with people from different parts of the globe. If you own an iPhone and want to stay on top of the time in various locations, you’ll be pleased to know that adding a location to the World Clock feature on your iPhone is a breeze. In this article, we will guide you through the steps to easily add a location to the World Clock on your iPhone, allowing you to effortlessly keep track of time across the world.
Inside This Article
- Enable World Clock on iPhone
- Open the Clock app on iPhone
- Add a new location to World Clock
- Customize World Clock Location Settings
- Conclusion
- FAQs
Enable World Clock on iPhone
The World Clock feature on the iPhone allows you to easily keep track of time in different locations around the globe. If you want to add a location to your World Clock, you first need to enable the feature on your iPhone. Follow these simple steps to enable World Clock on your iPhone:
- Unlock your iPhone and go to the home screen.
- Open the “Settings” app by tapping on the gear icon.
- Scroll down and find the “Clock” option. Tap on it.
- Under the “Clock” settings, you will see the “World Clock” option. Make sure the toggle switch next to it is turned on. If it is not, tap on the switch to enable it.
- Once enabled, you will see the World Clock feature on your iPhone’s Home screen.
Now that you have enabled the World Clock feature on your iPhone, you can proceed to add a new location to your World Clock.
Open the Clock app on iPhone
If you want to add a location to World Clock on your iPhone, you first need to access the Clock app. The Clock app is a built-in application on the iPhone and is usually found on the home screen or in a folder labeled “Utilities.” Once you locate the app, tap on its icon to open it.
As an alternative method, you can also swipe down on the home screen and use the search bar at the top of the screen to search for “Clock.” When the Clock app appears in the search results, tap on it to open.
Once you have successfully opened the Clock app, you will see several options at the bottom of the screen, including “World Clock.” Tap on the World Clock tab to proceed to the next step.
By opening the Clock app and accessing the World Clock tab, you have now set the stage for adding a new location to the World Clock on your iPhone. The next step is to learn how to actually add the desired location to the World Clock function.
Add a new location to World Clock
Adding a new location to the World Clock on your iPhone is a simple and convenient way to stay informed about different time zones. Whether you frequently travel, have family or friends in different parts of the world, or just want to keep track of the time in another location, the World Clock feature can be a useful tool.
To add a new location to your World Clock, follow these easy steps:
- Open the Clock app on your iPhone. The Clock app is a pre-installed app that comes with your device and is typically found on the home screen.
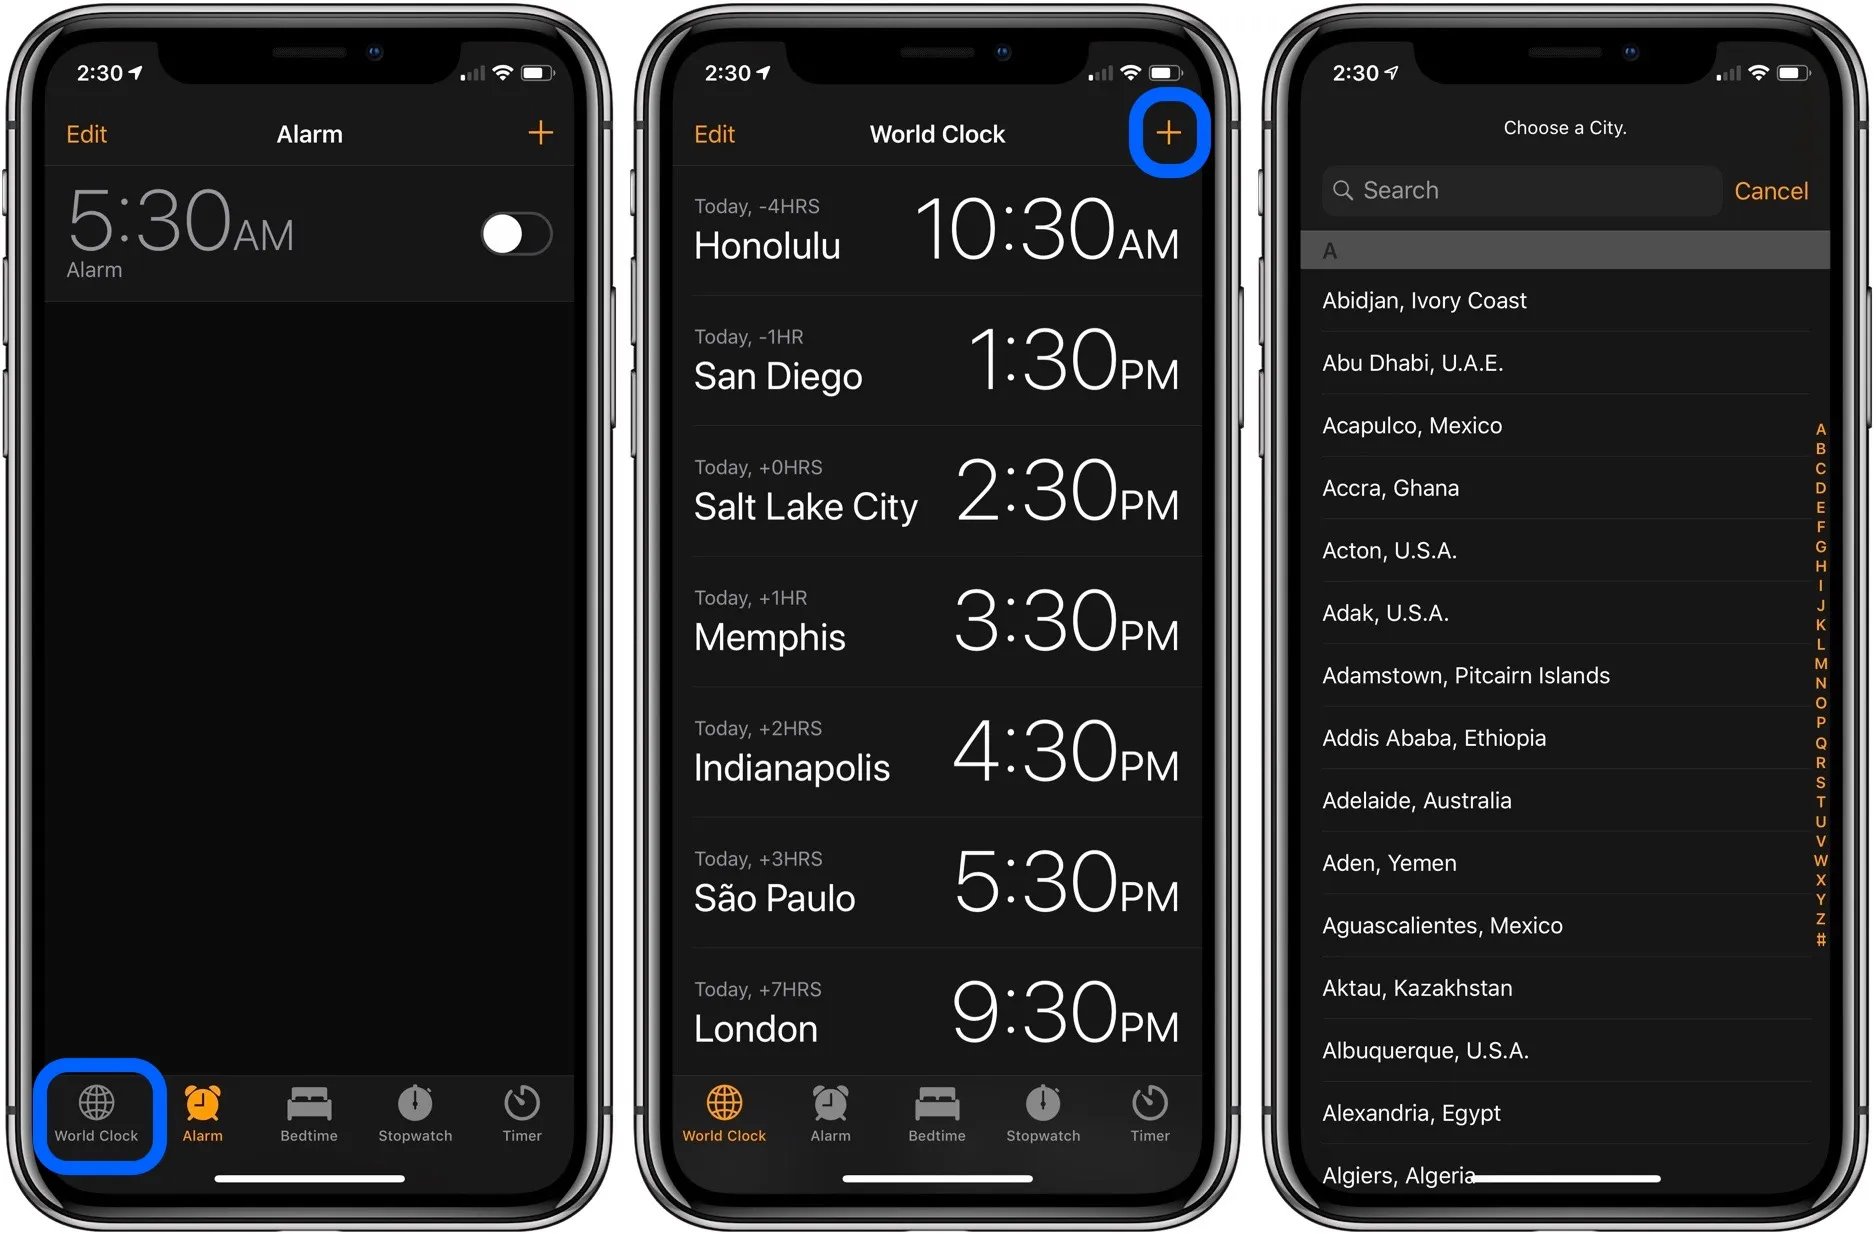
- Tap on the “World Clock” tab at the bottom of the screen. This will take you to the World Clock section, where you can view and manage the different locations.
- Tap on the “+” button in the top-right corner of the screen. This will bring up the “Search” bar.
- Type in the name of the city or location you want to add to your World Clock. As you type, the app will suggest matching locations to make it easier for you to select the correct one.
- Select the desired location from the search results. The app will display the time and date information for that location.
- Tap on the “Add” button in the top-right corner of the screen to add the location to your World Clock.
Once you’ve followed these steps, the new location will appear in your World Clock along with the current time. You can easily swipe left or right on the location to view additional details, such as the time difference from your current location.
You can add multiple locations to your World Clock to keep track of time zones around the world. This is particularly useful if you frequently communicate or do business with people in different countries or if you’re planning a trip and want to stay updated with the local time.
Adding a new location to your World Clock on iPhone is a great way to stay organized and on top of time differences. With just a few simple steps, you can ensure that you’re always aware of the current time in any part of the globe.
Customize World Clock Location Settings
Once you have added a location to the World Clock on your iPhone, you can further customize the location settings to make it more personalized and convenient. Here are some ways to do it:
1. Reorder the Locations: If you want to change the order of the locations in the World Clock, you can simply drag and drop them into the desired position. This way, you can prioritize the locations that are most important to you and have them displayed at the top of the list.
2. Rename the Locations: By default, the World Clock displays the names of the cities for each location entry. However, you can rename the locations to something more specific or meaningful to you. For example, you can change “New York” to “Home”, “London” to “Work”, or “Tokyo” to “Vacation”. To rename a location, simply swipe left on the location entry and tap on the “Edit” button. Then, tap on the location name and type in the new name.
3. Enable 24-Hour Format: The World Clock can display time in either the 12-hour format or the 24-hour format. If you prefer the 24-hour format, you can enable it by going to the Settings app on your iPhone, then tapping on “General”, “Date & Time”, and finally selecting “24-Hour Time”. Once enabled, the World Clock will show time in the 24-hour format for all the locations.
4. Show Additional Information: If you want to see more details about each location, you can enable the “Show City Abbreviation” option in the World Clock settings. This will display the abbreviation of the city name next to the time. Additionally, you can also enable the “Show Weather Condition” option to see the current weather condition for each location.
5. Remove Locations: If you no longer need a certain location in the World Clock, you can easily remove it. Swipe left on the location entry and tap on the “Delete” button. This will remove the location from your World Clock.
6. Change the Digital Time: By default, the World Clock displays time in analog format. However, if you prefer the digital format, you can change it in the World Clock settings. Go to the Clock app, tap on “World Clock”, and then toggle the “Analog” switch to “Digital”. This will change the time display to the digital format for all the locations.
With these customization options, you can personalize and optimize your World Clock on iPhone to fit your needs and preferences. Whether it’s rearranging the locations, renaming them, or enabling additional information, you can make the World Clock a useful tool for keeping track of time across different time zones.
Adding a location to the World Clock on your iPhone is a simple and convenient way to keep track of time in different parts of the world. By following the steps outlined in this article, you can easily customize your World Clock and stay updated on the time zones that matter to you.
With just a few taps, you can add, remove, and rearrange locations in the World Clock app, ensuring that you always have the information you need at your fingertips. Whether you’re a frequent traveler, have loved ones abroad, or simply have an interest in global time zones, the World Clock feature on your iPhone can greatly enhance your time management and planning.
So, go ahead and make the most of this handy feature on your iPhone. Stay connected with the world, no matter where you may be.
FAQs
Q: How do I add a location to World Clock on iPhone?
A: Adding a location to World Clock on iPhone is a simple process. To do this, follow the steps below:
- Open the Clock app on your iPhone.
- Navigate to the World Clock tab at the bottom of the screen.
- Tap the “+” icon in the top-right corner.
- Search for the desired location using the search bar at the top.
- Select the location from the search results.
- The location will now be added to your World Clock.
Q: Can I add multiple locations to World Clock?
A: Yes, you can add multiple locations to World Clock on your iPhone. Simply follow the process mentioned above for each location you want to add. You can view all the added locations in the World Clock tab of the Clock app.
Q: How can I rearrange the order of locations in World Clock?
A: To rearrange the order of locations in World Clock on iPhone, follow these steps:
- Open the Clock app on your iPhone.
- Navigate to the World Clock tab.
- Tap “Edit” in the top-right corner.
- Drag and drop the locations in the desired order.
- Tap “Done” when you’re finished rearranging the locations.
Q: How do I delete a location from World Clock?
A: Removing a location from World Clock on iPhone can be done by following these steps:
- Open the Clock app on your iPhone.
- Go to the World Clock tab.
- Swipe left on the location you want to delete.
- Tap the “Delete” button that appears on the right.
- The location will be removed from your World Clock.
Q: Can I change the time format in World Clock?
A: Yes, you can change the time format in World Clock on iPhone. To do this, follow these steps:
- Open the Settings app on your iPhone.
- Scroll down and tap “Clock”.
- Select “24-Hour Time” or “AM/PM” under the “Time” section.
- Once you’ve made your selection, the changes will be applied to the time format in World Clock.