
Welcome to our comprehensive guide on how to back up your iPhone to iCloud in 2023. As all iPhone users know, backing up your device is crucial to ensure that your valuable data, contacts, photos, and documents are safe and easily recoverable in the event of an accidental loss or device malfunction. In this article, we will walk you through the step-by-step process of backing up your iPhone to iCloud, outlining the benefits of cloud storage and providing valuable tips and tricks along the way. Whether you are a seasoned iPhone user or a new owner, this guide will help you navigate the often-overlooked world of data backup seamlessly. So, grab your iPhone, a cup of coffee, and let’s ensure your precious memories stay safe and sound with an iCloud backup.
Inside This Article
- Overview
- Step 1: Ensure iCloud Backup is enabled
- Step 2: Connect to Wi-Fi and plug in your iPhone
- Step 3: Open Settings and tap on your Apple ID
- Step 4: Tap on iCloud and select iCloud Backup
- Step 5: Tap on Back Up Now to start the backup process
- Step 6: Monitor the backup progress
- Step 7: Verify the backup is complete
- Step 8: Set up automatic iCloud backups
- Step 9: Restore your iPhone from an iCloud backup
- Conclusion
- FAQs
Overview
In today’s digital age, our smartphones have become an integral part of our lives. Our iPhones store a wealth of information, including precious photos, important contacts, and personal data. Losing or damaging this valuable data can be devastating. That’s why it’s crucial to regularly back up your iPhone to iCloud – Apple’s cloud storage service. By doing so, you can ensure that your data is safe and easily recoverable in case of any unforeseen events.
In this article, we will guide you through the process of backing up your iPhone to iCloud. Whether you’re a seasoned iPhone user or a newbie to the Apple ecosystem, this step-by-step guide will help you safeguard your data and give you peace of mind.
Before we dive into the details, it’s important to note that in order to use iCloud for backups, you’ll need an active internet connection and enough available iCloud storage space. Apple offers 5GB of free cloud storage, but depending on your usage, you may need to purchase additional storage. Now, without further ado, let’s get started on how to back up your iPhone to iCloud.
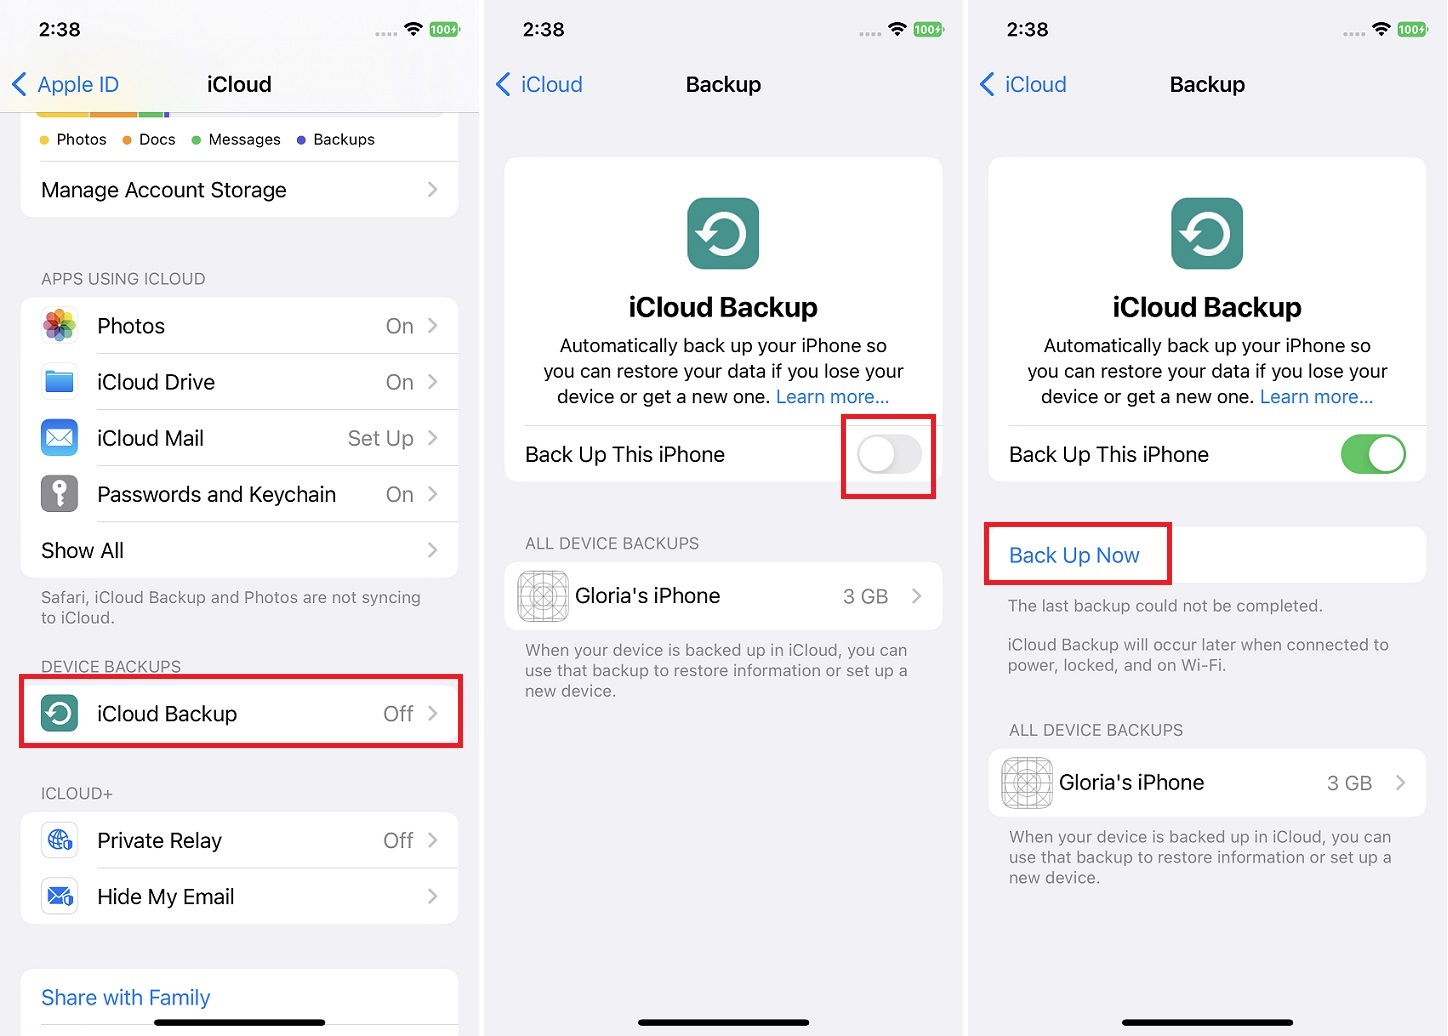
Step 1: Ensure iCloud Backup is enabled
Before you can back up your iPhone to iCloud, it is crucial to confirm that iCloud Backup is enabled on your device. iCloud Backup is a convenient feature that allows you to automatically back up your iPhone data to Apple’s cloud storage platform.
To check if iCloud Backup is enabled, follow these steps:
- Open the Settings app on your iPhone.
- Tap on your Apple ID, which is usually located at the top of the Settings menu.
- Scroll down and tap on “iCloud”.
- Ensure that the “iCloud Backup” option is turned on. If it is already enabled, you can proceed to the next step. If not, toggle the switch to enable iCloud Backup.
Enabling iCloud Backup ensures that all your important data, including contacts, photos, videos, settings, and app data, are securely stored in the cloud. This allows you to easily restore your data in case of device loss, damage, or when setting up a new iPhone.
Step 2: Connect to Wi-Fi and plug in your iPhone
After ensuring that iCloud Backup is enabled on your iPhone, the next step is to connect your device to a Wi-Fi network and plug it in to ensure a stable and uninterrupted backup process.
Connecting to Wi-Fi is important because iCloud backups require a stable internet connection to transfer your data securely to Apple’s servers. Make sure you are within range of a reliable Wi-Fi network before proceeding.
Additionally, it is crucial to plug in your iPhone during the backup process. Backups can consume a significant amount of battery power, and you don’t want your device to run out of juice midway through the backup, risking data loss or interruptions.
By connecting your iPhone to a power source, you ensure that the device remains powered throughout the backup process, giving you peace of mind knowing that your data is being securely backed up without any interruptions.
Once your iPhone is connected to a Wi-Fi network and plugged in, you are ready to move on to the next step in the process: accessing the iCloud Backup settings on your device.
Step 3: Open Settings and tap on your Apple ID
Once you have ensured that iCloud Backup is enabled, it’s time to navigate to your iPhone’s Settings menu. Here’s how to do it:
1. Locate the Settings app on your iPhone’s home screen. It is represented by a gray icon with gears.
2. Tap on the Settings app to open it. The Settings menu allows you to configure various aspects of your device.
3. Scroll down the list of options until you find the section labeled “Apple ID.” This is usually located near the top of the Settings menu.
4. Tap on your Apple ID to access your account settings. Your Apple ID is the account you use to sign in to all Apple services, including iCloud.
By tapping on your Apple ID, you open a new page with different options related to your account settings and preferences.
Once you have successfully opened your Apple ID settings, you are ready to proceed to the next steps in the backup process.
Step 4: Tap on iCloud and select iCloud Backup
Once you’ve accessed your iPhone’s settings by tapping on your Apple ID, it’s time to move on to the next step – tapping on “iCloud” and selecting “iCloud Backup.” This will take you to the iCloud Backup settings page, where you can manage your device’s backups.
When you tap on “iCloud Backup,” you’ll be presented with a couple of options. The first option is the “Back Up Now” button, which allows you to manually initiate a backup of your iPhone to iCloud. Tapping on this button will start the backup process, creating a current snapshot of your device’s data and saving it in iCloud.
It’s important to note that you’ll need to be connected to a Wi-Fi network in order to initiate a backup to iCloud. This is because iCloud backups can be large in size, and using cellular data to upload them would consume a significant amount of data and potentially incur additional charges.
Additionally, make sure your iPhone is connected to a power source, such as a wall outlet or a power bank. This ensures that your device doesn’t run out of battery during the backup process, which could interrupt the backup and potentially cause data loss.
In the iCloud Backup settings page, you may also notice a toggle button labeled “iCloud Backup.” This switch allows you to enable or disable automatic backups to iCloud. When enabled, your iPhone will automatically back up its data to iCloud when it’s plugged in, locked, and connected to Wi-Fi. If disabled, you’ll need to manually initiate backups by tapping on the “Back Up Now” button.
Enabling automatic iCloud backups is highly recommended as it ensures that your iPhone’s data is regularly and securely backed up without any manual intervention. This is especially useful if you frequently forget to initiate backups or if you tend to have busy schedules that don’t allow for manual backup management.
By following these steps and tapping on “iCloud” in your iPhone’s settings, then selecting “iCloud Backup,” you’ll be able to configure and manage your iPhone’s backups to iCloud effectively. This ensures that your important data is safely stored in the cloud, protecting you from potential data loss due to device damage, loss, or software issues.
Step 5: Tap on Back Up Now to start the backup process
Once you’ve connected to Wi-Fi and plugged in your iPhone, it’s time to begin the backup process. To do this, follow the simple steps below:
- Open the Settings app on your iPhone. It’s the gray icon with gears on your home screen.
- Scroll down and tap on your Apple ID. It’s located near the top of the Settings menu.
- In the Apple ID menu, tap on “iCloud” to access your iCloud settings.
- Scroll down and tap on “iCloud Backup”. This will bring you to the backup options menu.
- Finally, you’ll see the option to “Back Up Now”. Tap on it to initiate the backup process.
Once you’ve tapped on “Back Up Now”, your iPhone will begin backing up all your important data to iCloud. Depending on the amount of data on your device and your internet connection speed, the backup process may take a few minutes to an hour or longer. It’s important to keep your iPhone connected to Wi-Fi and plugged in during this time to ensure the backup completes successfully.
During the backup process, you can monitor the progress by staying on the “iCloud Backup” screen. You’ll see a status bar indicating the percentage of the backup that has been completed. It’s normal for the progress to pause briefly at times, especially if you have a large amount of data to back up.
Once the backup is complete, you’ll receive a notification on your iPhone confirming the successful backup. At this point, your iPhone’s data is secure and accessible on iCloud.
It’s worth mentioning that you can also set up your iPhone to automatically back up to iCloud. This way, you won’t have to manually initiate backups in the future. Simply go back to the “iCloud Backup” menu and toggle on the “iCloud Backup” switch. Your iPhone will then automatically back up your data when it’s connected to Wi-Fi and charging.
In the event that you need to restore your iPhone from an iCloud backup, you can do so during the initial setup process or through the “Settings” app. Restoring from an iCloud backup allows you to retrieve all your settings, apps, photos, contacts, and more, ensuring a seamless transition to a new or restored device.
By tapping on “Back Up Now” and enabling automatic backups on iCloud, you can have peace of mind knowing that your iPhone’s important data is safely stored and easily retrievable whenever you need it.
Step 6: Monitor the backup progress
Once you have initiated the backup process, it’s important to keep an eye on the progress to ensure that your iPhone is successfully backing up to iCloud. Here are some steps to monitor the backup progress:
1. Stay connected to Wi-Fi: Make sure that your iPhone stays connected to a stable Wi-Fi network throughout the backup process. iCloud backups can be large in size, so a strong and consistent internet connection is crucial.
2. Keep your iPhone plugged in: To prevent your iPhone from running out of battery during the backup, it’s recommended to keep it plugged into a power source. This will ensure that the backup process can continue without any interruptions.
3. Check the status in Settings: To monitor the progress of the backup, go to your iPhone’s Settings. Tap on your Apple ID at the top of the screen, then select “iCloud”. From there, tap on “iCloud Backup”. You will be able to see the date and time of the last successful backup and the backup size.
4. View backup progress: In the “iCloud Backup” menu, you will also be able to see a progress bar indicating the status of the backup process. This bar shows you how much of your data has been backed up to iCloud. If the bar is still moving, it means that the backup is in progress.
5. Stay patient: iCloud backups can take some time, especially if you have a large amount of data on your iPhone. It’s important to be patient and avoid interrupting the backup process. Let it complete at its own pace to ensure a successful backup.
6. Keep an eye on storage: As the backup progresses, it’s a good idea to check your iCloud storage to ensure that you have enough space for the backup. If you run out of storage, the backup process may be interrupted. Consider freeing up space by deleting unnecessary files or upgrading your iCloud storage plan if needed.
By following these steps and monitoring the backup progress, you can ensure that your iPhone’s data is securely backed up to iCloud. This will give you peace of mind knowing that your important information is protected and can be easily restored if needed.
Step 7: Verify the backup is complete
Once you’ve initiated the backup process, it’s crucial to ensure that the backup is complete before proceeding with any further actions. Follow these steps to verify the backup status:
1. Keep your iPhone connected to Wi-Fi and plugged in to prevent any interruptions during the verification process.
2. Go to the “Settings” app on your iPhone and tap on your Apple ID, which is located at the top of the screen.
3. Scroll down and tap on “iCloud.”
4. In the iCloud settings menu, select “iCloud Backup.”
5. Look for the “Last Backup” section to check the date and time of your most recent backup. If the date and time align with your recent backup attempt, then the backup is likely complete.
6. You can also check the backup size under the “Backup Size” section. If the size of the backup is increasing, it indicates that the backup is still in progress. However, if the backup size remains the same for an extended period, the backup is likely complete.
7. Another way to verify the backup is by examining the “Next Backup Size” section. If this section displays “Backup Size,” it means that the backup is complete and no further backup is scheduled at the moment.
8. Lastly, you can check the status of your backup by going back to the main “Settings” menu, tapping on “General,” and selecting “iPhone Storage.” Under the “Backups” section, you’ll see the backups listed along with the size and date. If your most recent backup is displayed, it confirms that the backup is complete.
By verifying the completion of your backup, you can proceed with confidence, knowing that your important data is safely stored in iCloud. It is recommended to double-check the backup status regularly, especially before performing any software updates or resetting your iPhone.
Step 8: Set up automatic iCloud backups
One of the most convenient features of iCloud is the ability to set up automatic backups for your iPhone. This ensures that your device data is regularly and securely backed up without manual intervention. To set up automatic iCloud backups, follow these simple steps:
First, make sure you are connected to a stable Wi-Fi network and that your iPhone is plugged in to a power source. This will ensure that the backup process is uninterrupted and your device remains charged throughout.
Next, navigate to the “Settings” app on your iPhone and tap on your Apple ID at the top of the screen. This will take you to your Apple ID settings.
Scroll down and tap on “iCloud.” Within the iCloud settings, locate and tap on “iCloud Backup.” This is where you can manage your iCloud backup settings.
On the iCloud Backup screen, you will find a toggle switch next to “iCloud Backup.” Tap on the toggle switch to enable automatic backups. Once enabled, your iPhone will automatically back up to iCloud when it is connected to Wi-Fi and charging.
It’s important to note that you need to have enough available storage in your iCloud account to accommodate automatic backups. If you don’t have enough storage, you may need to consider upgrading your iCloud storage plan.
To verify that automatic backups are set up correctly, you can check the “Last Backup” time displayed on the iCloud Backup screen. This will show you the date and time of your latest backup.
By setting up automatic iCloud backups, you can have peace of mind knowing that your iPhone data is regularly backed up and protected. In the event of a lost, damaged, or replaced device, you can easily restore your data from the latest backup and pick up where you left off.
Step 9: Restore your iPhone from an iCloud backup
After successfully backing up your iPhone to iCloud, you have the option to restore your device from that backup in the event that you need to replace your iPhone, or if you want to reset and restore your existing device to a previous state. Here’s how you can easily restore your iPhone from an iCloud backup:
1. Erase all content and settings: Make sure your iPhone is connected to Wi-Fi and go to Settings. Tap on “General” and scroll down to find “Reset.” Select “Erase all Content and Settings.” Confirm your selection and enter your passcode if prompted.
2. Set up your iPhone: After your iPhone restarts, you’ll be greeted with the “Hello” screen. Follow the on-screen instructions to set up your device until you reach the “Apps & Data” screen.
3. Restore from iCloud backup: On the “Apps & Data” screen, tap on “Restore from iCloud Backup.” Sign in to your iCloud account using your Apple ID and password.
4. Choose the backup: Select the iCloud backup that you want to restore from. You’ll see a list of available backups with the date and size of each. Choose the most recent backup that contains the data you want to restore and tap on it.
5. Wait for the restore process: The restore process may take some time depending on the size of the backup and the speed of your internet connection. Make sure your iPhone is connected to Wi-Fi and plugged in to ensure a smooth and uninterrupted restore process.
6. Complete the setup: Once the restore process is complete, your iPhone will restart and begin the setup process. Follow the on-screen instructions to complete the setup, including signing in to your Apple ID, configuring settings, and setting up Face ID or Touch ID if desired.
Note: During the restore process, it’s important to keep your iPhone connected to Wi-Fi and plugged in to avoid any interruptions. Also, make sure you have enough storage space on your iPhone to accommodate the data from the backup.
By following these steps, you can easily restore your iPhone from an iCloud backup and regain access to all your valuable data, including contacts, messages, photos, and more.
Conclusion
Backing up your iPhone to iCloud is a crucial step in safeguarding your valuable data. With the continuous advancements in technology and the ever-increasing reliance on smartphones, it is essential to have a reliable backup system in place. iCloud provides a convenient and efficient way to secure your photos, videos, contacts, and more.
By following the simple steps outlined in this guide, you can easily set up iCloud backup and ensure that your data is protected against unexpected loss or damage. Whether you’re upgrading to a new iPhone, experiencing a software issue, or accidentally deleting important files, having a backup in iCloud gives you peace of mind.
Regularly backing up your iPhone to iCloud should be a routine practice to prevent any potential data loss. Make sure to keep your iCloud storage space in check and adjust your backup settings to include all the essential data on your device. With iCloud backup, you can confidently explore all the great features your iPhone has to offer without worrying about losing your data.
FAQs
FAQ 1: Why should I back up my iPhone to iCloud?
Backing up your iPhone to iCloud is essential for several reasons. Firstly, it ensures that your important data, including photos, videos, contacts, and documents, are securely stored in the cloud. In the event of a lost or damaged device, having a backup allows you to easily restore your data onto a new iPhone. Additionally, iCloud backups enable you to seamlessly transfer your settings, preferences, and app data to a new device, making the transition smoother and more convenient.
FAQ 2: How can I back up my iPhone to iCloud?
To back up your iPhone to iCloud, follow these steps:
1. Ensure that your iPhone is connected to a Wi-Fi network.
2. Open the Settings app on your iPhone.
3. Tap on your iCloud account name at the top of the screen.
4. Select “iCloud” from the list of options.
5. Scroll down and tap on “iCloud Backup”.
6. Finally, tap on “Back Up Now” and wait for the backup process to complete.
FAQ 3: How long does it take to back up an iPhone to iCloud?
The duration of an iPhone backup to iCloud can vary depending on factors such as the size of your data and the speed of your internet connection. Typically, an initial backup may take several minutes to a few hours, especially if you have a large number of photos or videos. Subsequent backups are usually faster as only new or modified data needs to be uploaded. It is advisable to connect your iPhone to Wi-Fi and ensure that it has sufficient battery or is connected to a power source during the backup process.
FAQ 4: Is iCloud backup safe?
Yes, iCloud backup is designed to provide a secure and reliable method of storing your data. Apple uses advanced encryption techniques to protect your information, both during transmission and while it is stored on their servers. Additionally, iCloud backups are stored in multiple data centers, ensuring redundancy and reducing the risk of data loss. However, it is important to use a strong, unique password for your iCloud account and enable two-factor authentication for added security.
FAQ 5: How much iCloud storage do I need for an iPhone backup?
The amount of iCloud storage you need for an iPhone backup depends on the size of your data. By default, Apple provides 5 GB of free iCloud storage for each Apple ID, which may be sufficient for basic backups. However, if you have a large amount of photos, videos, or other files, you may need to purchase additional iCloud storage. Apple offers various storage plans, ranging from 50 GB to 2 TB, which can be easily upgraded from your iPhone’s settings.