
Group texting has become an integral part of our daily communication. Whether you need to plan a gathering with friends, update your colleagues on a project, or simply share exciting news with your loved ones, sending a group text can save you time and effort. If you’re an Android user, you’re in luck because Android devices offer a plethora of options for sending group texts. In this article, we will explore various methods on how to send a group text on Android, ensuring that your messages reach everyone in your intended recipient list seamlessly. From using default messaging apps to utilizing third-party group messaging apps, we’ll cover all the bases. So grab your Android device and let’s dive into the world of group texting.
Inside This Article
- Setting up a group text on Android
- Adding contacts to a group text on Android
- Composing a Group Text on Android
- Sending a Group Text on Android
- Conclusion
- FAQs
Setting up a group text on Android
Sending group texts can be a convenient and efficient way to communicate with multiple contacts simultaneously. If you’re an Android user, you’ll be pleased to know that setting up a group text on your device is a simple and straightforward process. This article will guide you through the steps to create a group, add contacts, and send a group text on your Android device.
To get started, you’ll need to create a group in your messaging app. Here’s how you can do it:
- Open the messaging app on your Android device.
- Tap the three-dot menu icon in the top-right corner of the screen.
- Select “New Group” from the menu options.
- Next, you’ll be prompted to add contacts to your group. You can do this by searching for their names or selecting them from your contact list.
- After adding the desired contacts, tap the checkmark or “Done” button to proceed.
- Finally, give your group a name that accurately represents the purpose or theme of the group conversation.
- Once you’ve named your group, tap “Create Group” to complete the setup process.
Congratulations! You have successfully created a group for your text messages. Now, let’s move on to sending a group text:
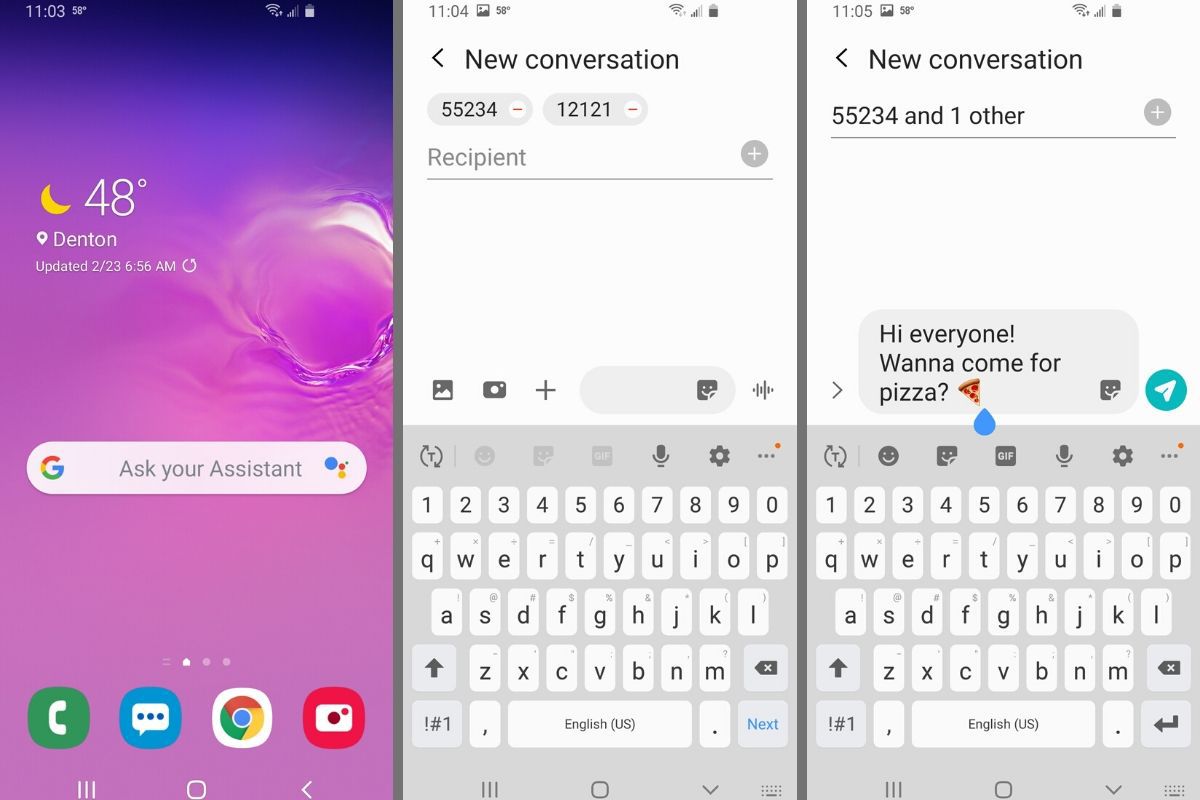
- Open the messaging app on your Android device.
- Tap the new message icon, usually represented by a pencil or a “+” symbol.
- In the recipient field, start typing the name of your group. As you type, the group name will appear in the suggested contacts list.
- Select your group from the suggestions or continue typing until the group name is the only suggestion left.
- You can now compose your message as you would for a regular text.
- Once you’re done, tap the send button to send your group text.
That’s it! You have successfully sent a group text to all the members of your Android group. Now, let’s explore some customization options for your group text:
If you want to customize the way you receive notifications for group texts, you can modify the settings for your messaging app. Here’s how:
- Open the messaging app on your Android device.
- Tap the three-dot menu icon in the top-right corner.
- Select “Settings” from the menu options.
- Look for the “Notifications” or “Notification Settings” tab.
- From there, you can choose to enable or disable group text notifications, change the sound, or adjust other notification preferences according to your preferences.
Additionally, you can enable or disable the “Reply All” feature for your group texts. Enabling this feature allows group members to reply to everyone in the group with a single tap. To manage this setting, follow these steps:
- Open the messaging app on your Android device.
- Tap the three-dot menu icon in the top-right corner.
- Select “Settings” from the menu options.
- Look for the “Group settings” or “Group messaging” tab.
- Here, you can toggle the switch to enable or disable the “Reply All” feature for your group texts.
Finally, it’s important to know how to manage your group text conversations. If you want to view the history of your group messages or remove contacts from the group, follow these steps:
- Open the messaging app on your Android device.
- Find the group conversation you want to manage.
- Tap on the group conversation to open it.
- From here, you can view the entire group message history and scroll through previous conversations.
- To remove a contact from the group, long-press on their name or message bubble and select the “Remove” or “Delete” option.
With these steps, you now have the knowledge to set up and send group texts on your Android device. Whether you’re planning an event, coordinating with a team, or simply staying connected with a group of friends, using group texts can make communication more efficient and convenient. So go ahead, create a group and start sending messages to multiple contacts at once!
Adding contacts to a group text on Android
If you’re looking to send a group text on your Android device, one of the first steps is to add contacts to your group. This allows you to conveniently send messages to multiple recipients at once, saving you time and effort. Here’s how you can easily add contacts to a group text on Android:
- Open your contacts app: Start by navigating to your contacts app on your Android device. This app is often labeled as “Contacts” or “People.”
- Select the desired contact: Scroll through your list of contacts or use the search bar to find the contact you want to add to the group text.
- Open the contact details: Once you’ve located the contact, tap on their name to view their details.
- Add to a group: In the contact details screen, look for an option that says “Add to Group” or something similar. Tap on it to proceed.
- Create or select a group: If you already have existing groups set up, you can select one from the available options. If not, you can create a new group by tapping on the “Create Group” button and giving it a name.
- Save the changes: After selecting the group, make sure to save the changes to add the contact to the group text.
- Repeat for more contacts: If you want to add more contacts to the group text, simply repeat the process for each new contact, selecting the same group you created or selected earlier.
Once you’ve added all the desired contacts to your group text, you’re ready to compose and send your message to the entire group. This streamlined process makes it easy to stay connected with multiple people at once, whether it’s for personal or professional purposes.
Composing a Group Text on Android
Sending a group text message can be a convenient way to communicate with multiple contacts at once on your Android device. Whether you want to plan a meet-up with friends or share important information with your colleagues, composing a group text can save you time and effort. Here are the steps to compose a group text on Android:
- Open the Messaging App: Start by opening the messaging app on your Android device. This can vary depending on the device and the messaging app you are using.
- Create a New Message: Look for the option to create a new message. It is usually represented by a pencil icon or a button labeled “New Message.”
- Add Recipients: Next, you need to add the recipients of your group text. Tap the “To” or “Recipient” field and start typing the names or phone numbers of the contacts you want to include in the group. You can also tap the “+” or “Add” button to search for contacts from your address book.
- Select the Group: If you have already set up a group for your contacts, you can simply type the name of the group in the recipient field, and all the contacts in that group will be added automatically. This saves you the hassle of individually selecting each contact.
- Compose Your Message: Once you have added all the necessary recipients, you can proceed to compose your group text message. Tap the message field and start typing your message. You can include text, emojis, and even attachments like photos or videos. Keep in mind that the character limit for a group text message may vary depending on your messaging app and service provider.
- Send Your Message: After you have composed your group text, double-check the message content for accuracy and clarity. Once you are satisfied, tap the send button, usually an arrow icon, to deliver your message to all the recipients.
That’s it! You have successfully composed a group text message on your Android device. Now you can easily communicate important information or engage in group conversations with multiple contacts at the same time. Keep in mind that the steps may vary slightly depending on the messaging app you are using, but the general process should remain the same.
Sending a Group Text on Android
Sending a group text can be a convenient way to communicate with multiple contacts at once. On Android devices, the process of sending a group text is straightforward. Here’s how you can do it:
- Open your messaging app: The first step is to open your messaging app. Look for the messaging icon on your home screen or app drawer and tap on it to launch the app.
- Start a new message: Once you are in the messaging app, look for the option to start a new message. This is usually represented by a “+” or a pencil icon. Tap on it to begin composing a new message.
- Add recipients: In the recipients field, start typing the name or phone number of the contacts you want to include in the group text. As you type, your phone will suggest matching contacts from your address book. Tap on the contacts to add them to the recipient list.
- Compose your message: With the recipients added, it’s time to compose your message. Tap on the message field and start typing your text. You can also add emojis, pictures, or other media to your message if your messaging app supports it.
- Send the group text: Once you are satisfied with your message, tap on the send button to send the group text. The message will be delivered to all the recipients you added.
It’s important to note that when you send a group text, all the recipients will be able to see each other’s phone numbers and the replies to the group text will be visible to everyone. If you want to send a text message to multiple recipients without revealing their contact information, you can consider using a group messaging service or an instant messaging app that supports group chat functionality.
Sending a group text on Android is a convenient way to communicate with multiple contacts at once. Whether you’re planning an event, coordinating with a work team, or just staying in touch with a group of friends, using the group text feature can save you time and effort.
Conclusion
In conclusion, sending a group text on Android devices is a convenient and efficient way to communicate with multiple people at once. Whether you need to coordinate plans with your friends, update your colleagues on a project, or share exciting news with your family, the group text feature on Android can simplify the process.
By following the steps outlined in this article, you can easily create group conversations, add and remove participants, and send messages that everyone in the group can see. It’s important to remember to respect everyone’s privacy and obtain consent before adding them to a group text.
With the growing popularity of group messaging, Android devices provide a user-friendly platform for managing and engaging in group conversations. So next time you need to communicate with multiple contacts simultaneously, make use of this handy feature on your Android device. Stay connected and streamline your group communication with ease!+
FAQs
Q: Can I send a group text message on Android?
A: Absolutely! Android devices have built-in functionality that allows you to send group text messages to multiple contacts simultaneously.
Q: How do I send a group text on Android?
A: To send a group text on Android, open your messaging app and create a new message. Then, in the “To” field, enter the names or phone numbers of the contacts you want to include in the group. Simply separate each contact with a comma or semi-colon. Write your message and hit send, and your group text will be sent to all the recipients.
Q: Is there a limit to the number of contacts I can add to a group text on Android?
A: The number of contacts you can add to a group text on Android depends on your device and carrier. In most cases, you can add a large number of contacts to a group text, but it’s always a good idea to check your device’s specifications or contact your carrier for any specific limitations.
Q: Can I name my group text on Android?
A: Android allows you to assign a name to your group text, making it easier to identify in your messaging app. To name your group text, open the conversation and tap on the three-dot menu icon. From there, select “People & options” or “Group details,” depending on your device. Then, tap on the group name field and enter the desired name for your group text.
Q: Can I add or remove contacts from a group text on Android?
A: Yes, you can add or remove contacts from a group text on Android even after it has been created. Simply open the group text conversation, tap on the people icon or the “Add members” button, depending on your device. From there, you can select additional contacts to add or remove existing contacts from the group.