
Are you tired of the typical rectangular or square shape of your pictures on your iPhone? If you want to add a unique touch to your images, then cropping them into a circle shape can be a great option. The circular frame adds a visually appealing element and makes the picture stand out from the crowd. But how can you achieve this on your iPhone? In this article, we will guide you through the step-by-step process of cropping a picture into a circle on your iPhone. Whether you want to use the picture for social media profiles or to create a fun effect, we’ve got you covered. So, grab your iPhone and let’s get started on transforming your photos into stunning circular masterpieces!
Inside This Article
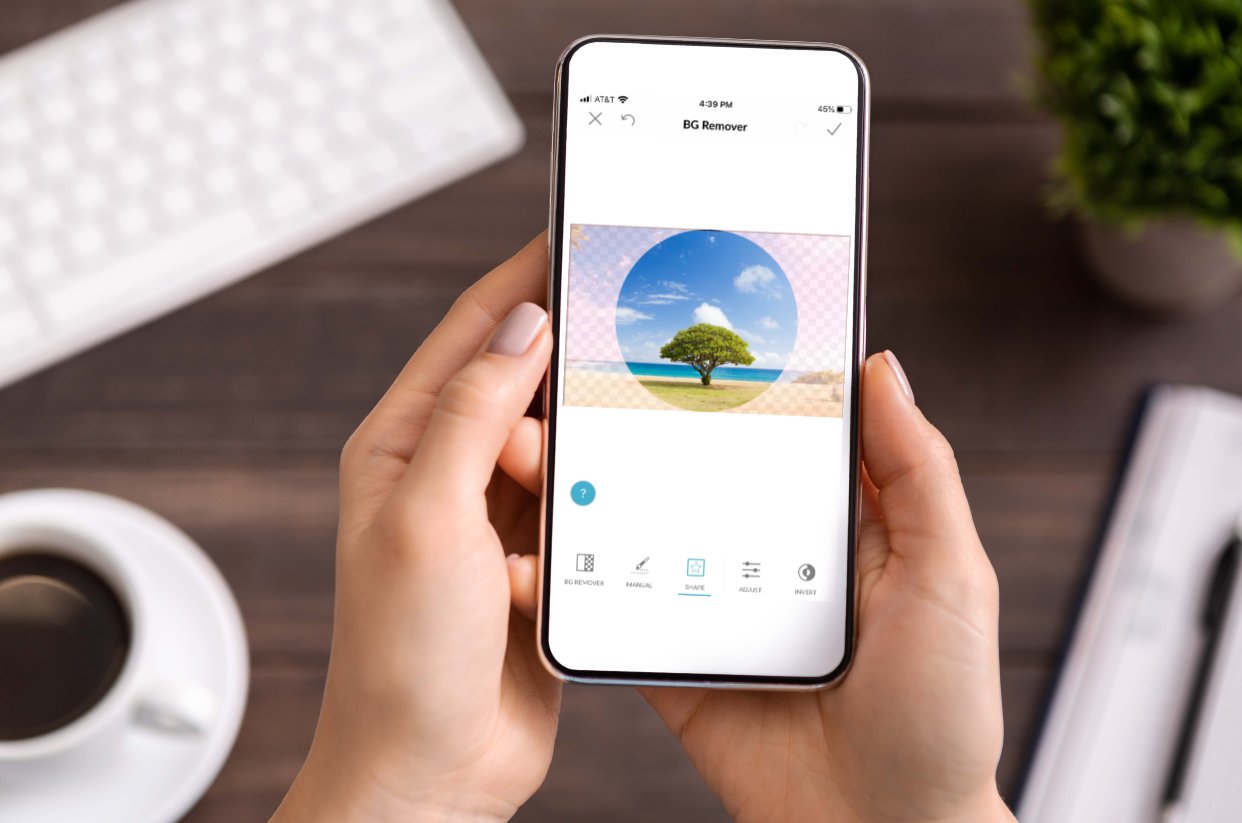
- Methods to Crop a Picture into a Circle on iPhone
- Method 1: Using the Markup Tool in the Photos App
- Method 2: Using Third-Party Apps from the App Store
- Method 3: Using the Clipping Mask Technique in a Graphic Design App – Step 1: Opening a Graphic Design App
- Step 2: Importing the Picture
- Step 3: Creating a Circle Shape
- Step 4: Applying a Clipping Mask to Crop the Picture
- Step 5: Saving the Cropped Picture
- Method 4: Using Online Image Editing Websites
- Conclusion
- FAQs
Methods to Crop a Picture into a Circle on iPhone
Do you want to add a unique touch to your photos by cropping them into a circle shape on your iPhone? Luckily, there are several methods you can use to achieve this. Whether you prefer using built-in tools or third-party apps, we’ve got you covered. In this article, we will explore four different methods to help you crop a picture into a circle on your iPhone.
Method 1: Using the Markup Tool in the Photos App
If you want a quick and easy way to crop a picture into a circle on your iPhone, the Markup tool in the Photos app is a great option. Follow these steps:
- Step 1: Selecting the Picture
Open the Photos app and select the picture you want to crop into a circle. - Step 2: Opening the Markup Tool
Tap the Edit button at the top right corner of the screen, then select the Markup tool (represented by a pen icon). - Step 3: Choosing the Circle Shape
Tap on the “+” symbol to access additional markup options, then select the circle shape. - Step 4: Adjusting the Circle Size
Resize the circle by dragging the handles, ensuring that it encloses the desired portion of your picture. - Step 5: Saving the Cropped Picture
Once you’re satisfied with the result, tap Done and save the cropped picture to your photo library.
Method 2: Using Third-Party Apps from the App Store
If you prefer more advanced editing features, you can use third-party apps from the App Store. Here’s how:
- Step 1: Downloading a Third-Party App
Search for a photo editing app that offers circle cropping functionality. Download and install the app on your iPhone. - Step 2: Opening the App and Importing the Picture
Open the app and import the picture you want to crop into a circle from your photo library. - Step 3: Cropping the Picture into a Circle
Look for the circle crop tool within the app’s editing options. Use this tool to crop your picture into a circle shape. - Step 4: Saving the Cropped Picture
After applying the circle crop, save the modified picture to your photo library or share it directly from the app.
Method 3: Using the Clipping Mask Technique in a Graphic Design App
Graphic design apps offer extensive editing capabilities, including the ability to create a circle-shaped clipping mask. Follow these steps:
- Step 1: Opening a Graphic Design App
Install and open a graphic design app on your iPhone that supports the clipping mask technique. - Step 2: Importing the Picture
Import the picture you want to crop into a circle from your photo library into the graphic design app. - Step 3: Creating a Circle Shape
Use the app’s shape tools to create a perfect circle shape that will serve as the clipping mask. - Step 4: Applying a Clipping Mask to Crop the Picture
Apply the clipping mask to the picture, which will crop it into a circle shape based on the circle shape you created in the previous step. - Step 5: Saving the Cropped Picture
Once the picture is cropped, save it to your photo library or export it in your desired format.
Method 4: Using Online Image Editing Websites
If you prefer to edit your photos online, there are various websites that offer circle cropping tools. Follow these steps:
- Step 1: Accessing an Online Image Editing Website
Open your preferred web browser and visit an online image editing website that offers circle cropping functionality. - Step 2: Uploading the Picture
Upload the picture you want to crop into a circle from your device to the online image editing website. - Step 3: Selecting the Circle Crop Tool
Look for the circle crop tool or the option to crop the picture into a circle shape within the website’s editing tools. - Step 4: Adjusting the Circle Size and Position
Use the website’s interface to adjust the size and position of the circle, ensuring that it encompasses the desired area of your picture. - Step 5: Saving and Downloading the Cropped Picture
Once you’re satisfied with the cropped picture, save it to your device by downloading it from the website.
Now you have several methods at your disposal to crop a picture into a circle on your iPhone. Whether you prefer built-in tools or third-party apps, you can unleash your creativity and add a unique touch to your photos. Try out these methods and enjoy the flexibility of transforming your pictures into captivating circular compositions.
Method 1: Using the Markup Tool in the Photos App
Step 1: Selecting the Picture
To begin cropping a picture into a circle on your iPhone using the Markup tool, open the Photos app and navigate to the desired image. Tap on the picture to select it.
Step 2: Opening the Markup Tool
Once you have selected the picture, tap on the “Edit” button located on the top-right corner of the screen. This will open up a range of editing options including the Markup tool.
Step 3: Choosing the Circle Shape
Within the Markup tool, tap on the (+) sign which will allow you to add different shapes and annotations. Select the “Circle” option from the list of available shapes.
Step 4: Adjusting the Circle Size
With the circle shape selected, you can now adjust its size and position. You can drag the circles on the edges to resize it or pinch in/out with two fingers to make it smaller/bigger.
Step 5: Saving the Cropped Picture
Once you are satisfied with the circle size and positioning, tap on the “Done” button on the top-right corner of the screen. Then, tap on “Save as New Photo” to create a new version of the cropped picture without altering the original image.
Method 2: Using Third-Party Apps from the App Store
If you’re looking for more advanced editing options and greater flexibility in cropping a picture into a circle on iPhone, you can turn to third-party apps available on the App Store. These apps offer specialized tools and features specifically designed for image editing and manipulation. Here’s a step-by-step guide on how to use a third-party app to achieve the desired effect:
Step 1: Downloading a Third-Party App
Begin by visiting the App Store on your iPhone and searching for third-party apps that offer circle cropping functionality. There are many options available, so read user reviews and ratings to find a reliable and highly-rated app that suits your needs. Once you’ve found the app you want, tap on the “Get” or “Download” button to install it on your device.
Step 2: Opening the App and Importing the Picture
Once the app has finished downloading, locate its icon on your home screen and tap to open it. Most third-party apps will provide you with the option to import a picture from your iPhone’s photo library. Tap on the relevant button or icon within the app to access your photo library and select the picture you want to crop into a circle.
Step 3: Cropping the Picture into a Circle
After importing the picture, you’ll typically find a variety of editing tools and options within the app. Look for a specific tool or feature that allows you to crop the picture into a circle. This could be a dedicated circle crop tool, a shape mask tool, or a brush tool that enables you to manually create a circular selection. Use the available tools to carefully outline and crop the picture into a circle.
Step 4: Saving the Cropped Picture
Once you’re satisfied with the circular crop, locate the “Save” or “Export” button within the app. Tap on it to save the cropped picture to your iPhone’s photo library or to the app’s own storage. Some apps may also provide options to directly share the cropped picture on social media platforms or through email. Select the desired saving or sharing option and follow the prompts to complete the process.
Using third-party apps from the App Store can provide you with a multitude of options and creative freedom when it comes to cropping a picture into a circle on your iPhone. Explore the various apps available, experiment with different features, and enjoy transforming your pictures into unique and visually appealing circular compositions.
Method 3: Using the Clipping Mask Technique in a Graphic Design App – Step 1: Opening a Graphic Design App
If you want to achieve a more professional and precise circle crop, you can utilize a graphic design app on your iPhone. These apps provide a wide range of creative tools and features, including the ability to apply a clipping mask for precise cropping. To begin, you’ll need to follow a series of steps.
Step 2: Importing the Picture
Once you have opened the graphic design app of your choice, locate the option to import or add an image. You can either choose an image from your iPhone’s photo library or import one from a cloud storage service. Select the picture you want to crop into a circle and wait for it to load into the app.
Step 3: Creating a Circle Shape
Now that you have imported your picture, it’s time to create a circle shape. In the graphic design app, find the shape tool or the option to draw custom shapes. Choose the circle shape tool and adjust the size and positioning of the circle according to your preferences. Ensure that the circle encompasses the area you want to keep in the final crop.
Step 4: Applying a Clipping Mask to Crop the Picture
With the circle shape created, it’s time to apply a clipping mask to crop the picture. In the graphic design app, locate the option to apply a mask or layer effect. Select the circle shape you created and apply it as a clipping mask to the imported picture. The clipping mask will hide any parts of the picture that fall outside of the circle shape, effectively cropping it into a perfect circle.
Step 5: Saving the Cropped Picture
Once you are satisfied with the crop, it’s important to save the cropped picture. Look for the save or export option within the graphic design app and choose the desired file format (such as JPEG or PNG). Enter a file name and select the save location, whether it’s your iPhone’s photo library or cloud storage. After saving, you will have a perfectly cropped picture in a circular shape.
Method 4: Using Online Image Editing Websites
When it comes to cropping a picture into a circle on your iPhone, using online image editing websites can provide a convenient and user-friendly solution. These websites offer a range of tools and features to help you achieve the desired crop effect. Follow the step-by-step guide below to learn how to use an online image editing website to crop your picture into a circle.
Step 1: Accessing an Online Image Editing Website
First, open a web browser on your iPhone and search for an online image editing website that offers circle cropping functionality. There are several popular websites like Canva, Fotor, and Pixlr that provide this feature.
Step 2: Uploading the Picture
Once you’ve selected an online image editing website, locate the option to upload a picture. This can usually be found in the homepage or main menu of the website. Tap on this option and select the picture you want to crop from your iPhone’s photo library.
Step 3: Selecting the Circle Crop Tool
After uploading the picture, browse through the editing tools provided by the website until you find the circle crop tool. In most cases, it will be represented by an icon of a circle or a circular frame. Tap on this tool to activate it.
Step 4: Adjusting the Circle Size and Position
With the circle crop tool activated, you can now adjust the size and position of the circle on your picture. Use the resizing handles or input numerical values to adjust the diameter of the circle according to your preference. You can also drag the circle to reposition it over the specific area you want to keep.
Step 5: Saving and Downloading the Cropped Picture
Once you are satisfied with the circle crop, look for the option to save or download the edited picture. Online image editing websites usually provide a save or download button located near the editing tools. This will allow you to save and download the cropped picture to your iPhone’s photo library or directly to your device.
By following these steps, you can easily crop a picture into a circle using an online image editing website on your iPhone. This method provides a quick and hassle-free way of achieving the desired crop effect without the need to install any third-party apps.
Conclusion
In conclusion, cropping a picture into a circle on an iPhone is a simple and effective way to enhance your photos and make them stand out. Whether you want to create unique profile pictures, social media posts, or personalized artwork, this technique can add a touch of creativity to your images.
By using either the Markup feature in the Photos app or third-party editing apps, you can easily achieve a circular cropping effect in just a few steps. Remember to experiment with different compositions and sizes to find the perfect balance for your visuals.
With this quick guide, you now have the tools and knowledge necessary to seamlessly crop a picture into a circle on your iPhone. So, go ahead and give it a try! Show off your artistic talent, and let your creativity shine through your circular photos!
FAQs
Q: Can I crop a picture into a circle on my iPhone?
Yes, you can! With the right app or editing tool, you can easily crop a picture into a circle shape on your iPhone.
Q: Which app can I use to crop a picture into a circle shape?
There are several apps available on the App Store that allow you to crop pictures into different shapes, including circles. Some popular options include Adobe Photoshop Express, Canva, and Snapseed.
Q: How do I crop a picture into a circle shape using Adobe Photoshop Express?
To crop a picture into a circle shape using Adobe Photoshop Express, follow these steps:
1. Install Adobe Photoshop Express from the App Store and open the app.
2. Select the picture you want to edit from your photo library.
3. Tap on the Crop icon and choose “Custom” as the aspect ratio.
4. Use your finger to drag the corners of the crop box, making it circular in shape.
5. Tap on the Apply button to save your changes and export the picture.
Q: Is it possible to crop a picture into a circle shape without using any apps?
Yes, if you don’t want to install any additional apps, you can also crop a picture into a circle shape using the Markup feature in the Photos app on your iPhone. Simply open the picture in the Photos app, tap on the Edit button, select the Crop tool, and drag the corners of the crop box into a circular shape. Once you’re done, tap on the Done button to save your changes.
Q: Can I adjust the size and position of the circle when cropping a picture?
Yes, most editing apps and tools allow you to adjust the size and position of the circle when cropping a picture. This gives you the flexibility to customize the shape according to your preference. Simply look for the resize or transform options within the app you are using, and you should be able to modify the circle’s size and position accordingly.