
Are you looking to capture your iPhone screen and create engaging videos or tutorials? Look no further! In this article, we will guide you through the process of recording your iPhone screen effortlessly. Whether it’s a gameplay session, a product demo, or a step-by-step guide, recording your screen can be incredibly useful.
With the increasing popularity of social media platforms like YouTube and TikTok, screen recordings have become a great way to share your expertise, creativity, or simply document your digital experiences. Fortunately, iPhones offer built-in screen recording functionality, making it easy for users to capture high-quality videos directly from their screens.
In the upcoming sections, we will explore different methods to record your iPhone screen, including the native screen recording feature, third-party apps, and tips to ensure the best recording quality. So, grab your iPhone and let’s dive into the world of screen recording!
Inside This Article
- Method 1: Using the built-in screen recording feature
- Method 2: Using third-party screen recording apps
- Method 3: Using QuickTime Player on a Mac
- Conclusion
- FAQs
Method 1: Using the built-in screen recording feature
One of the simplest and most convenient ways to record your iPhone screen is by utilizing the built-in screen recording feature. This feature allows you to capture everything that happens on your device’s screen, including app interactions, gameplay, and more. Best of all, it requires no additional apps or downloads.
To access the built-in screen recording feature, simply follow these steps:
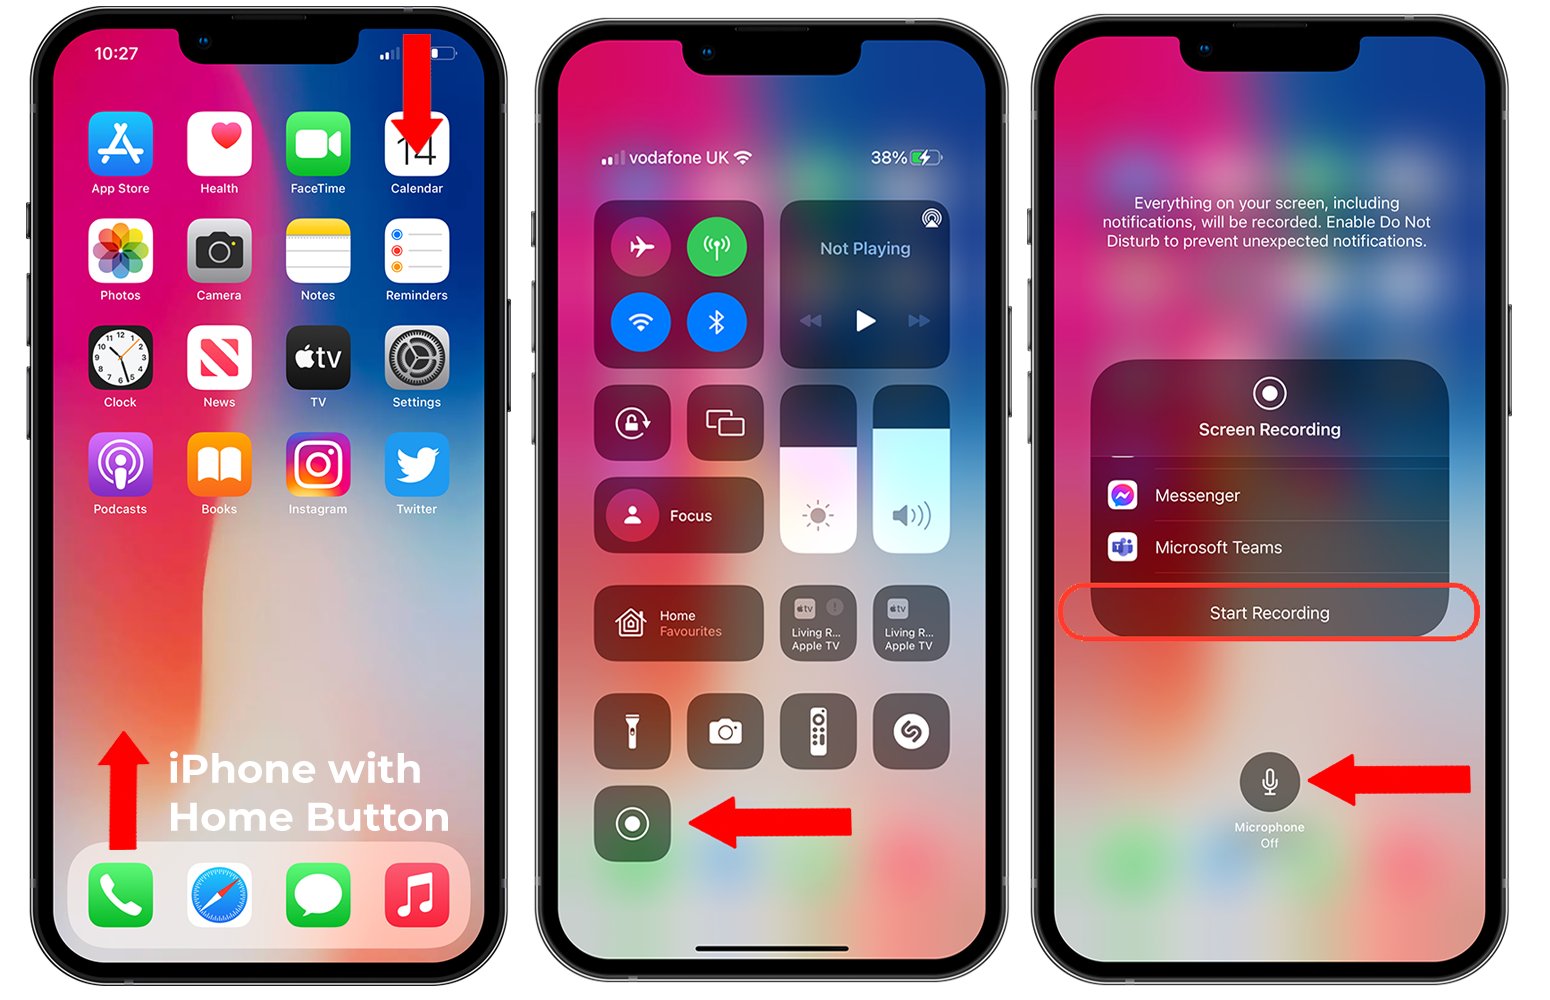
- Open the Control Center on your iPhone by swiping down from the top-right corner (or bottom, depending on your device model).
- Tap the screen recording button, which looks like a circle inside a circle.
- A countdown timer will appear, giving you a few seconds to prepare. After the timer has ended, your screen recording will commence.
- To stop the recording, tap the red status bar at the top of the screen and select “Stop”. Alternatively, you can open the Control Center again and tap the screen recording button once more.
After stopping the recording, the video file will be saved to your Photos app. From there, you can edit, share, or delete the recording as desired.
It’s worth noting that when using the built-in screen recording feature, certain activities may be restricted or blocked. For example, you won’t be able to record copyrighted content such as movies or streaming services. Additionally, some apps may disable the screen recording feature within their own interfaces.
Nevertheless, the built-in screen recording feature is a fantastic option for capturing and sharing various aspects of your iPhone’s screen. It’s a versatile tool that can be used for instructional purposes, troubleshooting, or simply capturing memorable moments. Give it a try and start recording your iPhone screen today!
Method 2: Using third-party screen recording apps
If you’re looking for more advanced and feature-rich options for recording your iPhone screen, third-party screen recording apps are a great solution. These apps provide additional functionalities and flexibility compared to the built-in screen recording feature on your iPhone. Here are a few popular screen recording apps that you can use:
1. AZ Screen Recorder: AZ Screen Recorder is one of the most popular third-party screen recording apps available for iPhone. It offers a simple and intuitive interface, allowing you to easily start and stop screen recordings. With AZ Screen Recorder, you can also customize various settings such as video resolution, frame rate, and audio source. Additionally, it provides features like video editing, live streaming, and sharing options to enhance your recording experience.
2. DU Recorder: DU Recorder is another powerful screen recording app that offers a wide range of features. In addition to recording your iPhone screen, it allows you to capture high-quality videos, edit them, and share them on various platforms. DU Recorder also provides options to customize the video resolution, frame rate, and bit rate to suit your needs. Moreover, it supports both internal and external audio recording, making it ideal for creating tutorial videos or gameplay recordings.
3. ScreenFlow: ScreenFlow is a professional-grade screen recording app that offers advanced features for recording and editing videos on your iPhone. It provides a comprehensive set of tools for capturing high-quality screen recordings, including options to highlight cursor movements, add annotations, and include picture-in-picture video. ScreenFlow also offers a powerful video editing suite, allowing you to trim, crop, and enhance your recordings. With its easy-to-use interface and robust feature set, ScreenFlow is a popular choice among content creators and professionals.
These are just a few examples of the many third-party screen recording apps available for iPhone. Depending on your specific needs, you can explore other options such as AirShou, Vidyo, or Record it! Each app may offer unique features and capabilities, so it’s worth researching and trying out different apps to find the one that suits you best.
Remember to check the app’s compatibility with your iPhone model and iOS version before downloading and installing it. Additionally, pay attention to user reviews, ratings, and the app’s reputation to ensure a reliable and user-friendly experience. Once you have selected and installed a third-party screen recording app, you can start recording your iPhone screen with greater ease and flexibility.
Method 3: Using QuickTime Player on a Mac
If you own a Mac, you have the advantage of using QuickTime Player to record your iPhone screen. QuickTime Player is a versatile media player that comes pre-installed on Mac computers and offers a range of useful features, including screen recording.
Here’s how you can use QuickTime Player to record your iPhone screen:
- Connect your iPhone to your Mac using a lightning cable.
- Open QuickTime Player on your Mac. You can find it in your Applications folder or by searching for it in Spotlight.
- Once QuickTime Player is open, go to the menu bar and click on “File” and then select “New Movie Recording”.
- A new window will appear with a camera icon. Click on the arrow next to the record button and select your iPhone as the camera and microphone source.
- Now, you should see your iPhone screen mirrored on your Mac. If you want to record audio from your iPhone, make sure the volume is turned up on your device.
- To start recording, simply click on the red record button in the QuickTime Player window.
- When you’re done recording, click on the stop button in the menu bar, or you can press the Command (?) + Control (?) + Esc keys on your keyboard.
- Finally, save your recording by going to “File” in the menu bar and selecting “Save”. Choose a location on your Mac to save the file, give it a name, and select the desired format.
Using QuickTime Player on a Mac provides a straightforward and reliable method for recording your iPhone screen. It’s a great option if you already have a Mac and want to take advantage of the built-in software. Keep in mind that QuickTime Player records the screen in a high-quality format, allowing you to capture every detail with precision.
Now that you know how to use QuickTime Player on your Mac to record your iPhone screen, you can easily create instructional videos, capture gameplay, or troubleshoot any issues you may encounter on your device. Take advantage of this convenient feature and unlock a world of possibilities!
Conclusion
In conclusion, recording your iPhone screen can be a valuable tool for various purposes. Whether you want to create engaging content for social media, capture important moments during gameplay, or create educational tutorials, the ability to record your iPhone screen opens up a world of possibilities. With the built-in screen recording feature on iOS devices, you can easily capture high-quality videos without the need for third-party apps or accessories.
By following the simple steps outlined in this article, you can start recording your iPhone screen and share your creations with the world. Remember to optimize your settings for the best recording experience, and consider the storage capacity and battery life of your device. With a little creativity and experimentation, you can unleash the full potential of your iPhone and produce professional-looking videos that will impress your audience.
FAQs
Q: Can I record my iPhone screen without using any third-party apps?
A: Yes, you can. Starting from iOS 11, iPhones have a built-in screen recording feature which allows you to capture your screen without the need for any additional apps.
Q: How do I enable the screen recording feature on my iPhone?
A: To enable screen recording on your iPhone, go to Settings, then Control Center, and tap on the “+” icon next to Screen Recording. This will add the screen recording feature to your Control Center, allowing you to easily access it whenever you need to record your screen.
Q: Can I record both the audio and video on my iPhone screen?
A: Yes, the screen recording feature on iPhones allows you to record both the audio and video. However, please note that if you want to record the audio coming from the device itself (e.g., sounds from apps or games), you need to turn on the microphone audio recording by long-pressing on the screen recording button in the Control Center and selecting “Microphone On”.
Q: How do I start a screen recording on my iPhone?
A: Once you have enabled the screen recording feature in your Control Center, simply swipe up from the bottom of your iPhone screen to access the Control Center. Look for the screen recording button (it looks like a circle within a circle), tap on it, and the recording will begin after a three-second countdown.
Q: Where can I find the screen recording files on my iPhone?
A: After you have finished recording your iPhone screen, the video file will be saved in the Photos app. You can access it by opening the Photos app and going to the “Recents” album. From there, you can edit, share, or delete the recording as desired.