
If you’re a proud owner of a MacBook, you’re probably familiar with its sleek design, impressive performance, and user-friendly interface. But did you know that you can customize your MacBook touchpad settings to enhance your overall user experience? Whether you want to adjust the sensitivity of your touchpad, change the scrolling direction, or enable additional gestures, there are numerous customization options available to suit your personal preferences. In this article, we will explore the various ways you can modify and personalize your MacBook touchpad settings, allowing you to navigate your device with ease and efficiency. So, let’s dive in and discover how to make the most out of your MacBook touchpad!
Inside This Article
- Setting Up the Trackpad
- Customizing Gestures: Navigating with Multitouch Gestures, Configuring Three-Finger Gestures, Customizing Four-Finger Gestures, Enabling and Disabling Swipe Gestures
- Modifying Scrolling Behavior
- Configuring Secondary Click – Enabling Right-click on Mac Trackpad – Customizing Secondary Click Behavior – Activating Click with Two Fingers
- Conclusion
- FAQs
Setting Up the Trackpad
The trackpad on your MacBook is a powerful tool that allows you to navigate and interact with your device effortlessly. By customizing its settings, you can enhance your productivity and make your MacBook experience even more tailored to your preferences.
One of the first steps in setting up your trackpad is to access the Trackpad Preferences. To do this, go to the Apple menu, select System Preferences, and click on the Trackpad icon. Here, you will find a range of options to fine-tune your trackpad’s behavior.
Adjusting the tracking speed is an important aspect of personalizing your trackpad. If you want the cursor to move faster across the screen, you can increase the tracking speed. Conversely, if you prefer a slower cursor movement, you can decrease the tracking speed. Experiment with different speeds until you find the one that feels most comfortable for you.
Enabling tap to click eliminates the need for pressing down on the trackpad physically. Instead, you can simply tap on the trackpad surface to register a click. This feature can be especially beneficial for users who prefer a lighter touch and want to reduce strain on their fingers.
On the other hand, if you find the force click and haptic feedback feature too sensitive or distracting, you have the option to disable it. Force click allows you to perform additional actions by pressing down harder on the trackpad, while haptic feedback provides tactile feedback through vibrations. If these features don’t align with your preferences, you can easily turn them off in the Trackpad Preferences.
Customizing Gestures: Navigating with Multitouch Gestures, Configuring Three-Finger Gestures, Customizing Four-Finger Gestures, Enabling and Disabling Swipe Gestures
One of the standout features of a MacBook is its trackpad, which allows for seamless navigation and interaction with various applications and features. By customizing gestures on your MacBook, you can enhance your productivity and make your user experience even more intuitive and efficient.
When it comes to navigating with multitouch gestures, your MacBook offers a range of options. Whether you want to swipe between full-screen applications, navigate through your browser history, or perform a quick Mission Control gesture, it can all be accomplished with a swipe or pinch on your trackpad.
To configure three-finger gestures, head over to the System Preferences and click on Trackpad. From there, select the “More Gestures” tab, where you will find options such as swiping between pages, swiping between full-screen apps, and accessing Mission Control. You can choose which gestures suit your workflow best and enable or disable them as needed.
For even more gesture customization, you can delve into the world of four-finger gestures. These gestures are particularly useful for power users or those who prefer a more hands-on approach to navigating their MacBook. With four fingers, you can perform actions like switching between desktop spaces, launching Launchpad, and swiping between open applications. Experiment with these gestures and find the ones that align with your workflow.
Swipe gestures provide a quick and efficient way to navigate through different elements on your MacBook. With swipe gestures, you can easily switch between full-screen applications, access the Notification Center, and even navigate through your Safari tabs effortlessly. In the Trackpad settings, you can enable or disable swipe gestures based on your personal preferences.
By customizing gestures on your MacBook, you can unlock a whole new level of productivity and convenience. Take the time to explore the various gesture options available and experiment with different combinations to find what works best for you. Whether it’s navigating between applications, accessing important features, or switching between desktop spaces, gestures offer a seamless way to interact with your MacBook and streamline your workflow.
Modifying Scrolling Behavior
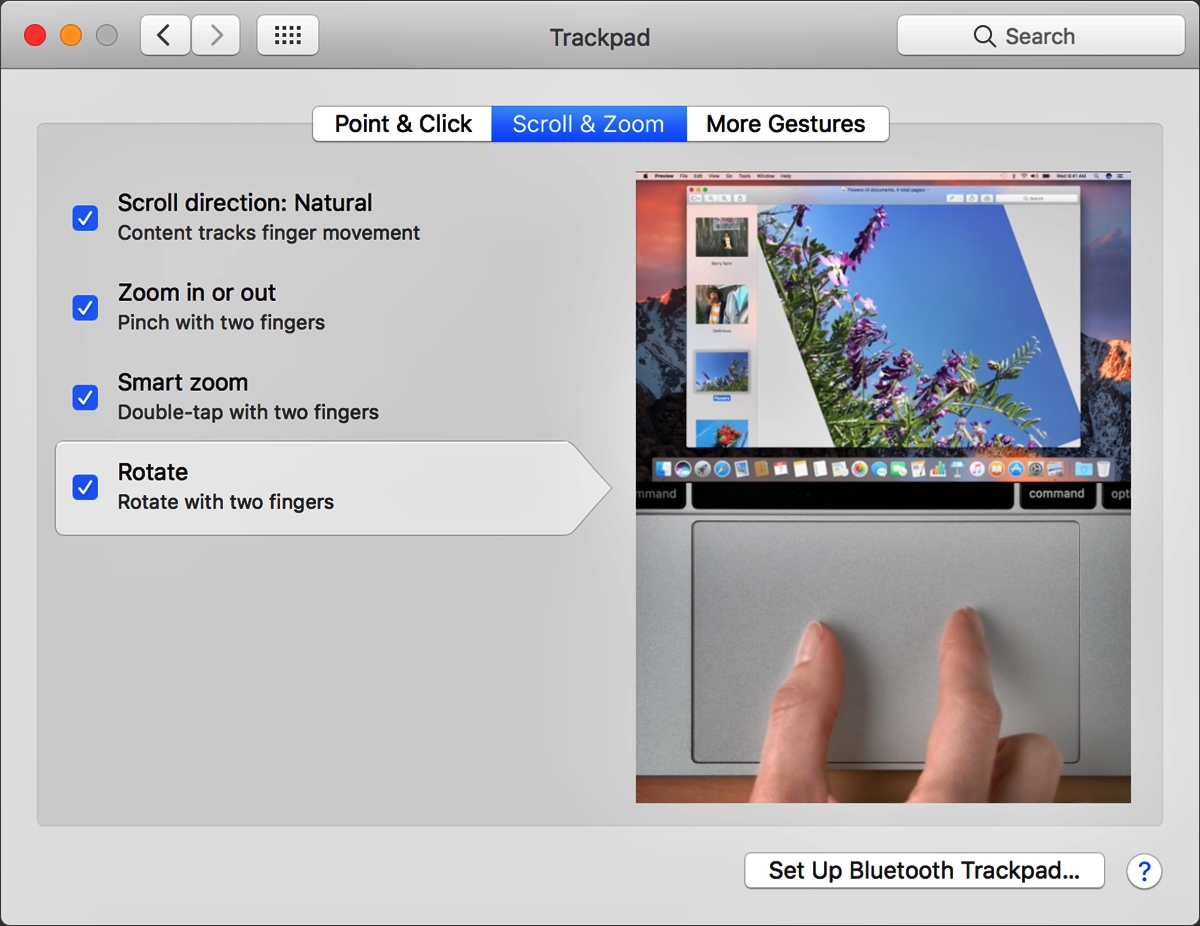
One of the great features of the MacBook touchpad is the ability to customize the scrolling behavior. Whether you prefer a traditional scrolling experience or want to try something different, the MacBook offers several options to modify scroll direction, adjust speed, enable natural scrolling, and disable scroll inertia.
Changing Scroll Direction
By default, the scroll direction on a MacBook touchpad is set to natural scrolling, where swiping up moves the content up and swiping down moves it down, similar to the scrolling on a smartphone or tablet. However, if you prefer the traditional scrolling method where swiping up moves the content down and swiping down moves it up, you can easily change the scroll direction.
Adjusting Scroll Speed
Scroll speed determines how fast the content moves when you swipe up or down on the touchpad. If you find the default scroll speed too slow or too fast for your liking, you can adjust it according to your preference. Increasing the scroll speed will make the content move faster, while decreasing it will make the content move slower.
Enabling Natural Scrolling
Natural scrolling is the default scrolling behavior on a MacBook touchpad. It mimics the scrolling experience on smartphones and tablets, where swiping up moves the content up and swiping down moves it down. This intuitive scrolling method is popular among users who are used to using touch devices. However, if you want to disable natural scrolling and revert to the traditional scrolling method, you can do so in the touchpad settings.
Disabling Scroll Inertia
Scroll inertia is the slight delay between the end of your swipe and the content coming to a complete stop. This feature is designed to mimic the physics of real-world objects and provide a more natural scrolling experience. However, if you find the scroll inertia unnecessary or you prefer a more responsive scrolling experience, you have the option to disable it in the touchpad settings.
Configuring Secondary Click – Enabling Right-click on Mac Trackpad – Customizing Secondary Click Behavior – Activating Click with Two Fingers
Secondary click, also known as right-click, is an essential feature on Mac trackpads that allows you to access context menus and perform additional actions. By default, Mac trackpads are set up to emulate a right-click when you use two fingers to click. However, you can customize the secondary click settings to suit your preferences. In this section, we will explore how to enable right-click, customize its behavior, and activate the click with two fingers.
To enable right-click on your Mac trackpad, follow these steps:
- Open the Apple menu in the top-left corner of your screen.
- Select “System Preferences” from the dropdown menu.
- In the System Preferences window, click on the “Trackpad” icon.
- Navigate to the “Point & Click” tab.
- Find the “Secondary click” option and select the checkbox next to it.
Once you have enabled right-click, you can customize its behavior. Here’s how:
- Go to the “Secondary click” option in the “Trackpad” preferences.
- Click on the dropdown menu next to “Secondary click” to choose the desired behavior.
- You have three options to choose from:
- “Click in the bottom right corner” emulates a traditional right-click.
- “Click in the bottom left corner” swaps the locations of the left and right clicks.
- “Click with two fingers” allows you to perform a right-click by tapping two fingers on the trackpad.
If you prefer to activate the right-click by clicking with two fingers, here’s how you can do it:
- Go to the “Secondary click” option in the “Trackpad” preferences.
- Select the “Click with two fingers” option from the dropdown menu.
Activating the click with two fingers can be a convenient gesture for performing right-click actions quickly and easily.
By customizing your secondary click settings on your Mac trackpad, you can enhance your productivity and streamline your workflow. Experiment with different options to find the configuration that suits you best. Now you’re all set to take full advantage of the secondary click feature on your Mac.
Conclusion
Customizing your MacBook touchpad settings can greatly enhance your productivity and overall user experience. By personalizing the gestures, sensitivity, and functionality of your touchpad, you can tailor it to meet your specific needs and preferences.
Whether you want to navigate through webpages with ease, switch between apps effortlessly, or perform various actions with just a few taps and swipes, the customizable touchpad settings on your MacBook allow you to do it all.
Take the time to explore and experiment with the different options available in the System Preferences and Accessibility settings to find the perfect balance for your touchpad usage.
By customizing your MacBook touchpad settings, you can unlock its full potential and make your daily tasks more efficient and enjoyable. So go ahead, unleash your creativity and tailor your touchpad experience to suit your unique needs.
FAQs
1.
Can I customize the touchpad settings on my MacBook?
Yes, you can customize the touchpad settings on your MacBook to suit your preferences. The macOS operating system offers a range of options for adjusting the sensitivity, gestures, and other aspects of the touchpad. This allows you to optimize your MacBook’s touchpad experience to enhance your productivity and comfort.
2.
How do I access the touchpad settings on my MacBook?
To access the touchpad settings on your MacBook, click on the Apple menu in the top-left corner of the screen and select “System Preferences.” In the System Preferences window, click on “Trackpad” to open the touchpad settings. Here, you can customize various options related to scrolling, cursor movement, gestures, and more.
3.
What are some common touchpad settings that can be customized?
Some common touchpad settings that can be customized on a MacBook include:
- Scrolling direction: You can choose whether to scroll content in the same or opposite direction as your finger movement.
- Tap to click: You can enable or disable the option to register a click when you tap on the touchpad.
- Secondary click: You can configure the touchpad to register a secondary click when you click with two fingers instead of one.
- Swipe gestures: You can enable or disable various swipe gestures, such as swipe between pages or apps, or swipe to switch between full-screen apps.
4.
Can I adjust the sensitivity of my MacBook’s touchpad?
Yes, you can adjust the sensitivity of your MacBook’s touchpad. In the touchpad settings, you will find an option to adjust the tracking speed, allowing you to increase or decrease the cursor movement speed in response to your finger movements. By finding the right balance for your needs, you can ensure smooth and precise control over your cursor.
5.
Are there any third-party apps available for advanced touchpad customization?
While macOS provides extensive touchpad customization options, some users may prefer more advanced customization features. Fortunately, there are third-party apps available, such as BetterTouchTool and MagicPrefs, that offer additional touchpad customization options. These apps allow users to create custom gestures, map keyboard shortcuts to touchpad actions, and perform other advanced touchpad customization tasks.