
Are you an iPhone user who loves capturing life’s precious moments with Live Photos? If so, you’ll be glad to know that you can enhance and edit your Live Photos directly on your iPhone. With its advanced camera capabilities and intuitive editing tools, Apple has made it incredibly easy for users to modify their Live Photos without the need for third-party apps or complicated software.
In this article, we will guide you through the process of editing live photos on your iPhone. Whether you want to apply filters, add effects, adjust the exposure, or crop the image, we’ve got you covered. By the end of this article, you’ll have the knowledge and skills to transform your Live Photos into stunning masterpieces that truly capture the essence of the moment.
Inside This Article
- Overview of Live Photos
- Editing Live Photos on iPhone
- Using the Live Photos Editing Tools
- Sharing Live Photos
- Conclusion
- FAQs
Overview of Live Photos
Live Photos is a feature introduced by Apple on iPhone that brings your photos to life. With Live Photos, your still images are enhanced with a snippet of video footage and audio, capturing the moments just before and after you press the shutter button. This adds a dynamic and immersive element to your photos, giving them a sense of movement and vitality.
When you take a Live Photo on your iPhone, it captures 1.5 seconds of video and audio, resulting in a file that combines both the still image and the short video clip. This seamless integration allows you to relive the magic and emotion of the captured moment.
Live Photos work by using the iPhone’s camera to continuously record video footage before and after you take a photo. The camera captures this footage at a high frame rate, usually around 30 frames per second. When you view a Live Photo, it plays the video clip in a loop, creating a dynamic visual experience that goes beyond a static image.
Live Photos can be taken with the rear-facing camera, front-facing camera, or even through screen recordings. It’s a versatile feature that adds an extra layer of depth and engagement to your photos, making them more captivating and memorable.
Editing Live Photos on iPhone
Live Photos on iPhone bring your pictures to life by capturing a few seconds of audio and motion before and after you press the shutter button. These dynamic images offer a unique way to capture and relive moments, but what if you want to edit them? Fortunately, the iPhone provides a range of editing tools that allow you to enhance your Live Photos and make them even more captivating.
Once you’ve taken a Live Photo, editing it becomes as easy as editing any other image on your iPhone. Simply open the Photos app and select the Live Photo you want to edit. Tap on the “Edit” button located at the top right corner of the screen, and you’re ready to begin.
The editing options for Live Photos are similar to those for regular photos. You can adjust the lighting and colors, crop the image, apply filters, and even add effects. The difference is that Live Photos also allow you to control the playback settings, enabling you to choose the exact moment that you want to highlight as the key frame.
One of the standout editing features for Live Photos is the ability to apply effects such as “Loop,” “Bounce,” and “Long Exposure.” Loop creates a continuous looped video, Bounce creates a back-and-forth motion, and Long Exposure produces a stunning photo with motion blur. These effects add a dynamic and artistic touch to your Live Photos.
When editing Live Photos, it’s important to remember that the changes you make are non-destructive. This means that you can always revert back to the original Live Photo if you’re not satisfied with the edits. Simply tap on “Revert” and your Live Photo will be restored to its original form.
Once you’ve finished editing your Live Photo, you can save the changes by tapping on “Done.” The edited Live Photo will be stored in your Photos app, alongside the original version. You can easily differentiate between them by looking for the “LIVE” text on the top left corner of the thumbnail.
Now that you know how to edit Live Photos on your iPhone, it’s time to unleash your creativity and transform your static images into captivating moments that truly come to life. Don’t be afraid to experiment with the various editing tools and effects to add a personal touch to your Live Photos.
Using the Live Photos Editing Tools
Editing Live Photos on your iPhone is a breeze with the built-in editing tools. These tools allow you to enhance your Live Photos by adjusting various aspects such as brightness, contrast, and saturation. Here’s how you can make the most of the editing tools:
1. Open the Live Photo you want to edit: Launch the Photos app on your iPhone and navigate to the Live Photo you wish to edit. Tap on the photo to open it in full screen.
2. Tap on the Edit button: Once the Live Photo is open, look for the Edit button on the top right corner of the screen. Tap on it to enter the editing mode.
3. Use the editing tools: The editing tools will appear at the bottom of the screen. These tools include:
- Adjustments: This tool allows you to tweak the brightness, contrast, saturation, and other parameters to enhance the overall look of your Live Photo. Simply slide the adjustment sliders left or right to achieve the desired effect.
- Filters: Apply pre-set filters to give your Live Photo a different mood or style. Experiment with different filters to find the one that best complements your photo.
- Crop & Rotate: If needed, you can crop your Live Photo to remove unwanted elements or adjust its composition. You can also rotate the photo to a different orientation.
- Markup: Add text, drawings, or other annotations to your Live Photo using the markup tools. This is particularly useful if you want to highlight a specific detail or personalize the photo.
- Brilliance: The brilliance tool helps in enhancing the overall dynamic range of your Live Photo. It intelligently adjusts shadows and highlights to make the photo more vibrant and detailed.
- Red-eye: If your Live Photo contains any instances of red-eye, you can use this tool to remove them and make the eyes look natural.
4. Preview and save your changes: After making the desired edits, tap on the Done button to preview your changes. If you’re satisfied with the edits, tap on Save to apply them to your Live Photo. Otherwise, you can tap on Revert to discard the changes and revert back to the original photo.
5. Enjoy your edited Live Photo: Once you’ve saved the edits, your Live Photo will be updated with the changes you made. You can now view and share the edited Live Photo with your friends and family.
With these powerful editing tools at your disposal, you can easily transform your Live Photos into stunning masterpieces right from your iPhone. Experiment with different adjustments, filters, and effects to create captivating images that truly come to life.
Sharing Live Photos
Once you’ve edited your Live Photos to perfection, it’s time to share them with the world. Here are some ways you can easily share your Live Photos on your iPhone:
1. Share via Messages: Tap on the Messages app and open a conversation. Tap the camera icon to access your photos library. Locate the Live Photo you want to share and tap on it. You can add a message or caption if desired and then hit the send button. The recipient will receive the Live Photo, and they can view the animated image by pressing and holding on it.
2. Share on Social Media: Open the Photos app and select the Live Photo you want to share. Tap the share button (the square with an upward arrow) and choose the social media platform you wish to share on, such as Instagram, Facebook, or Twitter. Add any necessary captions or tags, and then hit the post button. Your Live Photo will be shared as an animated image on your chosen social media platform.
3. Share via AirDrop: With AirDrop, you can share your Live Photos wirelessly with other Apple devices nearby. Open the Photos app and select the Live Photo you want to share. Tap the share button and choose the AirDrop option. You will see a list of nearby Apple devices. Tap on the device you want to send the Live Photo to, and the recipient will receive the image as a Live Photo that they can view on their device.
4. Share as a GIF: If you want to share your Live Photo as a GIF, there are several apps available on the App Store that can help you convert it. Simply search for “Live Photo to GIF” and choose one that suits your needs. These apps allow you to convert your Live Photo into a GIF format that can be easily shared via messaging apps or social media.
Sharing your Live Photos allows you to bring moments to life and share the emotions and actions captured in the animated images. Whether it’s through messaging apps, social media platforms, or wirelessly with AirDrop, there are plenty of ways to share the magic of Live Photos with others.
Conclusion
In conclusion, editing Live Photos on your iPhone is a simple and fun way to bring your images to life. With the built-in editing tools available in the Photos app, you can easily enhance your Live Photos by applying filters, cropping, adjusting exposure, and adding effects.
By following the steps outlined in this guide, you can unleash your creativity and create stunning visuals that capture the essence of the moment. Whether you want to add a pop of color, create dramatic lighting, or crop out unwanted elements, the editing options are endless.
So, next time you capture a Live Photo on your iPhone, don’t forget to explore the editing tools and bring your memories to life. Experiment with different effects, adjust the settings to your liking, and let your photos tell a story.
Remember, editing Live Photos is about engaging with your images on a deeper level, transforming a still moment into a dynamic snapshot of time. Embrace the power of editing and unlock the full potential of your Live Photos!
FAQs
1. Can I edit Live Photos on my iPhone?
Yes, you can edit Live Photos on your iPhone using the built-in Photos app. It offers various tools and features to enhance your Live Photos and make them even more memorable.
2. How do I edit Live Photos on my iPhone?
To edit Live Photos on your iPhone, follow these steps:
- Open the Photos app and locate the Live Photo you want to edit.
- Tap the photo to open it.
- Swipe up on the photo to reveal the editing options.
- Choose from a variety of editing tools such as crop, filters, adjustments, and more.
- Once you’re done editing, tap “Done” to save your changes.
3. Can I add effects or filters to Live Photos?
Yes, you can add effects and filters to Live Photos on your iPhone. After opening the Live Photo in the Photos app, swipe up to access the editing options. From there, you can choose from a range of predefined filters or apply various effects to enhance your Live Photo’s appearance.
4. Is it possible to trim a Live Photo on the iPhone?
Absolutely! Trimming a Live Photo on your iPhone is simple. Just follow these steps:
- Open the Photos app and select the Live Photo you want to trim.
- Tap on the Live Photo to open it.
- Swipe up to see the editing tools.
- Tap on the crop icon.
- Drag the sliders to select the specific portion of the Live Photo you want to keep.
- Tap “Done” to save the trimmed version of your Live Photo.
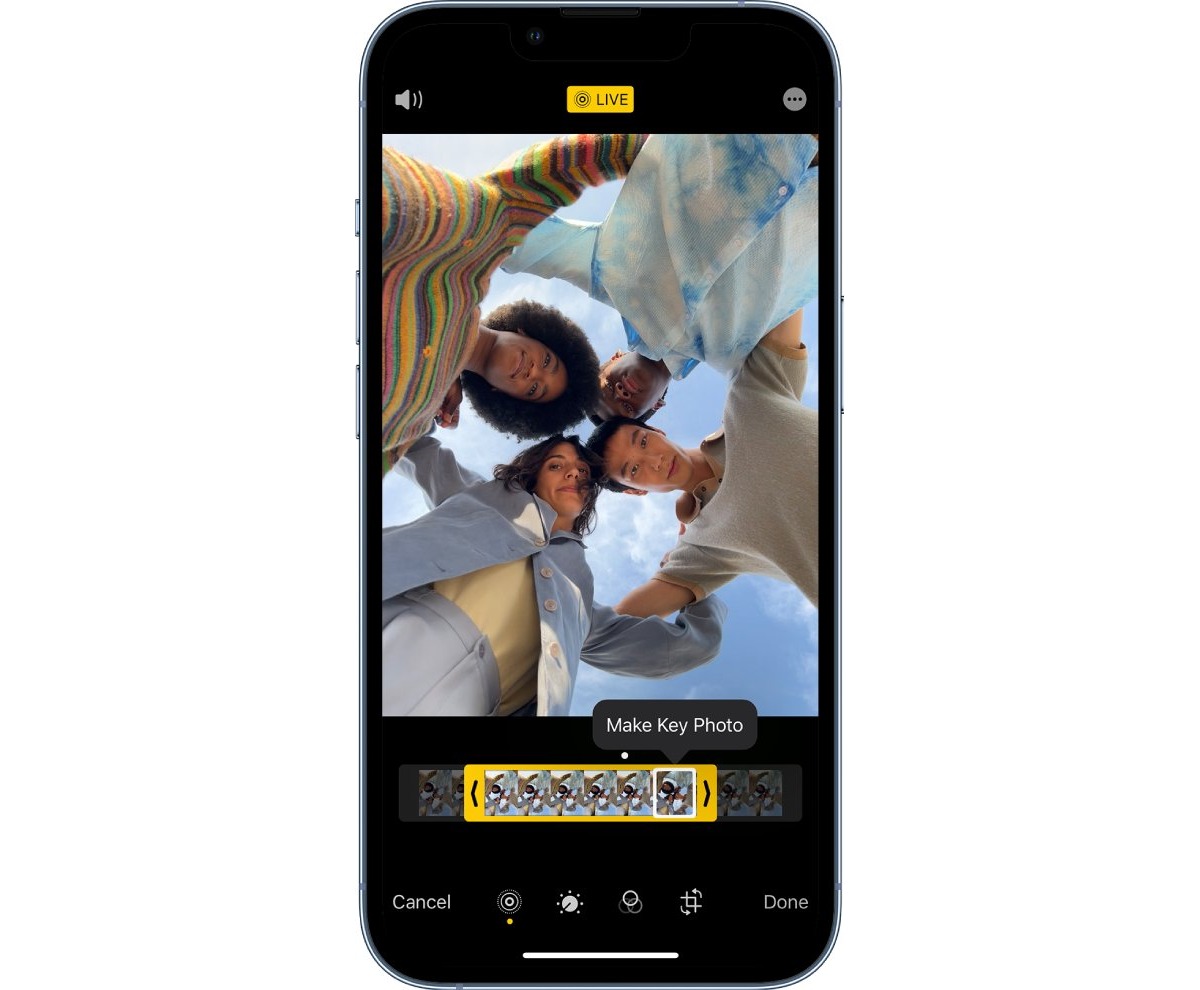
5. Can I change the key photo for a Live Photo?
Certainly! You can change the key photo for a Live Photo on your iPhone. Here’s how you can do it:
- Open the Photos app and select the Live Photo you want to change the key photo for.
- Tap on the Live Photo to open it.
- Swipe up to reveal the editing options.
- Scroll through the frames until you find the desired frame to set as the key photo.
- Tap “Make Key Photo” to set the selected frame as the new key photo for the Live Photo.