
In today’s digital age, smartphones have become an integral part of our lives, and the iPhone stands tall as one of the most popular and sophisticated devices on the market. With its high-quality camera and sleek design, the iPhone makes it easy to capture those precious moments in the form of pictures. But what happens when you want to share those pictures with your friends, family, or colleagues via email? That’s where this comprehensive guide comes in. In this article, we will explain step-by-step how to email pictures directly from your iPhone. Whether you want to send a single photo or multiple images, we’ve got you covered. Say goodbye to clunky file transfers or struggling to find a reliable method to share your photos. So, take out your iPhone and let’s dive into the world of emailing pictures effortlessly.
Inside This Article
- Step 1: Compose a New Email
- Step 2: Attach Photos to the Email
- Step 3: Enter Recipient’s Email Address
- Step 4: Write a Subject and Message
- Step 5: Send the Email
- Troubleshooting Tips
- Additional Considerations
- Conclusion
- FAQs
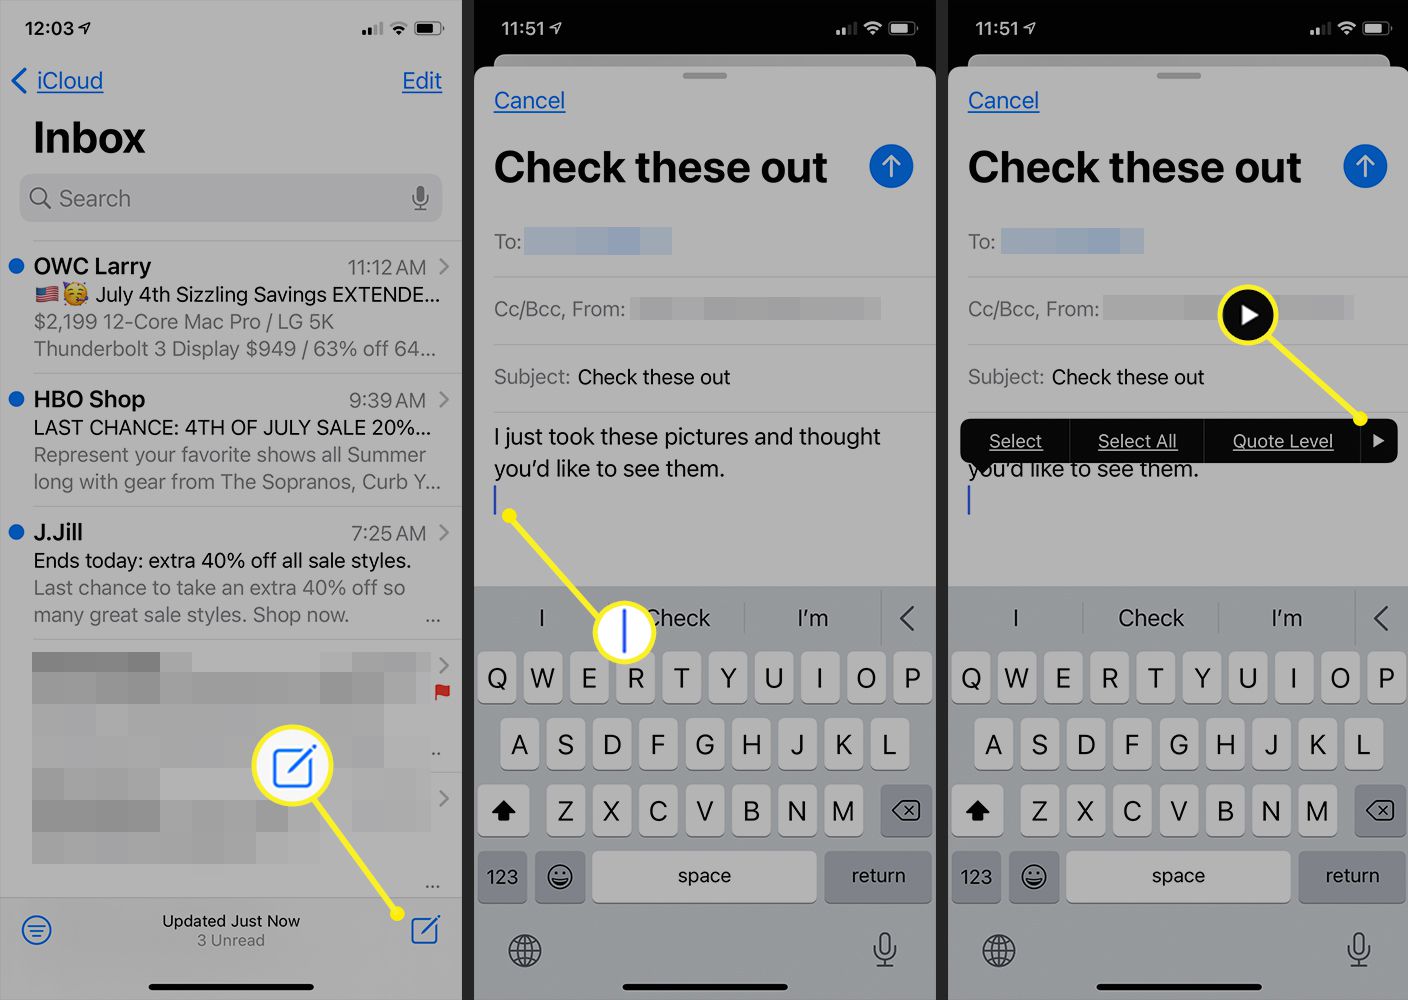
Step 1: Compose a New Email
Sending pictures from your iPhone via email is a convenient way to share your cherished memories with friends and family. To get started, follow these simple steps:
1. Open the Mail app on your iPhone. It’s represented by an envelope icon and is usually found on the home screen or in the app drawer.
2. Tap on the “Compose” button, which is typically located in the bottom right corner of the app.
3. A new email window will appear, prompting you to enter the recipient’s email address. You can type in the email address manually, or if the person is in your contact list, start typing their name, and your iPhone will suggest their email address.
4. If you want to send the email to multiple recipients, simply separate each email address with a comma.
5. Next, move on to the subject line. This is where you can give your email a brief title or summary. Make it descriptive yet concise, so the recipient knows what the email contains.
6. Now it’s time to write your message. Use this space to include any context or personal message you want to convey along with the pictures. Be creative and make your email engaging!
7. Double-check everything before proceeding. Ensure the recipient’s email address is correct, the subject line captures the essence of the email, and your message is well-written.
8. Once you’re satisfied with the email content, it’s time to attach the pictures. Let’s move on to the next step to learn how to do this.
Step 2: Attach Photos to the Email
Once you’ve composed a new email on your iPhone, the next step is to attach the photos you want to send. Fortunately, iOS makes this process simple and straightforward. Just follow these easy steps:
-
Tap on the body of the email where you want to insert the photo. This will bring up the editing options.
-
Tap on the “+” icon in the editing options. This will display a drop-down menu.
-
From the drop-down menu, select “Insert Photo or Video.” This will open your Photos app.
-
Browse through your photo albums and tap on the photo(s) you want to attach to the email. You can select multiple photos by tapping on each one. You’ll see a checkmark on the selected photos.
-
Once you’ve selected all the photos you want to attach, tap on the “Choose” button.
-
The selected photos will now be embedded in the email.
It’s important to note that the actual process of attaching photos to an email may vary slightly depending on the email client you’re using. However, the basic steps outlined above should apply to most email apps on iPhones.
Once you’ve successfully attached the photos, you can proceed to the next step of entering the recipient’s email address.
Step 3: Enter Recipient’s Email Address
Once you have attached the desired photos to the email, the next step is to enter the recipient’s email address. This is where you indicate who will receive the email with the attached pictures. Follow these simple steps to easily enter the email address on your iPhone:
1. After composing a new email and attaching the photos, tap on the “To” field. This will bring up the keyboard and allow you to enter the email address.
2. Begin typing the email address of the recipient. As you type, the iPhone will suggest matching email addresses from your contacts and previous email history. This makes it convenient as you can simply tap on the suggestion to enter the email address without typing the full thing.
3. You can also manually type in the email address if it’s not in your contacts or suggestions. Be careful to ensure accuracy while entering the address to avoid any delivery issues.
4. If you are sending the email to multiple recipients, separate each email address with a comma or tap on the “+” button to add recipients from your contacts.
5. Once you have entered the email address(es), double-check for any errors or typos. It’s important to verify that the addresses are correct to ensure the photos are sent to the intended recipients.
6. After confirming the recipient’s email address, you can proceed to the next step of writing a subject and message for the email.
Entering the recipient’s email address correctly is crucial to ensure that your pictures reach the intended recipients without any issues. By following these steps, you can successfully enter the email address on your iPhone and move on to the next steps of sending the email.
Step 4: Write a Subject and Message
Once you have attached the photos to your email, it’s time to craft a compelling subject line and compose a message to accompany your pictures. The subject line is the first thing that recipients will see, so it’s important to make it descriptive and engaging. This will increase the likelihood that your email will be opened and the images will be viewed.
When writing the subject line, consider including relevant keywords that describe the content of the photos. For example, if you’re sharing vacation pictures, you could use a subject line like “Memories from our Tropical Getaway” or “Highlights from our European Adventure.” This will give recipients a preview of what they can expect when they open your email.
In addition to the subject line, it’s a good idea to include a brief message with your photos. This can be a simple greeting or a more detailed explanation of the pictures. Feel free to add a personal touch and share any interesting anecdotes or memories related to the photos.
To make your message more visually appealing, you can use formatting options such as bold or italic text to emphasize certain points or highlight key details. This can help draw the recipient’s attention and make your email more engaging.
Remember to keep your message concise and to the point. Long paragraphs can be overwhelming for the recipient, so try to break up the text into smaller, digestible chunks. You can also use bullet points or numbered lists to organize your message and make it easier to read.
Before sending the email, take a moment to proofread your subject line and message. Check for any spelling or grammar errors to ensure that your email appears professional and polished. It’s also a good idea to read through the message one more time to make sure that it conveys the desired tone and captures the essence of the photos you are sharing.
Once you are satisfied with the subject line and message, you’re ready to send your email and share your pictures with others. Sending a well-crafted email will not only showcase your photos in the best light but also leave a positive impression on the recipients.
Step 5: Send the Email
After composing your email, attaching photos, and writing a subject and message, it’s time to send the email from your iPhone. Sending an email is a straightforward process that can be completed in just a few simple steps.
1. Double-check your email: Before hitting the send button, take a moment to review your email. Make sure that you have attached all the desired photos, and that the subject and message are accurate and complete.
2. Tap the Send button: On the email screen, look for the send button, usually represented by an arrow pointing upwards or a paper airplane icon. Tap this button to send your email.
3. Wait for the email to be sent: Once you tap send, your iPhone will begin the process of sending the email. Depending on the size of the attached photos and your internet connection speed, this process may take a few seconds to a few minutes. Be patient and allow your iPhone to complete the sending process.
4. Check the Sent folder: After the email has been sent, you may want to verify that it was successfully delivered. To do this, open your email app and navigate to the Sent folder. Look for the email you just sent and confirm that it appears in the sent folder. This will indicate that the email was sent successfully.
5. Confirm delivery with the recipient: If you want to be absolutely certain that your email was received by the recipient, you can reach out and ask them to confirm. Alternatively, you can also check your sent email’s “Read Receipts” if the feature is enabled. This will provide you with a notification once the recipient has opened the email.
That’s it! By following these simple steps, you can easily send an email with pictures from your iPhone. Whether you’re sharing vacation photos with friends or sending important documents, your iPhone makes it quick and convenient to send emails on the go.
Troubleshooting Tips
If you encounter any issues while trying to email pictures from your iPhone, don’t worry! Here are some troubleshooting tips to help you resolve common problems:
1. Check your internet connection: Make sure your iPhone is connected to a stable and reliable Wi-Fi or cellular network. A weak signal or a disconnected network can cause email sending issues.
2. Restart the Mail app: Sometimes, restarting the Mail app can solve temporary glitches or bugs. Simply close the app completely and then reopen it to see if the problem persists.
3. Clear storage space on your iPhone: Insufficient storage space can prevent your iPhone from sending emails with attachments. Delete any unnecessary files, apps, or photos to free up space and try sending the email again.
4. Update your iOS: Outdated software can cause compatibility issues with email services. Go to “Settings” > “General” > “Software Update” on your iPhone to check if there are any available updates. If so, install them and try sending the email again.
5. Verify email settings: Double-check your email account settings to ensure they are configured correctly. Go to “Settings” > “Mail” > “Accounts” on your iPhone and select the email account you are using. Verify the incoming and outgoing server settings and make any necessary changes.
6. Disable email restrictions: If you have enabled any restrictive settings or security measures for your email account, such as two-factor authentication, app-specific passwords, or email forwarding restrictions, try disabling them temporarily to see if it resolves the issue.
7. Contact your email service provider: If none of the above troubleshooting tips work, it may be an issue with your specific email service. Reach out to your email service provider’s customer support for further assistance and guidance.
By following these troubleshooting tips, you should be able to overcome any obstacles you encounter while trying to email pictures from your iPhone. Remember to double-check your settings, internet connection, and device storage to ensure a seamless and successful sending experience.
Additional Considerations
When it comes to emailing pictures from your iPhone, there are a few additional considerations you should keep in mind to ensure a seamless experience. Let’s take a look at some of these important aspects:
1. File Size: Keep in mind that email services usually have limitations on the file size you can send. Large image files can take a long time to upload and may fail to send altogether. It’s a good idea to resize your pictures before attaching them to the email to reduce the file size and increase the chances of successful delivery.
2. Cellular Data Usage: Sending emails with picture attachments can consume a significant amount of cellular data. If you are not connected to Wi-Fi, be mindful of your data usage to avoid exceeding your monthly allowance. Consider reducing the size of the images or connecting to a Wi-Fi network before sending the email.
3. Photo Quality: The quality of the photos you send can impact the recipient’s experience. If you want to preserve the image quality, ensure that your iPhone camera settings are optimized for high-resolution photos. This will help ensure that the photos retain their clarity when viewed on larger screens.
4. Privacy and Security: It’s important to be cautious about the privacy and security of the photos you send via email. Avoid sending sensitive or personal images through email, especially if the connection is not secure. Consider using a file-sharing service or encrypting the email if you need to send confidential or private photos.
5. Email Service Limitations: Different email service providers may have varying limitations on the number and size of attachments they allow. Make sure to familiarize yourself with the specific limitations of your email service to avoid any unexpected issues or rejected emails. You can usually find this information on the email provider’s website or support documentation.
By considering these factors, you can ensure that your emailed pictures are sent smoothly and provide the best possible viewing experience for the recipients.
Conclusion
In conclusion, emailing pictures from your iPhone is a simple and convenient way to share your captured moments with others. With just a few taps, you can easily attach and send your favorite photos right from your device. Whether you want to send them to friends and family, share them on social media, or even send them for professional purposes, the iPhone makes it effortless.
Remember to follow the steps outlined in this article to ensure a smooth and successful email sending experience. From selecting the images to composing the email and adding recipients, each step is crucial to sending your pictures without any hassle. By utilizing the built-in Mail app on your iPhone, you can take full advantage of its features and make your photo sharing experience truly seamless.
So, the next time you want to share a breathtaking sunset or a funny snapshot, don’t hesitate to use your iPhone to email pictures. It’s a convenient and effective way to spread joy and memories with the touch of a button.
FAQs
1. Can I email pictures directly from my iPhone?
Yes, absolutely! The iPhone offers a seamless and straightforward way to email pictures directly from your device. With just a few taps, you can easily share your favorite snapshots with friends, family, or colleagues.
2. How do I email a picture from my iPhone?
To email a picture from your iPhone, follow these simple steps:
- Open the Photos app on your iPhone.
- Select the picture you want to email by tapping on it.
- Tap the share icon, typically represented by a box with an arrow pointing upwards.
- Choose the “Mail” option from the list of available sharing methods.
- Compose your email, adding the recipient’s email address, subject, and any additional message you want to include.
- Tap the send button to send the email with the picture attached.
3. Can I send multiple pictures in the same email?
Yes, you can send multiple pictures in the same email from your iPhone. Here’s how:
- Open the Photos app and go to the album or folder where your pictures are located.
- Tap the “Select” button to choose multiple pictures.
- Once you’ve selected all the pictures you want to include, tap the share icon.
- Select the “Mail” option to start composing an email with the selected pictures attached.
- Complete the email details and send it as usual.
4. How can I reduce the file size of my pictures before emailing them from my iPhone?
If you want to reduce the file size of your pictures before emailing them from your iPhone, you can enable the “Optimize iPhone Storage” option in your device settings. Here’s how:
- Go to Settings on your iPhone.
- Scroll down and tap on “Photos.”
- Under the “Photos” section, select “Optimize iPhone Storage.”
Enabling this option will automatically store lower-resolution versions of your pictures on your iPhone, while the full-resolution versions will be available in iCloud. This helps reduce the file size of your pictures, making them easier to email.
5. Are there any size limitations when emailing pictures from an iPhone?
Yes, there are size limitations when emailing pictures from an iPhone. Most email providers have a maximum attachment size limit, typically ranging from 25 MB to 35 MB. If your picture exceeds this limit, you may encounter issues while sending the email. In such cases, you can consider reducing the file size of the picture or using cloud storage services to share large files.