
Welcome to our comprehensive guide on how to empty the trash on your iPhone. If you’re like most iPhone users, you probably accumulate a lot of digital clutter over time, including deleted photos, videos, emails, and other documents. While deleting items from your phone is a straightforward process, finding where they go after deletion can be a bit confusing. That’s where the trash or recycle bin comes in.
Similar to how a physical trash bin works, the trash on your iPhone acts as a temporary storage space for deleted items. It provides a safety net in case you accidentally delete something important and want to recover it. However, if left unchecked, the trash can consume unnecessary storage space on your device. In this article, we’ll walk you through step-by-step instructions on how to locate and empty the trash on your iPhone, freeing up valuable storage and keeping your device running smoothly.
Inside This Article
- Understanding the Trash on iPhone
- Step-by-Step Guide to Empty Trash on iPhone
- Managing Trash Settings on iPhone
- Recovering Deleted Items from Trash on iPhone
- Conclusion
- FAQs
Understanding the Trash on iPhone
Have you ever accidentally deleted a photo or document on your iPhone and realized that you need it back? That’s where the Trash feature comes in handy. Similar to the Recycle Bin on your computer, the Trash on iPhone is a temporary storage space for deleted items. When you delete a file or photo on your iPhone, it gets moved to the Trash folder instead of being permanently deleted.
The Trash on iPhone is designed to give you a second chance to recover items that you may have mistakenly deleted. It acts as a safety net, ensuring that important files and photos aren’t lost forever with a single tap. This feature provides peace of mind, allowing you to retrieve deleted items within a certain timeframe before they are permanently erased.
It’s important to note that not all apps on your iPhone have this Trash feature. The availability of the Trash folder depends on the app you are using. Some apps automatically move deleted items to the Trash, while others may not have a Trash folder at all. Familiarizing yourself with the Trash function within different apps can help you better manage your deleted items.
The Trash feature on iPhone also aids in saving storage space on your device. Rather than immediately deleting files or photos and taking up precious storage, they are temporarily stored in the Trash folder. This gives you time to review the contents of the Trash and decide which items you want to permanently remove.
Now that you have a basic understanding of the Trash on iPhone, let’s move on to the next section to learn how to empty the Trash and recover deleted items.
Step-by-Step Guide to Empty Trash on iPhone
Emptying the trash on your iPhone is a straightforward process. Follow these step-by-step instructions to clear out your trash and reclaim valuable storage space:
- Open the Photos app: Locate and tap on the Photos app icon on your iPhone’s home screen.
- Access the Albums tab: At the bottom of the screen, you will see several tabs. Tap on the “Albums” tab to view your photo albums.
- Locate the “Recently Deleted” album: Scroll down until you find the “Recently Deleted” album and tap on it.
- Select the photos or videos to delete: Inside the “Recently Deleted” album, you will see a collection of recently deleted items. Tap “Select” in the top-right corner to choose the specific items you want to delete.
- Delete the selected items: Once you have selected the photos or videos, tap the trash can icon at the bottom-right corner of the screen.
- Confirm the deletion: A pop-up message will appear asking if you want to delete the selected items permanently. Tap “Delete N Photos” (N represents the number of selected items) to confirm.
- Empty the Recently Deleted folder: Lastly, to free up storage space, you need to empty the “Recently Deleted” folder. Tap on “Select” in the top-right corner, then tap on “Delete All” at the bottom-left corner of the screen.
- Confirm the permanent deletion: A final pop-up message will appear, warning you that the action is irreversible. Tap “Delete N Photos” to complete the process.
It’s important to note that deleting items from the trash will permanently remove them from your device, and they cannot be recovered. Make sure to carefully review and select only the items you want to delete to avoid losing any valuable memories.
Managing Trash Settings on iPhone
Managing the trash settings on your iPhone can help you customize how long items stay in the trash before being permanently deleted. By adjusting these settings, you can have greater control over the storage space on your device.
To manage trash settings on your iPhone:
- Go to the “Settings” app on your iPhone.
- Scroll down and tap on “Mail” or “Mail, Contacts, Calendars,” depending on your iOS version.
- Select your email account for which you want to manage the trash settings.
- Under the “Mailbox Behaviors” section, tap on the “Trash” option.
- Here, you will find the option to adjust the time period before deleted items are permanently removed.
- Choose the desired time interval from the available options, such as “One day,” “One week,” “One month,” or “Never.”
- Close the settings app, and your changes will be saved.
By customizing the trash settings, you can ensure that deleted items are retained for your preferred duration. This can be helpful if you often find the need to recover accidentally deleted emails or files.
However, it’s important to note that increasing the time period for items to stay in the trash will consume more storage space on your device. Therefore, it’s recommended to find a balance between retaining deleted items and managing the available storage.
Additionally, it’s worth mentioning that the trash settings may vary slightly depending on the email service provider you are using. For example, Gmail and Outlook may have different options and configurations for managing the trash. Therefore, it’s always a good idea to refer to the support documentation provided by your email service for specific instructions.
Recovering Deleted Items from Trash on iPhone
Accidentally deleting important files or emails can be a stressful experience, but don’t worry. Your iPhone has a built-in feature that allows you to recover deleted items from the trash. Whether it’s a deleted photo, a lost contact, or a discarded email, you can easily retrieve them with just a few simple steps.
To begin the recovery process, follow these steps:
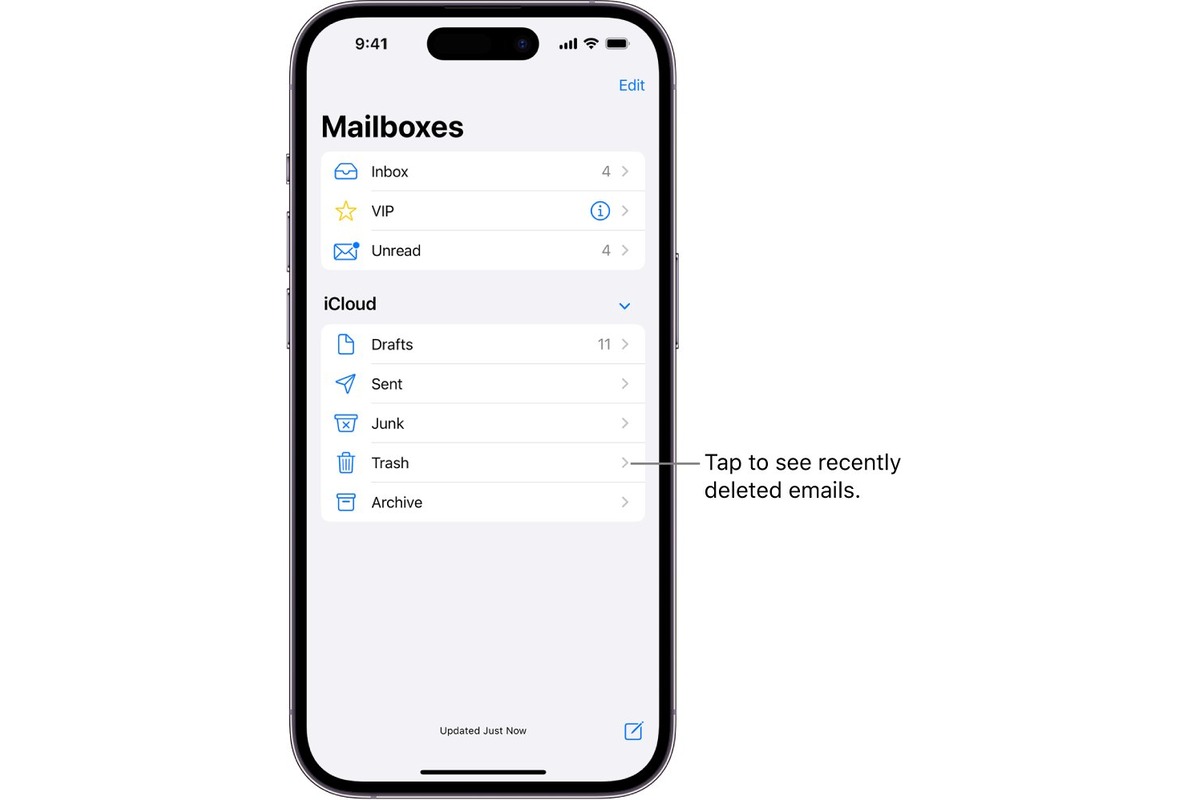
- Open the “Mail” app or the “Photos” app, depending on the type of item you want to recover.
- In the “Mail” app, navigate to the “Mailboxes” view and select the “Trash” folder. If you’re using the “Photos” app, go to the “Albums” tab and select the “Recently Deleted” album.
- Once you’re in the Trash or Recently Deleted folder, locate the item you want to recover. You can browse through the list or use the search bar to find specific items.
- Tap on the item to select it, then look for the “Recover” or “Restore” option. This will vary depending on the app you’re using. In the Mail app, you may need to tap on the folder icon with a curved arrow pointing upwards. In the Photos app, the option will be displayed as “Recover” at the bottom of the screen.
- Confirm the recovery action by selecting “Recover” or “Restore” again when prompted. The deleted item will be restored to its original location or folder.
It’s important to note that the recovery option is only available for a limited time. Deleted items in the Trash or Recently Deleted folder are automatically removed after a certain period. Therefore, it’s recommended to retrieve deleted items as soon as possible to avoid permanent loss.
If you’re unable to find the deleted item in the Trash or Recently Deleted folder, there are still options to recover them. You can try utilizing iCloud or third-party data recovery software to retrieve lost data on your iPhone.
Remember to regularly back up your iPhone using iCloud or iTunes to minimize the risk of data loss. Having a recent backup can greatly simplify the recovery process and ensure that your important files are always protected.
By following these steps and taking precautions to safeguard your data, you can confidently recover deleted items from the trash on your iPhone without stress or worry.
Ultimately, understanding how to empty the trash on your iPhone is a valuable skill that can help you efficiently manage your device’s storage and ensure optimal performance. By following the steps outlined in this article, you can easily free up space and remove unwanted files from your device.
Remember, regularly emptying the trash is essential to maintain a clutter-free iPhone and prevent the accumulation of unnecessary data. By taking a few minutes to clean out your trash folder, you can keep your device running smoothly and make room for new memories and experiences.
So, don’t let your iPhone’s trash pile up. Take control of your storage and keep your device organized and efficient by harnessing the power of the trash emptying feature. Enjoy a clutter-free mobile experience and make the most out of your iPhone’s capabilities.
FAQs
1. How do I empty the trash on my iPhone?
To empty the trash on your iPhone, follow these steps:
- Open the “Photos” app on your iPhone.
- Tap on the “Albums” tab at the bottom of the screen.
- Scroll down and tap on the “Recently Deleted” album.
- You will see a list of photos and videos that are in your trash. Tap on “Select” at the top right corner of the screen.
- Now, you can either tap on individual photos/videos to select them or tap on “Select All” at the top left corner of the screen to select all items in the trash.
- Once you have selected the items you want to permanently delete, tap on the “Delete” button at the bottom right corner of the screen.
- You will be prompted to confirm the deletion. Tap on “Delete [Number of Items]” to proceed.
- After confirming, the selected photos/videos will be permanently deleted and removed from your iPhone’s trash.
2. Can I recover deleted photos/videos from the trash on my iPhone?
Yes, you can recover deleted photos/videos from the trash on your iPhone. Follow these steps:
- Open the “Photos” app on your iPhone.
- Tap on the “Albums” tab at the bottom of the screen.
- Scroll down and tap on the “Recently Deleted” album.
- You will see a list of photos and videos that are in your trash.
- Tap on the photo/video you want to recover.
- Tap on the “Recover” button at the bottom right corner of the screen.
- The photo/video will be restored to your iPhone’s camera roll or the album it was originally in.
3. Are deleted photos/videos permanently erased from the iPhone’s trash?
No, deleted photos/videos are not permanently erased from the iPhone’s trash immediately. When you delete a photo or video, it will be moved to the “Recently Deleted” album where it remains for a certain period of time (typically 30 days) before it is automatically removed. During this time, you have the option to recover the deleted items from the trash. Once the items are automatically removed from the trash, they are considered permanently deleted and cannot be recovered through normal means.
4. How long do items stay in the iPhone’s trash?
Items in the iPhone’s trash, specifically in the “Recently Deleted” album, typically stay for 30 days before being automatically removed. After this time period, the items are permanently deleted from the device and cannot be recovered unless you have previously made a backup.
5. Can I delete the files in the iPhone’s trash immediately without waiting?
Yes, you can delete the files in the iPhone’s trash immediately without waiting for the automatic removal. Follow these steps:
- Open the “Photos” app on your iPhone.
- Tap on the “Albums” tab at the bottom of the screen.
- Scroll down and tap on the “Recently Deleted” album.
- Towards the bottom of the screen, you will see an option that says “Delete All”.
- Tap on “Delete All” and confirm the action when prompted.
- All the files in the trash will be permanently deleted and removed from your iPhone.