
**
Welcome to the ultimate guide on how to empty trash on iPhone 10. The iPhone 10, also known as the iPhone X, is a remarkable device with a plethora of features designed to enhance the user experience. However, managing storage and optimizing the device's performance are essential aspects of owning an iPhone 10. One crucial task is emptying the trash, which ensures that deleted items are permanently removed from the device, freeing up valuable space. In this comprehensive guide, we will explore the various methods to effectively empty the trash on your iPhone 10, allowing you to maintain a clutter-free and efficient device. So, let's delve into the step-by-step process of emptying the trash on your iPhone 10 and reclaim control over your device's storage!
**
Inside This Article
- Clearing the Trash on iPhone 10
- Step 1: Accessing the Trash
- Step 2: Emptying the Trash
- Step 3: Confirming Deletion
- Conclusion
- FAQs
Clearing the Trash on iPhone 10
Emptying the trash on your iPhone 10 can help you free up valuable storage space and keep your device running smoothly. When you delete items such as photos, videos, or documents, they are moved to the “Recently Deleted” folder, where they continue to take up space until you permanently remove them. Here’s how you can easily clear the trash and reclaim that space on your iPhone 10.
It’s important to note that the “Recently Deleted” folder holds onto your deleted items for a specific period before permanently erasing them. By clearing the trash, you can bypass this waiting period and immediately free up space on your device. This process is especially useful when you need to quickly create room for new photos, videos, or apps.
Let’s walk through the steps to access and empty the trash on your iPhone 10, ensuring that you can efficiently manage your storage and maintain optimal performance on your device.
Step 1: Accessing the Trash
Accessing the Trash on your iPhone 10 is a straightforward process. The Trash, also known as the Recently Deleted folder, stores deleted items such as photos, videos, and files for a limited period before permanently removing them from your device. To access the Trash, you can follow these simple steps.
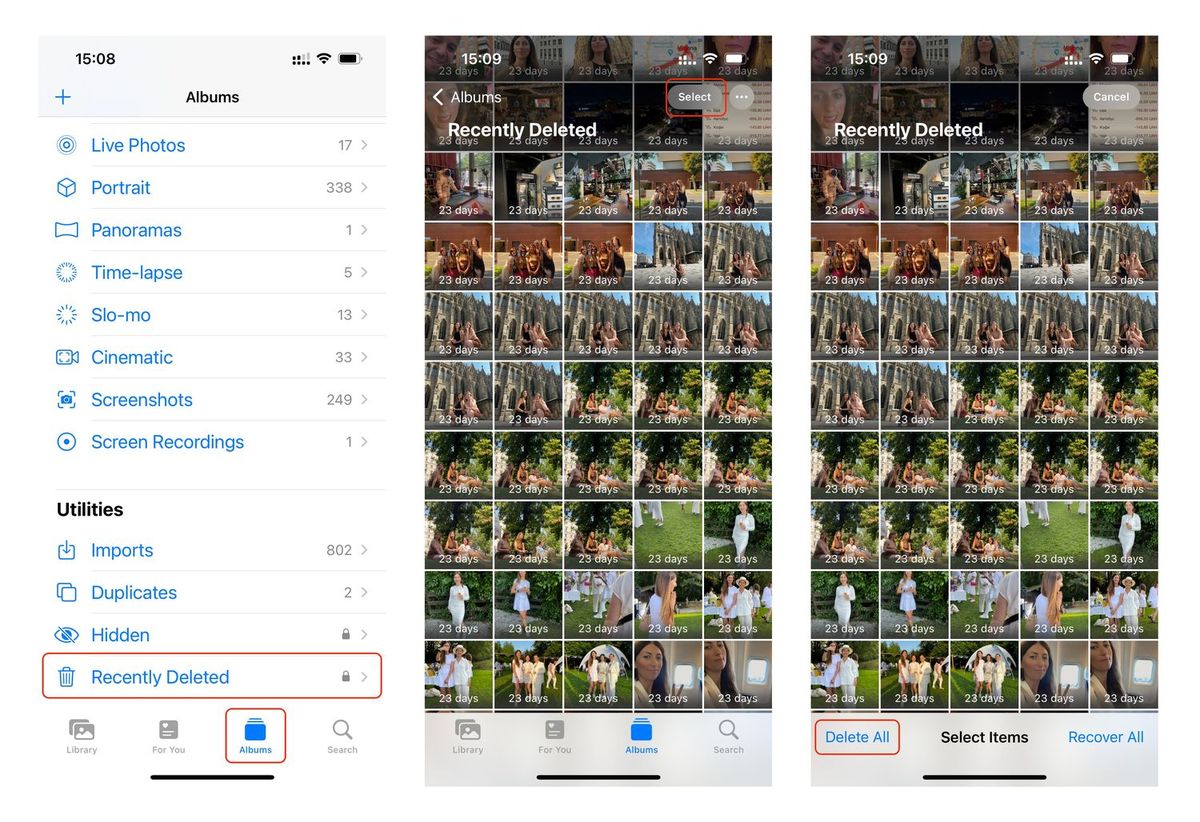
First, unlock your iPhone 10 by entering your passcode or using Face ID or Touch ID. Once you’re on the home screen, navigate to the “Photos” app, which features a multicolored pinwheel icon. Tap on the “Photos” app to open it and proceed to the “Albums” tab located at the bottom of the screen.
Next, scroll through the list of albums and locate the “Recently Deleted” folder. This folder contains all the items that have been deleted within the past 30 days. Tap on the “Recently Deleted” folder to access the contents, including the photos, videos, and other files that are awaiting permanent deletion.
Step 2: Emptying the Trash
After accessing the Trash folder, it’s time to clear out the clutter and free up valuable storage space on your iPhone 10. Here’s how to empty the Trash and permanently delete the unwanted items:
1. Once you’ve located the Trash folder, you’ll see all the deleted items stored there. To proceed with emptying the Trash, tap the “Edit” button located at the top right corner of the screen. This will allow you to select multiple items for deletion at once.
2. After tapping “Edit,” you’ll notice that small circles appear next to each item in the Trash. To select the items you want to delete, simply tap the circle next to each one. You can also choose “Select All” to delete all the items in one go.
3. Once you’ve selected the items you want to remove, a “Delete” button will appear at the bottom right corner of the screen. Tap this button to proceed with permanently deleting the selected items from the Trash folder.
4. A confirmation message will pop up, asking if you’re sure you want to delete the selected items. To complete the process, tap “Delete” once again. This action will permanently remove the items from the Trash, freeing up space on your iPhone 10.
Step 3: Confirming Deletion
Once you’ve selected the items you want to delete, a confirmation prompt will appear on your screen. This is a crucial step to prevent accidental deletions. The prompt will typically ask if you’re sure you want to permanently remove the selected items. It’s a final checkpoint to ensure that you don’t erase anything important unintentionally.
When you see the confirmation message, take a moment to review the items listed for deletion. This quick review can help you avoid deleting something by mistake. It’s a simple but effective way to ensure that you’re only removing the files or data you no longer need.
After reviewing the items, you’ll usually be asked to confirm the deletion by tapping a button or selecting “OK.” Some devices may require you to enter your passcode or use Touch ID or Face ID to proceed. This extra layer of security adds another safeguard against accidental deletions.
Conclusion
Clearing the trash on your iPhone 10 is a simple yet essential maintenance task that can help optimize your device’s performance and free up valuable storage space. By regularly emptying the trash in various apps, you can ensure that unnecessary files and data are removed, allowing your device to run smoothly and efficiently. Whether it’s clearing out deleted photos and videos, purging the recently deleted album, or managing storage in other apps, taking the time to declutter your iPhone can make a significant difference in its overall functionality.
FAQs
Q: How do I empty the trash on my iPhone 10?
A: To empty the trash on your iPhone 10, you can simply delete the files from the “Recently Deleted” album in the Photos app or permanently delete them from the “Recently Deleted” folder in the Files app.
Q: Will emptying the trash on my iPhone 10 permanently delete the files?
A: Yes, emptying the trash on your iPhone 10 will permanently delete the files, freeing up storage space on your device.
Q: Can I recover files after emptying the trash on my iPhone 10?
A: Once the trash is emptied on your iPhone 10, the files are permanently deleted and cannot be recovered unless you have a backup of your device that includes the deleted files.
Q: Are there any precautions I should take before emptying the trash on my iPhone 10?
A: It’s advisable to review the files in the trash to ensure that you don’t need any of them before emptying the trash on your iPhone 10. Additionally, consider backing up important files to prevent accidental data loss.
Q: Can I customize the settings for emptying the trash on my iPhone 10?
A: While there are no specific settings to customize the emptying of the trash on your iPhone 10, you can manage the files in the trash manually before deciding to permanently delete them.