
Are you struggling to delete an email on your iPhone? Have no fear, as we’re here to guide you through the process seamlessly! With the ever-increasing dependence on email for communication, it’s essential to know how to manage your inbox effectively. Deleting unwanted emails is a simple yet vital skill that can help keep your inbox organized and decluttered. In this article, we will walk you through the step-by-step process of deleting emails on your iPhone. Whether you want to delete a single email or multiple messages at once, we have got you covered. Say goodbye to email clutter and hello to a streamlined inbox! Read on to discover the simple tricks to delete emails with ease on your iPhone.
Inside This Article
- Common Methods to Delete Emails on iPhone
- Deleting Emails Individually
- Deleting Multiple Emails at Once
- Permanently Deleting Emails from iPhone
- Conclusion
- FAQs
Common Methods to Delete Emails on iPhone
Are you struggling to manage the overflowing emails in your iPhone inbox? Fret not, as we have got you covered! In this article, we will walk you through the common methods to delete emails on iPhone, helping you declutter your inbox effortlessly.
Method 1: Deleting individual emails
If you want to get rid of one specific email, follow these simple steps:
- Open the Mail app on your iPhone.
- Navigate to your inbox or the folder where the email is located.
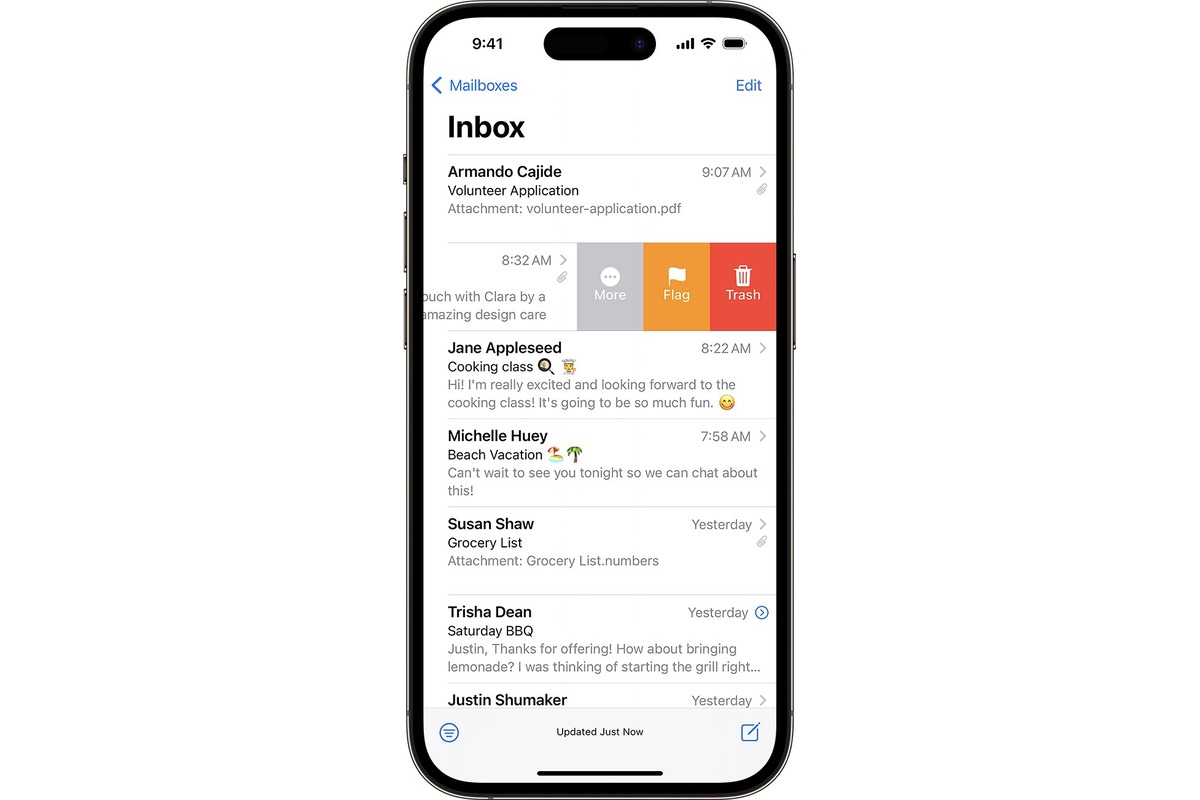
- Swipe left on the email you want to delete.
- Tap on the “Trash” button that appears on the right side.
Voila! The email is now deleted from your iPhone.
Method 2: Deleting multiple emails at once
Deleting emails in bulk is a time-saver and can help you manage your inbox efficiently. Here’s how you can do it:
- Launch the Mail app and go to the desired folder.
- Tap on the “Edit” button located at the top-right corner of the screen.
- Choose the emails you wish to delete by tapping on the circles next to them.
- Once selected, tap on the “Trash” option to delete them.
Now, you can wave goodbye to those unwanted emails cluttering your iPhone.
Method 3: Deleting emails from a specific sender
Is there a particular sender whose emails always end up in your spam or promotion folder? Say no more! Follow these steps to delete emails from a specific sender:
- Open the Mail app and go to the inbox or folder where the email is stored.
- Tap on the “Search” bar at the top of the screen.
- Type the name or email address of the sender whose emails you want to delete.
- Select the emails you want to delete and tap on the “Trash” option.
Keep your inbox organized by eliminating unwanted emails from that sender effortlessly.
Method 4: Deleting all emails from your iPhone
Ready to start afresh and clear out all the emails from your iPhone? Follow these steps:
- Open the Mail app and go to your inbox or any folder.
- Tap on the “Edit” button at the top-right corner.
- Now, select all the emails in your inbox by tapping on the circle at the top-left corner.
- Once selected, tap on the “Trash” option to delete them.
Take a deep breath – your iPhone is now free from the clutches of countless unwanted emails!
Now that you are armed with these common methods to delete emails on iPhone, you can finally conquer your overflowing inbox and regain control over your digital life. Say goodbye to the email clutter and welcome a clutter-free iPhone experience!
Deleting Emails Individually
Deleting emails individually on your iPhone is a quick and straightforward process. Here’s how you can do it:
1. Open the Mail app on your iPhone. This app is represented by a white envelope icon.
2. Navigate to the mailbox or folder where the email you want to delete is located. You can select the Inbox, Sent, or any other custom folder you have created.
3. Find the specific email you wish to delete from the list of emails displayed on the screen.
4. Once you have located the email, swipe from right to left across the email. This action will reveal the option to “Delete” the email.
5. Tap on the “Delete” option to remove the email from your iPhone. The email will be moved to the “Trash” folder, and you can retrieve it if necessary.
6. Alternatively, you can also tap on the email to open it and then tap on the trash can icon located at the bottom of the screen to delete the email.
You have now successfully deleted an email individually on your iPhone. Repeat these steps for any other emails you wish to remove.
Deleting Multiple Emails at Once
If you have a cluttered inbox on your iPhone and want to quickly get rid of multiple emails, you can use the method of deleting multiple emails at once. This method allows you to select and delete multiple emails simultaneously, saving you time and effort.
Here’s how you can easily delete multiple emails at once on your iPhone:
1. Open the Mail app on your iPhone and navigate to the mailbox or folder where the emails you want to delete are located.
2. Tap on “Edit” located at the top right corner of the screen. This will activate the selection mode.
3. Now, you can start selecting the emails you want to delete. Tap on the circles next to each email to select them. You can also tap and hold on an email and then swipe your finger to select multiple emails at once.
4. Once you have selected the desired emails, tap on the “Trash” or “Delete” icon at the bottom of the screen. This will move the selected emails to the trash folder.
5. To permanently delete the emails from your iPhone, go to the “Trash” or “Deleted Items” folder and tap on “Edit” again. Then, select the emails you want to delete permanently and tap on the “Delete” icon.
And that’s it! You have successfully deleted multiple emails at once on your iPhone.
Deleting multiple emails at once can be a huge time-saver, especially if you receive a high volume of emails on a regular basis. It helps you declutter your inbox and keeps your email management efficient.
Remember to regularly clear out unnecessary emails to keep your iPhone storage optimal and ensure a smooth email experience.
Permanently Deleting Emails from iPhone
Deleting emails on your iPhone not only helps you declutter your inbox but also ensures that sensitive information remains secure. While the default action is to move emails to the “Trash” folder, they still reside on your device until you manually delete them permanently. In this article, we will guide you through the process of permanently deleting emails from your iPhone, ensuring that they are completely removed from your device and cannot be recovered.
Method 1: Deleting individual emails
If you want to delete a single email permanently from your iPhone, follow these simple steps:
- Open the Mail app on your iPhone and locate the email you want to delete.
- Swipe left on the email to reveal the “Trash” button, and tap it. The email will be moved to the “Trash” folder.
- To permanently delete the email, go to the “Trash” folder and tap on it.
- In the “Trash” folder, tap on the “Edit” button in the upper-right corner.
- Select the email you want to permanently delete by tapping on the circle next to it.
- Finally, tap on the “Delete” button to permanently remove the email from your iPhone.
Method 2: Deleting multiple emails at once
If you have multiple emails you want to remove permanently, the Mail app allows you to delete them in bulk:
- Launch the Mail app and go to the mailbox or folder containing the emails you want to delete.
- Tap on the “Edit” button in the upper-right corner.
- Select the emails you want to permanently delete by tapping on the circles next to them.
- Once you have chosen all the emails, tap on the “Trash” button to move them to the “Trash” folder.
- To permanently delete the emails, go to the “Trash” folder and tap on it.
- Tap on the “Edit” button and select the emails you want to permanently delete.
- Finally, tap on the “Delete” button to permanently remove the emails from your iPhone.
Method 3: Deleting emails from a specific sender
If you receive a lot of emails from a specific sender and want to delete all of them, you can use the “Search” feature in the Mail app:
- Open the Mail app and go to the mailbox or folder where you want to perform the search.
- Tap on the search bar at the top and enter the email address or name of the sender.
- The Mail app will show you a list of emails from that sender. Tap on “Edit” to select multiple emails or swipe left on individual emails to delete them.
- Once you have selected the emails you want to delete, tap on the “Trash” button to move them to the “Trash” folder.
- To permanently delete the emails, go to the “Trash” folder, tap on it, and select the emails you want to permanently delete.
- Finally, tap on the “Delete” button to permanently remove the emails from your iPhone.
Method 4: Deleting all emails from your iPhone
If you want to start fresh and delete all emails from your iPhone, you can follow these steps:
- Open the Settings app on your iPhone and scroll down to find “Mail” or “Mail, Contacts, Calendars”.
- Tap on it and select the email account you want to remove all emails from.
- Scroll down and tap on “Delete Account”. Confirm the action.
- This will delete the email account along with all the emails associated with it from your iPhone.
By following these methods, you can easily and permanently delete emails from your iPhone, keeping your inbox organized and your sensitive information secure. Remember, once you delete emails permanently, they cannot be recovered, so make sure you double-check before taking any action.
Conclusion
Deleting emails on your iPhone is a simple and necessary task to keep your inbox organized and free from clutter. Whether you use the default Mail app or a third-party email client, the process is straightforward and can be done with just a few taps.
By following the steps outlined in this article, you can easily delete individual emails or multiple emails at once. Additionally, you can leverage the power of the search function to locate specific emails and delete them directly from the search results.
Remember to regularly delete unwanted emails and empty your trash folder to optimize storage space on your device. With a clean and organized email inbox, you can stay focused on the important messages and ensure efficient communication.
Now that you have the knowledge and tools to delete emails on your iPhone, you can take control of your inbox and enjoy a clutter-free email experience. Happy deleting!
FAQs
1. How do I delete an email on iPhone?
To delete an email on your iPhone, simply follow these steps:
- Open the Mail app on your iPhone.
- Navigate to the mailbox folder where the email you want to delete is located.
- Swipe from right-to-left on the email you want to delete.
- Tap on the “Delete” button that appears on the right-hand side of the email.
Alternatively, you can also open the email, tap on the trash bin icon at the bottom of the screen, and confirm the deletion.
2. Can I retrieve a deleted email on iPhone?
Yes, you can retrieve a deleted email on your iPhone, but only if it is still within the “Deleted Items” or “Trash” folder. To retrieve a deleted email, follow these steps:
- Open the Mail app on your iPhone.
- Navigate to the “Deleted Items” or “Trash” folder.
- Swipe from right-to-left on the email you want to retrieve.
- Tap on the “Move” button that appears on the right-hand side of the email.
- Select the mailbox folder where you want to move the email back to (e.g., Inbox).
If the email has been permanently deleted or removed from the “Deleted Items” or “Trash” folder, it cannot be retrieved.
3. How do I delete multiple emails on iPhone?
To delete multiple emails on your iPhone, follow these steps:
- Open the Mail app on your iPhone.
- Navigate to the mailbox folder containing the emails you want to delete.
- Tap on the “Edit” button located at the top-right corner of the screen.
- Select the emails you want to delete by tapping on the circle icon next to each email.
- Tap on the “Delete” button located at the bottom-right corner of the screen.
Confirm the deletion by tapping on “Delete” again if prompted. This will delete all selected emails in one go.
4. How do I permanently delete emails on iPhone?
By default, when you delete an email on your iPhone, it gets moved to the “Deleted Items” or “Trash” folder. To permanently delete emails and bypass the “Deleted Items” or “Trash” folder, follow these steps:
- Open the Mail app on your iPhone.
- Navigate to the mailbox folder containing the emails you want to permanently delete.
- Swipe from right-to-left on the email you want to permanently delete.
- Tap on the “Delete” button that appears on the right-hand side of the email.
This will immediately delete the email without moving it to the “Deleted Items” or “Trash” folder.
5. How do I empty the “Deleted Items” or “Trash” folder on iPhone?
To empty the “Deleted Items” or “Trash” folder on your iPhone and permanently delete all emails within it, follow these steps:
- Open the Mail app on your iPhone.
- Navigate to the “Deleted Items” or “Trash” folder.
- Tap on the “Edit” button located at the top-right corner of the screen.
- Tap on the “Delete All” button that appears at the bottom-left corner of the screen.
- Confirm the deletion by tapping on “Delete All” again if prompted.
This will permanently delete all emails within the “Deleted Items” or “Trash” folder and free up storage space on your iPhone.