
Are you tired of scrolling through your photo gallery to show your friends and family the amazing pictures from your recent trip? Well, fret no more! With the latest iPhone update, you can now easily share your photo albums with others using the Shared Albums feature. Whether it’s a family vacation, a special event, or just a collection of your favorite moments, Shared Albums allow you to conveniently share and collaborate on albums with your loved ones in just a few taps. In this article, we will walk you through the step-by-step process of getting and using Shared Albums on your iPhone, so you can easily share and relive your best memories with the people who matter most.
Inside This Article
- Enabling Shared Albums on iPhone
- Creating a Shared Album
- Adding Photos and Videos to a Shared Album
- Inviting Others to Join a Shared Album
- Viewing and Managing a Shared Album
- Troubleshooting Shared Albums on iPhone
- Conclusion
- FAQs
Enabling Shared Albums on iPhone
Shared Albums is a fantastic feature on your iPhone that allows you to collaborate and share photos and videos with friends and family. By enabling Shared Albums, you can create a shared space where everyone can contribute and enjoy memories together. In this article, we will guide you through the steps to enable Shared Albums on your iPhone.
To begin, open the “Settings” app on your iPhone and scroll down until you find “Photos”. Tap on it to access the Photos settings.
In the Photos settings, you’ll see an option called “Shared Albums”. Tap on it to proceed.
Here, you will find the toggle switch to enable Shared Albums. Simply tap on the switch to turn it on.
Once you’ve enabled Shared Albums, you’re all set to start creating and sharing albums with your loved ones.
It’s worth mentioning that enabling Shared Albums also enables the “Shared” tab in the Photos app, where you can easily access and manage all your shared albums.
Now that you’ve successfully enabled Shared Albums on your iPhone, it’s time to start creating your first shared album. Stay tuned for the next section where we will guide you through the process of creating a shared album on your iPhone.
Creating a Shared Album
Creating a shared album on your iPhone is a simple and convenient way to collaborate and share photos and videos with friends, family, or colleagues. Follow these steps to create a shared album:
- Open the Photos app on your iPhone.
- Tap on the “Albums” tab located at the bottom of the screen.
- Scroll down and select “New Album.”
- Give your shared album a descriptive name. This will help others understand the theme or purpose of the album.
- Tap on “Add” to start adding photos and videos to your shared album.
Once you have created a shared album, you can begin selecting and adding your desired media files. Remember that a shared album can contain both photos and videos, making it a versatile tool for sharing memories and experiences.
Pro tip: Before creating a shared album, make sure you have the necessary permissions to use the content you plan to add. It’s essential to respect copyright laws and obtain consent from individuals featured in your media files.
When you create a shared album, you become the owner and have control over adding, removing, and managing content. However, other participants in the shared album can also contribute their own photos and videos.
Now that you have a shared album, it’s time to invite others to join. In the next section, we’ll discuss how to extend your album’s reach and collaborate with others.
Adding Photos and Videos to a Shared Album
Once you have created a shared album on your iPhone, you can start adding photos and videos to it to share with others. Here is how you can easily add new content to a shared album:
1. Open the Photos app on your iPhone.
2. Tap on the “Albums” tab at the bottom of the screen.
3. Scroll down and find the shared album you want to add photos or videos to.
4. Tap on the shared album to open it.
5. Now, tap on the “Add” button located at the top right corner of the screen. It looks like a plus sign inside a square.
6. You will be presented with options to select photos and videos from your Camera Roll. Tap on the ones you want to add to the shared album. Selected items will be marked with a blue checkmark.
7. After selecting the desired photos and videos, tap on the “Done” button at the top right corner of the screen.
8. The selected items will now be added to the shared album, and they will be visible to anyone who has access to that album.
Please note that when you add photos or videos to a shared album, they are not removed from your Camera Roll. They are simply copied to the shared album, allowing you to keep the original files while also sharing them with others.
You can continue adding new photos and videos to a shared album at any time by following the same steps mentioned above.
Remember, the shared album is a collaborative space where all participants can contribute their own content, making it a fun and interactive way to share memories with friends and family.
Inviting Others to Join a Shared Album
Once you have set up a shared album on your iPhone, you can invite others to join and contribute to the album. Here’s how:
1. Open the Photos app on your iPhone and navigate to the shared album you want to invite others to join.
2. Tap on the album to open it, and then tap on the “People” tab at the bottom of the screen.
3. At the top of the “People” tab, you will see the option to “Invite People”. Tap on it.
4. You will be presented with different options to invite others. If you have the person’s Apple ID or iCloud email address, you can enter it in the “To:” field. You can also choose to share a link via AirDrop, Messages, or any other messaging app installed on your iPhone.
5. After entering the Apple ID, iCloud email, or choosing the sharing option, tap on “Send” to send the invitation.
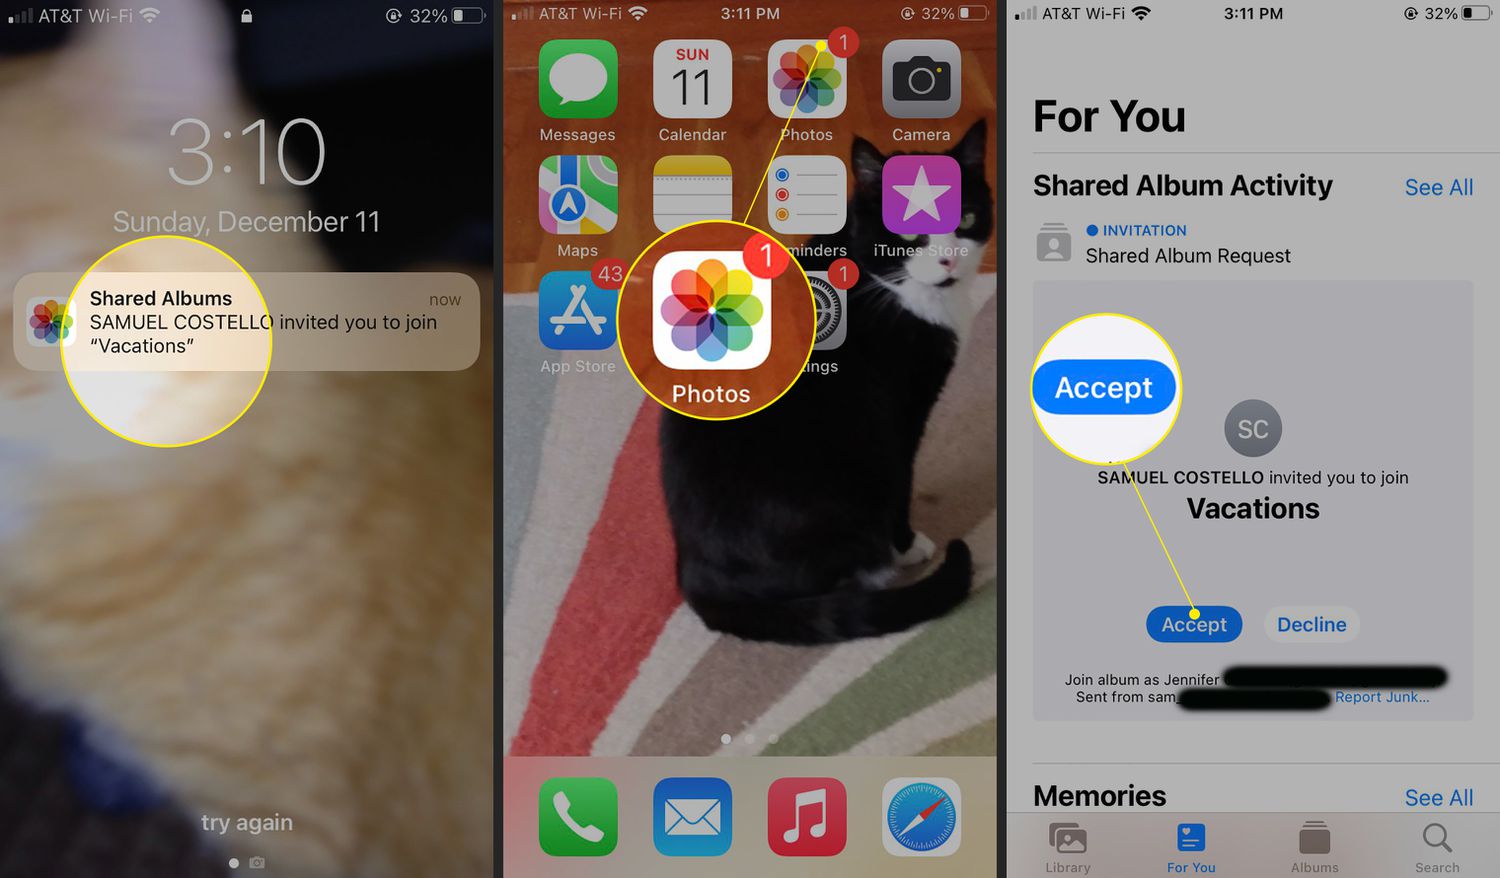
6. The person you invited will receive a notification or message containing a link to join the shared album.
7. Once they receive the invitation, they can tap on the link and choose to either subscribe to the album or contribute to it by adding their own photos and videos.
8. If the person you invited does not have an iPhone or an Apple device, they can still access the shared album via iCloud.com using their web browser.
9. To manage the participants in the shared album, you can tap on the “People” tab and see the list of all the people who have joined. From here, you can remove participants, change their access rights, or stop sharing the album altogether.
10. You can also set notifications for when someone adds photos or comments to the shared album. To do this, go to the “People” tab, tap on the person’s name, and enable or disable the notifications.
By following these simple steps, you can easily invite others to join your shared album on your iPhone. Whether it’s a family vacation album or a collaborative project, sharing memories and moments with others has never been easier!
Viewing and Managing a Shared Album
Once you have created a shared album on your iPhone and invited others to join, it’s time to explore the various ways you can view and manage the shared content. Here’s how to make the most out of your shared album experience:
1. Viewing the Shared Album: To view the shared album, open the Photos app on your iPhone and navigate to the “Shared” tab at the bottom of the screen. Here, you will find all the shared albums you are a part of. Simply tap on the desired album to start exploring the shared photos and videos.
2. Adding Comments and Likes: One of the interactive features of a shared album is the ability to leave comments and like photos or videos. To leave a comment, tap on a specific image and tap on the speech bubble icon. From there, you can type your comment and post it. To like a photo or video, simply double-tap on the desired media.
3. Sorting and Organizing: If you have a large collection of shared photos and videos, it can be useful to sort and organize them. From within the shared album, tap on the ellipsis (…) icon at the top-right corner. Here, you can choose “Sort” to arrange the content based on criteria such as recent, oldest, or media type.
4. Downloading and Saving: If you want to save a photo or video from a shared album to your iPhone’s camera roll, you can easily do so. Just tap on the desired media, then tap the Share button (square with an arrow pointing up). From the share sheet, select “Save Image” or “Save Video” to save it to your device.
5. Removing Photos and Videos: As the owner of a shared album, you have the authority to remove any photos or videos that you no longer want to be part of the album. To remove a media item, open the shared album, locate the content you wish to remove, and tap on the trash can icon. Confirm the deletion, and the item will be removed from the shared album.
6. Unsubscribing from a Shared Album: If you no longer wish to receive updates or be part of a shared album, you can unsubscribe from it. To do this, open the shared album, tap on the People tab, and swipe left on your name. Tap on the “Remove” option to unsubscribe from the album.
7. Managing Privacy Settings: As the creator of a shared album, you have control over the album’s privacy settings. You can choose to allow anyone with the shared album link to access and contribute to the album or limit access to only those with an invitation. To manage privacy settings, open the shared album, tap on the People tab, and adjust the settings as desired.
With these features and capabilities, you can efficiently view, manage, and interact with a shared album on your iPhone. Whether it’s adding comments, organizing content, or controlling privacy settings, Apple has made it easy and enjoyable to collaborate and share memories with others through shared albums.
Troubleshooting Shared Albums on iPhone
If you encounter any issues or difficulties with shared albums on your iPhone, there are a few troubleshooting steps you can take to resolve them. Here are some common problems and their potential solutions:
1. Shared Album Not Syncing: If you notice that your shared album is not syncing properly across your devices, try the following steps:
- Ensure that you have a stable internet connection.
- Check if you have enabled iCloud Photo Library and Shared Albums in your iPhone’s settings.
- Sign out of your iCloud account and sign in again.
- Restart your iPhone and check if the shared album starts syncing.
2. Unable to Add Photos or Videos: If you are unable to add photos or videos to a shared album, try the following solutions:
- Check if you have sufficient iCloud storage space available.
- Make sure that you have the necessary permissions to add content to the shared album.
- Restart your iPhone and try adding the photos or videos again.
- If you are still facing the issue, try creating a new shared album and see if you can add content to it.
3. Photos or Videos Not Appearing in the Shared Album: If the photos or videos you have added to a shared album are not appearing, try these troubleshooting steps:
- Refresh the shared album by pulling down on the screen to manually update the content.
- Check the permissions of the people you have invited to the shared album. They may not have access to view the content.
- If the issue persists, try removing and re-adding the photos or videos to the shared album.
- Contact Apple Support if you are still unable to see the content in the shared album.
4. Error Messages: If you encounter error messages while using shared albums, try the following:
- Restart your iPhone and try again.
- Update your iOS to the latest version, as it may resolve any compatibility issues.
- Check if the error message provides any specific instructions or codes and search online for possible solutions.
- If all else fails, contact Apple Support for assistance.
By following these troubleshooting steps, you should be able to resolve most issues related to shared albums on your iPhone. Remember to regularly check for software updates and ensure that you have a reliable internet connection to enjoy the seamless sharing experience.
Conclusion
In conclusion, getting shared albums on iPhone is a great way to share and cherish special moments with your friends and family. With the built-in Photos app and iCloud, you can easily create, customize, and collaborate on albums, making it a convenient and engaging experience.
By following the steps outlined in this article, you can seamlessly create shared albums, add photos and videos, invite others to contribute, and even control privacy settings. Whether it’s for a memorable vacation, a family gathering, or a collaborative project, shared albums offer a simple and intuitive way to connect and share moments with your loved ones.
So, start creating your shared albums today and capture memories that will last a lifetime. Embrace the power of technology to enhance your relationships and keep the bonds strong, all with just a few taps on your iPhone.
FAQs
1. Can I create shared albums on my iPhone?
Yes, you can create shared albums on your iPhone. With the Photos app, you can easily create albums and invite others to contribute and view them.
2. How can I create a shared album on my iPhone?
To create a shared album on your iPhone, follow these steps:
- Open the Photos app on your iPhone.
- Go to the “Albums” tab and select “New Album”.
- Give your album a name and tap “Add”.
- Select the photos and videos you want to add to the album.
- Tap “Done” and then “Shared Album”.
- Enter the names or email addresses of the people you want to share the album with.
- Tap “Create” to create the shared album.
3. Can I add or remove photos from a shared album?
Yes, you can add or remove photos from a shared album that you have created. To add photos, simply open the shared album, tap the “+” button, and select the photos you want to add. To remove photos, open the shared album, tap “Select”, choose the photos you want to remove, and then tap the trash bin icon.
4. Can I control who can contribute to a shared album?
Yes, you have control over who can contribute to a shared album. When creating a shared album, you can choose specific people to invite and set their access as either “Can Post” or “Can View”. Those with “Can Post” access can add, delete, and modify photos in the shared album, while those with “Can View” access can only view the photos.
5. What happens if I delete a photo from a shared album?
If you delete a photo from a shared album, it will be removed for all the participants of the album. However, the photo will still remain in your own library unless you delete it from there as well.